Sereniel Best Team and Build
NEW: Season 2 | Refinement | Arena
✪ Tiphera: Build | Cards | Banner
☆ Tiana: Partner Guide | Banner
✪ Nine: Build | Cards | Banner
See our Endgame Mode Tier List (Season 2 Updated!)
☆ Tier Lists: Character | Partner | Cards

This is a guide for the best teams and loadout for Sereniel in Chaos Zero Nightmare (CZN). Learn which combatants are best to pair with Sereniel, as well as recommended cards, partners, and equipment.
| Sereniel Guides | ||
|---|---|---|
| Team and Build | Cards and Materials | Banner |
List of Contents
Best Sereniel Build
| Click on a Link to Jump to a Section! | |||||||||||
|---|---|---|---|---|---|---|---|---|---|---|---|
Build Overview
※ Hover over equipments, memory fragments and cards to see effects
| Character | Partner | Equipment |
|---|---|---|

|

|
Intellect of Discord +18% Attack On Ravage, decrease Stress of allies by 1 Fairy King's Crown +6% Critical Chance Amorphous Cube +25% Damage Refinement: Increase Damage Amount of Attack Cards by 20% |
| Memory Fragments and Stat Priorities | ||
|
Black Wing Set +12% Attack Cursed Corpse Set Increases damage dealt to targets inflicted with Agony by 10%. Executioner's Tool Set +25% Critical Damage |
1. Instinct Damage % 2. Crit Chance % 3. Crit Damage % 4. Attack |
|
| Cards and Epiphanies | ||
 Homing Laser 4
AP Cost: 0 Type: ・100% Damage ・ 1 Afterglow ・ On Ravage or at the start of the turn, Move to hand Homing Laser 4
AP Cost: 0 Type: ・100% Damage ・ 1 Afterglow ・ On Ravage or at the start of the turn, Move to hand Homing Laser 4
AP Cost: 0 Type: ・100% Damage ・ 1 Afterglow ・ On Ravage or at the start of the turn, Move to hand  Plasma Missile 3
AP Cost: 1 Type: ・120% Damage ・ 2 Instinct Weakness ・ +60% Damage Amount to Homing Laser for 1 turn(s) Plasma Missile 3
AP Cost: 1 Type: ・120% Damage ・ 2 Instinct Weakness ・ +60% Damage Amount to Homing Laser for 1 turn(s)  Shining Core 3
AP Cost: 1 Type: Tags: Unique, Initiation・Create 2 Homing Laser L ・ On Ravage, create 2 Homing Laser L  Cobalt Light 4
AP Cost: 1 Type: ・120% Damage to random enemies ・ Add 1 Hit for each Homing Laser in hand  Pale Shooting Star 0
AP Cost: 2 Type: ・150% Damage ・ Activate 3 Homing Laser cards in Draw Pile and Graveyard |
||
Sereniel's best build focuses on consistently getting at least 4 Homing Lasers every turn and getting 6 or more Homing Lasers when ravaging enemies. This build makes sure that your deck does not get populated by Homing Lasers and ensures that you do not need to keep track of the exhaust tags of your Homing Laser L.
For her Memory Fragments, our setup works best with a 2/2/2 set using Black Wing, Cursed Corpse, and Executioner's Edge. This lets you amp her offensive stat and gain a 10% multiplicative damage if an enemy has Agony. However, if you're opting for a non-Selena team and not playing around Ravaging an enemy multiple times, using the Judgment's Flames Set will yield better results as it gives +50% additive damage to ravaged enemies.
With the removal of Laboratory 0 for season 2 content, we've adjusted her gear to use equipment obtainable in the new Burning Life chaos zone which includes the Intellect of Discord due to Senectus' higher appearance rate and a 20% card damage refinement bonus. Alternatives include the 18 card or less refinement with a thin deck team or the 25% bonus damage for exhaust cards to strengthen your laser Ls.
| Date | Changes |
|---|---|
| 2-9-2025 | ・Updated equipment and added refinement option for season 2. ・Updated best team to reflect |
| 12-24-2025 | ・Initial Sereniel build |
Sereniel Best Team
| Click on a Link to Jump to a Section! | |||||||||||
|---|---|---|---|---|---|---|---|---|---|---|---|
| Sub-DPS | Support |
|---|---|
 Selena Selena
|
 Hugo Hugo
|
Sereniel's best team is Selena and Cassius. Selena can use High-Power Scope to add an after-hit to all of Sereniel's 0 cost attacks while also replenishing the enemy's tenacity bar to allow Sereniel to utilize her ravage mechanics multiple times.
Hugo is the next best combatant as Hugo can use a follow up attack for every laser that Sereniel throws as long as Commence the Hunt stacks are managed which is very doable by **adding spores to your deck (either from Hugo himself or a different team member).
Alternative Team Members
| Character | Explanation |
|---|---|
 Veronica Veronica
|
Veronica can replace Rei or Cassius as another Support especially if you need more draw for Sereniel that your Cassius or Rei cannot provide at the moment. |
 Cassius Cassius
|
Can replace Hugo as a support. Cassius quest card triple 0 is a great source of sustain and extra damage which can be created easily with Sereniel's lasers. Consider swapping Cassius in if you're lacking healing during the content you're tackling. |
 Rei Rei
|
Rei can replace Selena or Cassius as another support as she is able to rapidly stack morale and other additive damage buffs to your team. This lets Sereniel's laser's damage scale up. This may make you fire less lasers but each individual laser will be able to hit hard and can overtake the other support's damage-pushing capability. |
 Mika Mika
|
Mika can replace Rei or Cassius as another Support if you are in need of survivability and wants more AP recovery to use Sereniel's cards. |
Sereniel Best Cards
| Click on a Link to Jump to a Section! | |||||||||||
|---|---|---|---|---|---|---|---|---|---|---|---|
| Card | Explanation |
|---|---|
|
Homing Laser
|
AP Cost: 0
Type:
・100% Damage ・ 1 Afterglow ・ On Ravage or at the start of the turn, Move to hand |
|
Plasma Missile
|
AP Cost: 1
Type:
・120% Damage ・ 2 Instinct Weakness ・ +60% Damage Amount to Homing Laser for 1 turn(s) |
|
Shining Core
|
AP Cost: 1
Type:
Tags: Unique, Initiation
・Create 2 Homing Laser L ・ On Ravage, create 2 Homing Laser L |
|
Cobalt Light
|
AP Cost: 1
Type:
・120% Damage to random enemies ・ Add 1 Hit for each Homing Laser in hand |
Sereniel can be built many ways but her most consistent and reliable build consists of Homing Laser with the epiphany that enables it to go to your hand at the start of the turn and when the enemy is ravaged. You lose damage and a stack of afterglow buff but at the cost of always getting at least 3 Homing Laser in your hand every turn start without needing to worry about the Exhaust tag. This should be your prime target for duplication and divine epiphanies.
Her choice of Plasma Missile will always be the epiphany that inflicts 2 stacks of Instinct Weakness to an enemy at the cost of losing tenacity damage. This is a fine exchange as this will increase the overall damage and tenacity damage of all your attacks for 2 turns even if the attribute is not Instinct. This makes her perfect to contents that are not Instinct focus.
Shining Core should have the epiphany that makes it an upgrade card with the Initiation tag as it will always give you 2 Homing Laser L after ravaging an enemy. This makes it so you can play at least 10 Homing Lasers every turn.
Cobalt Light must be the epiphany that increases its hit count the more Homing Lasers you have in hand. Since we have the Shining Core upgrade card epiphany, this ensures that Cobalt Light will always have at least 6 hits making it better than the rest of the epiphanies.
Essential Team Cards and Epiphanies
| Cassius Card | Explanation |
|---|---|
 Hunting Instincts Hunting Instincts
|
AP Cost: 1
Type:
Tags: Initiation
・When another combatant uses an Upgrade or Skill Card, 1 Commence the Hunt ・If Commence the Hunt is triggered, 50% chance of a random ally performing a Coordinated Attack on the target |
 Quick Fix Quick Fix
|
AP Cost: 1
Type:
Tags: Haste
・100% x 2 Damage ・If in Commence the Hunt, Draw 2 |
 Fixer's Approach Fixer's Approach
|
AP Cost: 1
Type:
Tags: Unique
・+40 Extra Attack of Commence the Hunt Damage |
| Rei Card | Explanation |
 High-Power Scope High-Power Scope
|
AP Cost: 0
Type:
・When another combatant's Attack Card is used,100% Coordinated Attack for 1 turn |
 Tactical Maneuver Tactical Maneuver
|
AP Cost: 0
Type:
Tags: Retain
・If the target is in Ravaged state, recharge Tenacity |
 Target Spotted Target Spotted
|
AP Cost: 1
Type:
・On Ravage, 200% Coordinated Attack |
Commence the Hunt is the name of the game for Hugo as Hugo wants to keep on using follow up attacks to maximize his DPS so ensure that you have 4 copies of his Hunting Instincts with epiphany 3.
For Selena, you want a mix of Tactical Maneuver and High-Power Scope. High-Power Scope lets you add additional hits to your lasers with Selena's coordinated attacks and Tactical Maneuver can be retained and used to replenish the enemy's tenacity bar once broken for another round of lasers.
Sereniel Best Partner
| Click on a Link to Jump to a Section! | |||||||||||
|---|---|---|---|---|---|---|---|---|---|---|---|
| Partner | Details |
|---|---|
 Peko Peko
|
Passive Effect: Overclock Beacon - The assigned Combatant’s Attack is increased by 8% The assigned combatant's Attack is increased by 8%. When the assigned Combatant's card moves from Graveyard to hand, hain 1 [Repairs Complete!]. [Repairs Complete] +10% Damage to Attack Cards of this unit during this battle (max 3 stacks). Increase Damage of the assigned Combatant's Attack Cards that are used against Ravaged targets by 15%. Ego Skill: Peko's Multi-Purpose Kit - When an ally inflicts Ravage, 1 Overclock to the assigned Combatant (1 time per turn). Overclock: +25% Critical Chance for 1 turn. |
Sereniel's best partner is Peko as she has the passive ability to increase the damage of her cards once she has moved cards from the graveyard three times and will last for the entire fight. She also has multiplicative damage buff against enemies that are in ravaged state. She also has the ego skill that will give Sereniel a critical chance buff after ravaging an enemy once per turn that also lasts for the entire fight.
Alternative Budget Partner
| Partner | Details |
|---|---|
 Yuri Yuri
|
The only budget hunter partner that can rival Peko is a max manifest ego Yuri as she has an innate 16% increase to Sereniel's base attack and a permanent 16% damage increase to all of her attacks once you shuffle your deck in a fight. |
Yuri vs Peko Damage Comparison
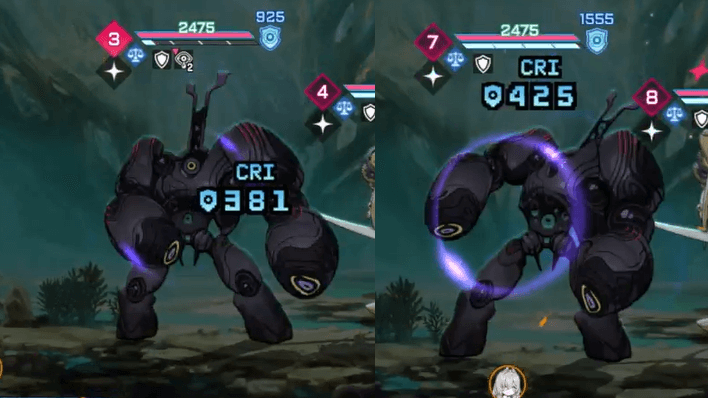 |
| Yuri (Left) vs Peko (Right) Damage Against Unravaged Enemies |
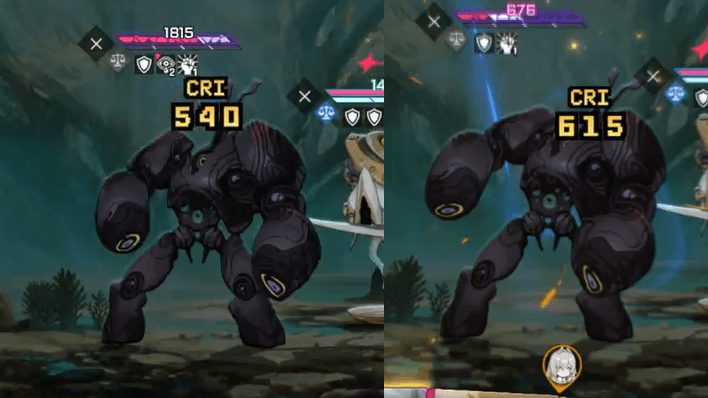 |
| Yuri (Left) vs Peko (Right) Damage Against Ravaged Enemies |
This test excludes damage buffs from the potentials, manifest ego, equipment and partners of the party members. The test also has both partner passives activated to compare the highest possible damage output they can provide for Sereniel.
Sereniel Best Memory Fragments
| Click on a Link to Jump to a Section! | |||||||||||
|---|---|---|---|---|---|---|---|---|---|---|---|
| Best Memory FragmentsTeam | |||||
|---|---|---|---|---|---|
 Judgment's Flames Set Judgment's Flames Set Judgment's Flames Set +50% Damage Amount to Instinct Cards used against Ravaged targets |
 Executioner's Tool Set Executioner's Tool Set Executioner's Tool Set +25% Critical Damage |
||||
Sereniel's best memory fragment is Judgment's Flames and Executioner's Tool. The first set gives all of her cards +50% additive damage buff which is great for her as most of her attacks consists of low damage multipliers. Sereniel builds off critical chance therefore it is best for her to also increase her critical damage.
Stat Priority
| Main Stats | Recommended Substats |
|---|---|
|
Ideal: Critical Chance % Desire: Instinct Damage % Imagination: Attack % |
・Critical Chance % (At least 60%) ・Critical Damage % ・Attack ・Attack % |
The main stat and sub stats Sereniel needs are Instinct Damage, Critical Chance, Critical Damage and Attack. Her last potential node needs at least 60% critical chance so aim for that if you can to get more damage boost to her Homing Lasers.
Sereniel Best Equipment
| Click on a Link to Jump to a Section! | |||||||||||
|---|---|---|---|---|---|---|---|---|---|---|---|
| Weapon | Armor | Accessory |
|---|---|---|
 Intellect of Discord Intellect of Discord Intellect of Discord +18% Attack On Ravage, decrease Stress of allies by 1 |
 Fairy King's Crown Fairy King's Crown Fairy King's Crown +6% Critical Chance |
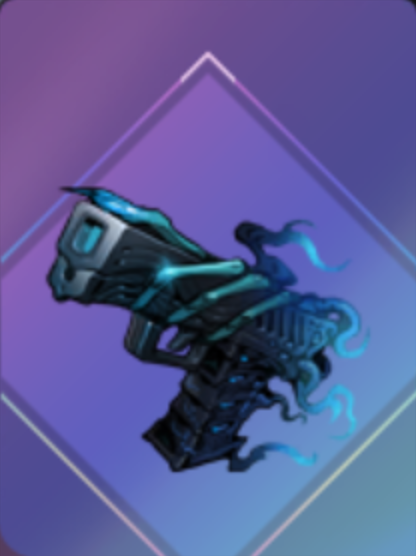
 Amorphous Cube Amorphous Cube Amorphous Cube +25% Damage |
| Best Refinement Options | ||
| Increase Damage Amount of Attack Cards by 20% At the start of battle, if owning 18 or less cards, increase Damage Amount of Attack Cards by 30% Increase Damage Amount of Exhaust cards by 25% |
||
With the Burning Life chaos zone, the equipment choice for Serniel is limited. Amorphous Cube is easily purchasable from the shop and adds a solid 25% additive damage to all of her attacks. Fairy King's Crown amps your crit rate to make your DPS more consistent and lastly, Intellect of Discord to further amplify Sereniel's main attack to scale her damage output.
As Intellect of Discord can only be obtained from Senectus, consider equipment such as the Dagger That Tricked the Shadow as a strong weapon alternative.
Alternative Budget Equipment
| Weapon | Armor | Accessory |
|---|---|---|
 Obsidian Sword Obsidian Sword Obsidian Sword Increase damage amount by 12% |
 Titan Combat Suit Titan Combat Suit Titan Combat Suit When taking Damage, Recover 2% HP (1 per turn) |
Amorphous Cube Amorphous Cube +25% Damage |
If you aren't able to get the best, you can settle for these equipment that some can be found in any chaos zones inside shops. Obsidian Sword to boost the overall damage of all her attacks. Incomplete Carapace for shield if you have 5 or more cards in hand at the end of turn which is easily achievable by her but can only be found in Laboratory 0 and Amorphous Cube gives a permanent +25% damage to all her attacks.
Sereniel Build Tips and Playstyle
| Click on a Link to Jump to a Section! | |||||||||||
|---|---|---|---|---|---|---|---|---|---|---|---|
|
|
Homing Laser and Cobalt Light Combo
Sereniel's best combo revolves around setting up for the right turn to unleash Cobalt Light after obtaining all the Homing Lasers when the enemy is ravaged. Here's how to do it:
- Make sure you have Cobalt Light in hand and Shining Core activated.
- (Optional) Use Plasma Missile to inflict Instinct Weakness to the enemy to deal more damage.
- Use your Homing Laser to Ravage the enemy. Stop using it once the enemy is ravaged.
- You should have at least 6 Homing Laser in hand.
- (Optional) Use Predator's Blade or Dark Condensation to buff Cobalt Light only if you have spare AP.
- Use Cobalt Light to deal high single-target damage or across multiple enemies randomly.
- If the enemy is still not dead, use the remaining Homing Lasers to deal more damage.
Multi-Hit Attacks Uses Only 1 Stack of Afterglow Against One Ravaged Enemy
As shown in the video above, it only uses 1 stack of Afterglow to deal the same damage across multiple hits only if the enemy is ravaged and only one target.
Use Your Homing Lasers First
Sereniel's exclusive buff called Afterglow enables her attacks to deal 1 tenacity damage and +50% additive damage regardless of the attribute of the enemy. Her only source of this buff comes from her Homing Lasers, so make sure to always play it first before using her other cards that doesn't
Multi-Hit Attacks Uses 1 Stack of Afterglow Each Per Tenacity Bar
If you use a multi-hit attack such as Cobalt Light, it will consume afterglow stacks per tenacity each for each hit. This can also apply to multiple enemies where the attack can jump to another target with tenacity bar left and it will consume it.
Clear Your Hand Before Ravaging an Enemy
All of Sereniel's Homing Laser will try to go back to your hand after you ravage an enemy. If you built her with cards that generate Homing Lasers, make sure to free your hand of cards to get the most amount of Homing Laser as you can only hold 10 cards.
Pale Shooting Star Does Not Include Exhaust Pile
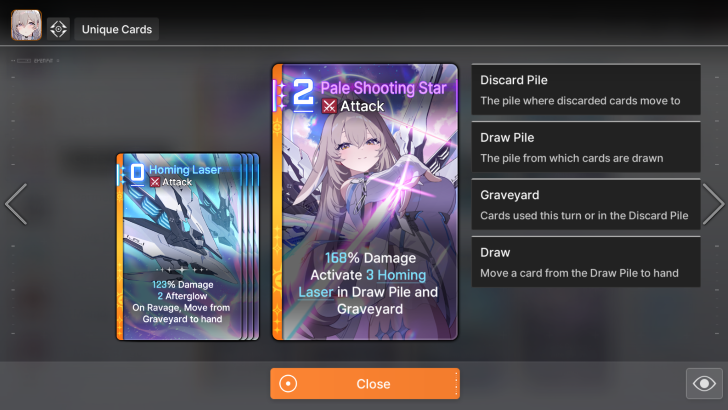
Pale Shooting Star only activates Homing Lasers from the discard pile, draw pile and used card pile but not the exhaust pile. Make sure to check if you have enough Homing Lasers to activate when you are about to use it.
Chaos Zero Nightmare (CZN) Related Guides

5 Star Character Builds
 Chizuru Chizuru
|
 Haru Haru
|
Hugo
|
 Kayron Kayron
|
 Khalipe Khalipe
|
 Luke Luke
|
 Magna Magna
|
 Mei Lin Mei Lin
|
 Narja Narja
|
 Nine Nine
|
 Orlea Orlea
|
 Renoa Renoa
|
 Rin Rin
|
 Sereniel Sereniel
|
Veronica
|
 Yuki Yuki
|
4 Star Character Builds
 Amir Amir
|
 Beryl Beryl
|
Cassius
|
 Lucas Lucas
|
 Maribell Maribell
|
Mika
|
 Nia Nia
|
 Owen Owen
|
Rei
|
|
Selena
|
 Tressa Tressa
|
Comment
 Olik2 2 months
Critical damage from artifact set is required as well hahahahahahahahahahahahah xDDDDDDDDDDDDD
Author

Sereniel Best Team and Build
Premium Articles

Rankings

Gaming News


![Marathon Cryo Archive Map Teased as [REDACTED] on Selection Screen](https://img.game8.co/4442236/6357203e58172f6de57f1991e7c39b22.png/thumb)
Popular Games

Genshin Impact Walkthrough & Guides Wiki
Umamusume: Pretty Derby Walkthrough & Guides Wiki
Pokemon Pokopia Walkthrough & Guides Wiki
Honkai: Star Rail Walkthrough & Guides Wiki
Monster Hunter Stories 3: Twisted Reflection Walkthrough & Guides Wiki
Arknights: Endfield Walkthrough & Guides Wiki
Wuthering Waves Walkthrough & Guides Wiki
Zenless Zone Zero Walkthrough & Guides Wiki
Pokemon TCG Pocket (PTCGP) Strategies & Guides Wiki
Monster Hunter Wilds Walkthrough & Guides Wiki


Recommended Games
Fire Emblem Heroes (FEH) Walkthrough & Guides Wiki
Diablo 4: Vessel of Hatred Walkthrough & Guides Wiki
Cyberpunk 2077: Ultimate Edition Walkthrough & Guides Wiki
Yu-Gi-Oh! Master Duel Walkthrough & Guides Wiki
Super Smash Bros. Ultimate Walkthrough & Guides Wiki
Pokemon Brilliant Diamond and Shining Pearl (BDSP) Walkthrough & Guides Wiki
Elden Ring Shadow of the Erdtree Walkthrough & Guides Wiki
Monster Hunter World Walkthrough & Guides Wiki
The Legend of Zelda: Tears of the Kingdom Walkthrough & Guides Wiki
Persona 3 Reload Walkthrough & Guides Wiki


All rights reserved
© Smilegate. All Rights Reserved.
The copyrights of videos of games used in our content and other intellectual property rights belong to the provider of the game.
The contents we provide on this site were created personally by members of the Game8 editorial department.
We refuse the right to reuse or repost content taken without our permission such as data or images to other sites.
I've been running Sereniel with Narja instead of Selena. Voracity gives a 30% damage buff and life steal, Predation is an 80% damage buff, Domain of Voracity doubles tenacity damage, and Bottomless Hunger has an Epiphany that grants ~7 Voracity in addition to granting a +40% damage boost to Mealtime every time you hit with something like Sereniel's lasers. Plus, Mealtime also has a fairly decent innate heal (110%, +30% every time you activate Voracity) for when you need to stay alive.