Best Reroll Tier List
NEW: Season 2 | Refinement | Arena
✪ Tiphera: Build | Cards | Banner
☆ Tiana: Partner Guide | Banner
✪ Nine: Build | Cards | Banner
See our Endgame Mode Tier List (Season 2 Updated!)
☆ Tier Lists: Character | Partner | Cards
This is a guide and tier list for rerolling characters in Chaos Zero Nightmare (CZN). Learn the fastest method to reroll your account and see the best character to reroll here!
List of Contents
Best Characters to Reroll Tier List
All Characters Reroll Tier List (February 2026)
| Tier | Characters |
|---|---|


|
|


|
|


|
|


|
Characters are unordered within each tier
SS Tier Characters
| Character | Explanation |
|---|---|
|
|
Mei Lin is capable of infinite scaling with her Rising Dragon Spire and constant attacks from her strikes that she can use multiple times in one turn. She can function on her own thanks to her ability to draw her cards and requires low amount of turns to fully setup. The only drawback is the difficulty of getting a good save data file for her. ► Mei Lin Best Team and Build |
|
|
Veronica is the premium draw engine in this game. She is capable of drawing 2 cards for 0 AP with the right build and can significantly increase the effectiveness of a team if she is a part of it. She is also valuable in chaos runs due to her deck containing a lot of cards with the unique tag that makes it easier to get the cards you want to duplicate. ► Veronica Best Team and Build |
S Tier Characters
| Character | Explanation |
|---|---|
|
|
Chizuru has access to infinite scaling with her Shadow of the Moon Card much like Mei Lin but void damage instead and requires more turns to setup. However, she is much easier to build and can go in different ways that can perform well compared to her best build. ► Chizuru Best Team and Build |
|
|
Hugo is capable of following up attacks from his teammates with his own as long as he can keep up his Commence the Hunt stacks. He relies heavily from another party member that can attack constantly that it restricts his build path. However, this makes it easier for him to be built. ► Hugo Best Team and Build |
|
|
Luke has constant 0 AP bullet generation for multiple attack cards that can fuel his own infinite scaling attack with his Dance of the Demon card. He can fully function on his own but he is hard to build as he requires specific epiphanies on his cards to fully work. ► Luke Best Team and Build |
|
|
Haru specializes in dealing Burst Damage with her Anchor Shot, especially when she uses it multiple times for the duration of the fight. She works great with teams that allow her to gain more AP to be able to use her Anchor Shot. ► Haru Best Team and Build |
|
|
Narja provides a variety of useful buffs as a support such as healing, additive buffs, shields, defense-based buffs and can also deal single-target or AoE damage. She does a lot of things and be able to fit in many teams making her a viable support. ► Narja Best Team and Build |
|
|
Khalipe is capable of providing shields to her party while dealing constant AoE damage with her Vulture Ejections. She can be built in many ways as long as she can pay for all the expensive cost of her cards. ► Khalipe Best Team and Build |
A Tier Characters
| Character | Explanation |
|---|---|
|
|
Yuki can dish out constant AoE damage especially when her cards has the Inspiration effect activated. She relies heavily on card draw to boost her cards and is fairly AP efficient if played right. ► Yuki Best Team and Build |
|
|
Renoa focuses on generating her Dirge Bullets to perform follow-up attacks after discarding it. She highly needs characters that can discard cards for her as she can easily crowd your deck with her Dirge Bullets. She has multiple build paths she can take based on whether she want to keep her Dirge Bullets or not. ► Renoa Best Team and Build |
|
|
Rin is a selfish character who shines as a solo DPS on her team. Her damage revolves around maintaining her Dark Mist Stance and the amount of skill cards currently in hand, restricting her party options. Most of her attacks are multi-hits that can benefit from damage buffs. She is easy to build around but can be hard to play. ► Rin Best Team and Build |
|
|
Kayron is an extremely flexible and scaling character that can work as either your main or sub-DPS across various team compositions. The more you invest in him, the wider the range of his build options is. His playstyle revolves around exhausting his generated Futility cards to fuel his attacks that are single-target or AoE. He is hard to build and play as he requires careful hand management and wants a lot of AP to use if you don't have his signature partner and Ego Manifestation. ► Kayron Best Team and Build |
B Tier Characters
| Character | Explanation |
|---|---|
|
|
Magna is an offensive tank that focuses on counterattacking to retaliate and deal damage that scales from her defenses, shielding your allies while opening up enemies to more damage with Vulnerable. She can fit in any team that requires more protection or damage but you need to take account her expensive cards. She is easy to build and play but requires a lot of AP to use and relies heavily in coutnerattack damage. ► Magna Best Team and Build |
|
|
Orlea is a versatile support character offering consistent damage and HP sustain throughout the fight. She specializes in longer fights and can fit in any team as she has to everything such as buffs, debuffs, healing, shielding and scaling damage. She can be built in many ways depending on what you need but hard to play as you need to carefully manage your hand. ► Orlea Best Team and Build |
How to Reroll
| Ways to Reroll |
|---|
|
|
Quickest Reroll Method
| 1 | After downloading the game, login with your own account, press start and watch the cutscene. You can delete your account data in game so you do not need to use the guest account feature. |
|---|---|
| 2 | You will start the prologue and skip the story. You will then start the first battle tutorial. |
| 3 | After the first prologue stage, start the next prologue stage to do another battle tutorial and skipping the story along the way. |
| 4 | The prologue should be done. Next, you will do a story stage and a quick tutorial on the gacha system giving you a guaranteed 4 star character, Tressa. |
| 5 | Finally, do the next stage for a Chaos Manifestation tutorial. You cannot skip this section but you can fast forward the events so you can get through section faster.. |
| 6 | Now, you are free to do what you want. Go to the main menu screen, click the three horizantal line button on the top right, click the mail icon then claim all the rewards. |
| 7 | Go back to the main menu then select Rescue. Choose the Special Request Rescue banner and spend all your Rescue Anchors until you get what you want. |
| 8 | Complete the first three battle missions, claim all the rewards, then spend all the crystals you got in the current Amplified Distress Signal banner. |
| 9 | If you are not satisfied with the result, simply go to the three horizantal line button on the top right then select the gear icon on the bottom right. |
| 10 | Select the person icon on the middle left of the screen then press Reset Server. This will delete your user data without needing to create a new account. After that, you can start again and do it how many times you want. |
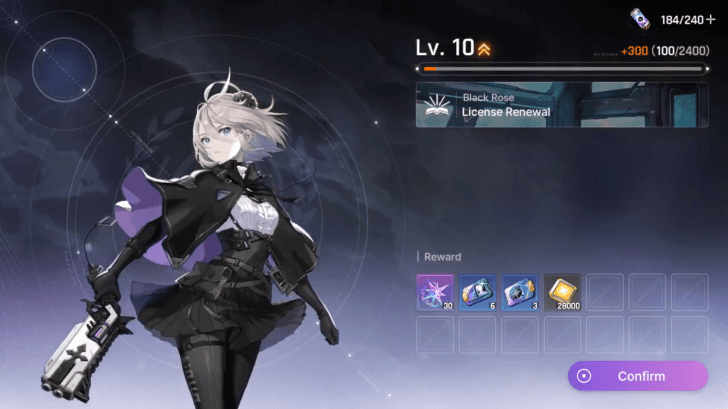
Level 10 Captain Navigation Method
| 1 | Past the point of the tutorial, to get the most pulls in the shortest amount of time, you need to reach Captain Level 10 which unlocks the Events page. |
|---|---|
| 2 | Simply complete all the tasks in the first page of the Growth Guide and claim all the rewards. |
| 3 | Once you reach Captain Level 10, you should be able to do another 10 pull on the limited banner and complete the Special Request Rescue banner that guarantees a 5 star character. |
Should You Reroll?
Yes, if You Want to Get a Specific Character
We only suggest rerolling if you want multiple 5-star characters early or a specific character you like. Rerolling purely for meta advantage is not recommended, as all characters appear viable with proper setup and time investment. Since non-collaboration units will eventually enter the permanent pool, most characters are not missable as well.
How Long Does it Take to Reroll?
10-20 Minutes for the Quickest Method
It takes around 10-20 minutes to be able to control the game and can be done much quicker thanks to the ability to skip story and fast forward Chaos Manifestation after the January 14 Patch Update but this gives you enough pulls on the limited banner and on the Special Request Rescue banner.
30-40 Minutes for the Captain Level 10 Method
This method requires unlocking the Events page that nets you 20 pulls on the limited banner, completes the Special Request Rescue banner and a few spare Rescue Anchor and Crystals but takes around 30-40 minutes.
Chaos Zero Nightmare (CZN) Related Guides
Chaos Zero Nightmare Wiki Front
Guides by Category
| Chaos Zero Nightmare Wiki Contents | |
|---|---|
 Characters Characters |
 Partners Partners |
 News News |
 Chaos Chaos |
 Ark City Ark City |
 Banners Banners |
 Tips and Tricks Tips and Tricks |
 Equipment Equipment |
 Cards Cards |
 Memory Fragments Memory Fragments |
 Items Items |
 Simulation Simulation |
 Glossary Glossary |
 Missions Missions |
 Galactic Disaster Galactic Disaster |
 Fates Fates |
Recommended Guides
 Best Characters Tier List
 Redeem Codes
 Chaos Zero Nightmare x Hololive Collab
 Team Composition Guide
 Best Teams
 Best Partners
 Upcoming Banners
 Neutral Card Tier List
 List of All Trauma Codes
 List of Voice Actors
 Best Memory Fragments
 Best Forbidden Cards
 Corruption Mode Explained
 Chaos Assault Explained
 Purification Protocol Explained
 Best Characters for All Endgame Modes
 Zero System Guide
 ID Card Sharing Board
 Environment Variables Guide
Comment
Author

Best Reroll Tier List
Premium Articles
Rankings
- We could not find the message board you were looking for.

Gaming News

![The Seven Deadly Sins: Origin [First Impressions] | A Promising Start](https://img.game8.co/4440581/584e0bfb87908f12c4eab6e846eb1afd.png/show)

![Monster Hunter Stories 3 Review [First Impressions] | Simply Rejuvenating](https://img.game8.co/4438641/2a31b7702bd70e78ec8efd24661dacda.jpeg/thumb)
![The Seven Deadly Sins: Origin [First Impressions] | A Promising Start](https://img.game8.co/4440581/584e0bfb87908f12c4eab6e846eb1afd.png/thumb)
Popular Games

Genshin Impact Walkthrough & Guides Wiki
Umamusume: Pretty Derby Walkthrough & Guides Wiki
Pokemon Pokopia Walkthrough & Guides Wiki
Honkai: Star Rail Walkthrough & Guides Wiki
Monster Hunter Stories 3: Twisted Reflection Walkthrough & Guides Wiki
Arknights: Endfield Walkthrough & Guides Wiki
Wuthering Waves Walkthrough & Guides Wiki
Zenless Zone Zero Walkthrough & Guides Wiki
Pokemon TCG Pocket (PTCGP) Strategies & Guides Wiki
Monster Hunter Wilds Walkthrough & Guides Wiki


Recommended Games
Fire Emblem Heroes (FEH) Walkthrough & Guides Wiki
Diablo 4: Vessel of Hatred Walkthrough & Guides Wiki
Cyberpunk 2077: Ultimate Edition Walkthrough & Guides Wiki
Yu-Gi-Oh! Master Duel Walkthrough & Guides Wiki
Super Smash Bros. Ultimate Walkthrough & Guides Wiki
Pokemon Brilliant Diamond and Shining Pearl (BDSP) Walkthrough & Guides Wiki
Elden Ring Shadow of the Erdtree Walkthrough & Guides Wiki
Monster Hunter World Walkthrough & Guides Wiki
The Legend of Zelda: Tears of the Kingdom Walkthrough & Guides Wiki
Persona 3 Reload Walkthrough & Guides Wiki


All rights reserved
© Smilegate. All Rights Reserved.
The copyrights of videos of games used in our content and other intellectual property rights belong to the provider of the game.
The contents we provide on this site were created personally by members of the Game8 editorial department.
We refuse the right to reuse or repost content taken without our permission such as data or images to other sites.