Nia Best Team and Build
NEW: Season 2 | Refinement | Arena
✪ Tiphera: Build | Cards | Banner
☆ Tiana: Partner Guide | Banner
✪ Nine: Build | Cards | Banner
See our Endgame Mode Tier List (Season 2 Updated!)
☆ Tier Lists: Character | Partner | Cards

This is a guide for the best teams and loadout for Nia in Chaos Zero Nightmare (CZN). Learn which combatants are best to pair with Nia, as well as recommended cards, partners, and equipment.
| Nia Guides | |
|---|---|
| Team and Build | Cards and Materials |
List of Contents
Best Nia Build
| Click on a Link to Jump to a Section! | |||||||||||
|---|---|---|---|---|---|---|---|---|---|---|---|
Build Overview
※ Hover over equipments, memory fragments and cards to see effects
| Character | Partner | Equipment |
|---|---|---|

|

|
Tentacles of Chaos +8% ally Attack Upon enemy Defeat, -2 Stress to the Combatant with the highest Stress Titan Combat Suit When taking Damage, Recover 2% HP (1 per turn) Lightless Stem Increase Heal Amount by 15% Refinement: ・At the start of battle, Draw 1 Exhaust card(s) of this unit |
| Memory Fragments and Stat Priorities | ||
|
Healer's Journey Set +12% Max HP Seth's Scarab Set Increase the damage, Shield, and Healing of Basic Cards by 20% Tetra's Authority Set +12% Defense |
1. Defense 2. Health 3. Ego Recovery |
|
| Cards and Epiphanies | ||
Nia's best build for the Season 2 content revolves around discard synergy while providing draws and buffs to the party. She focuses more on discarding therefore she is best paired with characters that has benefits when their card is discarded.
Her best set is still the standard 2/2/2 set for supports which are Healer's Journey for extra HP, Seth's Scarab for more value from her Amp Therapy in chaos runs, and Tetra's Authority set. Alternatively, you can also gear her with the 4 piece Glory's Reign set as other combatants can use their exhaust cards to activate its effect.
Her favored chaos zone is Burning Life to get her best equipment such as Vine Lord's Mask for more fixed shield after drawing exhaust cards. Combat Drum for a 20% multiplicative damage buff to the next attack from allies after exhaust 5 skill cards and Tentacles of Chaos for an 8% attack buff to allies but can only be obtained from Senectus.
| Date | Changes |
|---|---|
| 02-19-2026 | ・Updated build overview ・Added refinement recommendation ・Changed best cards ・Changed best equipment ・Added stat priority ・Added more details to best build tips and playstyle |
| 01-12-2026 | ・Updated build overview ・Updated best team ・Changed best cards ・Changed best memory fragment ・Changed best equipment ・Changed best playstyle and build tips |
| 11-19-2025 | ・Added Nia build overview ・Changed Nia's best team from Hugo and Selena to Renoa and Rei ・Changed Nia's best cards to reflect the new best team ・Changed Nia's best equipment to reflect the new chaos zone, Laboratory 0 ・Revised Nia build page layout |
Nia Best Team
| Click on a Link to Jump to a Section! | |||||||||||
|---|---|---|---|---|---|---|---|---|---|---|---|
| Main DPS | Sub-DPS |
|---|---|
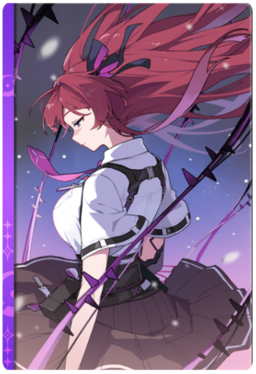
 Renoa Renoa
|
 Rei Rei
|
Nia's best team is Renoa and Rei. This team is all about discarding Dirge Bullets to activate its effects and buffing the damage with Rei while helping thin out the deck with exhausts. Nia's Ego Skill can also activate one of Renoa's combo that can dish out a lot of damage once you created a lot of Dirge Bullets in your deck.
Nia Best Cards
| Click on a Link to Jump to a Section! | |||||||||||
|---|---|---|---|---|---|---|---|---|---|---|---|
| Card | Epiphany Effect |
|---|---|
 Mute Accent Mute Accent
|
AP Cost: 1
・Discard all highest-cost cards ・The owner of those cards deals 100% Extra Attack on a random enemy |
 Nia's Curiosity Nia's Curiosity
|
AP Cost: 1
・Reveal 3 random cards from the Draw Pile ・Choose one to Draw ・Discard the rest |
 Soul Rip Soul Rip
|
AP Cost: 2
・When discarding a card, 1 Decibel, 1 Elasticity |
 Adagio Adagio
|
AP Cost: 0
・Discard 1 ・Draw 2 card(s) of the owner of that card |
 Spore Harvester Spore Harvester
|
AP Cost: 0
Tags: Retain, Exhaust ・Incinerate: Create 2 Contaminated Spore ・ Retain: Create 1 Contaminated Spore |
Due to the restrictions of Season 2, Nia's best cards does not revolve around Eternal Hunger anymore. Her ability is best used for discard synergy therefore she must focus on as much discard as possible while retaining the ability to provide draw for the party.
First, Mute Accent's epiphany must be the version that discards all highest-cost cards so that you can combo this with Dirge Bullets which has the same cost of 1 AP and therefore will be discarded as long as there is no 2 AP or more cards in your hand.
Soul Rip should have the epiphany that turns it into an upgrade card to thin your deck and provide a decibel and elasticity stack after discarding a card. Adagio, on the other hand, must now have the epiphany that only discards 1 but draws 2 card based on whose card was discarded.
G Chord does not really have a place in this build therefore it is best removed from the deck.
Essential Team Cards and Epiphanies
| Card | Epiphany Effect |
|---|---|
 Ballad of Pitch Black Ballad of Pitch Black
|
AP Cost: 0
・50% x 3 Damage ・For 1 turn, +100% Extra Attack Damage of Dirge Bullet |
 Flower of Devoured Fate Flower of Devoured Fate
|
AP Cost: 0
・Discard up to 3 cards from hand ・Generate that many Dirge Bullets |
 Last-Ditch Assault Last-Ditch Assault
|
AP Cost: 1
Tags: Retain, Exhaust ・150% Damage (+0%) ・Discard all Dirge Bullets and +50% Damage for that amount |
 Resonating Darkness Resonating Darkness
|
AP Cost: 1
Tags: Unique ・+60% Damage of cards with cost 1 |
|
Resonating Darkness
|
AP Cost: 0
・For 1 turn, +80% Damage to cards with cost 1 |
 Snack Time Snack Time
|
AP Cost: 0
Tags: Retain, Exhaust ・Heal 200% ・Draw 2 |
 Dark Condensation Dark Condensation
|
AP Cost: 1
・For 1 turn, +50% Damage to Void attack cards |
Renoa's cards must have a sufficient way to generate and discard Dirge Bullet. Flower of Devoured Fate must be the epiphany that discards up to 3 cards to generate 3 Dirge Bullets while Ballad of Pitch Black must be the epiphany that gives your Dirge Bullets +100% additive buff to the extra attack damage.
As for Rei, Season 2 enables you to obtain one unique and non-unique epiphany for each card therefore you can get one Resonating Darkness that boosts 1 AP cards by 60% additively and another Resonating Darkness that boost the same 1 AP cards for 80% but only for 1 turn.
Nia Best Partner
| Click on a Link to Jump to a Section! | |||||||||||
|---|---|---|---|---|---|---|---|---|---|---|---|
| Partner | Details |
|---|---|
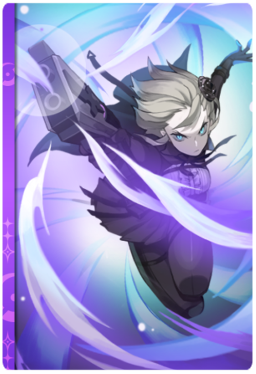
 Nyx Nyx
|
Passive Effect: Errante Hurricane - The assigned combatant's Defense, Health, and Heal Amount are increased by 8%. When the assigned combatant Draws for the first time each turn using an ability, +8% Damage dealt by allies for 1 turn. Ego Skill: Resonance - Discard up to 3 cards, then Draw +1 cards equal to the number discarded |
Nyx is a 5-star Controller partner that boosts the party damage when a card is drawn. She also helps boost healing output which in this build is what Nia always does other than drawing and discarding. After the Season 2 Balance, Nyx now gives a boost to defense, health and healing amount to Nia.
Alternative Budget Partner
| Partner | Explanation |
|---|---|
 Arwen Arwen
|
Arwen is a 4-star Controller partner that heals and gives damage reduction to the party. She is generally good and a great option if you don't have Nyx. |
Nia Best Memory Fragments
| Click on a Link to Jump to a Section! | |||||||||||
|---|---|---|---|---|---|---|---|---|---|---|---|
|
Healer's Journey Set +12% Max HP |
Seth's Scarab Set Increase the damage, Shield, and Healing of Basic Cards by 20% |
Tetra's Authority Set +12% Defense |
Your standard 2/2/2 set for non-DPS combatants. Healer's Journey and Tetra's Authority provides stats the team wants for extra sustain and durability. Seth's Scarab lets you use Nia much more easily on content that has her basic cards such as chaos zones for easier deck building.
The new 4 piece Glory's Reign set can be activated by other combatants too so if your other combatants benefits from a different set piece, Nia can also remove Healer's Journey Set and Seth's Scarab set to carry the 4 piece set for herself to give the team some team-wide bonuses.
Stat Priority
| Main Stats | Recommended Substats |
|---|---|
|
Ideal: Health % Desire: Health % Imagination: Defense % |
・Health
・Defense ・Ego Recovery |
For both main stats and substats, aim for Health, and Defense. You can then go for more health and defense for her substats and include in some Ego Recovery to try and see if you can get the requirement for her last potential node. Otherwise, these are the only stats she needs as the extra attack damage that is stated in her cards are based on who initiates it and not Nia herself.
Nia Best Equipment
| Click on a Link to Jump to a Section! | |||||||||||
|---|---|---|---|---|---|---|---|---|---|---|---|
| Weapon | Armor | Accessory |
|---|---|---|
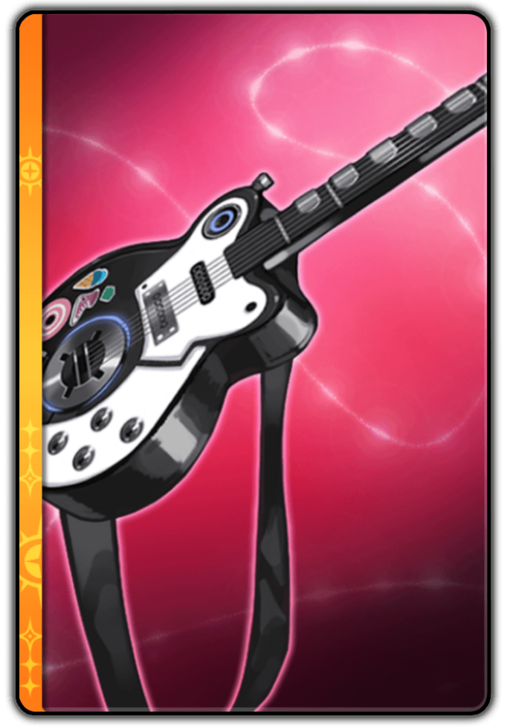
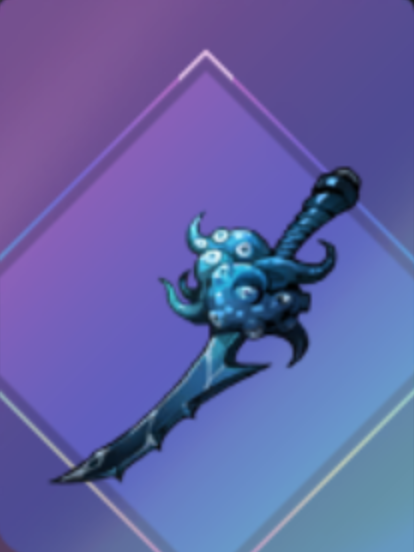 Tentacles of Chaos Tentacles of Chaos Tentacles of Chaos +8% ally Attack Upon enemy Defeat, -2 Stress to the Combatant with the highest Stress |
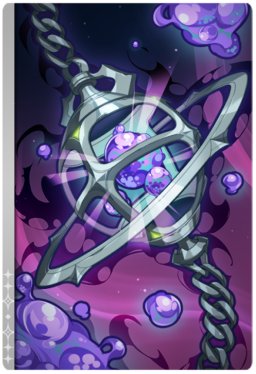
 Vine Lord's Mask Vine Lord's Mask Vine Lord's Mask When Drawing an Exhaust card through an ally ability, 80% Fixed Shield (2 times per turn) |
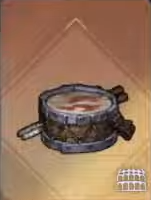 Combat Drum Combat Drum Combat Drum When 5 Skill Cards are created, increase Damage Amount of the next ally card activated by 20% (max 1 stack) |
| Refinement: ・At the start of the turn, if an Exhaust card is in Draw Pile, have a 30% chance to Draw 1 Exhaust card(s). ・At the start of battle, Draw 1 Exhaust card(s) of this unit ・Increase Shield Gain Amount by 15%, and increase Heal Amount by 15% |
||
Nia's best equipment can only be found in Burning Life with Vine Lord's Mask giving her fixed shield after drawing an exhaust card up to 2 times. Combat Drum for a 20% multiplicative damage boost to the parties next attack after exhausting 5 skill cards.
As for her weapon slot, you want to have Tentacles of Chaos which provides an 8% attack boost for her allies but can only be obtained from Senectus. However, due to how limited the selection of equipment Nia has, you can use any other chaos zones as long as you get Tentacles of Chaos.
As for her refinements, the best Nia can get revolves around drawing exhaust cards as a guarantee but only at the start of battle or a 30% chance each turn to draw 1 exhaust which in this build is most likely a Dirge Bullet.
Alternative Budget Equipment
| Weapon | Armor | Accessory |
|---|---|---|
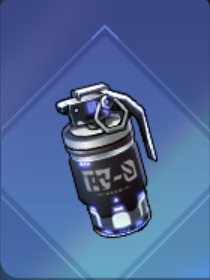 Flashbang Flashbang Flashbang At the start of battle, apply 3 Weaken to a random enemy |
 Titan Combat Suit Titan Combat Suit Titan Combat Suit When taking Damage, Recover 2% HP (1 per turn) |
 Grey Orb Grey Orb Grey Orb At the start of battle, gain 3 Damage Reduction |
If you aren't able to get the best, you can settle for these equipment that can be found in any chaos zones inside shops. Flashbang to inflict 3 Weaken on random enemies at the start of battle. Titan Combat Suit for healing after getting hit once every turn and Grey Orb that gives 3 damage reduction at the start of battle but this equipment can only be obtained after reaching 30 exploration level on The Foretold Ruin.
Nia Build Tips and Playstyle
| Click on a Link to Jump to a Section! | |||||||||||
|---|---|---|---|---|---|---|---|---|---|---|---|
|
|
Mute Accent Dirge Bullet Combo
One consistent combo you can do with Nia that enhances Renoa's damage is to use Mute Accent to discard up to 9 Dirge Bullets resulting to 9 extra attacks from Mute Accent and another 9 extra attacks from the Dirge Bullets after getting discarded. Here are the steps to execute this combo:
- Create Dirge Bullets using Echo of Sorrow or Flower of Devoured Fate.
- Keep creating Dirge Bullets until you have either Last-Ditch Assault or Mute Accent alongside a few Dirge Bullets.
- (Optional) Use Ballad of Pitch Black to increase the damage of your Dirge Bullets.
- Use either Last-Ditch Assault or Mute Accent to discard all your Dirge Bullets.
- Use Renoa's Ego Skill to return all your Dirge Bullets back to your hand.
- End your turn or (Optional) Use your Last-Ditch Assault or Mute Accent, whatever is left, to discard your Dirge Bullets again.
Adagio and Eternal Hunger Combo
This combo can only be done outside of Season 2 content and allows Nia to reactivate the effect of Eternal Hunger multiple times to gain AP and 1 card draw by using Adagio to place it on top of the draw pile and drawing it again using another draw effect or another Adagio. Here are the steps to do it:
- Make sure that Eternal Hunger and Adagio is in your hand
- Use Adagio to place Eternal Hunger on top of your draw pile
- Use another Adagio or other cards that draw to get the effect of Eternal Hunger again
- Repeat until you run out of Adagio to use
Shuffle Cards Fast to Activate Decibel
The goal of this build is to thin out the deck and activate decibel every other turn. Since decibel scales with extra damage, Nia needs characters that also deals a lot of extra damage such as Hugo and Selena. Nia will be the support of this team with heals built in her kit while Hugo and Selena will try to stack as much Commence the Hunt and Mark to sneak in more extra damage while setting up decibel.
Activate High Cost Cards With G Chord
Another way to use Nia is with G Chord and Adagio to activate high cost cards. The combo is to use Adagio and discard the card you want to activate then play G Chord to play the top card in the draw pile at the cost of only 2 AP so make sure to activate cards you want that are more than 3 AP.
Chaos Zero Nightmare (CZN) Related Guides

5 Star Character Builds
 Chizuru Chizuru
|
 Haru Haru
|
 Hugo Hugo
|
 Kayron Kayron
|
 Khalipe Khalipe
|
 Luke Luke
|
 Magna Magna
|
 Mei Lin Mei Lin
|
 Narja Narja
|
 Nine Nine
|
 Orlea Orlea
|
Renoa
|
 Rin Rin
|
 Sereniel Sereniel
|
 Veronica Veronica
|
 Yuki Yuki
|
4 Star Character Builds
 Amir Amir
|
 Beryl Beryl
|
 Cassius Cassius
|
 Lucas Lucas
|
 Maribell Maribell
|
 Mika Mika
|
 Nia Nia
|
 Owen Owen
|
Rei
|
 Selena Selena
|
 Tressa Tressa
|
Comment
Author

Nia Best Team and Build
Premium Articles
Rankings
- We could not find the message board you were looking for.

Gaming News

![The Liar Princess and the Blind Prince Review [PC] | Lovely to Look at but Tedious to Play](https://img.game8.co/4442586/8d95f5faf05780f1765ce7e0938bd825.jpeg/show)

![Monster Hunter Stories 3 Review [First Impressions] | Simply Rejuvenating](https://img.game8.co/4438641/2a31b7702bd70e78ec8efd24661dacda.jpeg/thumb)
![The Seven Deadly Sins: Origin Review [First Impressions] | A Promising Start](https://img.game8.co/4440581/584e0bfb87908f12c4eab6e846eb1afd.png/thumb)
Popular Games

Genshin Impact Walkthrough & Guides Wiki
Umamusume: Pretty Derby Walkthrough & Guides Wiki
Pokemon Pokopia Walkthrough & Guides Wiki
Honkai: Star Rail Walkthrough & Guides Wiki
Monster Hunter Stories 3: Twisted Reflection Walkthrough & Guides Wiki
Arknights: Endfield Walkthrough & Guides Wiki
Wuthering Waves Walkthrough & Guides Wiki
Zenless Zone Zero Walkthrough & Guides Wiki
Pokemon TCG Pocket (PTCGP) Strategies & Guides Wiki
Monster Hunter Wilds Walkthrough & Guides Wiki


Recommended Games
Fire Emblem Heroes (FEH) Walkthrough & Guides Wiki
Diablo 4: Vessel of Hatred Walkthrough & Guides Wiki
Cyberpunk 2077: Ultimate Edition Walkthrough & Guides Wiki
Yu-Gi-Oh! Master Duel Walkthrough & Guides Wiki
Super Smash Bros. Ultimate Walkthrough & Guides Wiki
Pokemon Brilliant Diamond and Shining Pearl (BDSP) Walkthrough & Guides Wiki
Elden Ring Shadow of the Erdtree Walkthrough & Guides Wiki
Monster Hunter World Walkthrough & Guides Wiki
The Legend of Zelda: Tears of the Kingdom Walkthrough & Guides Wiki
Persona 3 Reload Walkthrough & Guides Wiki


All rights reserved
© Smilegate. All Rights Reserved.
The copyrights of videos of games used in our content and other intellectual property rights belong to the provider of the game.
The contents we provide on this site were created personally by members of the Game8 editorial department.
We refuse the right to reuse or repost content taken without our permission such as data or images to other sites.