Beginner's Guide: All Tips and Tricks
NEW: Season 2 | Refinement | Arena
✪ Tiphera: Build | Cards | Banner
☆ Tiana: Partner Guide | Banner
✪ Nine: Build | Cards | Banner
See our Endgame Mode Tier List (Season 2 Updated!)
☆ Tier Lists: Character | Partner | Cards
Here are the best tips and tricks for beginners in Chaos Zero Nightmare (CZN). Learn everything you need to know to get started with the game, including combat tricks and progression tips to advance efficiently.
List of Contents
Everything You Need to Get Started
At the start, you'll go through a prologue that serves as the game's basic tutorial. It covers the core gameplay mechanic and combat flow. Since these fundamentals are introduced in-game, we will let you experience them there and instead focus on the details the game only briefly covered, starting with:
Fully Understanding the HUD
There is a lot going on in CZN’s HUD (Heads-Up Display), so the first step is to break down the regular combat screen. To keep things simple and avoid information overload, we will divide the HUD into two parts:
First Half: Character Side HUD
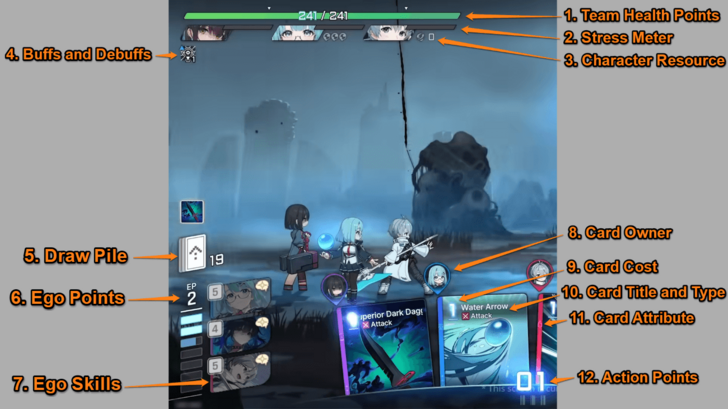 ① Team Health Points - Your entire team shares a single health bar. If it drops to zero, the battle will end in defeat. ② Stress Meter - Indicates a character’s stress level. When the meter is full, they will enter a Mental Breakdown, causing erratic behavior and reducing the team’s HP by a third. Stress builds up when enemies deal damage to a character. ③ Character Resource - These indicate resources tied to a character’s unique mechanics. They vary by character, as each individual has their own gimmick. ④ Character Buffs and Debuffs - This displays a list of active buffs and debuffs affecting your team. The numbers show how many stacks each buff or debuff has. You can tap them to view details of each effect. ⑤ Draw Pile - Displays the remaining cards you can draw. The number indicates how many cards remain in your draw pile. ⑥ Ego Points - Used to activate a character's Ego Skill. EP fills up as you use AP, defeat enemies, recover from breakdown, and end your turn. ⑦ Ego Skills - A powerful character skill that requires Ego Points to use. The required EP per character is shown on the upper left of the skill icon. Ego Skills can only be used once per combat unless the combatant recovers from a breakdown. ⑧ Card Owner - The character who owns the card in your hand. This is helpful when you begin to receive neutral cards that are not tied to specific characters. ⑨ Card Cost - The number of Action Points needed to use a card. Some cards show X as the cost, meaning it depends on how many Action Points you have remaining. ⑩ Card Title and Type - Displays the name of the card and its type. Card types are important because many card effects depend on them. There 4 types of cards: Attack, Skill, Upgrade, and Status Ailment. ⑪ Card Attribute - The card’s corresponding element, usually linked to the owner’s attribute. Using the correct attribute against an enemy significantly increase break value and boosts attack by 25%. ⑫ Action Points - Points required to cast cards. Any remaining AP is lost at the end of your turn. You receive 3 AP at the start of each turn. |
This section focuses on the icons that appear on the left side of the combat screen. These elements mostly provide information regarding your units, including your cards, ego points and skill, health, buffs and debuffs, and more.
Second Half: Monster Side HUD
 ⑬ Combat Rounds - The number of rounds in each encounter. Each circle represents one round, featuring different enemies in every round. ⑭ Action Count - Indicates when the enemy will attack. The number decreases each time you use a card. When it reaches zero, the enemy performs its anticipated action. If the enemy displays an infinity symbol, it performs its action at the end of your turn. ⑮ Attribute Weakness - The elemental weakness of an enemy. Using cards with the same attribute increases break damage and boosts attack by 25%. ⑯ Anticipated Action - The action the enemy performs when its action count reaches zero. It will either attack or cast a skill, depending on the displayed icon. ⑰ Menu - Here you can change game settings and leave the match. ⑱ Auto Battle - Allows the system to play your characters. Recommended for use in repetitive content, such as daily Simulations. Note that Auto Battle is not available during certain game modes, such as Chaos Manifestations. ⑲ Total Damage - The amount of damage dealt by your card or combo. ⑳ Enemy Health Bar - The enemy's total health points. Reducing this value to zero will defeat the enemy. ㉑ Tenacity Gauge - The enemy's break meter. Breaking the enemy reduces stress and grants you one Ability Point. ㉒ Enemy Buffs and Debuffs - You can find the active buffs and debuffs of an enemy under their shield bar. Similar to the characters, you can tap them to see the effects. ㉓ Graveyard Pile - Where your cards go after use. Cards in the graveyard are reshuffled into the draw pile once it becomes empty. Cards used during a round are not sent to the graveyard until the turn ends, as indicated by the addition sign. Note that the graveyard is different from the Exhaust Pile. Upgrade cards and cards with the Exhaust tag or effect cannot be reshuffled into your deck for the remainder of the combat. ㉔ Protos Skill - Consumes Sands of Time to reset an action or a turn. ㉕ End Turn - End your turn by clicking the blue Play Icon in the lower right corner of the screen. Doing so will discard any cards and AP you have remaining, unless otherwise stated by certain card effects or tags. |
This section focuses on the icons that appear on the right side of the combat screen. These icons provide information regarding your enemies, along with access to various menu and combat options, such as your Protos Skills and the Auto Battle button.
Learn How Cards Work
Cards are easier to understand when divided into sections. Each card generally includes the following elements:
1. Card Costs
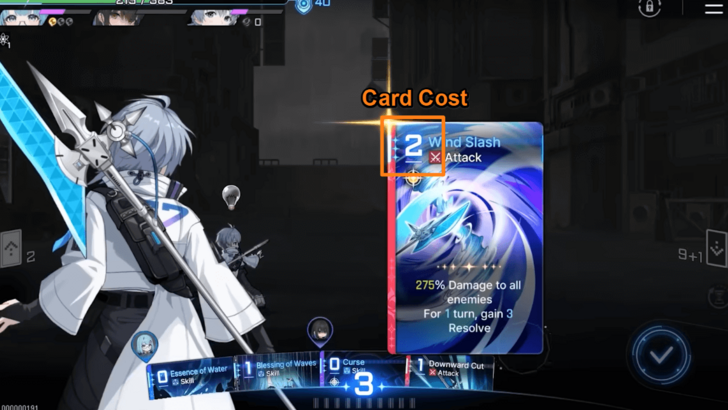
Every playable card has its own AP cost located on the upper left. The basic idea is that higher-cost cards generally deal more damage or offer more effects, but that is not always the case, so it is good to always analyze whether the card's cost is worth the effect. Zero-cost cards, for example, give you free damage despite lower multipliers, allowing extra damage or triggering certain effects like follow-ups.
Cards that show no AP cost number cannot be used directly in battle. To activate these cards, you will need to trigger certain conditions. Another unique cost is 'X,' which means that the card will consume all your remaining AP, and its effects will apply depending on how much AP you have left.
Finally, note that card costs can be changed through Epiphanies. Choosing an Epiphany that modifies cost is usually a decent go-to option if you do not know which upgrade to choose!
2. Card Types
 Attack Attack
|
Attack cards are usually damage type cards, but they can also give buff or debuffs. |
|---|---|
 Skill Skill
|
Skill cards can deal damage, but they are primarily used to provide buffs and debuffs, restore health, grant shields, draw additional cards, and generate Ability Points. Their effects activate immediately upon use and may last for several turns. |
 Upgrade Upgrade
|
As the name implies, Upgrade cards boosts the stats or effects of the user. They are usually permanent and will last until the battle is over. |
 Status Ailment Status Ailment
|
Status Ailment cards often inflict debuffs on your team. They also occupy card slots, which can disrupt your rotation. On rare occasions, certain cards may provide bonuses or effects when you have Status Ailment cards in your hand. |
In addition to the types mentioned above, you will also encounter two other card categories: Neutral cards and Monster cards. Neutral cards are non-character cards found in investigation areas or the shop. Monster cards, true to their name, are obtained from specific monsters within the Chaos Manifestation.
3. Card Attributes
| All Attributes | |||||
|---|---|---|---|---|---|
 Passion Passion
|
 Void Void
|
 Instinct Instinct
|
|||
 Order Order
|
 Justice Justice
|
||||
Elements function a bit differently in CZN, as these attributes do not have strengths or weaknesses against one another. This means that characters have no attribute vulnerabilities. Only enemies are affected by attribute weaknesses, which are displayed near their HP bar.
Here is an easy way to remember the attributes:
- Passion (Fire Icon): Think "burning with passion," which links it to Fire.
- Void (Violet Icon): Void and Violet both start with the letter V.
- Instinct (Eye Icon): This element’s icon is an Eye. Instinct starts with "I," which sounds just like Eye.
- Order (Cross Icon): The Order element is represented by the Cross icon.
- Justice (Weighing Scale Icon): Justice uses its classic symbol, the Weighing Scale.
4. Card Tags
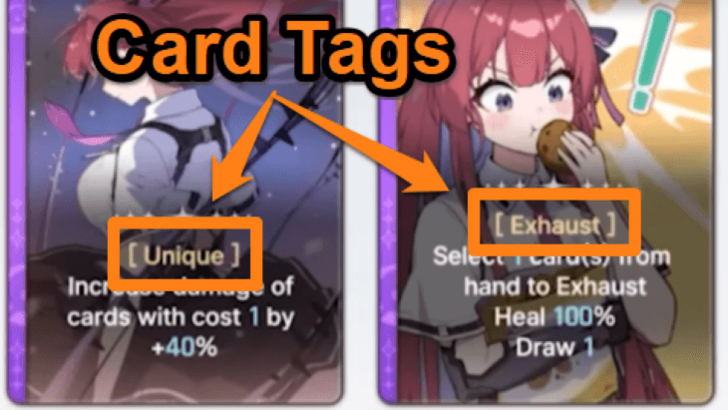
Card tags are very important in CZN as they drastically change how a card behaves. This includes how often or reliably you can play it and how it synergizes with other cards in your deck. Some notable tags you will encounter at the beginning are:
- Retain - Cards with the Retain tag will stay in your hand even after you end your turn.
- Exhaust - Cards that have the Exhaust tag are sent to the Exhaust pile after usage. These cards are not shuffled into your Draw pile, meaning you can typically only use them once per battle.
- Ultimate - Cards with the Ultimate tag end your turn whenever you use them, so make sure that you have used your other cards and spent your remaining AP.
- Lead - Cards with the Lead tag have a chance to have their cost reduced by 1 at the start of your turn. Make sure to use these cards first, as using another card will remove the AP reduction.
- Outbreak of War - Cards with the Outbreak of War tag are always placed on top of your Draw pile at the start of the match, allowing you to draw and use them at the beginning of the match.
Tags can also be altered or removed via the Epiphany upgrade system, so consider tags when choosing an upgrade!
5. Card Effects
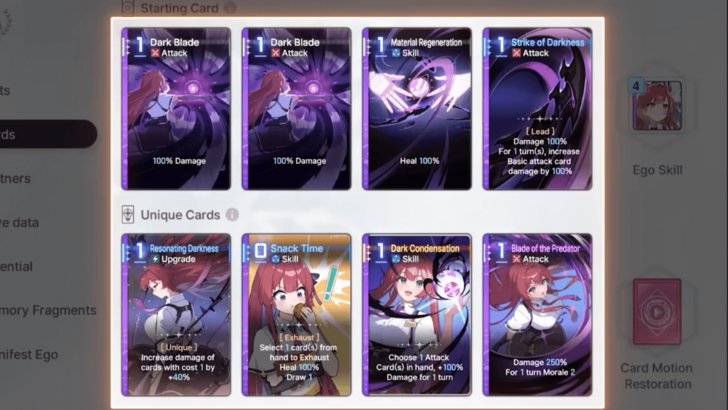
Card effects are the most important factor when evaluating cards, as they define your builds and team compositions. Initially, your character uses simple Starter cards. By playing the Chaos Manifestation mode, you will unlock Unique character cards, which have stronger, more character-specific effects. A key strategy is to replace your basic Starter cards with these more powerful Unique cards to improve your deck's synergy and effectiveness.
Effects, similar to costs and tags, can be modified through the Epiphany system of the game. This is often the most significant factor to consider when choosing an upgrade, as effects can drastically change and even create builds that are not possible without these modifications.
Create Team Synergies

Now that you understand how cards work, let's go talk about how deck-building works in the game, which is through creating a team with good card synergy.
There are two key considerations when creating an effective team. First, each member should have a dedicated role. Typically, you will want one main DPS (damage per second) character, one support, and one sub-DPS or utility character. Having three main DPS characters may cause them to compete for Ability Points, while having three supports may result in insufficient damage to complete the run.
Second, your team must have strong card synergy. Each card’s effect should complement another or compensate for the weaknesses of each character. For example, combining Tressa’s daggers with Hugo’s follow-up attack allows them to strike enemies simultaneously without consuming Ability Points. Another example is using Rei, who can support Void characters, alongside Kayron, who can deal powerful Void damage.
Choose the Right Partner
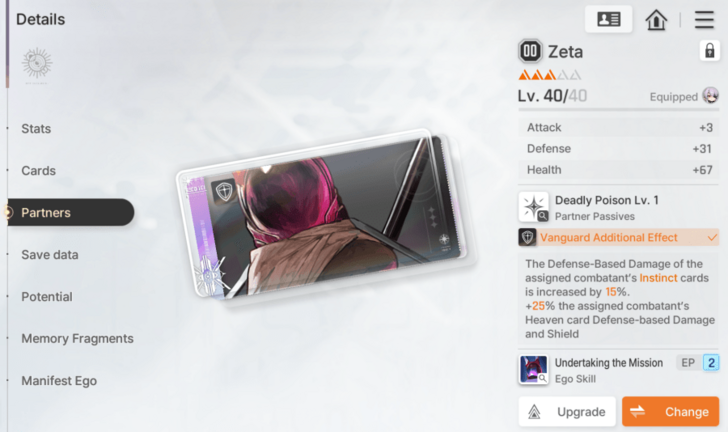
Part of team building involves selecting the right partners to equip. They not only provide stats and passive effects to your characters but also contribute through their Ego Skills during combat. Since your partners' Ego Skills are part of the cycle, you must choose those that complement your team or provide what it lacks, such as additional healing, card draw, or damage.
On top of that, try to aim to use a Partner that has the same attribute as the Combatant to get bonus effects.
List of All Partners
Explore All Available Game Modes
| Game Mode | Details |
|---|---|
| Missions | There are two different missions: Story missions and combat missions. Story missions take you through the main chapters of the game so you can learn more about the story, while combat missions consist of stages with challenging combat encounters. |
| Chaos | Chaos is divided into two game modes: Chaos Manifestation and the Zero System. These are the main roguelike modes where you progress through a series of stages to build your character's save data. This save data functions as a loadout, which you can then use in different game modes. |
| Simulations | Simulations consist of your daily and weekly dungeons, where you can spend stamina to get materials to upgrade your character. |
After forming your team, you can take on the various game modes available, particularly the Chaos Manifestation. In this mode, you can acquire save data that contains upgraded cards and equipment for each of your characters, allowing your team to become even stronger and more prepared for more challenging content.
Beginner Combat Tricks
|
|
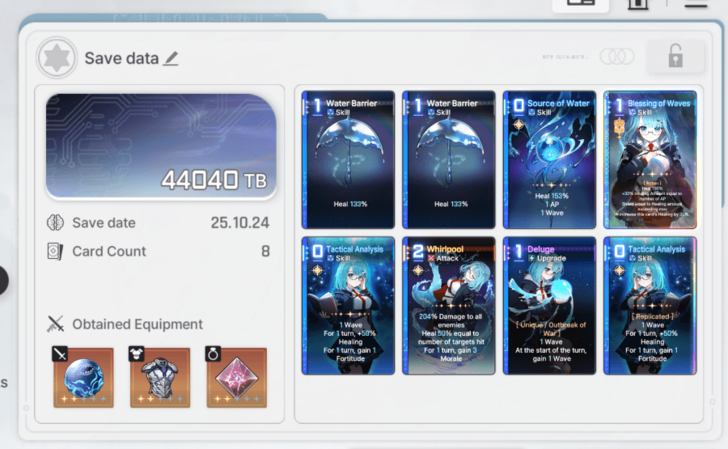
Understand the Value of Removing Cards
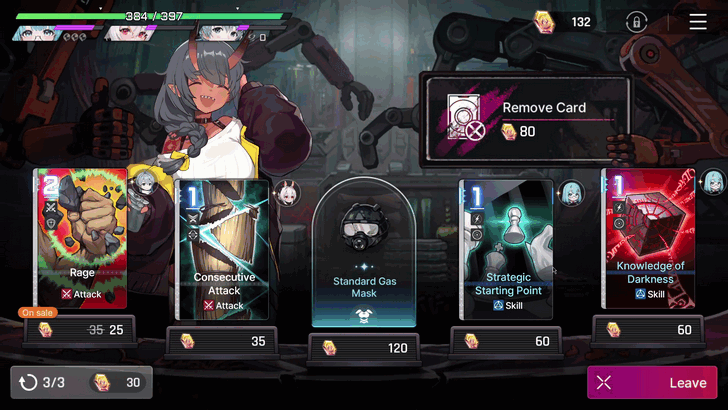
It is very important to understand that removing cards from your deck is vital for a smoother rotation. Having too many cards in your Draw pile will decrease the chances of drawing the cards you want consistently. The fewer cards you have, the easier it is to activate the combos that you want your team to perform.
There are a number of ways to remove cards, such as removing them through the traveling shop in Chaos Manifestation or activating certain card effects that will allow you to exhaust other cards for the remainder of the combat.
Prioritize Epiphanies During Combat
Always be on the lookout whenever your character triggers an Epiphany, and activate the corresponding card immediately because ome card upgrades can change how you plan to approach a certain turn.
Target Enemies with Low Action Count
When choosing a target, it is generally better to eliminate enemies with a low Action Count as soon as possible to prevent them from dealing damage or activating a skill that can negatively impact the encounter. If all enemies have the same action count, then prioritize the ones that will deal direct damage to you.
Break an Enemy Before Defeating Them
Breaking an enemy will reduce some Stress and grant 1 AP, which in turn can allow you to activate more cards. Notably, you can break an enemy as you deal the final blow, allowing you to defeat the enemy and gain the benefits of breaking at the same time. You can determine the amount of Break you will deal by hovering the card you plan to use over an enemy.
Tenacity Damage Info and Effects
Prevent Stress by Using Shields

Shields are powerful in the early game. Not only do they prevent you from taking damage, but they also prevent Stress buildup from enemy attacks. It is a good idea to cast shields whenever you see an enemy preparing to attack.
How to Reduce or Increase Stress
Early Progression Tips
|
|
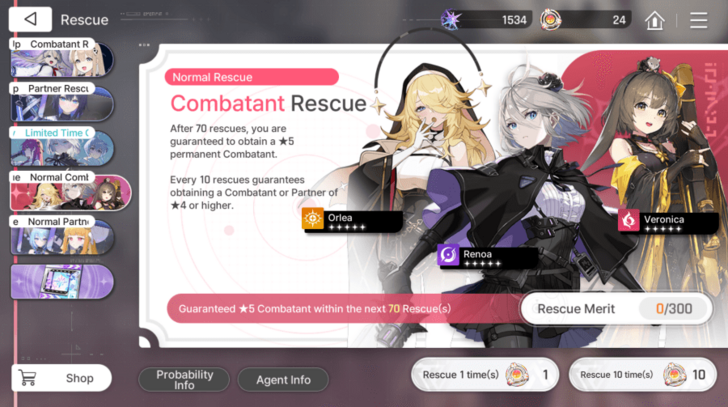
Reroll to Get High Potential Characters
Rerolling is not a must, but is an option if you want to get multiple 5 stars, character you are interested in, or high potential units early on.
Reroll Guide: Best Reroll Tier List
Reach Chapter 2 on the First Day to Unlock Dailies
Chapter 2 unlocks many of your daily activities, such as Ark City and Simulations. Aim to reach the chapter within the first day so you do not miss out on daily passes and can start spending your stamina. Always aim to complete these daily tasks to get Crystals and tons of EXP for faster account leveling.
Dailies Guide: What to Do Every Day
Eat Food to Get Buffs

After unlocking Ark City, you can visit the cafe to get food and obtain a buff. These buffs can last a few turns or battles depending on the indicated effect. They should help you complete any game modes smoothly.
Push Content Before Doing Weeklies
Your weekly activities are a good source of rare materials but have limited passes. We recommend reserving these runs for the end of the week, when you have upgraded your characters and progressed as far as you can, enabling you to clear the more difficult weekly challenges and obtain better rewards.
Gear Up Characters One at a Time
Chaos Zones are the levels in Chaos Manifestation where you can do the roguelike content of the game. You will be able to get a Save File for a character after the run, which you can then use on other content, like going through Simulations to farm materials.
Value Support Characters for the Long Run
It is a common gacha trope that main damage dealers are often outclassed by stronger characters in future updates. Therefore, it is generally wiser to invest in support-oriented characters if you want to use your resources efficiently.
This does not mean you should avoid investing in your main DPS, as they remain essential for progression, but you should refrain from spending all of your resources exclusively on DPS characters.
Avoid Spending on the Standard Banner
Power creep is unavoidable in gacha games, meaning new characters will eventually outclass older ones. Considering this, we advise against spending pull currency on the standard banner. Saving your limited Crystals for limited banners is generally the best strategy to maximize your resources.
Ultimately, however, you are free to spend your currency however you like and pull for any characters that interest you. By the end of the day, what's important is to have fun!
List of All Banners: Which Banner to Pull?
Save Up Tear of Gods
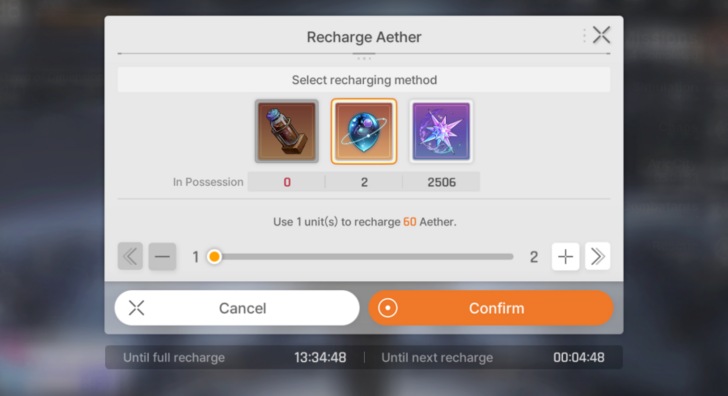
Tear of God is an item that can replenish Aether in the game. It's best to save them up and only use them once you get to Level 30 and above to get materials for your characters.
You can also use some of them on earlier levels to quickly level up and unlock higher difficulty stages, which yield more and higher rarity drops.
Midgame Progression Tips
|
|
Farm Legendary Memory Fragments
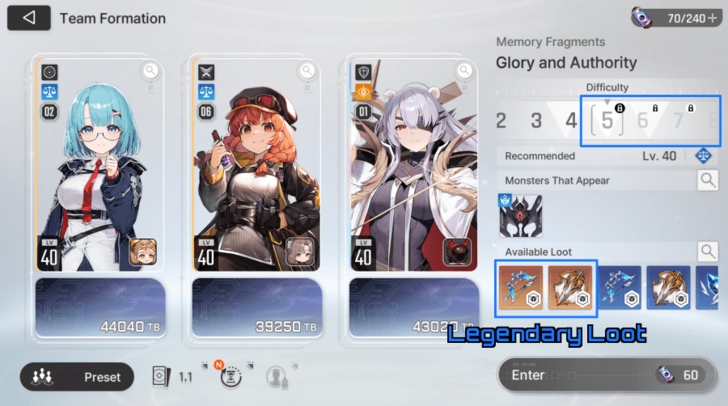
Once you hit Captain Level 40, you will unlock Difficulty 5 stages which drop Legendary Memory Fragment from its tab on the Simulation or from Chaos Loot. Although the drop rate is still a bit low, you can now start farming it and start getting ready for the endgame.
Prepare Two Teams for Basin of Hyperspace

Basin of Hyperspace is a battle challenge content where you will have to clear each stage with two teams. You can start doing as soon as you reach Captain Level 30, but it's best to wait and start grinding it once you reach Level 40 to increase the level cap and get stronger equipment.
Since preparing two teams will require tons of Aether, you should use some of your Tear of Gods or Aether Empty Powder to replenish Aether to get the materials you need.
Get Ready for Zero System
Although Zero System is considered as an endgame content, it will be unlocked as soon as you reach Captain Level 40. It is similar to Chaos Manifestation, but there will be tons of positive and negative modifiers.
You should also prepare to progress through here to get higher and better Save Files for your characters.
All Tips and Tricks
Chaos Zero Nightmare (CZN) Related Guides
Chaos Zero Nightmare Wiki Front
Guides by Category
| Chaos Zero Nightmare Wiki Contents | |
|---|---|
 Characters Characters |
 Partners Partners |
 News News |
 Chaos Chaos |
 Ark City Ark City |
 Banners Banners |
 Tips and Tricks Tips and Tricks |
 Equipment Equipment |
 Cards Cards |
 Memory Fragments Memory Fragments |
 Items Items |
 Simulation Simulation |
 Glossary Glossary |
 Missions Missions |
 Galactic Disaster Galactic Disaster |
 Fates Fates |
Comment
Author

Beginner's Guide: All Tips and Tricks
Premium Articles
Rankings
- We could not find the message board you were looking for.

Gaming News

![Monster Hunter Stories 3 Review [First Impressions] | Simply Rejuvenating](https://img.game8.co/4438641/2a31b7702bd70e78ec8efd24661dacda.jpeg/show)

![Monster Hunter Stories 3 Review [First Impressions] | Simply Rejuvenating](https://img.game8.co/4438641/2a31b7702bd70e78ec8efd24661dacda.jpeg/thumb)
![The Seven Deadly Sins: Origin [First Impressions] | A Promising Start](https://img.game8.co/4440581/584e0bfb87908f12c4eab6e846eb1afd.png/thumb)
Popular Games

Genshin Impact Walkthrough & Guides Wiki
Umamusume: Pretty Derby Walkthrough & Guides Wiki
Pokemon Pokopia Walkthrough & Guides Wiki
Honkai: Star Rail Walkthrough & Guides Wiki
Monster Hunter Stories 3: Twisted Reflection Walkthrough & Guides Wiki
Arknights: Endfield Walkthrough & Guides Wiki
Wuthering Waves Walkthrough & Guides Wiki
Zenless Zone Zero Walkthrough & Guides Wiki
Pokemon TCG Pocket (PTCGP) Strategies & Guides Wiki
Monster Hunter Wilds Walkthrough & Guides Wiki


Recommended Games
Fire Emblem Heroes (FEH) Walkthrough & Guides Wiki
Diablo 4: Vessel of Hatred Walkthrough & Guides Wiki
Cyberpunk 2077: Ultimate Edition Walkthrough & Guides Wiki
Yu-Gi-Oh! Master Duel Walkthrough & Guides Wiki
Super Smash Bros. Ultimate Walkthrough & Guides Wiki
Pokemon Brilliant Diamond and Shining Pearl (BDSP) Walkthrough & Guides Wiki
Elden Ring Shadow of the Erdtree Walkthrough & Guides Wiki
Monster Hunter World Walkthrough & Guides Wiki
The Legend of Zelda: Tears of the Kingdom Walkthrough & Guides Wiki
Persona 3 Reload Walkthrough & Guides Wiki


All rights reserved
© Smilegate. All Rights Reserved.
The copyrights of videos of games used in our content and other intellectual property rights belong to the provider of the game.
The contents we provide on this site were created personally by members of the Game8 editorial department.
We refuse the right to reuse or repost content taken without our permission such as data or images to other sites.