Spellblade Build and Best Skills
★ Classes & Builds: Warrior, Mage, Rogue
★ Equipment: Weapons, Armor, and Accessories
★ All Major Choices and effects on the story
★ Romance Guides for each Companion
★ Beginner and Combat guides for starting out
★ Find all Treasure Chests and Wolf Statues

The Spellblade Mage Build is a build you can create for the Spellblade specialization in Dragon Age: The Veilguard. Learn the best skills to get, the best weapon and armor to use, the best companions to bring, and more!
| Mage Guides | ||
|---|---|---|
| Best Builds | Skill Tree & Priority |
All Equipment |
| Spellblade Builds |
Death Caller Builds |
Evoker Builds |
List of Contents
The Best Spellblade Build for Dragon Age: Veilguard
Early-Game Spellblade Build
| Skills | 1.
Meteor Meteor Call down an elemental meteor that crushes and burns enemies in its way. Deals damage in an area around your target and applies Burning.
2. Wall of Fire Wall of Fire Summon a flaming barrier, burning enemies foolish enough to cross it. Enemies incur damage and Burning each second they remain inside the wall.
3. Storm Surge Storm Surge Leap backward, stirring up a storm of elemental energy in your wake. Deals damage to all nearby enemies.
4. Destructive Light Destructive Light Summon a concentrated beam of primal elemental energy. Deals damage each second to all enemies caught in the beam while applying Burning.
|
|---|---|
| Main |
Urthemiel's Ash Urthemiel's Ash Fire
+25% Burning Duration Burning enemies deal -25% damage for the duration +1 Maximum Burning stacks +20% Burning damage per stack +10% Weapon Damage |
| Off-Hand |
Split-Hilt Dirk Split-Hilt Dirk Physical
+20% Heavy attack damage +30% damage with Final Heavy attacks +25% Stagger |
| Alt. Weapon |
Flamebranch Flamebranch Fire
+15% Mana generation Hitting a Burning enemy with this weapon generates +2 Mana +50 maximum Mana Deal 25% bonus Fire Ability damage for every 50 Mana spent +20% Barrier Damage |
| Helmet |
Helm of Light and Shadow Helm of Light and Shadow +25% Detonation Damage
+25% Stagger applied by Detonations Gain Detonation damage based on your companion relationship Companion cooldowns reduced by 50% when they perform a Detonation +20% Electricity Resistance |
| Armor |
Defiant Plate Defiant Plate +25% Cold Resistance
+5 Max Cold Resistance Immune to Chilled Deal 150 Cold damage and apply Chilled to nearby enemies when you reach Low Health +20% Fire Resistance |
| Belt |
Tincture Kit Tincture Kit +20% healing received
+1 Revival Charges -30% duration of companion healing cooldowns |
| Amulet |
Halla's Grace Halla's Grace +20% Quickened duration
+10% Quickened effectiveness Gain Quickened after every fifth Ability used Ability costs are reduced while Quickened is active +25% Ultimate Damage |
| Ring 1 |
Amaranthine Loop Amaranthine Loop +25% Stagger
+25% Staggered Duration +25% Takedown damage +25% Mana Regeneration |
| Ring 2 |
Graven Opal Graven Opal +20% Ranged attack damage
+15% Weakpoint damage +25% Mana Generation |
| Runes | 1.
Besiege Besiege 2. Ravage Ravage 3. Upend Upend |
| Companions | Lucanis: Debilitate Lucanis opens up his enemies with a debilitating strike. Deals high Stagger.
Abominate Lucanis sweeps the area with demonic strength. Deals high Barrier damage and applies Knocked Down to enemies in the area.
Soothing Potion (Lucanis) Grants Rejuvenation to heal for 600. A Talon is ready for anything and never without a potent concoction on hand. Lucanis tosses a restorative tincture to you, granting Rejuvenation.
|
| Harding: Heavy Draw Harding draws her bowstring back as far as it will go, unleashing a devastating shot. Deals high Stagger.
Soothing Potion (Harding) An expert scout carries only the best resources. This special brew is a pick-me-up like no other. Harding tosses a restorative tincture to you, granting Rejuvenation.
Shred Harding shreds her opponent’s defenses with a decisive shot. Deals high Stagger.
|
|
For your early game skills, get Wall of Fire for some good Fire Damage, Meteor for inflicting Burning, and Storm Surge to help get out of tight spots.
Most of the enchantment choices do not matter too much in the early game so go with whichever gives damage, stagger, or mana generation buffs.
Endgame Spellblade Build
| Skills | 1.
Meteor Meteor Call down an elemental meteor that crushes and burns enemies in its way. Deals damage in an area around your target and applies Burning.
+75% Damage vs. Armor 2. Storm Surge Storm Surge Leap backward, stirring up a storm of elemental energy in your wake. Deals damage to all nearby enemies.
Apply Shocked on Hit 3. Void Blade Void Blade Harness the agility of the Antivan Crows, dashing forward in a flash of dark energy before landing a deadly slash that explodes a moment later. Deals damage twice.
+75% Damage While Shocking Weapons 4. Thunderous End Thunderous End Conjure a deadly avatar of the storm to seek vengeance on your enemies. Deals heavy damage and applies 2 stacks of Shocked to enemies within a large radius.
|
|---|---|
| Main |
Mage's Gambit Mage's Gambit Electric
+20% Final attack damage Hitting with a Final attack will alternate the damage type of this weapon between Electric and Fire +15% Fire and Electric damage Critical hits apply Burning or Shocked based on the current damage type of the Orb +20% Final Attack Damage |
| Off-Hand |
Thorn of Misfortune Thorn of Misfortune Physical
+20% Critical Damage Triggering an Arcane Bomb now deals Critical damage Critical hits with this weapon now apply an Affliction based on the damage type of your Orb Creating an Arcane Bomb requires 1 fewer Arcane Mark +25% Arcane Bomb Trigger Damage |
| Alt. Weapon |
Flamebranch Flamebranch Fire
+15% Mana generation Hitting a Burning enemy with this weapon generates +2 Mana +50 maximum Mana Deal 25% bonus Fire Ability damage for every 50 Mana spent +1 Light Staff Projectile Count |
| Helmet |
Stinging Blow Stinging Blow +25% Flaming Weapons durations
+25% Flaming Weapons damage Flaming Weapons damage is doubled vs. Burning enemies While Flaming Weapons is active, Final attacks vs. Burning enemies add 1 stack +20% Advantage Duration |
| Armor |
Explorer's Suit Explorer's Suit +25% Electric Resistance
+5 max Electric Resistance Immune to Shocked Deal 150 Electricity damage and apply Shocked to nearby enemies when you reach Low Health +15% Affliction Duration |
| Belt |
Warden's Straps Warden's Straps +12% radius of Potion effect
+15% Fire damage |
| Amulet |
Crow's Perch Medallion Crow's Perch Medallion +20% Strike Ability damage
+25% Health damage from Strike Abilities Gain 25 Mana on Critical hits with Strike Abilities Gain Immovable when you Stagger an enemy with a Strike Ability +20% Shocked Damage |
| Ring 1 |
Focus of the Veil Focus of the Veil +15% Electric Damage
+25% Electric Resistance +20% Electric Ability damage vs. Barrier 50% of all of your other damage type bonuses contribute to your Electric damage bonus +25% Strike Ability Damage |
| Ring 2 |
Brass Root Brass Root +20% Shocked damage
+20% damage vs. Shocked enemies +25% Shocked duration +1 maximum Shocked stacks +25% Blast Ability Damage |
| Runes | 1.
Escalate Escalate 2. Ravage Ravage 3. Scorch Scorch |
| Companions | Taash: Dragonfire Strike Taash lands a fiery overhead strike that leaves enemies concussed, confused, and burning. Applies Burning on hit.
Spitfire Taash spits a searing burst of flame that takes the fight out of the foe. Deals high Stagger.
Dragon's Roar Taash roars with draconic fury, drawing enemy attention. Taunts enemies in the area, forcing them to briefly focus their attacks on Taash. Does not affect some of the strongest boss enemies.
|
| Lucanis: Debilitate Lucanis opens up his enemies with a debilitating strike. Deals high Stagger.
Eviscerate Lucanis deals a decisive blow, targeting an enemy’s weakest point. At half health or less, this deals bonus damage, increasing in effectiveness the closer the target is to death. Detonates Overwhelmed.
Abominate Lucanis sweeps the area with demonic strength. Deals high Barrier damage and applies Knocked Down to enemies in the area.
|
|
When you reach Endgame, the Spellblade will have abilities for both Fire and Electric with a dual-element Orb that synergizes well with your kit, making you more versatile.
Other than that, the Spellblade focuses on inflicting Shocked and Burning simultaneously, while dealing huge damage with your Arcane Bomb.
Spellblade Skill Priority
Skill Tree Progression
| Order | Skill | Description |
|---|---|---|
| 1 |
Fade Strike
(Core) |
Use your speed to unleash a powerful attack with any weapon after using Fade Step. Also unlocks an additional follow-up attack while sprinting by pressing Light or Heavy attack. |
| 2 |
Downfall
(Core) |
Jump attacks guarantee Critical hits if the target is Knocked Down. |
| 3 |
Wall of Fire
(Sustain) |
Summon a flaming barrier, burning enemies foolish enough to cross it. Enemies incur damage and Burning each second they remain inside the wall. |
| 4 |
Velocity
(Sustain) |
Stagger from weapon attacks: +20% |
| 5 |
Essence Eater
(Antivan Crow) |
Performing a Takedown grants 250 health and 20 Ultimate. |
| 6 |
Deterioration
(Antivan Crow) |
Penetration: +15% |
| 7 |
Imbued Reaction
(Antivan Crow) |
Perfect Defense grants Shocking Weapons. Shocking Weapons deals 25% more damage. |
| 8 |
Staggering Charge
(Antivan Crow) |
Stagger from Charged attacks: +20% |
| 9 |
Storm Surge
(Antivan Crow) |
Leap backward, stirring up a storm of elemental energy in your wake. Deals damage to all nearby enemies. |
| 10 |
Finale
(Antivan Crow) |
Final attack damage: +10% |
| 11 |
Spirit Blade
(Antivan Crow) |
You can now use your Heavy attack at the end of a Light Attack Chain to conjure a blade and project it a short distance. The blade consumes an Arcane Bomb. Requires Orb and Dagger. |
| 12 |
Return Fire
(Sustain) |
Use a Light or Heavy attack after a Perfect Defense to perform a counterattack. |
| 13 |
Bigger Blast
(Sustain) |
Arcane Bomb Damage: +15% |
| 14 |
Inner Focus
(Sustain) |
Successful Light attacks generate an additional 25% Mana. This value is doubled against enemies suffering from an Affliction. |
| 15 |
Wildfire
(Sustain) |
Fire damage: +10% |
| 16 |
Meteor
(Sustain) |
Call down an elemental meteor that crushes and burns enemies in its way. Deals damage in an area around your target and applies Burning. |
| 17 |
Demolisher
(Sustain) |
Maximum Arcane Bomb stacks: +1 |
| 18 |
Flames of Inspiration
(Sustain) |
Defeating a Burning enemy grants Rally Party. |
| 19 |
Bombastic
(Sustain) |
Blast Abilities now deal 25% more Detonation damage. Arcane Shot now Detonates Sundered enemies. |
| 20 |
Thunderous End
(Spellblade) |
Conjure a deadly avatar of the storm to seek vengeance on your enemies. Deals heavy damage and applies 2 stacks of Shocked to enemies within a large radius. |
| 21 |
Void Blade
(Spellblade) |
Harness the agility of the Antivan Crows, dashing forward in a flash of dark energy before landing a deadly slash that explodes a moment later. Deals damage twice. |
| 22 |
Finale
(Spellblade) |
Final attack damage: +10% |
| 23 |
Blast Efficiency
(Spellblade) |
Blast Abilities cost 50 less Mana. |
| 24 |
Deterioration
(Spellblade) |
Penetration: +15% |
| 25 |
Arcane Strike
(Spellblade) |
Strike Abilities now hit with an Arcane Bomb. |
| 26 |
Medium Armor Mastery
(Antivan Crow) |
While wearing a Medium Vitaar/Helmet and Armor: Critical damage +20% Final damage +20% Charged attack damage +20% Agile attack damage +20%. |
| 27 |
Bulwark
(Antivan Crow) |
Physical Resistance: +10% |
| 28 |
Energy Burst
(Burst) |
Abilities that deal Fire or Electric damage increase the other type’s damage by 15% for 10 seconds. |
| 29 |
Veil Blasts
(Sustain) |
Apply 15% of your current Mana as bonus damage for Blast Abilities. |
| 30 |
Spirit of Vengeance
(Spellblade) |
You can now throw your Spirit Blade a second time by pressing Heavy attack when it returns to you. Requires Orb and Dagger. |
| 31 |
Demolisher
(Spellblade) |
Maximum Arcane Bomb stacks: +1 |
| 32 |
Orbital Burst
(Spellblade) |
When triggering an Arcane Bomb, deal 100% of the damage in a 6 meter radius. Also deals significant Stagger to targets. |
| 33 |
Conductivity
(Spellblade) |
Defeating an enemy with one or more Arcane Bombs still active causes the effect to jump to the nearest enemy within 10 meters. |
| 34 |
Breacher
(Antivan Crow) |
Blast Abilities deal 50% more damage vs Barrier and Armor. |
| 35 |
Staggering Strikes
(Antivan Crow) |
Strike Abilities deal 50% more Stagger. |
| 36 |
Wrath
(Sustain) |
Critical Damage: +10% |
| 37 |
Battlecry
(Sustain) |
Maximum Burning stacks: +1 |
| 38 |
Elemental Executioner
(Antivan Crow) |
Final attacks are Critical against enemies with Low Health. |
| 39 |
Shellbreaker
(Antivan Crow) |
Damage vs. Armor: +20% |
| 40 |
Veil Flurry
(Spellblade) |
Hold Light attack at the end of Light Attack Chain and release at the right moment to unleash your Orb in a circle around you. |
| 41 |
Antivan Kiss
(Spellblade) |
Maximum Shocked stacks: +1 Maximum Burning stacks: +1 |
| 42 |
Electrical Burns
(Spellblade) |
Applying Burning also applies Shocked. Applying Shocked also applies Burning. |
| 43 |
Shocking Tactician
(Spellblade) |
Achieving maximum Shocked stacks on an enemy triggers an Electric burst in an area around them. |
| 44 |
Underestimated
(Antivan Crow) |
Light attack damage vs. health: +10% |
| 45 |
Pressure Point
(Antivan Crow) |
Landing a Critical hit with Strike Abilities grants Quickened. |
| 46 |
Baleful Blast
(Antivan Crow) |
Blast Abilities deal Critical hits to enemies with Low Health. |
| 47 |
Concentration
(Burst) |
Charged attack damage: +10% |
| 48 |
Perfect Cast
(Burst) |
Releasing a Charged attack the moment it reaches the maximum charge level increases its damage by 50%. |
| 49 |
Shocking Strikes
(Burst) |
Using Strike Abilities applies Shocked to nearby enemies. |
| 50 |
Precision Strikes
(Burst) |
Strike abilities land a Critical hit against enemies who are Knocked Down. |
| 51 |
Reclamation
(Burst) |
Mana restored after defeating enemy: +8 |
| 52 |
Amperage
(Burst) |
Electric damage: +10% |
| 53 |
Debilitating Shocks
(Antivan Crow) |
Takes 15% less damage from enemies who are Shocked. |
| 54 |
Traumatize
(Burst) |
Takedown damage: +15% |
| 55 |
Nexus Shock
(Burst) |
Hitting enemies with at least 3 stacks of Shocked causes a chain of Electric damage that strikes up to 2 additional enemies within range. |
The skills above make sure you get to the Spellblade specialization the fastest way possible. We added a mix of Fire and Lightning damage with this skill progression, with more focus on Fire since that's where the Arcane Bomb buffs are found.
Make sure to get all the Ability Upgrades in Antivan Crow as this will be beneficial towards Staggering, making Critical Hits, and gaining Advantage buffs.
Best Spellblade Weapons
Spellblades can work well with either Fire or Electric weapons due to their innate versatility between the two elements. Our Offhand recommendation focuses on Heavy attacks for early game, and Arcane Bombs for late game.
When you reach endgame, fire damage is still your priority but with the added Mage's Gambit that can swap between Fire and Electric. This should help you be more flexible for difficult fights later in the game.
Best Spellblade Gear
While it does not matter what you equip in the early game, anything you come across with Fire or Electric Damage and Strike Ability Damage can lead you towards building your Endgame gear.
Make sure you pick up Focus of the Veil and Brass Roots as these will significantly boost the damage for all your Electric spells.
Best Spellblade Runes
| Rune | Pros & Cons | |
|---|---|---|
| Early Game | ||
|
Besiege Besiege |
• Probably the best rune to slot in the early game. • Bypasses Barrier attack damage penalty altogether, making sure you are breaking it the fastest way possible. • Use this if enemies have the blue barrier meter up. |
|
|
Ravage Ravage |
• A straight up damage boost against enemies. • Deals +50% damage when the enemies are reduced to their red health. • Great for finishing off enemies. |
|
|
Upend Upend |
• Converts all your resistances to offensive damage bonuses of the same type. • Works well with the armor enchantments we slotted in! |
|
| End Game | ||
|
Escalate Escalate |
• Enhances your next ability with more damage. • Great for maxing out the damage of your highest damaging abilities. |
|
|
Ravage Ravage |
• Use only when Barriers/Armor is destroyed. • Ideal for finishing off enemies. |
|
|
Scorch Scorch |
• Can work in tandem with Shocking Weapons. • Great for inflicting Burning. |
In the early game, your runes will be mostly for damage boosts since most of your abilities can shred Barriers/Armor.
By endgame, Ravage will still be viable for damage boosts but is paired together with Escalate now, while Scorch will work in tandem with Shocking Weapons.
Best Spellblade Companions
Early Game Companions
| Companion | Build |
|---|---|
 Lucanis Lucanis
|
Skills: Debilitate Lucanis opens up his enemies with a debilitating strike. Deals high Stagger.
Abominate Lucanis sweeps the area with demonic strength. Deals high Barrier damage and applies Knocked Down to enemies in the area.
Soothing Potion (Lucanis) Grants Rejuvenation to heal for 600. A Talon is ready for anything and never without a potent concoction on hand. Lucanis tosses a restorative tincture to you, granting Rejuvenation.
Equipment: Main Weapon: Crowkeeper Crowkeeper Physical
With Lucanis in the party, your Critical Ability hits apply Bleeding If the enemy is at maximum Bleeding stacks, they are also afflicted with Necrosis. Keepsake: Butcher's Screw Butcher's Screw Physical
Attack My Target applies Vulnerability to Necrotic damage Armor: Wings of Antiva Wings of Antiva Detonations deal an additional 100 Necrotic damage
|
 Harding Harding
|
Skills: Heavy Draw Harding draws her bowstring back as far as it will go, unleashing a devastating shot. Deals high Stagger.
Soothing Potion (Harding) An expert scout carries only the best resources. This special brew is a pick-me-up like no other. Harding tosses a restorative tincture to you, granting Rejuvenation.
Shred Harding shreds her opponent’s defenses with a decisive shot. Deals high Stagger.
Equipment: Main Weapon: My Regards My Regards Physical
Attack My Target deals +300% damage vs. Staggered enemies +25% Staggered duration Keepsake: Secrets and Memories Secrets and Memories Healing
18% Increased Healing +20% Critical damage Critical Hits vs. Bleeding enemies add 1 stack of Bleeding Armor: Spelunker's Gear Spelunker's Gear +50% Sundered duration
Harding deals +50% damage vs. Sundered enemies Trinket: Orlesian Sovereign Orlesian Sovereign Gain Precision the first time Harding uses an Ability during each encounter
Precision now also grants +25% Penetration for its Critical hit |
Lucanis and Harding work well together since their abilities are capable of doing Primer + Detonation combos.
Make sure to use Soothing Potion whenever you can since the Spellblades like to get up close and personal.
Endgame Companions
| Companion | Build |
|---|---|
 Taash Taash
|
Skills: Dragonfire Strike Taash lands a fiery overhead strike that leaves enemies concussed, confused, and burning. Applies Burning on hit.
Spitfire Taash spits a searing burst of flame that takes the fight out of the foe. Deals high Stagger.
Dragon's Roar Taash roars with draconic fury, drawing enemy attention. Taunts enemies in the area, forcing them to briefly focus their attacks on Taash. Does not affect some of the strongest boss enemies.
Equipment: Main Weapon: Golden Locus Golden Locus Physical
Attack My Target deals +25% damage vs. health; this bonus is doubled vs. Dragons Attack My Target's damage bonus is now tripled vs. Dragons Keepsake: Jade Cleaver Jade Cleaver Physical
The entire party gets +1 maximum Burning stacks Taash's basic attacks can interrupt Burning stacks Armor: Strong Arm Strong Arm Overwhelemed enemies have reduced Fire Resistance
Bonuses to Overwhelmed effectiveness are also applied to this Fire Resistance reduction Trinket: Numbing Herbs Numbing Herbs All of Taash's Abilities apply Burning
Burning applied by Taash reduces enemy Defense by -15% per stack |
 Lucanis Lucanis
|
Skills: Debilitate Lucanis opens up his enemies with a debilitating strike. Deals high Stagger.
Eviscerate Lucanis deals a decisive blow, targeting an enemy’s weakest point. At half health or less, this deals bonus damage, increasing in effectiveness the closer the target is to death. Detonates Overwhelmed.
Abominate Lucanis sweeps the area with demonic strength. Deals high Barrier damage and applies Knocked Down to enemies in the area.
Equipment: Main Weapon: Trevisan Poignard Trevisan Poignard Physical
Using Lucanis' Abilities grants you +10% Ultimate Keepsake: God's Foil God's Foil Physical
Attack My Target has +50% Penetration Enemies already Afflicted with Bleeding gain another stack. Armor: Corvid Cloak Corvid Cloak Detonating an Overwhelmed enemy applies Bleeding
If the Detonated enemy already has Bleeding, deal an additional 100 Necrotic damage Trinket: |
For endgame, Taash becomes viable due to the increased Fire Damage and Burning affliction, while Lucanis now applies Shocked and can detonate Overwhelmed on his enemies which works in tandem your kit.
How to Play the Spellblade
The Spellblade is a specialization for the Mage that uses blades imbued by magic instead of the generic elemental staves. They also fight in melee range and therefore play like a Rogue more than the stereotypical Mage that casts spells from long range.
- Use The Mageknife or Spellblade
- Create and Trigger Arcane Bombs
- Parry Attacks for Extra Damage!
- Use Crowd Control At All Times!
- Switch to Staff When Attacking from Range
Use The Mageknife or Spellblade
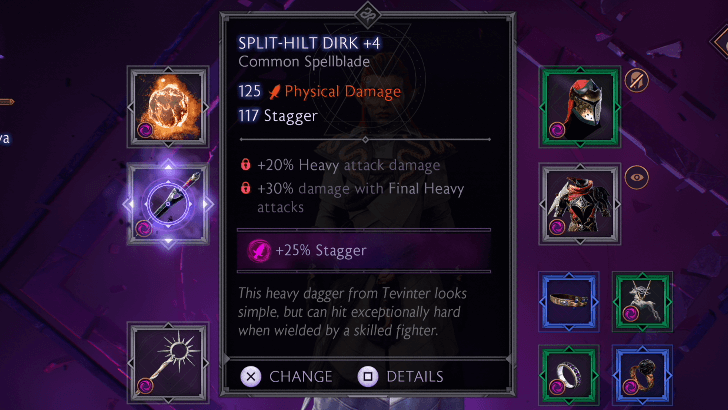
The Spellblade uses the Mageknife or Spellblades as their primary weapon. It is a dagger-like weapon imbued by magic and is usually paired with an elemental orb. The orb slotted with the Mageknife dictates the element associated with it.
Create and Trigger Arcane Bombs
The main bread-and-butter combo for a Spellblade is their utilization of Arcane Bombs by accumulating Arcane Marks on enemies. Arcane Marks are accumulated using the dagger's Light attacks with three (3) Arcane Marks producing an Arcane Bomb.
Trigger Arcane Bombs with Heavy Attacks
When Arcane Bombs are primed on enemies, Spellblades must trigger them for big damage! Arcane Bombs are triggered using Heavy Attacks or the Spinning Blade move on the fourth attack of the Light Attack chain when the Spirit Blade skill has been unlocked.
Take note that normal Heavy Attacks have a winding animation that leaves you exposed to attacks, so be careful. Also, getting attacked mid-combo resets the Light attack chain count so the spinning blade move won't trigger if you get interrupted.
Parry Attacks for Extra Damage!
Because Mageknives and Spellblades are considered melee weapons, they have access to a parry. Spellblade users can parry attacks by tapping the block button as the attack is about to hit them. The game conveniently shows an indicator on top of the Rook's head when they are about to be hit, and the parry window is when the indicator is glowing Yellow.
Use Crowd Control At All Times!
Crowd Control is extremely important in Dragon Age: The Veilguard, and thankfully the Spellblade have access to a bunch of Crowd Control skills. The most important one is Storm Surge which interrupts enemies from attacking while causing the Rook to leap backwards, creating a safe distance when in a pinch.
Storm Surge also applies Overwhelm, so you can order your capable companions to trigger that for bonus Stagger damage!
Switch to Staff When Attacking from Range
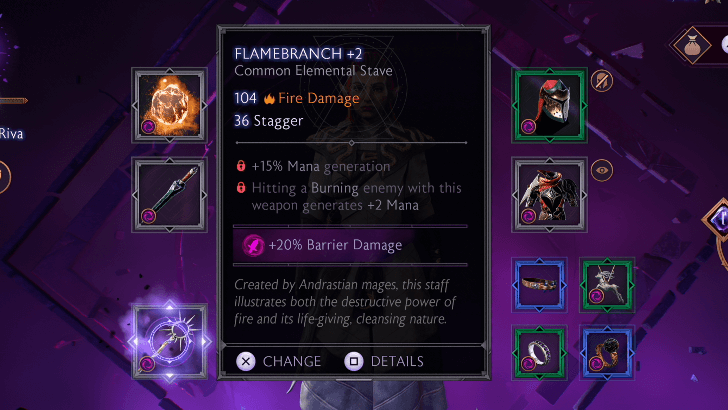
If you find yourself in a situation that prohibits you from getting close to an enemy, you can switch to your Staff to deal damage from long range. This won't be as effective as the Mageknives, but it is helpful in minimizing DPS loss.
Dragon Age: The Veilguard Related Guides

All Classes, Specializations, and Best Builds
List of Class and Specialization Builds
| Warrior Class | ||
|---|---|---|
 Champion Champion |
 Slayer Slayer |
 Reaper Reaper |
| Mage Class | ||
 Death Caller Death Caller |
 Spellblade Spellblade |
 Evoker Evoker |
| Rogue Class | ||
 Duelist Duelist |
 Veil Ranger Veil Ranger |
 Saboteur Saboteur |
Comment
Initially looked like a good build but taking medium armour mastery but suggesting heavy armour for the build makes me think it's dodgy
Author
Spellblade Build and Best Skills
improvement survey
03/2026
improving Game8's site?

Your answers will help us to improve our website.
Note: Please be sure not to enter any kind of personal information into your response.

We hope you continue to make use of Game8.
Rankings
- We could not find the message board you were looking for.
Gaming News
Popular Games

Genshin Impact Walkthrough & Guides Wiki

Honkai: Star Rail Walkthrough & Guides Wiki

Umamusume: Pretty Derby Walkthrough & Guides Wiki

Pokemon Pokopia Walkthrough & Guides Wiki

Resident Evil Requiem (RE9) Walkthrough & Guides Wiki

Monster Hunter Wilds Walkthrough & Guides Wiki

Wuthering Waves Walkthrough & Guides Wiki

Arknights: Endfield Walkthrough & Guides Wiki

Pokemon FireRed and LeafGreen (FRLG) Walkthrough & Guides Wiki

Pokemon TCG Pocket (PTCGP) Strategies & Guides Wiki
Recommended Games

Diablo 4: Vessel of Hatred Walkthrough & Guides Wiki

Fire Emblem Heroes (FEH) Walkthrough & Guides Wiki

Yu-Gi-Oh! Master Duel Walkthrough & Guides Wiki

Super Smash Bros. Ultimate Walkthrough & Guides Wiki

Pokemon Brilliant Diamond and Shining Pearl (BDSP) Walkthrough & Guides Wiki

Elden Ring Shadow of the Erdtree Walkthrough & Guides Wiki

Monster Hunter World Walkthrough & Guides Wiki

The Legend of Zelda: Tears of the Kingdom Walkthrough & Guides Wiki

Persona 3 Reload Walkthrough & Guides Wiki

Cyberpunk 2077: Ultimate Edition Walkthrough & Guides Wiki
All rights reserved
© 2024 Electronic Arts Inc.
The copyrights of videos of games used in our content and other intellectual property rights belong to the provider of the game.
The contents we provide on this site were created personally by members of the Game8 editorial department.
We refuse the right to reuse or repost content taken without our permission such as data or images to other sites.


![Everwind Review [Early Access] | The Shaky First Step to A Very Long Journey](https://img.game8.co/4440226/ab079b1153298a042633dd1ef51e878e.png/thumb)

![Monster Hunter Stories 3 Review [First Impressions] | Simply Rejuvenating](https://img.game8.co/4438641/2a31b7702bd70e78ec8efd24661dacda.jpeg/thumb)


As others said, this build has severe issues and discrepancies. Unfortunately, is the only build I can find online which uses Meteor and not only boring thunder spells.