This survey will take about 1 minute.
Your answers will help us to improve our website.
Outriders
How to Beat Shaman Warlord | Boss Fight Strategy Guide

This is a guide to beating the Shaman Warlord in Babylon in the game Outriders. This article provides information on Shaman Warlord, as well as tested strategies for beating them.
Shaman Warlord Information
Basic Information
While not the strongest of Ferals in brute strength, the Shaman Warlord is the most capable at manipulating the Anomaly's power to deadly effect. In contrast to most other Ferals, they wear little protective gear, and depend more on their powers to prevent injury.
Tips and Strategies
General Tip
This fight is not a sprint, it's a marathon. Winning requires mastery of positioning, timing, and reflexes. Treat it as a training ground for when you face the Final Boss.
Unlike most Elites you've fought so far, the Shaman Warlord is a rare exception from Elites that come at you with gunfire or melee attacks.
The Shaman Warlord utilizes Anomaly power better than any enemy you've faced so far, Outrider.
Essential Shards
If you have gear with these Shards, we recommend to max them out, especially Status Power before facing the Shaman Warlord.
Bonus Firepower
|
Increases weapon damage |
|---|---|
Status Power |
Increases damage of Burn, Toxic, and Bleed. Increase duration of Ash, Weakness, Vulnerable |
Weapon Life Leech |
Percentage of Health regained by dealing weapon damage |
Max Health |
Additional Health points |
Recommended Mod Pairings
As mentioned, this fight is a marathon. These Mod-sets were selected to deal heavy damage over time.
Toxic Set
 Improved Toxic Bullets Improved Toxic Bullets
|
 Radical Therapy Radical Therapy
|
 Toxic Piercer Toxic Piercer
|
Burn Set
 Bullet Kindling Bullet Kindling
|
 Improved Burning Bullets Improved Burning Bullets
|
 Twice as Hot Twice as Hot
|
Bleed Set
 Bloody Boost Bloody Boost
|
 Improved Bleeding Bullets Improved Bleeding Bullets
|
 Blood Potion Blood Potion
|
Take the High Ground
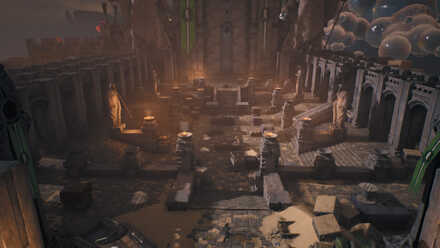
Here is an overview of the battle field. Berserkers will charge at you from the center, but the center is a deadman's zone.
The right wing has blockades where enemy groups could trap you. The left wing is free from any obstruction and holds the Ammo Stockbox at the end of the hall.
Berserkers First
Berserkers will be the first ones to charge at you. Eliminating them at once should be the top of your to-do list every time they are spawned. Some of these Berserkers inflict Freeze and most of them inflict Bleed on contact.
Elite Backup
Once the Warlords are spawned, your priority will change. Eliminate the two Warlords before they have a chance to use Stone Skin Aura and reinforce the Armor of every Feral in the field.
Overload
Overload works in the same way as Moloch's Solar Blast. The difference is that Shaman Warlord not only sets up an anomaly barrier as he charges the attack, but also follows your movement as he charges it.
If you have successfully eliminated the Berserkers, you can use the obstructions in the field as shield covers to wait out the attack unharmed.
Grasping Shock
Grasping Shock is a wide AoE attack that temporarily incapacitates your character if caught in its zone. Shaman Warlord will spam this attack along with Anomaly Rifts, making this fight a real "dance of death".
Anomaly Rifts
Shaman Warlord summons an Anomaly rift that shoots out Anomaly Energy. These floating blue orbs can take a lot of gunfire, but most Anomaly-based atttacks are more effective in destroying it.
However, you don't have to waste bullets or time (on skill cooldowns) on it since it disappears after 25 seconds. You only need to keep out of sight from it so it can't shoot at you.
Guerilla Tactics
If you have Anomaly-Power Rounds, unload your magazine on the Shaman Warlord. Then switch to a weapon with a Status Effect-inducing mod attached. You don't have to unload a whole magazine on the Shaman Warlord, just inflict it with a Status Effect while you wait for your Anomaly-powered Rounds to finish cooldown.
Using the pillars on the left wing as shielding, position yourself so that you can take aim at the Shaman Warlord but the Anomaly Rift can't take aim at you.
For reference:
| |
Deals damage equal to 2.5% of your Ability Power every 0.5 seconds for 5 seconds |
| |
Deals damage equal to 3.7% of your Ability Power every 0.5 seconds for 6 seconds |
| |
Deals damage equal to 3.5% of your Ability Power every 0.5 seconds for 6 seconds. |
Boss Battle Related Articles
| Rift Town | |
|---|---|
| Reunion | Gauss |
| First City | |
| Dedication | Juggernaut Captain |
| Salvation | Captain Serrano |
| Eagle Peaks | |
| Inferno | Molten Acari |
| Frequency | Frequency Triad |
| Wreckage Zone | |
| Mentor | Brood Mother |
| No Man's Land (Trench Town) | |
| Onslaught | Moloch |
| Quarry | |
| Expedition | Behemoth |
| Forest Enclave | |
| Mayhem | Chrysaloid |
| Asylum | Scarskin |
| The Stronghold | |
| Judgment | Kang's Enforcer |
| Ancient Ruins | |
| Relics | Altered Bailey |
| The Gate | |
| Retaliation | Kang's Huntmaster |
| Frontier | Mosscloak Behemoth |
| Dunes | |
| Beyond | Wasteland Behemoth |
| Warlord | |
| Utargak | |
| Bonds | Yagak |
| Desolate Fort | |
| Echoes | Skirmisher Warlord |
| Pax City | |
| Babylon | Shaman Warlord |
| The Caravel | |
| Humanity | Yagak |
Author
How to Beat Shaman Warlord | Boss Fight Strategy Guide
Please participate in our site
improvement survey
03/2026
improvement survey
03/2026
Would you assist in
improving Game8's site?
improving Game8's site?

×
We are listening to our users' valuable opinions and discussing how to act on them.
The information collected through this survey will be used for the purpose of improving our services. In addition, the information will only be disclosed a part of a statistic in a format that will not allow identification of personal information.
Begin Survey
Not Now
×
Please rate each item regarding Game8.co's Advertisements.
Amount of Ads
Very Dissatisfied
Somewhat Dissatisfied
Fine
Somewhat Satisfied
Highly Satisfied
Placement of Ads
Timing of Ad Display
Ad Loading Speed
Safeness of Ads
Content of Ads
×
Please rate each item regarding Game8.co's Quality of Articles.
Amount of information
Very Dissatisfied
Somewhat Dissatisfied
Fine
Somewhat Satisfied
Highly Satisfied
Frequency of updates
Speed of new information
Accuracy of articles
Understandibility of articles
Readability of sentences
×
Please rate each item regarding Game8.co's Usability of the Site.
Ease of finding information
Very Dissatisfied
Somewhat Dissatisfied
Fine
Somewhat Satisfied
Highly Satisfied
Loading Speed
Use of Color
Font Size
Visibility of Images
Easy to Understand Layout
×
Please rate each item regarding Game8.co's Message Boards, Comments.
Ease of Writing
Very Dissatisfied
Somewhat Dissatisfied
Fine
Somewhat Satisfied
Highly Satisfied
Readability
Ease in Finding Information
Comment Quality
Comment Quantity
Admin Response
×
Please rate each item regarding Game8.co's Site's new design.
Please rate our site's new design
Very Dissatisfied
Somewhat Dissatisfied
Fine
Somewhat Satisfied
Highly Satisfied
Do you think that the website's design change makes the site easier to use?
Has the new design made it easier for you to find information on the site?
Has the new design improved the overall visual appeal of the site?
How would you rate your overall satisfaction with the new design of the site?
×
How likely are you to recommend Game8 to someone you know?
Very Unlikely
0
1
2
3
4
5
6
7
8
9
10
Very Likely
If you have other opinions regarding potential improvement to the website, please share them with us. We would appreciate your honest opinion.
Note: This is a free response section, so you can proceed without entering anything.
Note: Please be sure not to enter any kind of personal information into your response.
Note: Please be sure not to enter any kind of personal information into your response.
×
Thank You
×
Thank you for participating in our survey! Your answers will help us to improve the quality of our website and services.
We hope you continue to make use of Game8.
We hope you continue to make use of Game8.
Close
Rankings
- We could not find the message board you were looking for.
Gaming News


![Monster Hunter Stories 3 Review [First Impressions] | Simply Rejuvenating](https://img.game8.co/4438641/2a31b7702bd70e78ec8efd24661dacda.jpeg/thumb)
Popular Games

Genshin Impact Walkthrough & Guides Wiki
Honkai: Star Rail Walkthrough & Guides Wiki
Umamusume: Pretty Derby Walkthrough & Guides Wiki
Pokemon Pokopia Walkthrough & Guides Wiki
Resident Evil Requiem (RE9) Walkthrough & Guides Wiki
Monster Hunter Wilds Walkthrough & Guides Wiki
Wuthering Waves Walkthrough & Guides Wiki
Arknights: Endfield Walkthrough & Guides Wiki
Pokemon FireRed and LeafGreen (FRLG) Walkthrough & Guides Wiki
Pokemon TCG Pocket (PTCGP) Strategies & Guides Wiki


Recommended Games
Diablo 4: Vessel of Hatred Walkthrough & Guides Wiki
Cyberpunk 2077: Ultimate Edition Walkthrough & Guides Wiki
Fire Emblem Heroes (FEH) Walkthrough & Guides Wiki
Yu-Gi-Oh! Master Duel Walkthrough & Guides Wiki
Super Smash Bros. Ultimate Walkthrough & Guides Wiki
Pokemon Brilliant Diamond and Shining Pearl (BDSP) Walkthrough & Guides Wiki
Elden Ring Shadow of the Erdtree Walkthrough & Guides Wiki
Monster Hunter World Walkthrough & Guides Wiki
The Legend of Zelda: Tears of the Kingdom Walkthrough & Guides Wiki
Persona 3 Reload Walkthrough & Guides Wiki


All rights reserved
OUTRIDERS © 2021 Square Enix Limited. All rights reserved. Developed by PCF Group S.A. SQUARE ENIX and the SQUARE ENIX logo are registered trademarks or trademarks of Square Enix Holdings Co., Ltd. OUTRIDERS is a registered trademark or trademark of Square Enix Ltd. People Can Fly and the People Can Fly logo are registered trademarks of PCF Group S.A. “PlayStation” and the “PS” Family logo are registered trademarks and “PS5, PS4” are trademarks of Sony Interactive Entertainment Inc.
The copyrights of videos of games used in our content and other intellectual property rights belong to the provider of the game.
The contents we provide on this site were created personally by members of the Game8 editorial department.
We refuse the right to reuse or repost content taken without our permission such as data or images to other sites.