 Crossed Roads
This survey will take about 1 minute.
Your answers will help us to improve our website.
Fire Emblem Warriors Three Hopes
Chapter 13 Walkthrough - Darkness Attacks (Golden Wildfire)
Check out our:
★ Story Walkthrough for how to get S Rank Rewards and the Best Responses to Support Conversations!
★ Character Tier List / Class Tier List for party building!
★ List of Characters for guides on recruiting all characters and their best classes.
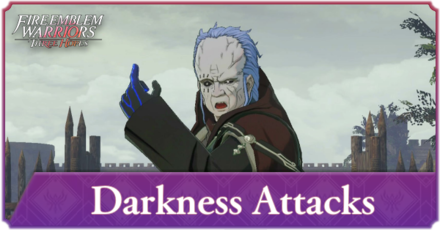
Darkness Attacks is Chapter 13 of the Golden Wildfire Route in Fire Emblem Warriors Three Hopes. Read on to learn about the different quests, survey spots, rewards, and support conversations within the chapter, as well as our walkthrough for its main quest!
| ⮜ Previous Chapter | Next Chapter ⮞ |
|---|---|
| Chapter 12: Two Kings |
Chapter 14: A Symbol of the Past |
List of Contents
Darkness Attacks Recruitable Characters
| All Recruitable Characters in Darkness Attacks | ||
|---|---|---|
 Dorothea Dorothea
|
||
You'll need to use the Persuade Dorothea strategy to get the opportunity to recruit her. When the side objective is given to escort her, stick close to her so that you can easily rescue her from enemies that will block the way.
Recruitment Guide: How to Recruit Units
Darkness Attacks Quests, Survey Spots, and Rewards
Darkness Attacks Quests
| Quest | Type | Rewards |
|---|---|---|
| The Pacification of Ordelia | Main |
S Rank Reward: Sword of Begalta x1
First Time Reward: Master Seal x1 |
| A Falling-Out | Side |
S Rank Reward: Brave Bow x1
Capture Reward: 7,200 G |
| Establish a Frontline Response Base | Side |
S Rank Reward: Bolt Axe x1
Capture Reward: Activity Points Recovered: 1 |
| Keep the Peace | Side |
S Rank Reward: Extra Large Bullion x1
Capture Reward: Training Points Recovered: 1 |
| Prevent the Bandit's Escape | Side |
S Rank Reward: Master Seal x1
Capture Reward: 7,200 G |
| Reinforce Hrym Terriitory | Side |
S Rank Reward: Cursed Ashiya Sword x1
Capture Reward: Activity Points Recovered: 1 |
| An Unsettling Report | Side |
S Rank Reward: Fruit of Llife x1
Capture Reward: 7,200 G |
| Seek Out Information | Side |
S Rank Reward: Arrow of Indra x1
Capture Reward: Training Points Recovered: 1 |
| A Reason to Fight | Paralogue |
S Rank Reward: Sauin Militia x1
First Time Reward: Speedwing x1 |
Darkness Attacks Survey Spots
| Side Mission | Survey Spot | Type | Reward / Conditions |
|---|---|---|---|
| A Falling-Out | House | Visit | Reward: Lavish Building Material x16, Elite Training Gear x6, and Storage Compartment x6 |
| A Falling-Out | House | Meet Conditions |
Survey Conditions: Trade Arithmetic Textbook
Reward: Fears and Frights of Fodlan |
| Establish a Frontline Response Base | House | Visit | Reward: Lavish Building Material x16 and Purveyor's License x10 |
| Establish a Frontline Response Base | Stronghold | Meet Conditions |
Survey Conditions: Defeat at least 2000 enemies in the chapter.
Reward: Free Forge Uses: 10 |
| Keep the Peace | Stronghold | Visit | Reward: Lavish Building Material x16 and Advanced Combat Manual x12 |
| Keep the Peace | Tent | Choice | Reward: Raise Morale for 2 units of choice. |
| Prevent the Bandit's Escape | Stronghold | Visit | Reward: Build Bridge |
| Prevent the Bandit's Escape | Tower | Choice | Reward: Raise Combat Art Level for Lances for one unit. |
| Reinforce Hrym Terriitory | Stronghold | Visit | Reward: Lavish Building Material x16, Hero's Insignia x6, and Master Smithing Set x12 |
| Reinforce Hrym Terriitory | House | Choice | Reward: White Verona or Ailell Pomegranate |
| An Unsettling Report | Cave | Visiit | Reward: Item Shop Restocked |
| An Unsettling Report | House | Meet Conditions |
Survey Conditions: Must complete all side missions in this area.
Reward: Dancer Class unlocked. |
| An Unsettling Report | Stronghold | Visit | Reward: Lavish Building Material x16 and Luxurious Furnishings x6 |
| An Unsettling Report | Tower | Choice | Reward: Raise the Res. of one unit. |
| Seek Out Information | Mine | Pay |
Gold Required: 2, 500 G
Reward: Wooz Steel x20 |
| Seek Out Information | Tent | Visit | Reward: Seal the Back Route |
| Seek Out Information | House | Choice | Reward: Arcane Crystal or Mythril |
| Seek Out Information | Mine | Meet Condition |
Survey Conditions: Must attain Battle Rank S on any difficulty.
Reward: Umbral Steel x20 |
The Pacification of Ordelia Strategies and Walkthrough
Recommended Strategies for The Pacification of Ordelia
| Strategy | Description | Cost |
|---|---|---|
| Build Bridge | Build a bridge to create a new path. | 20 (SB) / 30 (GW) |
| Persuade Dorothea | Convince an enemy general to join your army. | 10 (AG) / 30 (GW) |
| Archer Protection | Assign an archer unit to protect allies as they advance. | 10 |
The Pacification of Ordelia Objectives
| Victory Condition | Defeat Condition |
|---|---|
| Rescue the citizens. | The evacuation shelter is captured. |
|
Main Objectives
1. Defeat the Bow Knight and quickly aid Hanneman! 2. Defeat Pallardó and aid Manuela! 3. Defeat the real Pallardó! 4. Defeat Metodey! 5. Defeat the demonic beast! 6. Defeat Solon! 7. Defeat the Mysterious Mages to bring down the Wall of Darkness! Side Objectives ・ Defeat the Thieves and rescue the Citizens! ・ Defeat Pallardó's subordinate and reclaim the stolen goods! ・ Escort Dorothea to the Evacuation Shelter and recruit them! |
|
The Pacification of Ordelia Walkthrough
| Objectives | |
|---|---|
| 1 | 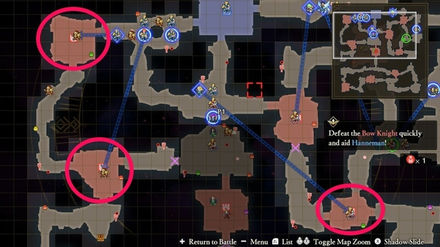 Defeat the Bow Knight and quickly aid Hanneman! In addition to sending units to protect Hanneman, make sure to send at least one unit each to all available strongholds, particularly those encircled above. The encircled Strongholds will also be the location of Citizens you'll need to rescue. |
| 2 | 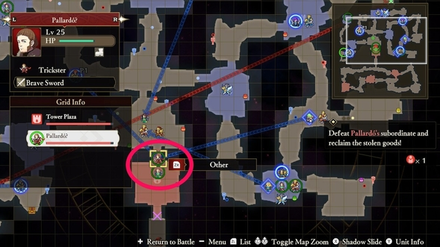 Defeat Pallardó and aid Manuela! Send all available units to fight Pallardó and a few Bow Knights. Don't send units that are still escorting Citizens. |
| 3 | 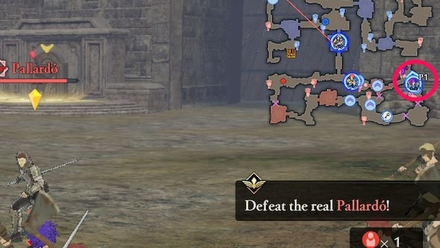 Defeat the real Pallardó! Let the real Pallardó run from you until you reach the drawbridge area, which is encircled above. Defeat him here then bring the drawbridge down. Bringing this down gives you an additional route and also makes it easier for Dorothea to get back to the Evacuation Shelter later on. |
| 4 | 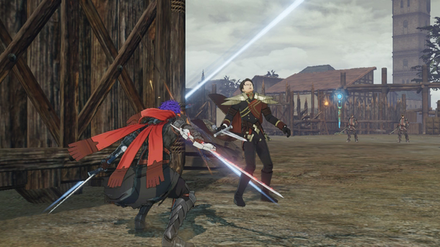 Defeat Metodey! Lead Metodey into the nearest Stronghold. At this point, you should have been able to build up your Warrior Gauge. Use your special attack to immediately clear a Stronghold and beat Metodey. |
| 5 | 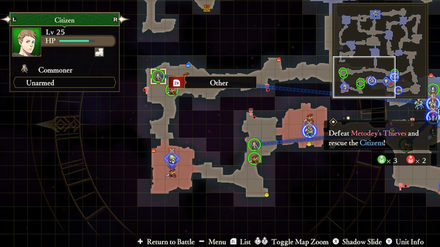 While fighting Metodey, split your units and send at least one to each of the new Strongholds. Citizens that you'll need to protect will appear nearby. |
| 6 |  Defeat the demonic beast! If you've already taken the Strongholds, you can send all units except for a single controllable one to attack the demonic beast. |
| 7 | 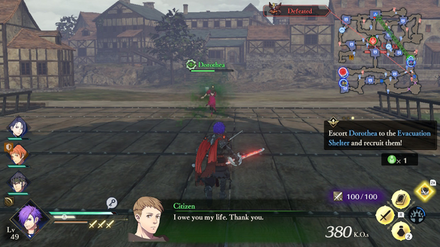 Escort Dorothea to the Evacuation Shelter and recruit them! Dorothea will get poisoned. If you recruit her, use the lone controllable unit to guard her as she makes her way back. Time is of the essence so don't switch to any other unit while escorting her. Get ahead of her and clear the way of enemies to make the path safer. |
| 8 | Once Dorothea's safe, send the remaining unit to the Demonic Beast. Unleash all your attacks to beat it. |
| 9 | 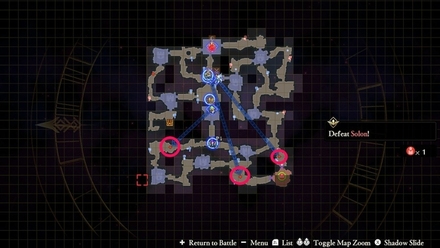 Defeat Solon! Instead of sending all your units to Solon, send one to each of the encircled areas in the map. You'll need to defeat Mages that appear here to reach Solon since he'll be blocked off by a wall. Leave the rest of the units near the wall. |
| 10 | 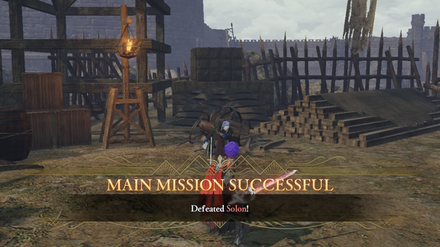 Defeat the Mysterious Mages to bring down the Wall of Darkness! Once you defeat the Mages, switch to your units near Solon and beat him. He'll cast a number of spells but can be easily overwhelmed. |
Darkness Attacks Support and Romance Conversations
In Camp
 Claude
(Cutscene) Claude
(Cutscene) |
Prompt: | We don't know what's motivating the attacks, but survivors claim to have spotted some suspicious figures working alongside the bandits. | ||
|---|---|---|---|---|
| Answers: | Reactions: | |||
| Guess they're the Knights of Seiros. | None | |||
| Say you have a hunch about who they are. | +1 Support with Claude | |||
|
Claude
|
Prompt: | It's entirely possible that whoever's doing this doesn't want that to happen. | ||
| Answers: | Reactions: | |||
| Agree it can't be a coincidence. | +1 Support with Claude | |||
| Give it some thought. | None | |||
 Hilda Hilda
|
Prompt: | I'm more worried about the fact that there were so many bandits lurking around Leicester in the first place. | ||
| Answers: | Reactions: | |||
| Agree it's a problem. | +1 Support with Hilda | |||
| Tell her it's always been this way. | None | |||
 Lorenz Lorenz
|
Prompt: | Are you not curious to find out if you do? | ||
| Answers: | Reactions: | |||
| Admit you're curious. | +1 Support with Lorenz | |||
| Claim you're not curious. | None | |||
 Raphael Raphael
|
Prompt: | I gotta start workin' my upper body to keep everything balanced. | ||
| Answers: | Reactions: | |||
| Be skeptical. | +1 Support with Raphael | |||
| Scold him. | None | |||
 Lysithea Lysithea
|
Prompt: | If those who slither in the dark are behind, I swear I will make them suffer! | ||
| Answers: | Reactions: | |||
| Try to calm her down. | None | |||
| Apologize. | +1 Support with Lysithea | |||
 Marianne Marianne
|
Prompt: | He even told me to return safely. What has gotten into him? | ||
| Answers: | Reactions: | |||
| Who knows? | None | |||
| He was showing that he cares. | +1 Support with Marianne | |||
 Bernadetta Bernadetta
|
Prompt: | I have no clue where I am. The Alliance? No, wait, it's the Federation now...right? | ||
| Answers: | Reactions: | |||
| Sympathize with her. | +1 Support with Bernadetta | |||
| Tell her where you are. | None | |||
 Petra Petra
|
Prompt: | I am having a better time fighting in this situation. What about you? | ||
| Answers: | Reactions: | |||
| Definitely better. | +1 Support with Petra | |||
| Definitely worse. | None | |||
 Balthus Balthus
|
Prompt: | Ordelia territory's taking a beating. We gotta get out there and help them. | ||
| Answers: | Reactions: | |||
| Ask him why. | None | |||
| Offer to help him out. | +1 Support with Balthus | |||
 Constance Constance
|
Prompt: | But now... We've mobilized our forces and prioritized aiding the people, rather than the war itself. I feel misty-eyed with gratitude. | ||
| Answers: | Reactions: | |||
| Express relief. | None | |||
| Express shock about her past. | +1 Support with Constance | |||
 Hapi Hapi
|
Prompt: | It's like I sense...darkness? Or something like that. It's hard to put into words.? | ||
| Answers: | Reactions: | |||
| Ask about the darkness. | +1 Support with Hapi | |||
| Say you sense it too. | None | |||
Between Battles
| There doesn't appear to be any conversations that affect Support between this Chapter's battles. |
Fire Emblem Warriors: Three Hopes Related Guides
Story Walkthrough: List of Chapters
All Story Walkthroughs
All Paralogues
Author

Chapter 13 Walkthrough - Darkness Attacks (Golden Wildfire)
Please participate in our site
improvement survey
03/2026
improvement survey
03/2026
Would you assist in
improving Game8's site?
improving Game8's site?

×
We are listening to our users' valuable opinions and discussing how to act on them.
The information collected through this survey will be used for the purpose of improving our services. In addition, the information will only be disclosed a part of a statistic in a format that will not allow identification of personal information.
Begin Survey
Not Now
×
Please rate each item regarding Game8.co's Advertisements.
Amount of Ads
Very Dissatisfied
Somewhat Dissatisfied
Fine
Somewhat Satisfied
Highly Satisfied
Placement of Ads
Timing of Ad Display
Ad Loading Speed
Safeness of Ads
Content of Ads
×
Please rate each item regarding Game8.co's Quality of Articles.
Amount of information
Very Dissatisfied
Somewhat Dissatisfied
Fine
Somewhat Satisfied
Highly Satisfied
Frequency of updates
Speed of new information
Accuracy of articles
Understandibility of articles
Readability of sentences
×
Please rate each item regarding Game8.co's Usability of the Site.
Ease of finding information
Very Dissatisfied
Somewhat Dissatisfied
Fine
Somewhat Satisfied
Highly Satisfied
Loading Speed
Use of Color
Font Size
Visibility of Images
Easy to Understand Layout
×
Please rate each item regarding Game8.co's Message Boards, Comments.
Ease of Writing
Very Dissatisfied
Somewhat Dissatisfied
Fine
Somewhat Satisfied
Highly Satisfied
Readability
Ease in Finding Information
Comment Quality
Comment Quantity
Admin Response
×
Please rate each item regarding Game8.co's Site's new design.
Please rate our site's new design
Very Dissatisfied
Somewhat Dissatisfied
Fine
Somewhat Satisfied
Highly Satisfied
Do you think that the website's design change makes the site easier to use?
Has the new design made it easier for you to find information on the site?
Has the new design improved the overall visual appeal of the site?
How would you rate your overall satisfaction with the new design of the site?
×
How likely are you to recommend Game8 to someone you know?
Very Unlikely
0
1
2
3
4
5
6
7
8
9
10
Very Likely
If you have other opinions regarding potential improvement to the website, please share them with us. We would appreciate your honest opinion.
Note: This is a free response section, so you can proceed without entering anything.
Note: Please be sure not to enter any kind of personal information into your response.
Note: Please be sure not to enter any kind of personal information into your response.
×
Thank You
×
Thank you for participating in our survey! Your answers will help us to improve the quality of our website and services.
We hope you continue to make use of Game8.
We hope you continue to make use of Game8.
Close
Rankings
- We could not find the message board you were looking for.
Gaming News


![Monster Hunter Stories 3 Review [First Impressions] | Simply Rejuvenating](https://img.game8.co/4438641/2a31b7702bd70e78ec8efd24661dacda.jpeg/thumb)
Popular Games

Genshin Impact Walkthrough & Guides Wiki
Honkai: Star Rail Walkthrough & Guides Wiki
Umamusume: Pretty Derby Walkthrough & Guides Wiki
Pokemon Pokopia Walkthrough & Guides Wiki
Resident Evil Requiem (RE9) Walkthrough & Guides Wiki
Monster Hunter Wilds Walkthrough & Guides Wiki
Wuthering Waves Walkthrough & Guides Wiki
Arknights: Endfield Walkthrough & Guides Wiki
Pokemon FireRed and LeafGreen (FRLG) Walkthrough & Guides Wiki
Pokemon TCG Pocket (PTCGP) Strategies & Guides Wiki


Recommended Games
Diablo 4: Vessel of Hatred Walkthrough & Guides Wiki
Cyberpunk 2077: Ultimate Edition Walkthrough & Guides Wiki
Fire Emblem Heroes (FEH) Walkthrough & Guides Wiki
Yu-Gi-Oh! Master Duel Walkthrough & Guides Wiki
Super Smash Bros. Ultimate Walkthrough & Guides Wiki
Pokemon Brilliant Diamond and Shining Pearl (BDSP) Walkthrough & Guides Wiki
Elden Ring Shadow of the Erdtree Walkthrough & Guides Wiki
Monster Hunter World Walkthrough & Guides Wiki
The Legend of Zelda: Tears of the Kingdom Walkthrough & Guides Wiki
Persona 3 Reload Walkthrough & Guides Wiki


All rights reserved
© Nintendo / INTELLIGENT SYSTEMS © KOEI TECMO GAMES CO., LTD. Fire Emblem and Nintendo Switch are trademarks of Nintendo. © Nintendo.
The copyrights of videos of games used in our content and other intellectual property rights belong to the provider of the game.
The contents we provide on this site were created personally by members of the Game8 editorial department.
We refuse the right to reuse or repost content taken without our permission such as data or images to other sites.
Why is Ingrid in the Support section when she's not recrutable in this route ? An error ?