Chapter 14 Walkthrough - The Absent Emperor (Azure Gleam)
Check out our:
★ Story Walkthrough for how to get S Rank Rewards and the Best Responses to Support Conversations!
★ Character Tier List / Class Tier List for party building!
★ List of Characters for guides on recruiting all characters and their best classes.
The Absent Emperor is Chapter 14 of the Azure Gleam Route in Fire Emblem Warriors Three Hopes. Read on to learn about the different quests, survey spots, rewards, and support conversations within the chapter, as well as our walkthrough for its main quest!
| ⮜ Previous Chapter | Next Chapter ⮞ |
|---|---|
| Chapter 13: A Trick of the Goddess |
Chapter 15: The Hour of Vengeance (If Byleth is recruited) Final Chapter: The End of Tragedy (If Byleth is defeated) |
List of Contents
The Absent Emperor Recruitable Characters
| All Recruitable Characters in The Absent Emperor | ||
|---|---|---|
| There are no recruitable characters in this chapter. | ||
Recruitment Guide: How to Recruit Units
The Absent Emperor Quests, Survey Spots, and Rewards
The Absent Emperor Quests
| Quest | Type | Rewards |
|---|---|---|
| The Chase to Garreg Mach | Main |
S Rank Reward: Amalthea x1
First Time Reward: Master Seal x1 |
| Stamp Out the Survivors | Side |
S Rank Reward: Extra Large Bullion x1
Capture Reward: Activity Points Recovered: 1 |
| Bandit Raid | Side |
S Rank Reward: Sage's Tome+10 x1
Capture Reward: 7,800 G |
| Save the Alliance Army | Side |
S Rank Reward: Sword of Zoltan+10 x1
Capture Reward: Training Points Recovered: 1 |
| Brigands in Siward | Side |
S Rank Reward: The Axe of Zoltan x1
Capture Reward: Activity Points Recovered: 1 |
| A Sudden Insurrection | Side |
S Rank Reward: Master Seal x1
Capture Reward: 7,800 G |
| Establish a Bridgehead | Side |
S Rank Reward: Lance of Zoltan+10 x1
Capture Reward: 7,800 G |
| Cover the Combat Engineers | Side |
S Rank Reward: Ailell Pomegranate x1
Capture Reward: Training Points Recovered: 1 |
The Absent Emperor Survey Spots
| Side Mission | Survey Spot | Type | Reward / Conditions |
|---|---|---|---|
| Stamp Out the Survivors | Cave | Meet Condition |
Survey Conditions: Must complete all side missions in this area.
Reward: 10,000 G |
| Stamp Out the Survivors | Stronghold | Visit | Reward: Lavish Building Material x20 and Elite Training Gear x8 |
| Bandit Raid | Tent | Choice |
Survey Conditions: Watch the knife-throwing act or Watch the magic act.
Reward: Training Points Recovered: 1 (for choosing the Knife-throwing act) or Activity Points Recovered: 1 (for choosing the Magic act) |
| Bandit Raid | Stronghold | Visit | Reward: Lavish Building Material x20, Hero's Insignia x8, and Advanced Combat Manual x15 |
| Save the Alliance Army | House | Meet Condition |
Survey Conditions: Trade Owl Feather x1
Reward: Sunflower x2, Anemone x2, and Carnation x2 |
| Save the Alliance Army | Stronghold | Visit | Reward: Morale Up for two selected units |
| Brigands in the Siward | House | Visit | Reward: Lavish Building Material x20 and Purveyor's License x13 |
| Brigands in the Siward | Tent | Pay |
Gold Required: 2,000 G
Reward: Item Shop Restocked |
| Brigands in the Siward | Stronghold | Visit | Reward: Support Points Up for two selected units |
| Brigands in the Siward | House | Choice | Reward: Giant Shell or Talisman |
| A Sudden Insurrection | Mine | Visit | Reward: Lavish Building Material x20 and Master Smithing Set x15 |
| A Sudden Insurrection | Cave | Visit | Reward: Dex Up for a selected unit |
| Establish a Bridgehead | Tent | Pay |
Gold Required: 1,500 G
Reward: Teutates Loach x3, Airmid Pike x3, and Caledonian Gar x3 |
| Establish a Bridgehead | Stronghold | Choice | Reward: Axe of Zoltan or Bow of Zoltan |
| Establish a Bridgehead | House | Visit | Reward: Lavish Building Material x20, Luxurious Furnishings x8, and Storage Compartment x8 |
| Cover the Combat Engineers | Cave | Visit | Reward: Light the Beacon |
| Cover the Combat Engineers | House | Meet Condition |
Survey Conditions: Must attain Battle Rank S on Cover the Combat Engineers.
Reward: Golden Ring x1 |
The Chase to Garreg Mach Strategies and Walkthrough
Recommended Strategies for The Chase to Garreg Mach
| Strategy | Description | Cost |
|---|---|---|
| Light the Beacon | Light beacons to confuse the enemy and temporarily halt the enemy advance. | 20 (GW) / 30 (AG) |
| Assign Staff Officers | Slightly strengthen allies for a period of time at the start of battle. | 10 |
| Poison Tactic | Begin the battle with the enemy's HP slightly decreased. | 10 |
| Hire Mercenaries | Summon mercenaries to engage the enemy force. Reinforcements will deploy periodcally. | 10 |
The Chase to Garreg Mach Objectives
| Victory Condition | Defeat Condition |
|---|---|
| Defeat Duke Aegir. | Duke Aegir reaches the evacuation point. |
|
Main Objectives
1. Defeat Duke Aegir to prevent them from reaching the evacuation point! 2. Seize the Mountain Trailhead and blockade Duke Aegir's evacuation point! 3. Defeat Caspar and pursue Duke Aegir! 4. Defeat Count Bergliez and pursue Duke Aegir! 5. Defeat Count Bergliez and Count Hevring! 6. Defeat Duke Aegir! 7. Defeat Byleth once and for all! (If Byleth was not recruited) Side Objectives ・ Seize the stronghold to stop the ballistae! |
|
The Chase to Garreg Mach Walkthrough
| Objectives | |
|---|---|
| 1 | 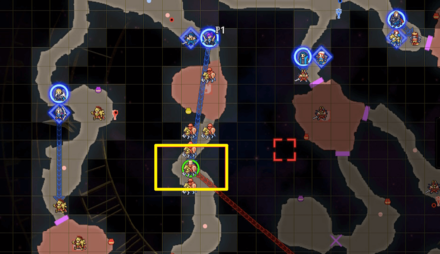 Defeat Duke Aegir to prevent them from reaching the evacuation point! Have Shez chase down Duke Aegir since he is vulnerable to sword wielders. Duke Aegir is located directly below the map where the starting unit is positioned, so just go straight as soon as the battle begins. |
| 2 | 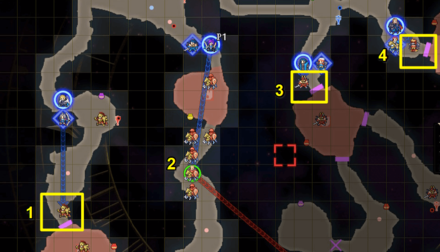 Seize the Mountain Trailhead and blockade Duke Aegir's evacuation point! Command units to defeat the gatekeepers down the 1st, 3rd, and 4th roads and seize the strongholds. Initiate the prompt to Light the Beacon when it appears to confuse the enemy forces and stop them from advancing. |
| 3 | 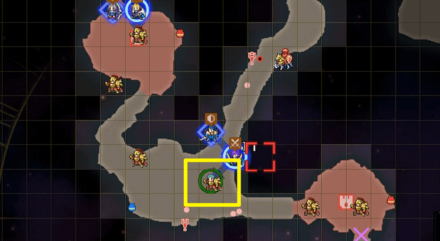 Defeat Caspar and pursue Duke Aegir! After defeating Duke Aegir the first time, Caspar will aid him and he will retreat. You will then have to defeat Caspar. After defeating Caspar, Duke Aegir will start advancing again. Head down the map to where Duke Aegir will be and defeat him once more. |
| 4 | 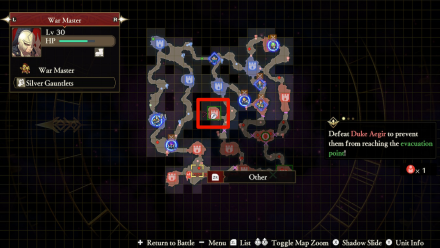 Seize the stronghold to stop the ballistae! Have a unit seize the central stronghold. Be sure to defeat the enemy with a key to be able to open the chest on the northeastern area of the map. |
| 5 | 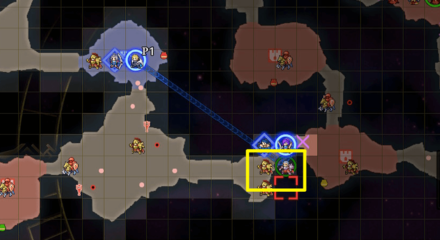 Defeat Count Bergliez! Before Duke Aegir's HP runs out, he will be aided by Count Bergliez. Engage in battle with Count Bergliez. Count Hevring will also heal Count Bergliez after depleting his health. Defeat both of them to be able to open the next gate and continue advancing towards Duke Aegir. |
| 6 | 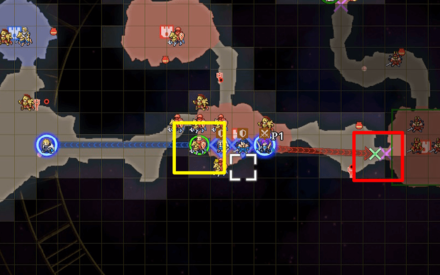 Defeat Duke Aegir! Catch up to Duke Aegir before he reaches the evacuation point! Then engage in combat and finally defeat him. |
| 7 | 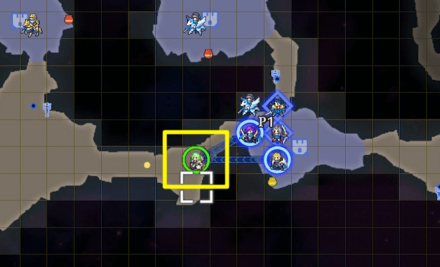 Defeat Byleth once and for all! If Byleth was not recruited, they will appear in their awakened state on the south-west of the map. Command an All Out Offensive on Byleth. Take advantage of each of your units' Warrior Gauge Attacks to deplete Byleth's health significantly! |
The Absent Emperor Support and Romance Conversations
In Camp
 Dimitri Dimitri
|
Prompt: | He said he'd devised a strategy that would keep the enemy at bay using only the Alliance forces. I do hope they are all safe though. | ||
|---|---|---|---|---|
| Answers: | Reactions: | |||
| Express optimism. | +1 Support with Dimitri | |||
| Express doubt. | None | |||
 Felix Felix
|
Prompt: | He still wishes to be the emperor's shield, even though he knows what's going on in the Empire. His sense of duty is admirable. | ||
| Answers: | Reactions: | |||
| He sounds a lot like Dedue. | +1 Support with Dedue | |||
| He sounds a lot like Felix. | +1 Support with Felix | |||
 Ashe Ashe
|
Prompt: | Do you remember Caspar, the Minister of Military Affairs' son? He's an old classmate of ours. | ||
| Answers: | Reactions: | |||
| Say you remember him. | +1 Support with Ashe | |||
| Say you don't remember him. | None | |||
 Annette Annette
|
Prompt: | I wish I knew how I could get that strong. | ||
| Answers: | Reactions: | |||
| Claim it's through efficient training. | +1 Support with Annette | |||
| Calim it's through natural talent. | None | |||
 Ingrid Ingrid
|
Prompt: | Do you think his loyalty is sincere? | ||
| Answers: | Reactions: | |||
| He's being sincere. | +1 Support with Ingrid | |||
| He's being fake. | None | |||
 Linhardt Linhardt
|
Prompt: | Caspar was there as well. Though it would appear he has escaped for the time being. | ||
| Answers: | Reactions: | |||
| Show consideration. | None | |||
| Comment that he's taking it well. | +1 Support with Linhardt | |||
 Ignatz Ignatz
|
Prompt: | If only Holst were here... | ||
| Answers: | Reactions: | |||
| Agree with him. | None | |||
| Act tough. | +1 Support with Ignatz | |||
 Yuri Yuri
|
Prompt: | What's with that look? Is it really so strange that I'm here? | ||
| Answers: | Reactions: | |||
| Say it's strange. | None | |||
| Say it's not strange. | +1 Support with Yuri | |||
 Balthus Balthus
|
Prompt: | There's this guy back in Enbarr that I owe a whole bunch of money to and now he's been captured by the Kingdom army. | ||
| Answers: | Reactions: | |||
| Ask why it's bad news. | None | |||
| Roll your eyes. | +1 Support with Balthus | |||
 Hapi Hapi
|
Prompt: | That gives me an icky feeling. It's almost like we're the bad guys now or something. | ||
| Answers: | Reactions: | |||
| Agree with her. | +1 Support with Hapi | |||
| Remind her that's how you two met. | TBD | |||
 Catherine Catherine
|
Prompt: | Lady Rhea and the others must be near the monastery by now. I sure hope they're safe. | ||
| Answers: | Reactions: | |||
| Reassure her. | +1 Support with Catherine | |||
| Express doubt. | None | |||
 Shamir Shamir
|
Prompt: | Honestly, I would've rather been with Rhea than stuck here. | ||
| Answers: | Reactions: | |||
| Assume she doesn't like the heat./td> | TBD | |||
| Assume she wants to protect the archbishop. | None | |||
| Directly ask why. | +1 Support with Shamir | |||
In Camp (After 1st Side Quest)
 Dimitri Dimitri
|
Prompt: | Prompt | ||
|---|---|---|---|---|
| Answers: | Reactions: | |||
| Answer1 | +1 Support with Dimitri | |||
| Answer2 | +1 Support with Dimitri | |||
Between Battles
| There doesn't appear to be any conversations that affect Support between this Chapter's battles. |
Fire Emblem Warriors: Three Hopes Related Guides

Story Walkthrough: List of Chapters
All Story Walkthroughs
All Paralogues
Comment
Idk if I’m missing something or if it’s something the devs overlooked, but why do we get 70 Strat points when you only need 60 total
Author
Chapter 14 Walkthrough - The Absent Emperor (Azure Gleam)
improvement survey
03/2026
improving Game8's site?

Your answers will help us to improve our website.
Note: Please be sure not to enter any kind of personal information into your response.

We hope you continue to make use of Game8.
Rankings
- We could not find the message board you were looking for.
Gaming News
Popular Games

Genshin Impact Walkthrough & Guides Wiki

Honkai: Star Rail Walkthrough & Guides Wiki

Umamusume: Pretty Derby Walkthrough & Guides Wiki

Pokemon Pokopia Walkthrough & Guides Wiki

Resident Evil Requiem (RE9) Walkthrough & Guides Wiki

Monster Hunter Wilds Walkthrough & Guides Wiki

Wuthering Waves Walkthrough & Guides Wiki

Arknights: Endfield Walkthrough & Guides Wiki

Pokemon FireRed and LeafGreen (FRLG) Walkthrough & Guides Wiki

Pokemon TCG Pocket (PTCGP) Strategies & Guides Wiki
Recommended Games

Diablo 4: Vessel of Hatred Walkthrough & Guides Wiki

Cyberpunk 2077: Ultimate Edition Walkthrough & Guides Wiki

Fire Emblem Heroes (FEH) Walkthrough & Guides Wiki

Yu-Gi-Oh! Master Duel Walkthrough & Guides Wiki

Super Smash Bros. Ultimate Walkthrough & Guides Wiki

Pokemon Brilliant Diamond and Shining Pearl (BDSP) Walkthrough & Guides Wiki

Elden Ring Shadow of the Erdtree Walkthrough & Guides Wiki

Monster Hunter World Walkthrough & Guides Wiki

The Legend of Zelda: Tears of the Kingdom Walkthrough & Guides Wiki

Persona 3 Reload Walkthrough & Guides Wiki
All rights reserved
© Nintendo / INTELLIGENT SYSTEMS © KOEI TECMO GAMES CO., LTD. Fire Emblem and Nintendo Switch are trademarks of Nintendo. © Nintendo.
The copyrights of videos of games used in our content and other intellectual property rights belong to the provider of the game.
The contents we provide on this site were created personally by members of the Game8 editorial department.
We refuse the right to reuse or repost content taken without our permission such as data or images to other sites.
 Crossed Roads


![Monster Hunter Stories 3 Review [First Impressions] | Simply Rejuvenating](https://img.game8.co/4438641/2a31b7702bd70e78ec8efd24661dacda.jpeg/thumb)


Yeah I was trying to see if I fucked up but I guess its an oversight