Chapter 13 Walkthrough - Clash of Torment (Azure Gleam)
Check out our:
★ Story Walkthrough for how to get S Rank Rewards and the Best Responses to Support Conversations!
★ Character Tier List / Class Tier List for party building!
★ List of Characters for guides on recruiting all characters and their best classes.
Clash of Torment is Chapter 13 of the Azure Gleam Route in Fire Emblem Warriors Three Hopes. Read on to learn about the different quests, survey spots, rewards, and support conversations within the chapter, as well as our walkthrough for its main quest!
| ⮜ Previous Chapter | Next Chapter ⮞ |
|---|---|
| Chapter 12: A Trick of the Goddess |
Chapter 14: The Absent Emperor |
List of Contents
Clash of Torment Recruitable Characters
| All Recruitable Characters in Clash of Torment | ||
|---|---|---|
 Jeritza Jeritza
|
||
Recruiting Jeritza requires the strategy 'Persuade the Death Knight' which costs 30 Strategy Points. You also need to bring Mercedes to the battle and have her persuade the Death Knight.
Clash of Torment Quests, Survey Spots, and Rewards
Clash of Torment Quests
| Quest | Type | Rewards |
|---|---|---|
| Showdown at Ailell | Main |
S Rank Reward: Sword of Moralta x1
First Time Reward: Scythe of Sariel x1 |
| Cycles of Nostalgia | Paralogue |
S Rank Reward: Fodlan Liberation Army x1
First Time Reward: Spirit Dust x1 |
Clash of Torment Survey Spots
| There are no Survey Spots in this chapter. |
Showdown at Ailell: Azure Gleam Strategies and Walkthrough
Recommended Strategies for Showdown at Ailell: Azure Gleam
| Strategy | Description | Cost |
|---|---|---|
| Persuade the Death Knight | Convince an enemy general to join your army. | 30 |
| Stronghold Sabotage | Decrease the durability of all enemy strongholds at the beginning of battle. | 10 |
Showdown at Ailell: Azure Gleam Objectives
| Victory Condition | Defeat Condition |
|---|---|
| Defeat Duke Aegir and Edelgard. | All ally strongholds are captured. |
|
Main Objectives
1. Seize the strongholds and advance your army's front line! 2. Defeat Ladislava! 3. Get the Death Knight's attention and lure them to the destination! 4. Defeat the Death Knight/Persuade the Death Knight! 5. Defeat Myson and their allies! 6. Defeat Count Bergliez and Caspar! Side Objectives ・ Defeat the Dark Bishops and aid the Church Soldiers! ・ Defeat Baron Martyn and their allies targeting the stronghold to the rear! |
|
Showdown at Ailell: Azure Gleam Walkthrough
| Objectives | |
|---|---|
| 1 | Be sure to bring Mercedes for this battle so she can persuade the Death Knight into joining your army. Assign her as a playable unit for an important strategy later on. |
| 2 | 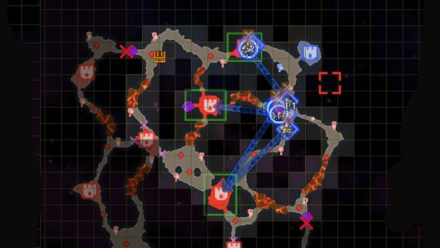 Seize the strongholds and advance your army's front line! Start off the battle by splitting your party into groups of three, with each group taking on a stronghold. |
| 3 | Defeat Ladislava! After seizing all three strongholds, proceed to widen your territory by pushing forward and seizing the ones ahead. Ladislava will later arrive southwest of the map. Use Shez to rush towards Ladislava and defeat them swiftly. |
| 4 | 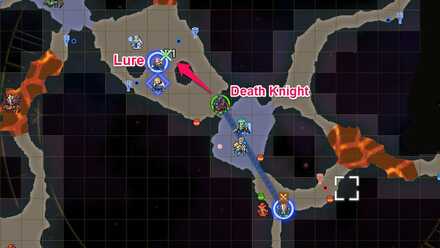 Get the Death Knight's attention and lure them to the destination! Once Ladislava has been defeated, the Death Knight will arrive from the northeastern corner of the map. Play as Mercedes and lure the Death Knight to the 'X' marked on the map. |
| 5 | 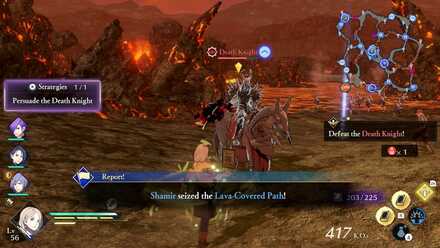 Defeat and Recruit the Death Knight! The moment the Death Knight has arrived at the center of the map, be sure to hit the prompt for Persuade the Death Knight in order to recruit him before taking him down. |
| 6 | 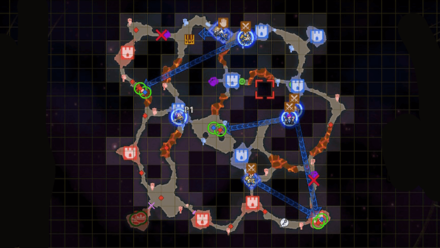 Defeat Myson and their allies! Once the Death Knight has been recruited, Myson and his allies will appear from the southwest corner of the map. Myson can easily be taken down by Shez, so it's best to assign other units to take down the other reinforcements attacking your strongholds. |
| 7 | 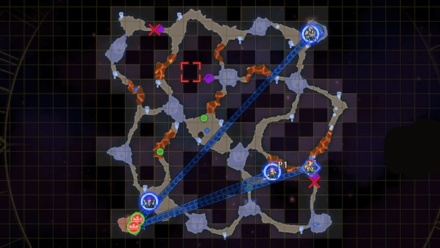 Defeat Count Bergliez and Caspar! After defeating Myson and his allies, there will be no more reinforcements. That said, launch an All-Out Offense against Count Bergliez and Caspar to claim victory. |
Clash of Torment Support and Romance Conversations
In Camp
 Felix Felix
|
Prompt: | A monster like him can't live without fighting, so it's hard to believe he's just gone. | ||
|---|---|---|---|---|
| Answers: | Reactions: | |||
| Suggest he might be dead. | TBD | |||
| Suggest he left the military. | +1 Support with Felix | |||
 Mercedes Mercedes
|
Prompt: | Many people from Faerghus don't do well in the heat, so I can't help but be concerned for them. | ||
| Answers: | Reactions: | |||
| Suggest finding a way to stay cool. | +1 Support with Mercedes | |||
| Laugh it off. | None | |||
 Bernadetta Bernadetta
|
Prompt: | Now I'm doubly terrified! You all go on ahead, I'm going to just burrow under a blanket forever. | ||
| Answers: | Reactions: | |||
| Encourage her. | None | |||
| Call her bluff. | +1 Support with Bernadetta | |||
 Petra Petra
|
Prompt: | At that time, I was chasing the archbishop. She is here now also. Is this what is called fate? | ||
| Answers: | Reactions: | |||
| Yep, definitely fate. | +1 Support with Petra | |||
| Nah. | None | |||
 Lorenz Lorenz
|
Prompt: | However, we will continue to work with you all until we have reclaimed the monastery. | ||
| Answers: | Reactions: | |||
| Express gratitude. | +1 Support with Lorenz | |||
| Express suspicion. | None | |||
 Yuri Yuri
|
Prompt: | We'd be wise to consider the possibility of a massive battle in the Valley of Torment. | ||
| Answers: | Reactions: | |||
| Ask why. | None | |||
| Agree with him. | +1 Support with Yuri | |||
 Balthus Balthus
|
Prompt: | What do you think of the new guy, Claude? I've been doing some digging into him. | ||
| Answers: | Reactions: | |||
| Say Claude's a schemer. | TBD | |||
| Say Claude's charming. | None | |||
| Ask why he researched Claude. | +1 Support with Balthus | |||
 Constance Constance
|
Prompt: | Now my name shall be known throughout all Faerghus as well! | ||
| Answers: | Reactions: | |||
| Cut in. | None | |||
| Cheer her on. | +1 Support with Constance | |||
 Catherine Catherine
|
Prompt: | So tell me, are you one of the people worried about Lady Rhea's ability to command on the front lines? | ||
| Answers: | Reactions: | |||
| Admit you are. | None | |||
| Say you're not worried. | +1 Support with Catherine | |||
 Shamir Shamir
|
Prompt: | Then the war will be over. As long as the Empire isn't run by fools, that is. | ||
| Answers: | Reactions: | |||
| Agree with her. | None | |||
| Express doubt. | +1 Support with Shamir | |||
Between Battles
| There doesn't appear to be any conversations that affect Support between this Chapter's battles. |
Fire Emblem Warriors: Three Hopes Related Guides

Story Walkthrough: List of Chapters
All Story Walkthroughs
All Paralogues
Author
Chapter 13 Walkthrough - Clash of Torment (Azure Gleam)
improvement survey
03/2026
improving Game8's site?

Your answers will help us to improve our website.
Note: Please be sure not to enter any kind of personal information into your response.

We hope you continue to make use of Game8.
Rankings
- We could not find the message board you were looking for.
Gaming News
Popular Games

Genshin Impact Walkthrough & Guides Wiki

Honkai: Star Rail Walkthrough & Guides Wiki

Umamusume: Pretty Derby Walkthrough & Guides Wiki

Pokemon Pokopia Walkthrough & Guides Wiki

Resident Evil Requiem (RE9) Walkthrough & Guides Wiki

Monster Hunter Wilds Walkthrough & Guides Wiki

Wuthering Waves Walkthrough & Guides Wiki

Arknights: Endfield Walkthrough & Guides Wiki

Pokemon FireRed and LeafGreen (FRLG) Walkthrough & Guides Wiki

Pokemon TCG Pocket (PTCGP) Strategies & Guides Wiki
Recommended Games

Diablo 4: Vessel of Hatred Walkthrough & Guides Wiki

Cyberpunk 2077: Ultimate Edition Walkthrough & Guides Wiki

Fire Emblem Heroes (FEH) Walkthrough & Guides Wiki

Yu-Gi-Oh! Master Duel Walkthrough & Guides Wiki

Super Smash Bros. Ultimate Walkthrough & Guides Wiki

Pokemon Brilliant Diamond and Shining Pearl (BDSP) Walkthrough & Guides Wiki

Elden Ring Shadow of the Erdtree Walkthrough & Guides Wiki

Monster Hunter World Walkthrough & Guides Wiki

The Legend of Zelda: Tears of the Kingdom Walkthrough & Guides Wiki

Persona 3 Reload Walkthrough & Guides Wiki
All rights reserved
© Nintendo / INTELLIGENT SYSTEMS © KOEI TECMO GAMES CO., LTD. Fire Emblem and Nintendo Switch are trademarks of Nintendo. © Nintendo.
The copyrights of videos of games used in our content and other intellectual property rights belong to the provider of the game.
The contents we provide on this site were created personally by members of the Game8 editorial department.
We refuse the right to reuse or repost content taken without our permission such as data or images to other sites.
 Crossed Roads


![Monster Hunter Stories 3 Review [First Impressions] | Simply Rejuvenating](https://img.game8.co/4438641/2a31b7702bd70e78ec8efd24661dacda.jpeg/thumb)


