 Crossed Roads
This survey will take about 1 minute.
Your answers will help us to improve our website.
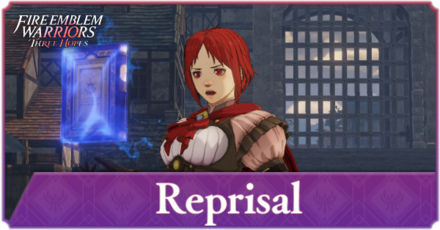
Fire Emblem Warriors Three Hopes
Chapter 11 Walkthrough - Reprisal (Azure Gleam)
Check out our:
★ Story Walkthrough for how to get S Rank Rewards and the Best Responses to Support Conversations!
★ Character Tier List / Class Tier List for party building!
★ List of Characters for guides on recruiting all characters and their best classes.
Reprisal is Chapter 11 of the Azure Gleam Route in Fire Emblem Warriors Three Hopes. Read on to learn about the different quests, survey spots, rewards, and support conversations within the chapter, as well as our walkthrough for its main quest!
| ⮜ Previous Chapter | Next Chapter ⮞ |
|---|---|
| Chapter 10: Fanaticism |
Chapter 12: A Trick of the Goddess |
List of Contents
Reprisal Recruitable Characters
| All Recruitable Characters in Reprisal | ||
|---|---|---|
 Linhardt Linhardt
|
 Constance Constance
|
|
All characters listed in the table will join your party after initiating the strategies 'Persuade Linhardt' and 'Persuade Constance' and defeating them in the battle. To get both characters, you need a total of 60 strategy points.
Recruitment Guide: How to Recruit Units
Reprisal Quests, Survey Spots, and Rewards
Reprisal Quests
| Quest | Type | Rewards |
|---|---|---|
| The Blitz of the Western Empire | Main |
S Rank Reward: Speedwing x1
First Time Reward: Master Seal x1 |
| Capture Enemy Supplies | Side |
S Rank Reward: Brave Axe x1
Capture Reward: Training Points Recovered: 1 |
| Seize Nuvelle Territory | Side |
S Rank Reward: Extra Large Bullion x1
Capture Reward: Activity Points Recovered: 1 |
| Eliminate the Assassins | Side |
S Rank Reward: Master Seal x1
Capture Reward: 6,000 G |
| Stop the Imperial Convoy | Side |
S Rank Reward: Brave Bow x1
Capture Reward: Training Points Recovered: 1 |
| Last Ditch Resistance | Side |
S Rank Reward: Arrow of Indra x1
Capture Reward: 6,000 G |
| Drive Back an Ambush | Side |
S Rank Reward: Brave Lance x1
Capture Reward: Activity Points Recovered: 1 |
| Take Formation in Essar | Side |
S Rank Reward: Premium Magic Herbs x1
Capture Reward: 6,000 G |
| Raiders from the North | Paralogue |
S Rank Reward: Fraldarius Soldiers x1
First Time Reward: Gautier Knights x1 |
Reprisal Survey Spots
| Side Mission | Survey Spot | Type | Reward / Conditions |
|---|---|---|---|
| Capture the Enemy Supplies | House | Visit | Reward: Lavish Building Material x20 and Hero's Insignia x8 |
| Capture the Enemy Supplies | Cave | Meet Condition |
Survey Conditions: Must defeat 2,000 enemies in Chapter 11.
Reward: 8,000 G |
| Capture the Enemy Supplies | Tower | Visit | Reward: Lances Combat Arts Level Up |
| Seize Nuvelle Territory | Estate | Meet Condition |
Survey Conditions: Must have a Falcon Knight.
Reward: Fears and Frights of Fodlan |
| Seize Nuvelle Territory | Tent | Pay |
Gold Required: 2,000 G
Reward: Master Seal x1 |
| Seize Nuvelle Territory | House | Visit | Reward: Morale Up for two selected untis |
| Seize Nuvelle Territory | Tower | Visit | Reward: Lavish Building Material x20, Master Smithing Set x15, and Elite Training Gear x8 |
| Eliminate the Assassins | House | Visit | Reward: Disruption |
| Eliminate the Assassins | Spring | Choice | Reward: Ailell Pomegranate or Golden Apple |
| Stop the Imperial Convoy | Bridge | Choice | Reward: Dagdan Mercenaries or Morfi's Magic Corps |
| Stop the Imperial Convoy | Tent | Visit | Reward: Lavish Building Material x20 and Advanced Combat Manual x15 |
| Stop the Imperial Convoy | Cave | Meet Condition |
Survey Conditions: Trade Blue Cheese x1
Reward: Free Forge Uses: 10 |
| Last Ditch Resistance | Ruins | Visit | Reward: Lavish Building Material x20 and Luxurious Furnishings x8 |
| Last Ditch Resistance | Cave | Battle | Reward: Assorted rewards from battle. |
| Last Ditch Resistance | Tent | Pay |
Gold Required: 1,000 G
Reward: Item Shop Restocked |
| Drive Back an Ambush | Bridge | Visit | Reward: Rodrigue's Ambush |
| Drive Back an Ambush | House | Visit | Reward: Lavish Building Material x20, Purveyor's License x13, and Storage Compartment x8 |
| Take Formation in Essar | Tent | Visit | Reward: Str Up for a selected unit |
| Take Formation in Essar | House | Meet Condition |
Survey Conditions: Must complete all side missions in this area.
Reward: Herlock Shield x1 |
| Take Formation in Essar | Gate | Visit | Reward: Verona x5, Albinean Berries x5, and Poultry x5 |
| Take Formation in Essar | Mine | Choice | Reward: Rusted Sword or Rusted Lance |
The Blitz of the Western Empire Strategies and Walkthrough
Recommended Strategies for The Blitz of the Western Empire
| Strategy | Description | Cost |
|---|---|---|
| Persuade Constance | Convince an enemy general to join your army. | 10 (SB) / 30 (AG) / 20 (GW) |
| Persuade Linhardt | Convince an enemy general to join your army. | 10 (GW) / 30 (AG) |
| Stronghold Sabotage | Decrease the durability of all enemy strongholds at the beginning of battle. | 10 |
The Blitz of the Western Empire Objectives
| Victory Condition | Defeat Condition |
|---|---|
| Defeat Duke Gerth. | None. |
|
Main Objectives
1. Seize the strongholds on the outskirts of the city! 2. Seize the Tower Plaza! 3. Pursue Monica! 4. Seize all the strongholds in the city! 5. Defeat Linhardt/Defeat and recruit Linhardt! 6. Defeat Constance/Defeat and recruit Constance! 7. Defeat Baron Ochs! 8. Defeat Monica! 9. Defeat Hanneman and Manuela! 10. Defeat Duke Gerth! Side Objectives ・ Defeat Baron Gillingr and Viscount Essar! ・ Defeat Viscount Hymir! |
|
The Blitz of the Western Empire Walkthrough
| Objectives | |
|---|---|
| 1 | 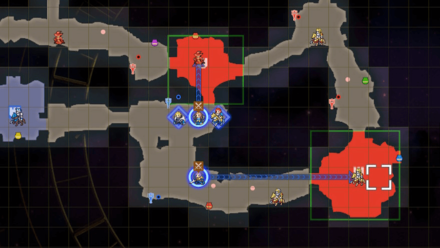 Seize the strongholds on the outskirts of the city! Start the fight off by sending three to four units to the southeast corner of the map to seize the two strongholds. As much as possible, keep Shez at the center, while the remaining ones take on the west stronghold. |
| 2 | 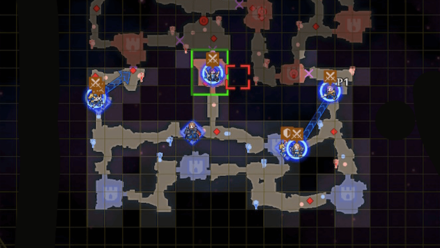 Seize the Tower Plaza! Afterwards, have Shez sieze the Tower Plaza and wait for Monica to arrive. Be sure to keep your units from the southern corners stationed for now. |
| 3 | Have Shez Pursue Monica! Once Monica makes opens the front gates, chase after her. Later on, you will find out that you were led to a trap and Monica will retreat. |
| 4 | 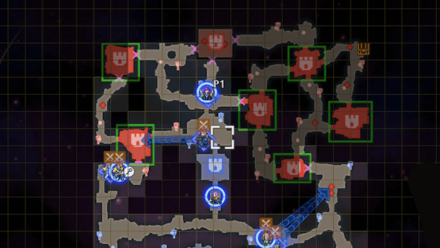 Stay in Position Until the Arrival of Linhardt! As Monica discusses the plan, Linhardt will eventually arrive, followed by Constance, aiming to flank the central stronghold. |
| 5 | 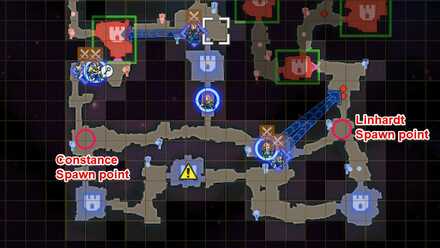 Persuade Linhardt and Constance to Join Your Ranks! Wait for the prompt to Persuade Linhardt before taking him down for him to join your party! The same goes for Constance, so be on the lookout for their prompts before acting to prevent killing them. |
| 6 | 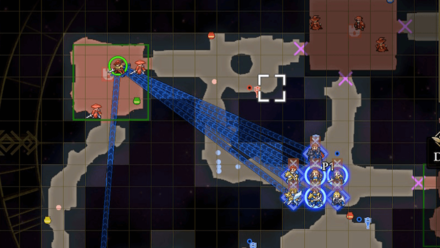 Defeat Baron Ochs! After taking down the two, launch an All-Out Offense towards Baron Ochs to beat him swiftly. |
| 7 | 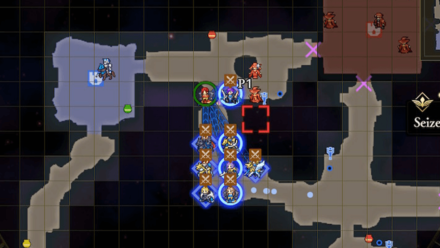 Defeat Monica! Upon Baron Ochs' defeat, proceed back to the center and have a quick battle against Monica before reaching your destination. |
| 8 | 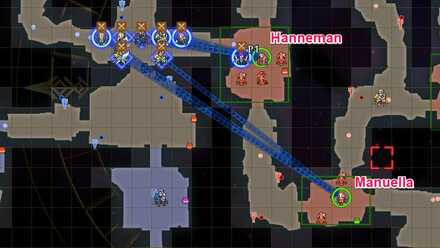 Defeat Hanneman and Manuela! After beating Monica, proceed to the locked eastern strongholds as you prepare to face off against previous professors Hanneman and Manuela. Be sure to beat Manuela first to prevent her from healing Hanneman! |
| 9 | 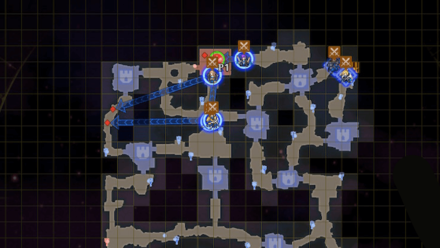 Defeat Duke Gerth! Lastly, proceed to the northernmost stronghold to defeat Duke Gerth. You may choose to place units at the northern corners of the map to take down Viscount reinforces as well. Afterwards, consider yourself the victor of this battle! |
Reprisal Support and Romance Conversations
In Camp
 Dimitri Dimitri
|
Prompt: | Villages burned to the ground, towns deserted, rampant poverty... I have to wonder what Edelgard thinks of all this. | ||
|---|---|---|---|---|
| Answers: | Reactions: | |||
| Say she doesn't care. | TBD | |||
| Say she's frustrated. | None | |||
| Say you don't know. | +1 Support with Dimitri | |||
 Dedue Dedue
|
Prompt: | No doubt you have heard of some of these houses before. | ||
| Answers: | Reactions: | |||
| Yep. | +1 Support with Dedue | |||
| Nope. | None | |||
 Sylvain Sylvain
|
Prompt: | I appreciate what they're doing, but I have to admit, it's also kind of scary. | ||
| Answers: | Reactions: | |||
| Ask what he means. | +1 Support with Sylvain | |||
| Chide him. | None | |||
 Annette Annette
|
Prompt: | But now we're the ones invading. I can't help but feel kinda guilty about it. | ||
| Answers: | Reactions: | |||
| Empathize with her. | +1 Support with Annette | |||
| Disagree with her. | None | |||
 Rodrigue Rodrigue
|
Prompt: | Perhaps I never should have shown him that letter. | ||
| Answers: | Reactions: | |||
| Tell him not to worry. | +1 Support with Rodrigue | |||
| Say he might be right. | None | |||
 Bernadetta Bernadetta
|
Prompt: | How can this be happening?! I don't wanna die! | ||
| Answers: | Reactions: | |||
| Reason with her. | +1 Support with Bernadetta | |||
| Appeal to her emotions. | None | |||
 Petra Petra
|
Prompt: | But I am thinking Brigid will no longer be having a relationship with the Empire in my lifetime. | ||
| Answers: | Reactions: | |||
| Say that's obvious. | +1 Support with Petra | |||
| Ask about the Empire winning. | None | |||
 Lorenz Lorenz
|
Prompt: | What about you? Do you have confidence in us as your allies in battle? | ||
| Answers: | Reactions: | |||
| Say yes. | +1 Support with Lorenz | |||
| Dodge the question. | None | |||
 Hapi Hapi
|
Prompt: | Hm? | ||
| Answers: | Reactions: | |||
| Stare in confusion. | TBD | |||
| Express concern. | +2 Support with Hapi | |||
 Ignatz Ignatz
|
Prompt: | The Imperial army was on one side of the conflict, of course, but can you guess who they were up against? | ||
| Answers: | Reactions: | |||
| Say the Kingdom. | TBD | |||
| Say the Western Church. | None | |||
| Take a wild guess. | +1 Support with Ignatz | |||
 Shamir Shamir
|
Prompt: | But if I have to kill someone, I'd rather they be bad guys. Like the Empire. How about you? | ||
| Answers: | Reactions: | |||
| Agree with her. | None | |||
| Disagree with her. | +1 Support with Shamir | |||
 Seteth Seteth
|
Prompt: | This person reportedly wields a power similar to your own. Do you have any idea who they are? | ||
| Answers: | Reactions: | |||
| Say you don't know. | +1 Support with Seteth | |||
| Don't answer. | None | |||
Between Battles
| There doesn't appear to be any conversations that affect Support between this Chapter's battles. |
Fire Emblem Warriors: Three Hopes Related Guides
Story Walkthrough: List of Chapters
All Story Walkthroughs
All Paralogues
Author

Chapter 11 Walkthrough - Reprisal (Azure Gleam)
Please participate in our site
improvement survey
03/2026
improvement survey
03/2026
Would you assist in
improving Game8's site?
improving Game8's site?

×
We are listening to our users' valuable opinions and discussing how to act on them.
The information collected through this survey will be used for the purpose of improving our services. In addition, the information will only be disclosed a part of a statistic in a format that will not allow identification of personal information.
Begin Survey
Not Now
×
Please rate each item regarding Game8.co's Advertisements.
Amount of Ads
Very Dissatisfied
Somewhat Dissatisfied
Fine
Somewhat Satisfied
Highly Satisfied
Placement of Ads
Timing of Ad Display
Ad Loading Speed
Safeness of Ads
Content of Ads
×
Please rate each item regarding Game8.co's Quality of Articles.
Amount of information
Very Dissatisfied
Somewhat Dissatisfied
Fine
Somewhat Satisfied
Highly Satisfied
Frequency of updates
Speed of new information
Accuracy of articles
Understandibility of articles
Readability of sentences
×
Please rate each item regarding Game8.co's Usability of the Site.
Ease of finding information
Very Dissatisfied
Somewhat Dissatisfied
Fine
Somewhat Satisfied
Highly Satisfied
Loading Speed
Use of Color
Font Size
Visibility of Images
Easy to Understand Layout
×
Please rate each item regarding Game8.co's Message Boards, Comments.
Ease of Writing
Very Dissatisfied
Somewhat Dissatisfied
Fine
Somewhat Satisfied
Highly Satisfied
Readability
Ease in Finding Information
Comment Quality
Comment Quantity
Admin Response
×
Please rate each item regarding Game8.co's Site's new design.
Please rate our site's new design
Very Dissatisfied
Somewhat Dissatisfied
Fine
Somewhat Satisfied
Highly Satisfied
Do you think that the website's design change makes the site easier to use?
Has the new design made it easier for you to find information on the site?
Has the new design improved the overall visual appeal of the site?
How would you rate your overall satisfaction with the new design of the site?
×
How likely are you to recommend Game8 to someone you know?
Very Unlikely
0
1
2
3
4
5
6
7
8
9
10
Very Likely
If you have other opinions regarding potential improvement to the website, please share them with us. We would appreciate your honest opinion.
Note: This is a free response section, so you can proceed without entering anything.
Note: Please be sure not to enter any kind of personal information into your response.
Note: Please be sure not to enter any kind of personal information into your response.
×
Thank You
×
Thank you for participating in our survey! Your answers will help us to improve the quality of our website and services.
We hope you continue to make use of Game8.
We hope you continue to make use of Game8.
Close
Rankings
- We could not find the message board you were looking for.
Gaming News


![Monster Hunter Stories 3 Review [First Impressions] | Simply Rejuvenating](https://img.game8.co/4438641/2a31b7702bd70e78ec8efd24661dacda.jpeg/thumb)
Popular Games

Genshin Impact Walkthrough & Guides Wiki
Honkai: Star Rail Walkthrough & Guides Wiki
Umamusume: Pretty Derby Walkthrough & Guides Wiki
Pokemon Pokopia Walkthrough & Guides Wiki
Resident Evil Requiem (RE9) Walkthrough & Guides Wiki
Monster Hunter Wilds Walkthrough & Guides Wiki
Wuthering Waves Walkthrough & Guides Wiki
Arknights: Endfield Walkthrough & Guides Wiki
Pokemon FireRed and LeafGreen (FRLG) Walkthrough & Guides Wiki
Pokemon TCG Pocket (PTCGP) Strategies & Guides Wiki


Recommended Games
Diablo 4: Vessel of Hatred Walkthrough & Guides Wiki
Cyberpunk 2077: Ultimate Edition Walkthrough & Guides Wiki
Fire Emblem Heroes (FEH) Walkthrough & Guides Wiki
Yu-Gi-Oh! Master Duel Walkthrough & Guides Wiki
Super Smash Bros. Ultimate Walkthrough & Guides Wiki
Pokemon Brilliant Diamond and Shining Pearl (BDSP) Walkthrough & Guides Wiki
Elden Ring Shadow of the Erdtree Walkthrough & Guides Wiki
Monster Hunter World Walkthrough & Guides Wiki
The Legend of Zelda: Tears of the Kingdom Walkthrough & Guides Wiki
Persona 3 Reload Walkthrough & Guides Wiki


All rights reserved
© Nintendo / INTELLIGENT SYSTEMS © KOEI TECMO GAMES CO., LTD. Fire Emblem and Nintendo Switch are trademarks of Nintendo. © Nintendo.
The copyrights of videos of games used in our content and other intellectual property rights belong to the provider of the game.
The contents we provide on this site were created personally by members of the Game8 editorial department.
We refuse the right to reuse or repost content taken without our permission such as data or images to other sites.
Dimitri: She doesn't care +1 Dimitri