 Crossed Roads
This survey will take about 1 minute.
Your answers will help us to improve our website.
Fire Emblem Warriors Three Hopes
Chapter 06 Walkthrough - Bridge of Betrayal (Scarlet Blaze)
Check out our:
★ Story Walkthrough for how to get S Rank Rewards and the Best Responses to Support Conversations!
★ Character Tier List / Class Tier List for party building!
★ List of Characters for guides on recruiting all characters and their best classes.
Bridge of Betrayal is Chapter 06 of the Scarlet Blaze Route in Fire Emblem Warriors Three Hopes. Read on to learn about the different quests, survey spots, rewards, and support conversations within the chapter, as well as our walkthrough for its main quest!
| ⮜ Previous Chapter | Next Chapter ⮞ |
|---|---|
| Chapter 5: Skirmish in the Fog |
Chapter 7: The Triumph of Valor |
List of Contents
Bridge of Betrayal Recruitable Characters
| All Recruitable Characters in Bridge of Betrayal | ||
|---|---|---|
 Lorenz Lorenz
|
 Ignatz Ignatz
|
 Balthus Balthus
|
All characters listed in this table can be recruited using the Persuade Strategy during the Battle Prep part of the main quest. You need at least 10 Strategy Points each to recruit all characters to your party.
Recruitment Guide: How to Recruit Units
Bridge of Betrayal Quests, Survey Spots, and Rewards
Bridge of Betrayal Quests
| Quest | Type | Rewards |
|---|---|---|
| The Great Coup of Myrddin | Main |
S Rank Reward: Ambrosia x1
First Time Reward: Intermediate Seal x1 |
| Cover the Allied Retreat | Side |
S Rank Reward: Intermediate Seal x1
Capture Reward: Activity Points Recovered: 1 |
| Drive Back the Alliance Army | Side |
S Rank Reward: Rapier x1
Capture Reward: 3,000 G |
| Quell the Resistance in Ordelia | Side |
S Rank Reward: Rocky Burdock x1
Capture Reward: Training Points Recovered: 1 |
| Rescue the Detachment | Side |
S Rank Reward: Wingthresher x1
Capture Reward: Activity Points Recovered: 1 |
| Take the Banks of the Airmid | Side |
S Rank Reward: Blessed Lance x1
Capture Reward: Training Points Recovered: 1 |
Bridge of Betrayal Survey Spots
| Side Mission | Survey Spot | Type | Reward / Conditions |
|---|---|---|---|
| Cover the Allied Retreat | Stronghold | Visit | Reward: Basic Building Material x38, Recruit Training Gear x30 |
| Cover the Allied Retreat | Spring | Visit | Reward: Morale Up for two Units of choice |
| Cover the Allied Retreat | House | Meet Conditions |
Survey Conditions: Defeat 2,000 enemies in Chapter 06.
Reward: Dexterity Ring x1 |
| Drive Back the Alliance Army | Tent | Visit | Reward: Sulter's License x15, Beginner Combat Manual x20 |
| Drive Back the Alliance Army | House | Choice |
Survey Conditions: Get advice from a myrmidon or Get advice from a monk.
Reward: Activity Points Recovered: 1 (for choosing Monk) |
| Drive Back the Alliance Army | Bridge | Visit | Reward: Raise a random magic of a selected unit by one level. |
| Quell the Resistance in Ordelia | House | Choice |
Survey Conditions: Choose between a Killer Lance or a Killer Bow
Reward: Killer Bow+4 x1 |
| Quell the Resistance in Ordelia | Tower | Visit | Reward: Basic Building Material x38, Squire's Insignia x15, Storage Bag x10 |
| Rescue the Detachment | House | Pay |
Gold Required: 250 G
Reward: Owl Feather x1 |
| Rescue the Detachment | Tent | Visit | Reward: Basic Building Material x38, Apprentice Smithing Set x15 |
| Take the Banks of the Airmid | Bridge | Meet Conditions |
Survey Conditions: Trade 3 Smithing Stone
Reward: Basic Building Material x38, Humble Furnishings x10 |
| Take the Banks of the Airmid | Tower | Meet Conditions |
Survey Conditions: Must complete all side missions in this area.
Reward: Build Bridge |
The Great Coup of Myrddin Strategies and Walkthrough
Recommended Strategies for The Great Coup of Myrddin
| Strategy | Description | Cost |
|---|---|---|
| Build Bridge | Build a bridge to create a new path. | 20 (SB) / 30 (GW) |
| Persuade Balthus | Convince an enemy general to join your army. | 10 (SB) / 20 (AG) |
| Persuade Ignatz | Convince an enemy general to join your army. | 10 |
| Persuade Lorenz | Convince an enemy general to join your army. | 10 |
The Great Coup of Myrddin Objectives
| Victory Condition | Defeat Condition |
|---|---|
| Defeat Lorenz and Count Gloucester. | Ladislava is routed. |
|
Main Objectives
1. Defeat the Brawlers and aid Ladislava! 2. Seize the strongholds and secure the route to Ladislava! 3. Defeat Balthus! / Defeat and recruit Balthus! 4. Defeat Ignatz to stop the ballistae! / Defeat and recruit Ignatz! 5. Defeat Acheron 6. Defeat Count Gloucester and Lorenz! / Defeat and recruit Lorenz! 7. Defeat Count Gloucester! Side Objectives ・ Seize the western stronghold and stop the Alliance Army's scheme! ・ Seize the crucial strongholds and take control of the Great Bridge of Myrddin! |
|
The Great Coup of Myrddin Walkthrough
| Objectives | |
|---|---|
| 1 |  Defeat the Brawlers and aid Ladislava! The team starts out in the southeast part of the map. Have several units head to both strongholds northwest and a couple of units heading to the strongholds to the west. You'll need to seize these strongholds to secure the route. |
| 2 | Have half of the team continue moving west to take down the second stronghold to the west to complete the Side Mission and to prepare for Ignatz appearance. |
| 3 | 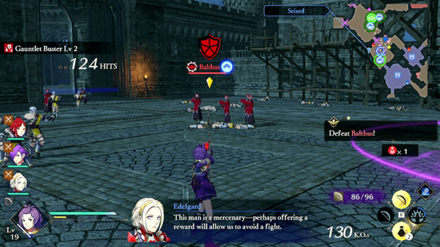 Defeat Balthus! / Defeat and recruit Balthus! Balthus will appear just beyond the two strongholds northwest of the starting point. This will be your chance to recruit him if you used the Persuade Balthus strategy. |
| 4 | 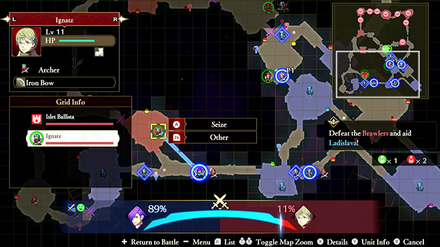 Defeat Ignatz to stop the ballistae! / Defeat and recruit Ignatz! Ignatz will make an appearance in the southeast section of the map preparing Ballistae to target your team. This will be your chance to recruit him if you used the Persuade Ignatz strategy. |
| 5 | After Balthus is defeated, the gates to Ladislava will open, send in the team to take out the brawlers. |
| 6 | 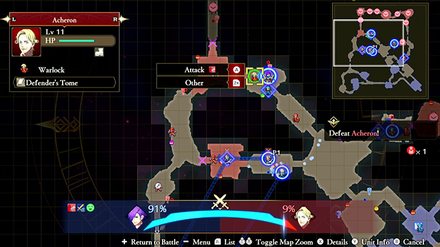 Defeat Acheron Once Ladislava has been rescued, she will retreat. Acheron will appear for you to defeat in the northwest. He will also have subordinates appear that you can defeat to clear the side mission to recover stolen supplies. |
| 7 | As Acheron's health drops he will summon more mages to help him. Take them all out. After defeating him Count Gloucester and Lorenz will reveal themselves along the north part of the map. |
| 8 | 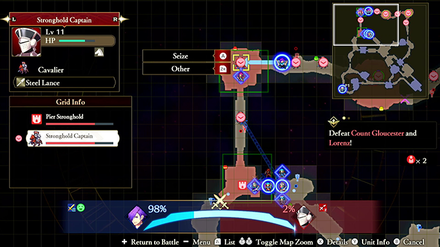 Defeat Count Gloucester and Lorenz! / Defeat and recruit Lorenz! With Lorenz on the map, you can now activate the strategy to persuade him. On the way to him, seize the two strongholds on the northwest part of the map to secure both sides of the bridge. |
| 9 | 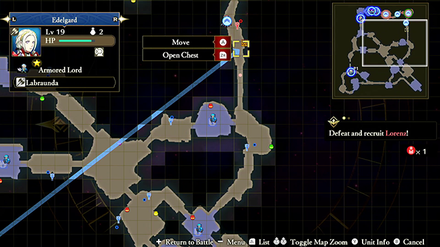 If you used the Build Bridge strategy, a bridge will be formed on the gap on the eastern side of the map. Sending a troop or two to approach Count Gloucester from this side will let you surround him faster. The chest here also has a Bullion you can take. |
| 10 | 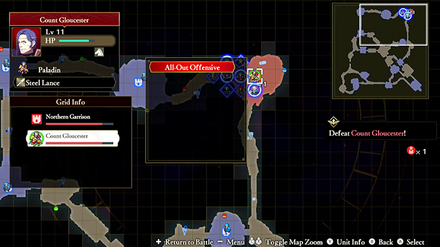 Defeat Count Gloucester! After defeating Lorenz, you can then continue to corner Count Gloucester in the northwest. Defeating him will end the quest. |
Bridge of Betrayal Support and Romance Conversations
In Camp
 Hapi Hapi
|
Prompt: | Plus, I owe him for that business under Garreg Mach. | ||
|---|---|---|---|---|
| Answers: | Reactions: | |||
| Look confused. | None | |||
| Volunteer to complain to Hubert. | +1 Support with Hapi | |||
 Hubert Hubert
|
Prompt: | Well, I have little choice but to praise Count Gloucester's deception. | ||
| Answers: | Reactions: | |||
| Tell him to focus. | +1 Support with Hubert | |||
| Claim Bergliez was caught off-guard. | None | |||
 Jeritza Jeritza
|
Prompt: | Not your business. But it has been decided that I am the house's scion. | ||
| Answers: | Reactions: | |||
| Remember Jeritza's surname. | None | |||
| Express surprise. | +1 Support with Jeritza | |||
 Petra Petra
|
Prompt: | I will never be allowing the man who defeated Brigid to die in this place! | ||
| Answers: | Reactions: | |||
| Ask if she still bears a grudge. | None | |||
| Ask if she wants him to live. | +1 Support with Petra | |||
 Bernadetta Bernadetta
|
Prompt: | But I'm still worried! | ||
| Answers: | Reactions: | |||
| Swear you'll keep her safe. | +1 Support with Bernadetta | |||
| Claim no one can know the future. | None | |||
 Caspar Caspar
|
Prompt: | Still, nothing's a guarantee on the battlefield, and I can't shake these thoughts of what might happen... | ||
| Answers: | Reactions: | |||
| Try to cheer him up. | +1 Support with Caspar | |||
| Take an optimistic view. | None. | |||
 Linhardt Linhardt
|
Prompt: | It would be a terrible waste of effort if we weren't able to assist them - so let us endeavor to ensure we can do so. | ||
| Answers: | Reactions: | |||
| Act shocked. | None | |||
| Agree with him. | +1 Support with Linhardt | |||
Between Battles
 Edelgard Edelgard
|
Prompt: | But not just anyone can hold Gloucester territory together, and I have no one else to take Lorenz's place. | ||
|---|---|---|---|---|
| Answers: | Reactions: | |||
| Retort sarcastically. | +1 Support with Hubert | |||
| Grudgingly agree. | None. | |||
Fire Emblem Warriors: Three Hopes Related Guides
Story Walkthrough: List of Chapters
All Story Walkthroughs
All Paralogues
Author

Chapter 06 Walkthrough - Bridge of Betrayal (Scarlet Blaze)
Please participate in our site
improvement survey
03/2026
improvement survey
03/2026
Would you assist in
improving Game8's site?
improving Game8's site?

×
We are listening to our users' valuable opinions and discussing how to act on them.
The information collected through this survey will be used for the purpose of improving our services. In addition, the information will only be disclosed a part of a statistic in a format that will not allow identification of personal information.
Begin Survey
Not Now
×
Please rate each item regarding Game8.co's Advertisements.
Amount of Ads
Very Dissatisfied
Somewhat Dissatisfied
Fine
Somewhat Satisfied
Highly Satisfied
Placement of Ads
Timing of Ad Display
Ad Loading Speed
Safeness of Ads
Content of Ads
×
Please rate each item regarding Game8.co's Quality of Articles.
Amount of information
Very Dissatisfied
Somewhat Dissatisfied
Fine
Somewhat Satisfied
Highly Satisfied
Frequency of updates
Speed of new information
Accuracy of articles
Understandibility of articles
Readability of sentences
×
Please rate each item regarding Game8.co's Usability of the Site.
Ease of finding information
Very Dissatisfied
Somewhat Dissatisfied
Fine
Somewhat Satisfied
Highly Satisfied
Loading Speed
Use of Color
Font Size
Visibility of Images
Easy to Understand Layout
×
Please rate each item regarding Game8.co's Message Boards, Comments.
Ease of Writing
Very Dissatisfied
Somewhat Dissatisfied
Fine
Somewhat Satisfied
Highly Satisfied
Readability
Ease in Finding Information
Comment Quality
Comment Quantity
Admin Response
×
Please rate each item regarding Game8.co's Site's new design.
Please rate our site's new design
Very Dissatisfied
Somewhat Dissatisfied
Fine
Somewhat Satisfied
Highly Satisfied
Do you think that the website's design change makes the site easier to use?
Has the new design made it easier for you to find information on the site?
Has the new design improved the overall visual appeal of the site?
How would you rate your overall satisfaction with the new design of the site?
×
How likely are you to recommend Game8 to someone you know?
Very Unlikely
0
1
2
3
4
5
6
7
8
9
10
Very Likely
If you have other opinions regarding potential improvement to the website, please share them with us. We would appreciate your honest opinion.
Note: This is a free response section, so you can proceed without entering anything.
Note: Please be sure not to enter any kind of personal information into your response.
Note: Please be sure not to enter any kind of personal information into your response.
×
Thank You
×
Thank you for participating in our survey! Your answers will help us to improve the quality of our website and services.
We hope you continue to make use of Game8.
We hope you continue to make use of Game8.
Close
Rankings
- We could not find the message board you were looking for.
Gaming News


![Monster Hunter Stories 3 Review [First Impressions] | Simply Rejuvenating](https://img.game8.co/4438641/2a31b7702bd70e78ec8efd24661dacda.jpeg/thumb)
Popular Games

Genshin Impact Walkthrough & Guides Wiki
Honkai: Star Rail Walkthrough & Guides Wiki
Umamusume: Pretty Derby Walkthrough & Guides Wiki
Pokemon Pokopia Walkthrough & Guides Wiki
Resident Evil Requiem (RE9) Walkthrough & Guides Wiki
Monster Hunter Wilds Walkthrough & Guides Wiki
Wuthering Waves Walkthrough & Guides Wiki
Arknights: Endfield Walkthrough & Guides Wiki
Pokemon FireRed and LeafGreen (FRLG) Walkthrough & Guides Wiki
Pokemon TCG Pocket (PTCGP) Strategies & Guides Wiki


Recommended Games
Diablo 4: Vessel of Hatred Walkthrough & Guides Wiki
Cyberpunk 2077: Ultimate Edition Walkthrough & Guides Wiki
Fire Emblem Heroes (FEH) Walkthrough & Guides Wiki
Yu-Gi-Oh! Master Duel Walkthrough & Guides Wiki
Super Smash Bros. Ultimate Walkthrough & Guides Wiki
Pokemon Brilliant Diamond and Shining Pearl (BDSP) Walkthrough & Guides Wiki
Elden Ring Shadow of the Erdtree Walkthrough & Guides Wiki
Monster Hunter World Walkthrough & Guides Wiki
The Legend of Zelda: Tears of the Kingdom Walkthrough & Guides Wiki
Persona 3 Reload Walkthrough & Guides Wiki


All rights reserved
© Nintendo / INTELLIGENT SYSTEMS © KOEI TECMO GAMES CO., LTD. Fire Emblem and Nintendo Switch are trademarks of Nintendo. © Nintendo.
The copyrights of videos of games used in our content and other intellectual property rights belong to the provider of the game.
The contents we provide on this site were created personally by members of the Game8 editorial department.
We refuse the right to reuse or repost content taken without our permission such as data or images to other sites.
linhart 2nd chose