Chapter 05 Walkthrough - Skirmish in the Fog (Azure Gleam)
Check out our:
★ Story Walkthrough for how to get S Rank Rewards and the Best Responses to Support Conversations!
★ Character Tier List / Class Tier List for party building!
★ List of Characters for guides on recruiting all characters and their best classes.
Skirmish in the Fog is Chapter 05 of the Azure Gleam Route in Fire Emblem Warriors Three Hopes. Read on to learn about the different quests, survey spots, rewards, and support conversations within the chapter, as well as our walkthrough for its main quest!
| ⮜ Previous Chapter | Next Chapter ⮞ |
|---|---|
| Chapter 4: To War! |
Chapter 6: Conspiracy in the Air |
List of Contents
Skirmish in the Fog Recruitable Characters
| All Recruitable Characters in Skirmish in the Fog | ||
|---|---|---|
 Dorothea Dorothea
|
 Seteth Seteth
|
 Flayn Flayn
|
 Gatekeeper Gatekeeper
|
||
Seteth and Flayn will join your party at the start of this chapter.
Dorothea can be recruited using the Persuade Strategy during the Battle Prep part of the main quest. You need at least 10 Strategy Points to recruit her.
Gatekeeper will only appear on this chapter on the third New Game Plus playthrough.
Recruitment Guide: How to Recruit Units
Skirmish in the Fog Quests, Survey Spots, and Rewards
Skirmish in the Fog Quests
| Quest | Type | Rewards |
|---|---|---|
| The Battle of Magdred | Main |
S Rank Reward: Speed Carrot x1
First Time Reward: Intermediate Seal x1 |
| Maintain Order in Charon | Side |
S Rank Reward: Intermediate Seal x1
Capture Reward: Training Points Recovered: 1 |
| Defend the Supply Base | Side |
S Rank Reward: Steel Bow x1
Capture Reward: Activity Points Recovered:1 |
| Halt the Enemy's Pursuit | Side |
S Rank Reward: Ailell Pomegranate x1
Capture Reward: Training Points Recovered: 1 |
| Free the Prisoners | Side |
S Rank Reward: Bullion x1
Capture Reward: Activity Points Recovered: 1 |
| A Grave Threat - Blue Lions | Extra | No Fixed Rewards |
| Eagles, Lions, and Deer | Paralogue |
S Rank Reward: Seiros Gatekeepers x1
First Time Reward: Seraph Robe x1 |
Skirmish in the Fog Survey Spots
| Side Mission | Survey Spot | Type | Reward / Conditions |
|---|---|---|---|
| Maintain Order in Charon | Stronghold | Visit | Reward: Basic Building Material x 38, Recruit Training Gear x30, and Storage Bag x10 |
| Maintain Order in Charon | Tent | Pay |
Gold Required: 500 G
Reward: Turnip x5, Chickpeas x5, and Cabbage x5 |
| Defend the Supply Base | Cave | Visit | Reward: Torch |
| Defend the Supply Base | Ruins | Choice | Reward: Volunteer Armored Co. x1 or Volunteer Brawlers x1 |
| Defend the Supply Base | House | Meet Conditions |
Survey Conditions: Exchange 3 Cabbage
Reward: Basic Building Material x38 and Squire's Insignia x15 |
| Halt the Enemy's Pursuit | House | Meet Conditions |
Survey Conditions: Must have the Thief class.
Reward: Smithing Stone x30 |
| Halt the Enemy's Pursuit | Lake | Visit | Reward: Selected unit +5 Cha |
| Halt the Enemy's Pursuit | House | Visit | Reward: Basic Building Material x38, Apprentice Smithing Set x15, and Humble Furnishings x10 |
| Halt the Enemy's Pursuit | Tent | Visit | Reward: Resonant Ward |
| Free the Prisoners | Forest | Meet Conditions |
Survey Conditions: Defeat 1,000 enemies in Chapter 5.
Reward: Spicy Fish and Turnip Stew |
| Free the Prisoners | Tent | Visit | Reward: Basic Building Material x38, Sutler's License x15 |
The Battle of Magdred Strategies and Walkthrough
Recommended Strategies for The Battle of Magdred
| Strategy | Description | Cost |
|---|---|---|
| Torch | Light a torch, improving visibility in the fog. | 20 |
| Persuade Dorothea | Convince an enemy general to join your army. | 10 (AG) / 30 (GW) |
| Flying Surge | Summon a flying unit to engage the enemy. Reinforcements will deploy periodically. | 10 |
The Battle of Magdred Objectives
| Victory Condition | Defeat Condition |
|---|---|
| Defeat Lonato. | None. |
|
Main Objectives
1. Seize the strongholds and defeat the enemy's vanguard! 2. Defeat Byleth! 3. Find and defeat Jeralt in one of the strongholds! 4. Find and defeat the Gaspard General among the enemy reinforcements. 5. Get to Lonato! 6. Defeat Dorothea! / Defeat and Recruit Dorothea! 7. Defeat Lonato! Side Objectives ・ Face and defeat Byleth! ・ Defeat Alois! ・ Defeat the Messenger to prevent reinforcements from appearing! |
|
The Battle of Magdred Walkthrough
| Objectives | |
|---|---|
| 1 | Seize the strongholds and defeat the enemy's vanguard! Order your units to seize the strongholds marked on the map. |
| 2 | Defeat Byleth! Launch an All Out Offensive on Byleth |
| 3 | 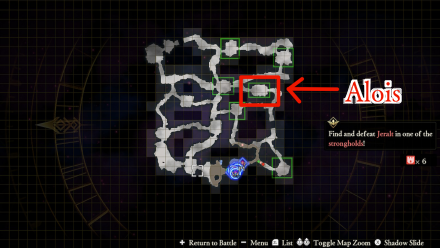 Find and defeat Jeralt in one of the strongholds! Before getting to Jeralt, find Alois on the area marked on the map above first. |
| 4 | 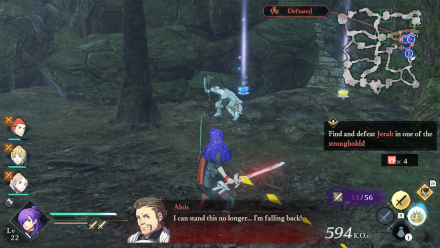 Defeat Alois! Launch an All Out Offensive on Alois and use Shez or any sword-wielding unit to fight him. |
| 5 | 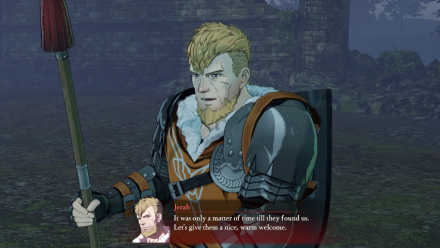 Defeat Jeralt Defeating Alois will reveal Jeralt's location so go ahead and launch an All Out Offensive on him as well. |
| 6 | 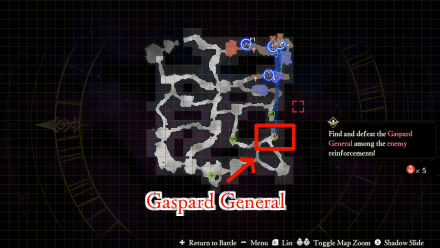 Find and defeat the Gaspard General among the enemy reinforcements. Head to the area marked on the map above and defeat the Gaspard General using a lance-user. |
| 7 | 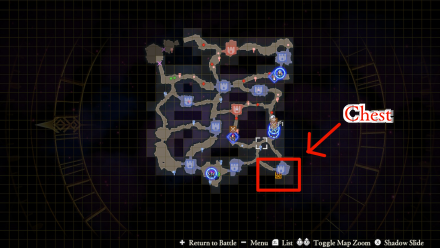 Get the key from the enemy! Have another unit go after the enemy with a key. After getting the key, open the chest on the lower right corner of the map. |
| 8 | Get to Lonato! Head over to the area marked on the map. |
| 9 | 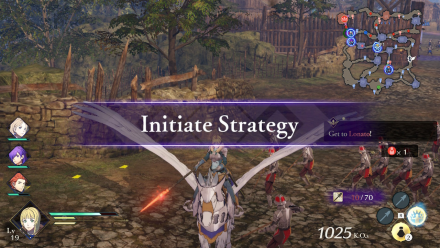 Defeat and recruit Dorothea! Go to where Dorothea is on the map and defeat her. If you picked the strategy 'Persuade Dorothea', you can recruit her to your army after defeating her. Just don't forget to initiate the strategy by long pressing the |
| 10 | Defeat the Messenger to prevent reinforcements from appearing! Order a unit to go after the messenger. |
| 11 | 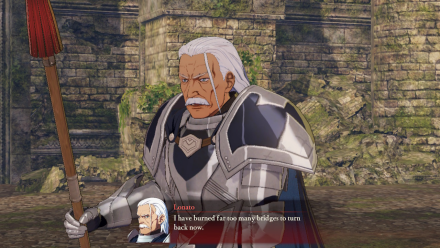 Defeat Lonato! Launch an All Out Offensive on Lonato to take him down quickly! |
Skirmish in the Fog Support and Romance Conversations
In Camp
 Dimitri Dimitri
|
Prompt: | You may be inconvenienced as well. Please inform me right away if anything comes up. | ||
|---|---|---|---|---|
| Answers: | Reactions: | |||
| Tell him you understand. | +1 Support with Dimitri | |||
| Crack a joke. | None | |||
 Catherine Catherine
|
Prompt: | The name's Catherine, or Thunder Catherine, if you will. I'm one of the Knights of Seiros. Good to be fighting by your side. | ||
| Answers: | Reactions: | |||
| Introduce yourself. | None | |||
| Tell her you've heard of her. | +1 Support with Catherine | |||
 Petra Petra
|
Prompt: | But I am feeling relief not to be fighting the Empire again soon. I can be giving my full strength now. | ||
| Answers: | Reactions: | |||
| Tell her the Empire's army will be there too. | +1 Support with Petra | |||
| Agree it's a relief. | None | |||
 Seteth Seteth
|
Prompt: | Bearing that in mind, we dispatched a portion of the Knights of Seiros to rush to your aid. | ||
| Answers: | Reactions: | |||
| Ask if he's going to fight too. | None | |||
| Ask if that's the only reason they're fighting. | +1 Support with Seteth | |||
 Flayn Flayn
|
Prompt: | Of course, I did not just up and come here. I secured Lady Rhea's permission first. | ||
| Answers: | Reactions: | |||
| Accept what she says. | +1 Support with Flayn | |||
| Doubt her fighting skill. | None | |||
 Ashe Ashe
|
Prompt: | He might hold a grudge against the church because of my stepbrother, but to go so far as recruiting people from the city into his forces ... | ||
| Answers: | Reactions: | |||
| Ask for more details. | +1 Support with Ashe | |||
| Agree. | None | |||
 Ingrid Ingrid
|
Prompt: | Ah, no, wait. I shouldn't speak about matters pertaining to other houses. | ||
| Answers: | Reactions: | |||
| Prompt her to continue. | None | |||
| Leave it be. | +1 Support with Ingrid | |||
 Mercedes Mercedes
|
Prompt: | But the old Southern Church and the modern one must be entirely different, right? | ||
| Answers: | Reactions: | |||
| Ask how they're different. | None | |||
| Agree they're different. | +1 Support with Mercedes | |||
Between Battles
| There doesn't appear to be any conversations that affect Support between this Chapter's battles. |
Fire Emblem Warriors: Three Hopes Related Guides

Story Walkthrough: List of Chapters
All Story Walkthroughs
All Paralogues
Comment
Author
Chapter 05 Walkthrough - Skirmish in the Fog (Azure Gleam)
improvement survey
03/2026
improving Game8's site?

Your answers will help us to improve our website.
Note: Please be sure not to enter any kind of personal information into your response.

We hope you continue to make use of Game8.
Rankings
- We could not find the message board you were looking for.
Gaming News
Popular Games

Genshin Impact Walkthrough & Guides Wiki

Honkai: Star Rail Walkthrough & Guides Wiki

Umamusume: Pretty Derby Walkthrough & Guides Wiki

Pokemon Pokopia Walkthrough & Guides Wiki

Resident Evil Requiem (RE9) Walkthrough & Guides Wiki

Monster Hunter Wilds Walkthrough & Guides Wiki

Wuthering Waves Walkthrough & Guides Wiki

Arknights: Endfield Walkthrough & Guides Wiki

Pokemon FireRed and LeafGreen (FRLG) Walkthrough & Guides Wiki

Pokemon TCG Pocket (PTCGP) Strategies & Guides Wiki
Recommended Games

Diablo 4: Vessel of Hatred Walkthrough & Guides Wiki

Cyberpunk 2077: Ultimate Edition Walkthrough & Guides Wiki

Fire Emblem Heroes (FEH) Walkthrough & Guides Wiki

Yu-Gi-Oh! Master Duel Walkthrough & Guides Wiki

Super Smash Bros. Ultimate Walkthrough & Guides Wiki

Pokemon Brilliant Diamond and Shining Pearl (BDSP) Walkthrough & Guides Wiki

Elden Ring Shadow of the Erdtree Walkthrough & Guides Wiki

Monster Hunter World Walkthrough & Guides Wiki

The Legend of Zelda: Tears of the Kingdom Walkthrough & Guides Wiki

Persona 3 Reload Walkthrough & Guides Wiki
All rights reserved
© Nintendo / INTELLIGENT SYSTEMS © KOEI TECMO GAMES CO., LTD. Fire Emblem and Nintendo Switch are trademarks of Nintendo. © Nintendo.
The copyrights of videos of games used in our content and other intellectual property rights belong to the provider of the game.
The contents we provide on this site were created personally by members of the Game8 editorial department.
We refuse the right to reuse or repost content taken without our permission such as data or images to other sites.
 Crossed Roads


![Monster Hunter Stories 3 Review [First Impressions] | Simply Rejuvenating](https://img.game8.co/4438641/2a31b7702bd70e78ec8efd24661dacda.jpeg/thumb)


