Chapter 13 Walkthrough - Severing the Past (Scarlet Blaze)
Check out our:
★ Story Walkthrough for how to get S Rank Rewards and the Best Responses to Support Conversations!
★ Character Tier List / Class Tier List for party building!
★ List of Characters for guides on recruiting all characters and their best classes.

Severing the Past is Chapter 13 of the Scarlet Blaze Route in Fire Emblem Warriors Three Hopes. Read on to learn about the different quests, survey spots, rewards, and support conversations within the chapter, as well as our walkthrough for its main quest!
| ⮜ Previous Chapter | Next Chapter ⮞ |
|---|---|
| Chapter 12: The Rising Darkness |
Chapter 14: Torment of the Eagle and Lion (If Byleth is recruited) Chapter 14: A Clash of Ambitions (If Byleth is defeated) |
List of Contents
Severing the Past Recruitable Characters
| All Recruitable Characters in Severing the Past | ||
|---|---|---|
| There are no recruitable characters in this chapter. | ||
Recruitment Guide: How to Recruit Units
Severing the Past Quests, Survey Spots, and Rewards
Severing the Past Quests
| Quest | Type | Rewards |
|---|---|---|
| Reclaiming Fort Merceus | Main |
S Rank Reward: The Inexhaustible x1
First Time Reward: Master Seal x1 |
| Eliminate the Remaining Bandits | Side |
S Rank Reward: Devil Axe x1
Capture Reward: Training Points Recovered: 1 |
| Finish Off Those Who Slither in the Dark | Side |
S Rank Reward: Brave Bow x1
Capture Reward: Activity Points Recovered: 1 |
| Defend the Checkpoint | Side |
S Rank Reward: Extra Large Bullion x1
First Time Reward: 7,200 G |
| Break Through to the Fortress | Side |
S Rank Reward: Aura Knuckles x1
Capture Reward: Training Points Recovered: 1 |
| Take Down the Scouts | Side |
S Rank Reward: Master Seal x1
Capture Reward: Activity Points Recovered: 1 |
| Seize the Trade Route | Side |
S Rank Reward: Sage's Tome+10 x1
Capture Reward: 7,200 G |
| Peacekeeping in Fenja | Side |
S Rank Reward: Golden Apple x1
Capture Reward: 7,200 G |
| Mercenary Complications | Paralogue |
S Rank Reward: New Guardians of Fodlan x1
First Time Reward: Secret Book x1 |
Severing the Past Survey Spots
| Side Mission | Survey Spot | Type | Reward / Conditions |
|---|---|---|---|
| Eliminate the Remaining Bandits | House | Visit | Reward: Lavish Building Material x16, Elite Training Gear x6 |
| Eliminate the Remaining Bandits | House | Meet Condition |
Survey Conditions: Trade Coffee Beans x5
Reward: Fears and Frights of Fodlan |
| Eliminate the Remaining Bandits | Stronghold | Choice | Reward: Fierce Strength Ring or Captivating Charm Ring |
| Finish Off Those Who Slither in the Dark | Cave | Battle | Reward: Assorted rewards from battle. |
| Finish Off Those Who Slither in the Dark | House | Visit | Reward: Lavish Building Material x16, Advanced Combat Manual x12 |
| Finish Off Those Who Slither in the Dark | Tower | Meet Condition |
Survey Conditions: Defeat a total of 2000 enemies in this chapter.
Reward: Master Seal x3 |
| Finish Off Those Who Slither in the Dark | Tent | Choice | Reward: Ambrosia or White Verona |
| Finish Off Those Who Slither in the Dark | House | Visit | Reward: Lavish Building Material x16, Hero's Insignia x6 |
| Finish Off Those Who Slither in the Dark | Spring | Visit | Reward: Support Points Up for two selected units |
| Finish Off Those Who Slither in the Dark | Ruins | Choice |
Survey Conditions: Invite the brawler to your camp or Invite the traveling entertainer to your camp.
Reward: Training Points Recovered: 1 (for choosing brawler) or Activity Points Recovered: 1 (for choosing entertainer) |
| Break Through to the Fortress | House | Visit | Reward: Dex +5 to a selected unit. |
| Break Through to the Fortress | Stronghold | Visit | Reward: Lavish Building Material x16, Master Smithing Set x12, Storage Compartment x6. |
| Break Through to the Fortress | Tent | Pay |
Gold Required: 1,000 G
Reward: Fodlan Fencers x1 |
| Take Down the Scouts | Bridge | Visit | Reward: Wall-Mounted Catapults |
| Take Down the Scouts | House | Pay |
Gold Required: 1,300 G
Reward: Turnip x10, Chickpeas x10, Cabbage x10 |
| Seize the Trade Route | Estate | Visit | Reward: Lavish Building Material x16, Purveyor's License x10, Luxurious Furnishings x6 |
| Seize the Trade Route | House | Visit | Reward: Infiltration |
| Seize the Trade Route | Mine | Meet Condition |
Survey Conditions: Must complete all side missions in this area.
Reward: Umbral Steel x10 |
| Peacekeeping in Fenja | House | Meet Condition |
Survey Conditions: Must attain Battle Rank S on any difficulty.
Reward: Sword of Zoltan+10 x1 |
| Peacekeeping in Fenja | Cave | Visit | Reward: 9,600 G |
| Peacekeeping in Fenja | Tent | Visit | Reward: Hexlock Shield x1 |
Reclaiming Fort Merceus Strategies and Walkthrough
Recommended Strategies for Reclaiming Fort Merceus
| Strategy | Description | Cost |
|---|---|---|
| Wall-Mounted Catapults | Activate the catapults on the walls of Fort Merceus | 30 |
| Infiltration | Use infiltrators to reinforce the auxiliary unit. | 30 |
| Hire Mercenaries | Summon mercenaries to engage the enemy force. Reinforcements will deploy periodcally. | 10 |
Reclaiming Fort Merceus Objectives
| Victory Condition | Defeat Condition |
|---|---|
| Defeat the Former Duke Aegir. | Main force wiped out, or the detached force is routed. |
|
Main Objectives
1. Seize the strongholds and advance to the inner ward! 2. Defeat the Dark Bishops to bring down the Wall of Darkness! 3. Defeat Dolfonos and their allies! 4. Use the detached force to disable the controls and stop the Viskam! 5. Defeat Kronya! 6. Defeat Viscount Fenja and their allies, and advance on the Former Duke Aegir! Side Objectives ・ Seize the strongholds to stop the ballistae! ・ Defeat the enemy reinforcements! ・ Defeat the Dark Knight and their allies targeting the detached force! ・ Seize all the strongholds! |
|
Reclaiming Fort Merceus Walkthrough
| Objectives | |
|---|---|
| * | We recommend bringing a pair of Sword-wielders, Axe-wielders, and Gauntlet-wielders for this quest. You'll also have one party member on the southeast of the map separated from the rest of the team (which will start from the northeast.) We recommend having Edelgard as the solo unit due to her natural bulk. |
| 1 | 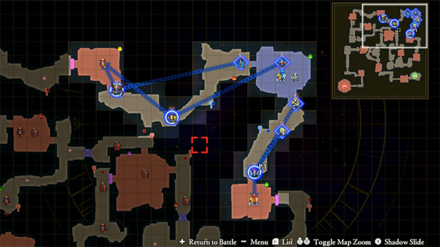 Seize the strongholds and advance to the inner ward! When the battle starts the team won't have a lot of room to go to, so just seize the strongholds available to you as you move towards the inner ward. |
| 2 | 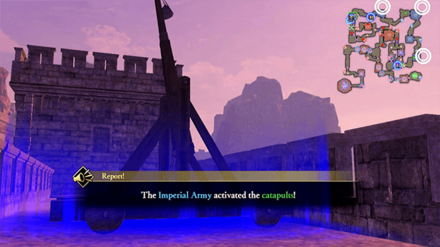 Upon reaching the inner wards, you'll be able to initiate the Wall-Mounted Catapults strategy giving your team sa artillery on your side. |
| 3 | 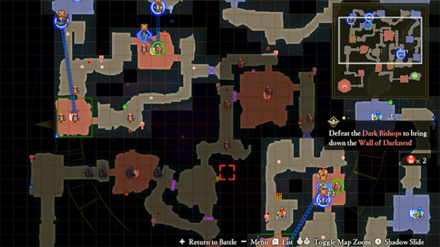 Defeat the Dark Bishops to bring down the Wall of Darkness! You'll then learn that the next barriers will be walls of Dark Magic. You'll have to take down the Dark Bishops on both corners of the map to open the path. While you're at it, take down the strongholds that house the ballistae to have a safer advance. |
| 4 | 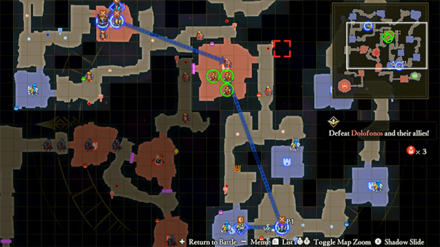 Defeat Dolfonos and their allies! With the Dark Bishops out of the way, Dolfonos and their allies will reveal themselves near the middle of the map. Your team may converge on to their location to take them out. |
| 5 | As you form your attack, the enemy will activate a magical construct called a Viskam. You'll have to send over your detached unit to disable the controls to keep your team safe. This is now the chance for your unit on the southwest of the map to make their advance. This will also be your chance to initiate the Infiltration Strategy |
| 6 | Use the detached force to disable the controls and stop the Viskam! It is a straightforward path for your detached unit so press forward and deactivate each switch at both strongholds you'll come across. Make sure that the rest of the map is still secured by the rest of your team. |
| 7 | 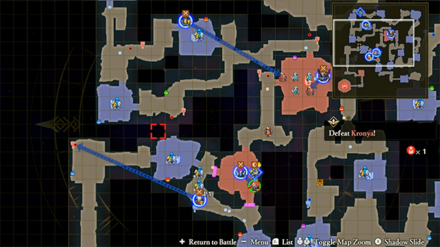 Defeat Kronya! Speaking of the rest of the map, Kronya would have appeared near the middle of the map. Keep her occupied with your strongest units while you secure the rest of the map. Defeating her will open up the path to reunite you with your detached unit. |
| 8 | 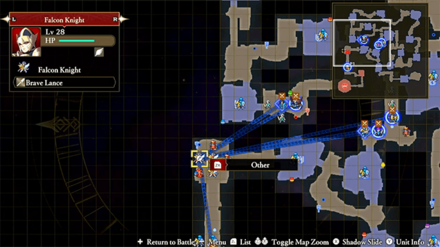 Defeat Viscount Fenja and their allies, and advance on the Former Duke Aegir! Be ready to move your troops to reunite with your detached unit as Viscount Fenja will appear on the west part of the map. An all-out offensive will be an easy way to send all your troops over. |
| 9 | With the momentum in your favor, press on to corner the former Duke. Don't be concerned with the Fire Orbs as Count Hevring will soon arrive with back-up. |
| 10 | 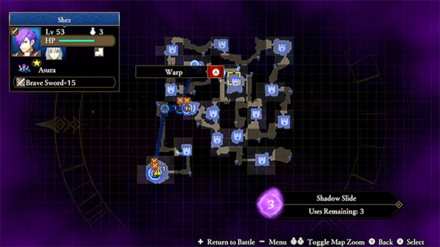 Duke Aegir will try to call for his own back up, but with most of the strongholds occupied, it shouldn't be too hard to defeat any stragglers. Warp to any nearby stronghold to pick off stray enemies. |
Severing the Past Support and Romance Conversations
In Camp
 Edelgard Edelgard
|
Prompt: | We must divide our attention among these many issues all at once. | ||
|---|---|---|---|---|
| Answers: | Reactions: | |||
| Appreciate her hard work. | +1 Support with Edelgard | |||
| Tell her it won't be a problem. | None | |||
 Hubert Hubert
|
Prompt: | The former Duke Aegir is quite capable, though those who slither in the dark are likely assiting him. | ||
| Answers: | Reactions: | |||
| Express shock that he complimented Duke Aegir. | +1 Support with Hubert | |||
| Agree about Duke Aegir. | None | |||
 Ferdinand Ferdinand
|
Prompt: | I know my father better than anyone, so does it not follow that I would be the best person to guess at his thinking? | ||
| Answers: | Reactions: | |||
| Worry he's pushing himself too hard. | None | |||
| Nod and offer a suggestion. | +1 Support with Ferdinand | |||
 Linhardt Linhardt
|
Prompt: | It would well be worth taking a long around if we weren't going there for a battle. | ||
| Answers: | Reactions: | |||
| Say you're looking forward to seeing it. | None | |||
| Say there isn't time to sightsee. | +1 Support with Linhardt | |||
 Caspar Caspar
|
Prompt: | And I know my brother's been taken hostage, but you don't need to worry about him. He was prepared for this. We're a warrior family after all. | ||
| Answers: | Reactions: | |||
| Ask about other family members. | +1 Support with Caspar | |||
| Say you're still worried. | None | |||
 Dorothea Dorothea
|
Prompt: | I guess you could say this is the first step in that direction. | ||
| Answers: | Reactions: | |||
| Ask what she means. | None | |||
| Ask if she agrees. | +1 Support with Dorothea | |||
| Reply that nobility is necessary. | None | |||
 Petra Petra
|
Prompt: | Despite being a maiden, she was formidable. I am imagining the old general is even more greatly formidable. | ||
| Answers: | Reactions: | |||
| The maiden is more formidable. | None | |||
| The old general is more formidable. | +1 Support with Petra | |||
 Ashe Ashe
|
Prompt: | There's all kinds of work that needs doing. Stuff like building repairs and tossing out rubble... | ||
| Answers: | Reactions: | |||
| Agree to go. | +1 Support with Ashe | |||
| Turn him down. | None | |||
 Jeritza Jeritza
|
Prompt: | I can kill in your place... It wouldn't be a problem... | ||
| Answers: | Reactions: | |||
| That wouldn't work. | +1 Support with Mercedes | |||
| That sounds fine. | None | |||
 Raphael Raphael
|
Prompt: | I listened in and I kept hearing 'em say something that sounded like "funya munya." Wonder what's that's all about. | ||
| Answers: | Reactions: | |||
| Maybe that's what they say in their sleep. | None | |||
| Maybe it's an unknown language. | +1 Support with Raphael | |||
 Yuri Yuri
|
Prompt: | Not only that, but they've holed themselves up in the infamous Fort Merceus, of all places. How on earth are we going to tackle this? | ||
| Answers: | Reactions: | |||
| Ask if he has a secret plan. | None | |||
| Compliment the enemy's skill. | +1 Support with Yuri | |||
 Balthus Balthus
|
Prompt: | There's this guy back in Enbarr that I owe a whole bunch of money to and now he's joined up with old Duke Aegir. | ||
| Answers: | Reactions: | |||
| Ask why it's bad news. | None | |||
| Roll your eyes. | +1 Support with Balthus | |||
 Constance Constance
|
Prompt: | Why was Nuvelle not among them? Does our revival not serve as an attractive lure for other regions?! | ||
| Answers: | Reactions: | |||
| Consider the question. | None | |||
| Sigh. | +1 Support with Constance | |||
 Shamir Shamir
|
Prompt: | But to be honest I wouldn't mind taking out those who've changed sides to join Edelgard, either. | ||
| Answers: | Reactions: | |||
| Ask what she means. | None | |||
| Admonish her. | +1 Support with Shamir | |||
 Byleth Byleth
|
Prompt: | And they called me a demon for it. What else should I have done? | ||
| Answers: | Reactions: | |||
| Think about it. | +1 Support with Byleth | |||
| Tell them not to worry. | None | |||
Between Battles
| There doesn't appear to be any conversations that affect Support between this Chapter's battles. |
Fire Emblem Warriors: Three Hopes Related Guides
Story Walkthrough: List of Chapters
All Story Walkthroughs
 Crossed Roads
All Paralogues
Comment
Author

Chapter 13 Walkthrough - Severing the Past (Scarlet Blaze)
Rankings
- We could not find the message board you were looking for.
Gaming News

![Monster Hunter Stories 3 Review [First Impressions] | Simply Rejuvenating](https://img.game8.co/4438641/2a31b7702bd70e78ec8efd24661dacda.jpeg/show)


![Monster Hunter Stories 3 Review [First Impressions] | Simply Rejuvenating](https://img.game8.co/4438641/2a31b7702bd70e78ec8efd24661dacda.jpeg/thumb)
Popular Games

Genshin Impact Walkthrough & Guides Wiki
Honkai: Star Rail Walkthrough & Guides Wiki
Umamusume: Pretty Derby Walkthrough & Guides Wiki
Pokemon Pokopia Walkthrough & Guides Wiki
Resident Evil Requiem (RE9) Walkthrough & Guides Wiki
Monster Hunter Wilds Walkthrough & Guides Wiki
Wuthering Waves Walkthrough & Guides Wiki
Arknights: Endfield Walkthrough & Guides Wiki
Pokemon FireRed and LeafGreen (FRLG) Walkthrough & Guides Wiki
Pokemon TCG Pocket (PTCGP) Strategies & Guides Wiki


Recommended Games
Diablo 4: Vessel of Hatred Walkthrough & Guides Wiki
Cyberpunk 2077: Ultimate Edition Walkthrough & Guides Wiki
Fire Emblem Heroes (FEH) Walkthrough & Guides Wiki
Yu-Gi-Oh! Master Duel Walkthrough & Guides Wiki
Super Smash Bros. Ultimate Walkthrough & Guides Wiki
Pokemon Brilliant Diamond and Shining Pearl (BDSP) Walkthrough & Guides Wiki
Elden Ring Shadow of the Erdtree Walkthrough & Guides Wiki
Monster Hunter World Walkthrough & Guides Wiki
The Legend of Zelda: Tears of the Kingdom Walkthrough & Guides Wiki
Persona 3 Reload Walkthrough & Guides Wiki


All rights reserved
© Nintendo / INTELLIGENT SYSTEMS © KOEI TECMO GAMES CO., LTD. Fire Emblem and Nintendo Switch are trademarks of Nintendo. © Nintendo.
The copyrights of videos of games used in our content and other intellectual property rights belong to the provider of the game.
The contents we provide on this site were created personally by members of the Game8 editorial department.
We refuse the right to reuse or repost content taken without our permission such as data or images to other sites.