Final Chapter Walkthrough - The End of Tragedy (Azure Gleam)
Check out our:
★ Story Walkthrough for how to get S Rank Rewards and the Best Responses to Support Conversations!
★ Character Tier List / Class Tier List for party building!
★ List of Characters for guides on recruiting all characters and their best classes.
The End of Tragedy is the final chapter of the Azure Gleam Route in Fire Emblem Warriors Three Hopes. Read on to learn about the different quests, survey spots, rewards, and support conversations within the chapter, as well as our walkthrough for its main quest!
| ⮜ Previous Chapter | Next Chapter ⮞ |
|---|---|
| Chapter 14: The Absent Emperor (If Byleth is defeated) Chapter 16: Into the Chasm (If Byleth is recruited) |
- |
List of Contents
The End of Tragedy Recruitable Characters
| All Recruitable Characters in The End of Tragedy | ||
|---|---|---|
| There are no recruitable characters in this chapter. | ||
Recruitment Guide: How to Recruit Units
The End of Tragedy Quests, Survey Spots, and Rewards
The End of Tragedy Quests
| Quest | Type | Rewards |
|---|---|---|
| Homecoming | Main |
S Rank Reward: Gradivus x1
First Time Reward: Master Seal x1 |
The End of Tragedy Survey Spots
| There are no survey spots in this chapter. |
Homecoming Strategies and Walkthrough
Recommended Strategies for Homecoming
| Strategy | Description | Cost |
|---|---|---|
| Lion King's Wave Attack | Summon elites from the Holy Kingdom of Faerghus to launch an onslaught on the enemy. | 30 |
| Stronghold Sabotage | Decrease the durability of all enemy strongholds at the beginning of battle. | 10 |
Homecoming Objectives
| Victory Condition | Defeat Condition |
|---|---|
| Defeat Thales. | None. |
|
Main Objectives
1. Seize the strongholds and secure rendezvous points for the Alliance Army! 2. Defeat Anaximandros and their allies! 3. Disable the controls and stop all the Viskam! 4. Defeat Kronya and her allies, and defend the Alliance Army rendezvous points! 5. Defeat Anaximandros! 6. Eliminate the Imperial Army in the upper walls and secure a route to the monastery! 7. Defeat Count Varley and cut a path to the monastery! 8. Advance on Garreg Mach Monastery! 9. Defeat Kronya and aid Rhea! 10. Defeat Thales! Side Objectives ・ Seize the strongholds to stop the ballistae and fire orbs! |
|
Homecoming Walkthrough
| Objectives | |
|---|---|
| 1 | During Battle Prep, we recommend assigning Linhardt in your party because he has an advantage against most of the enemies throughout the map. |
| 2 | 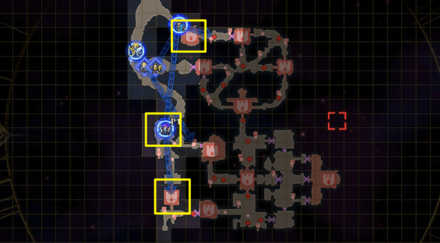 Seize the strongholds and secure rendezvous points for the Alliance Army! Seize the first three accessible strongholds by dividing your party and sending Shez down to the south-west stronghold, other playable units to the one on the west, and another group to the north. |
| 3 | 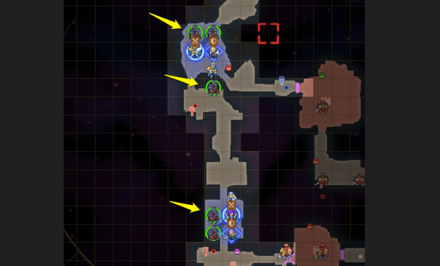 Defeat Anaximandros and their allies! Once you have seized the three strongholds, Anaximandros will appear. Defend your strongholds by defeating them! Once they are all defeated, the gates will open to the next strongholds. |
| 4 | 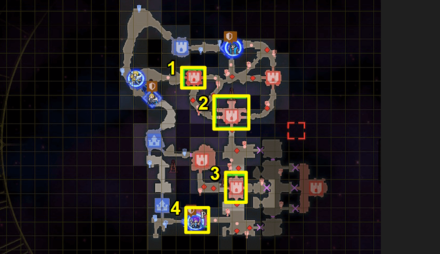 Disable the controls and stop all the Viskam! 4 Viskams will activate and deal large damage to different areas on the map. Seize the 4 strongholds and operate the levers to disable them. |
| 5 | 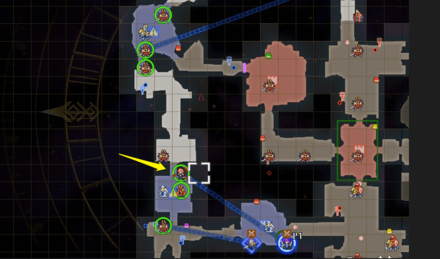 Defeat Kronya and her allies, and defend the Alliance Army rendezvous points! Just after the Viskams activate, Kronya and some allies will appear in the west and south-west strongholds. Send in units to defeat them before they seize your strongholds! |
| 6 | 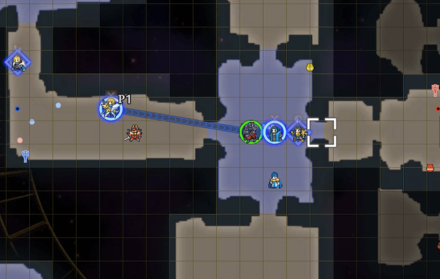 Defeat Anaximandros! Once you disable all 4 Viskams, more Anaximandros will appear and try to take over the strongholds again. Defeat them and continue to defend your strongholds! By the time you finish, Hilda will arrive with the Alliance Army. |
| 7 | 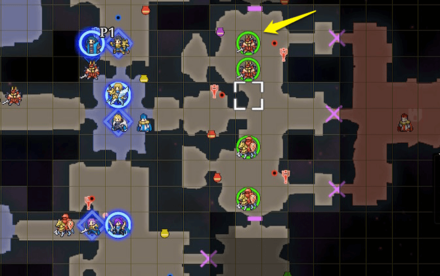 Eliminate the Imperial Army in the upper walls and secure a route to the monastery! The gates will open to the entrance of the monastery. Defeat the Mortal Savants stationed in the south-east base just before the monastery. Once all Mortal Savants are defeated, a Titanus will appear. Take advantage of your units' Warrior Gauge Attacks to deal significant damage to it. |
| 8 | 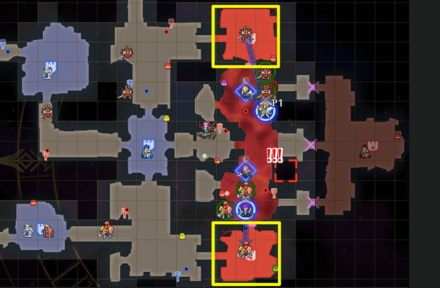 Seize the strongholds to stop the ballistae and fire orbs! The Imperial Army will use Blaze on the area and any unit inside will have their HP depleted gradually. Seize the nearby strongholds to stop the ballistae and fire orbs! Then, defeat the remaining enemies in the area. |
| 9 | 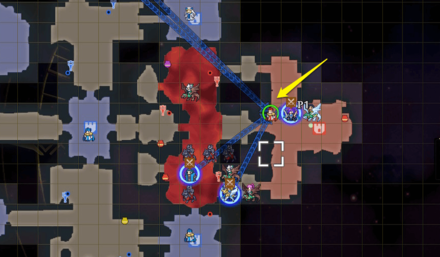 Defeat Count Varley and cut a path to the monastery! After defeating the Titanus, Dark Knights will appear as reinforcements. Then Claude will sneak into the monastery and open the last remaining gates to Count Varley. Command an All Out Offensive and defeat Count Varley! |
| 10 | 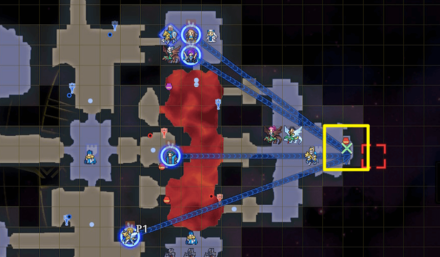 Advance on Garreg Mach Monastery! Defeating Count Varley will grant access to the interior of Garreg Mach Monastery. Go to the entrance point to advance inside. |
| 11 | 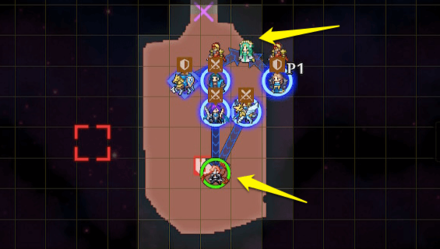 Defeat Kronya and aid Rhea! Rhea will be right inside the monastery upon entering, and Kronya will then appear shortly after. Defeat Kronya while guarding Rhea! A prompt for the Lion's Wave Attack strategy will appear. Initiate it by holding the
|
| 12 | 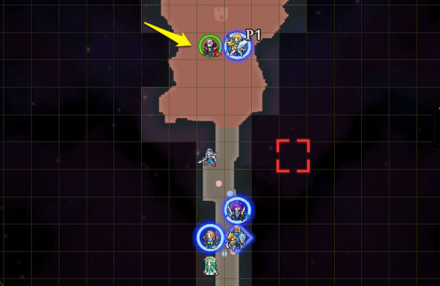 Defeat Thales! Advance to the very far end of the map to finally defeat Thales! He will alternate between attacking you himself, and having Edelgard attack for him. Continue to attack them both until Thales's HP is fully depleted! |
The End of Tragedy Support and Romance Conversations
In Camp (With Byleth)
 Dimitri Dimitri
|
Prompt: | Shez. Does Arval still dwell within you? | ||
|---|---|---|---|---|
| Answers: | Reactions: | |||
| Say Arval's gone. | None | |||
| Say they're still there. | +1 Support with Dimitri | |||
 Annette Annette
|
Prompt: | Just like old time. Maybe one day, we'll all be able to get along like we did back then. | ||
| Answers: | Reactions: | |||
| Give an encouraging nod. | +1 Support with Annette | |||
| Say it will be difficult. | None | |||
 Ingrid Ingrid
|
Prompt: | I hope we can maintain our good relationship with the Alliance after the war ends. | ||
| Answers: | Reactions: | |||
| Say we can. | +1 Support with Ingrid | |||
| Say we can't. | None | |||
 Bernadetta Bernadetta
|
Prompt: | Ahhh! Oh no, the time has come... It's finally here! | ||
| Answers: | Reactions: | |||
| Express confusion. | +1 Support with Bernadetta | |||
| Sympathize with her. | None | |||
 Dorothea Dorothea
|
Prompt: | If we defeat those horrid people manipulating the Empire, perhaps that will lay the foundation for a peaceful future. | ||
| Answers: | Reactions: | |||
| Correct her. | None | |||
| Cheer her up. | +1 Support with Dorothea | |||
 Petra Petra
|
Prompt: | When relations between two regions can easily shatter, a third one takes importance. | ||
| Answers: | Reactions: | |||
| Agree with her. | None | |||
| Bring up the Empire. | +1 Support with Petra | |||
 Lorenz Lorenz
|
Prompt: | I suspect we will return to Leicester once the monastery is reclaimed, you see. | ||
| Answers: | Reactions: | |||
| Thank him for everything. | None | |||
| Tell him you'll miss him. | +1 Support with Lorenz | |||
 Raphael Raphael
|
Prompt: | You must feel the same way, right? C'mon, you can tell me. | ||
| Answers: | Reactions: | |||
| Agree with him. | +1 Support with Raphael | |||
| Disagree with him. | None | |||
 Marianne Marianne
|
Prompt: | I feel the same. I believe Claude will make it. | ||
| Answers: | Reactions: | |||
| Say you're impressed. | +1 Support with Marianne | |||
| Express suspicion. | None | |||
 Hapi Hapi
|
Prompt: | You OK? Not gonna pull any more shenanigans, yeah? | ||
| Answers: | Reactions: | |||
| Say you're OK. | None | |||
| Say you're not OK. | +1 Support with Hapi | |||
 Constance Constance
|
Prompt: | Feel free to use me as a decoy, or make me pretend to surrender, or have me sabotage them from underground. I care not what I do. | ||
| Answers: | Reactions: | |||
| Refuse. | None | |||
| Comment on her suggestions. | +1 Support with Constance | |||
 Catherine Catherine
|
Prompt: | Ugh, I can't stop worrying about Lady Rhea. We need to get out there right now and save her, Shez. | ||
| Answers: | Reactions: | |||
| Chide her. | None | |||
| Agree with her. | +1 Support with Catherine | |||
 Byleth Byleth
|
Prompt: | I was so confused when you got caught in that strange magic and vanished. | ||
| Answers: | Reactions: | |||
| Apologize for attacking her. | None | |||
| Thank her for not killing you. | +1 Support with Byleth | |||
In Camp (Without Byleth)
 Dimitri Dimitri
|
Prompt: | If perchance you face him on the battlefield, will you allow me to deal the killing blow? | ||
|---|---|---|---|---|
| Answers: | Reactions: | |||
| Nod in assent. | Dimitri | |||
| Waffle a bit. | TBD | |||
Between Battles
| There doesn't appear to be any conversations that affect Support between this Chapter's battles. |
Fire Emblem Warriors: Three Hopes Related Guides

Story Walkthrough: List of Chapters
All Story Walkthroughs
All Paralogues
Author
Final Chapter Walkthrough - The End of Tragedy (Azure Gleam)
improvement survey
03/2026
improving Game8's site?

Your answers will help us to improve our website.
Note: Please be sure not to enter any kind of personal information into your response.

We hope you continue to make use of Game8.
Rankings
- We could not find the message board you were looking for.
Gaming News
Popular Games

Genshin Impact Walkthrough & Guides Wiki

Honkai: Star Rail Walkthrough & Guides Wiki

Umamusume: Pretty Derby Walkthrough & Guides Wiki

Pokemon Pokopia Walkthrough & Guides Wiki

Resident Evil Requiem (RE9) Walkthrough & Guides Wiki

Monster Hunter Wilds Walkthrough & Guides Wiki

Wuthering Waves Walkthrough & Guides Wiki

Arknights: Endfield Walkthrough & Guides Wiki

Pokemon FireRed and LeafGreen (FRLG) Walkthrough & Guides Wiki

Pokemon TCG Pocket (PTCGP) Strategies & Guides Wiki
Recommended Games

Diablo 4: Vessel of Hatred Walkthrough & Guides Wiki

Cyberpunk 2077: Ultimate Edition Walkthrough & Guides Wiki

Fire Emblem Heroes (FEH) Walkthrough & Guides Wiki

Yu-Gi-Oh! Master Duel Walkthrough & Guides Wiki

Super Smash Bros. Ultimate Walkthrough & Guides Wiki

Pokemon Brilliant Diamond and Shining Pearl (BDSP) Walkthrough & Guides Wiki

Elden Ring Shadow of the Erdtree Walkthrough & Guides Wiki

Monster Hunter World Walkthrough & Guides Wiki

The Legend of Zelda: Tears of the Kingdom Walkthrough & Guides Wiki

Persona 3 Reload Walkthrough & Guides Wiki
All rights reserved
© Nintendo / INTELLIGENT SYSTEMS © KOEI TECMO GAMES CO., LTD. Fire Emblem and Nintendo Switch are trademarks of Nintendo. © Nintendo.
The copyrights of videos of games used in our content and other intellectual property rights belong to the provider of the game.
The contents we provide on this site were created personally by members of the Game8 editorial department.
We refuse the right to reuse or repost content taken without our permission such as data or images to other sites.
 Crossed Roads


![Monster Hunter Stories 3 Review [First Impressions] | Simply Rejuvenating](https://img.game8.co/4438641/2a31b7702bd70e78ec8efd24661dacda.jpeg/thumb)


