 Crossed Roads
This survey will take about 1 minute.
Your answers will help us to improve our website.
Fire Emblem Warriors Three Hopes
Chapter 12 Walkthrough - A Trick of the Goddess (Azure Gleam)
Check out our:
★ Story Walkthrough for how to get S Rank Rewards and the Best Responses to Support Conversations!
★ Character Tier List / Class Tier List for party building!
★ List of Characters for guides on recruiting all characters and their best classes.

A Trick of the Goddess is Chapter 12 of the Azure Gleam Route in Fire Emblem Warriors Three Hopes. Read on to learn about the different quests, survey spots, rewards, and support conversations within the chapter, as well as our walkthrough for its main quest!
| ⮜ Previous Chapter | Next Chapter ⮞ |
|---|---|
| Chapter 11: Reprisal |
Chapter 13: Clash of Torment |
List of Contents
A Trick of the Goddess Recruitable Characters
| All Recruitable Characters in A Trick of the Goddess | ||
|---|---|---|
 Byleth (F) Byleth (F)
|
 Jeralt Jeralt
|
|
Recruiting Byleth and Jeralt requires choosing the strategy 'Locate Ambushers', defeating Fleche, and defeating Randolph before Byleth reaches him.
Recruitment Guide: How to Recruit Units
A Trick of the Goddess Quests, Survey Spots, and Rewards
A Trick of the Goddess Quests
| Quest | Type | Rewards |
|---|---|---|
| The Conquest of Hevring | Main |
S Rank Reward: Tathlum Bow x1
First Time Reward: Master Seal x1 |
| Villages in Peril | Side |
S Rank Reward: Aura Knuckles x1
Capture Reward: 6,600 G |
| The Way to Hevring | Side |
S Rank Reward: Master Seal x1
Capture Reward: Training Points Recovered: 1 |
| Charge into Enemy Territory | Side |
S Rank Reward: Abyssal Tome x1
Capture Reward: Activity Points Recovered: 1 |
| Scramble for the Stronghold | Side |
S Rank Reward: Bow of Zoltan x10
Capture Reward: 6,600 G |
| The Bandit Stronghold | Side |
S Rank Reward: Extra Large Bullion x1
Capture Reward: 6,600 G |
| An Ambush from the Shadows | Side |
S Rank Reward: Bolt Axe x1
Capture Reward: Activity Points Recovered: 1 |
| Intel on the Imperial Army | Side |
S Rank Reward: Rocky Burdock x1
Capture Reward: Training Points Recovered: 1 |
A Trick of the Goddess Survey Spots
| Side Mission | Survey Spot | Type | Reward / Conditions |
|---|---|---|---|
| Villages in Peril | House | Meet Condition |
Survey Conditions: Trade Stylish Hair Clip x1
Reward: Free Forge Uses: 10 |
| Villages in Peril | House | Visit | Reward: Morale Up for two selected units |
| Villages in Peril | Cave | Visit | Reward: Lavish Building Material x20 and Elite Training Gear x8 |
| Villages in Peril | House | Battle | Reward: Assorted rewards from battle. |
| The Way to Hevring | Mine | Visit | Reward: Wootz Steel x10 |
| The Way to Hevring | Mine | Meet Condition |
Survey Conditions: Must have the Mortal Savant class.
Reward: 8,800 G |
| The Way to Hevring | Spring | Visit | Reward: Support Points Up for two selected units |
| The Way to Hevring | House | Visit | Reward: Lavish Building Material x20, Luxurious Furnishings x8, and Purveyor's License x13 |
| Charge into Enemy Territory | Tower | Visit | Reward: Lavish Building Material x20 and Advanced Combat Manual x15 |
| Charge into Enemy Territory | Ruins | Visit | Reward: Monstrous Strength Ring x1 |
| Charge into Enemy Territory | Tent | Visit | Reward: Locate Ambushers |
| Scramble for the Strongholds | Tent | Visit | Reward: Ironclad Defense |
| Scramble for the Strongholds | House | Pay |
Gold Required: 500 G
Reward: Arcane Crystal x10 |
| Scramble for the Strongholds | House | Visit | Reward: Master Seal x3 |
| Scramble for the Strongholds | Tower | Choice | Reward: Platepiercer Duelists or Wingrender Archers |
| The Bandit Stronghold | House | Choice |
Survey Conditions: Watch the contest of strength or Try some of the local delicacies
Reward: Training Points Recovered: 1 (for choosing contest) or Activity Points Recovered: 1 (for choosing local delicacies) |
| The Bandit Stronghold | Cave | Visit | Reward: Lavish Building Material x20 and Hero's Insignia x8 |
| The Bandit Stronghold | Cave | Visit | Reward: Gauntlet Combat Arts Level Up |
| The Bandit Stronghold | House | Meet Condition |
Survey Conditions: Must attan Battle Rank S on The Bandit Stronghold.
Reward: Tea Leaves x1, Stylish Hair Clip x1, and Dapper Handkerchief x1 |
| The Bandit Stronghold | Tent | Meet Condition |
Survey Conditions: Trade The History of Fodlan x1
Reward: Crestological Mysteries |
| An Ambush from the Shadows | Mine | Visit | Reward: Agarthium x10 |
| An Ambush from the Shadows | Mine | Meet Condition |
Survey Conditions: Defeat 2,000 enemies in Chapter 12.
Reward: Def Up |
| An Ambush from the Shadows | Mine | Choice | Reward: Umbral Steel x10 or Mythril x10 |
| Intel on the Imperial Army | House | Visit | Reward: Lavish Building Material x20, Master Smithing Set x15, and Storage Compartment x8 |
| Intel on the Imperial Army | House | Meet Condition |
Survey Conditions: Must complete all side missions in this area.
Reward: Acquire the Dancer Class |
The Conquest of Hevring Strategies and Walkthrough
Recommended Strategies for The Conquest of Hevring
| Strategy | Description | Cost |
|---|---|---|
| Locate Ambushers | Mobilize a reconnaissance unit to detect ambushes. This strategy will significantly turn the tide of battle. | 30 |
| False Rumors | Slightly weaken the enemy for a period of time by demoralizing them at the start of battle. | 10 |
| Assign Armored Unit | Assign an armored unit to protect a target. | 10 |
| Assign Staff Officers | Slightly strengthen allies for a period of time at the start of battle. | 10 |
The Conquest of Hevring Objectives
| Victory Condition | Defeat Condition |
|---|---|
| Defeat Randolph. | Dimitri or Rodrigue is routed. |
|
Main Objectives
1. Defeat the Imperial Army vanguard! 2. Advance on Randolph and watch out for mercenary ambushers! 3. Defeat Fleche! 4. Defeat the mercenary raiders and prevent them from infiltrating the Allied Base! 5. Defeat Randolph! Side Objectives ・ Defeat the Tricksters and aid the Paladin ・ Defeat Byleth! |
|
The Conquest of Hevring Walkthrough
| Objectives | |
|---|---|
| 1 | 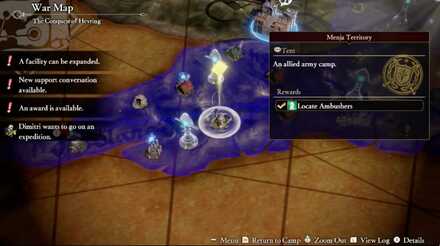 Preparing for Byleth's Recruitment. Before the battle, you will need to unlock the Locate Ambushers Strategy. This will be found at a Survey Spot labeled Menja Territory on the map. |
| 2 |  At the start of the battle, select the Locate Ambushers Strategy. Be sure to save before the battle, since you'll miss your chance to recruit Byleth if you fail! |
| 3 | 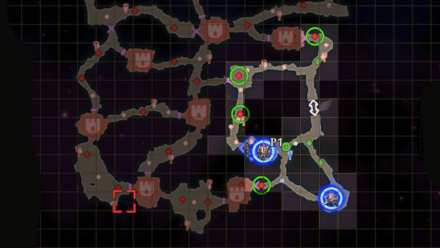 Defeat the Imperial Army vanguard! At the start of the battle, have four of your controllable units assigned to one Imperial Army vanguard with one support unit tied one to each. It is recommended to have Shez take on the center vanguards in preparation for their next move. |
| 3 | 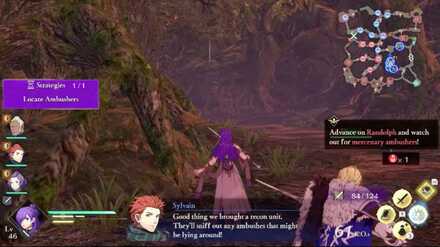 Stay in Position and Wait for the Strategy Prompt! Use the Locate Ambushers Strategy after defeating the Imperial Army vanguards. This is important to do, as pushing further and getting caught by the mercenaries will rob you off your chance of recruiting Byleth. |
| 4 | 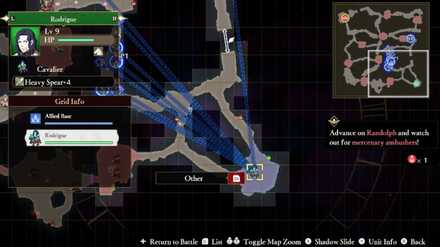 Prevent Units from Getting Caught! This is where things get tricky. If any of your units are seen by a Mercenary, the objective will change and you won't be able to recruit Byleth. Use an All-Out Defense on the bottom-right stronghold to get them out of the way. |
| 5 |  Follow the Green Arrow Path! A green arrow will appear on your map which will show the way to go to avoid any Mercenaries. Follow it and defeat any Stronghold Leaders on the way to open closed gates. If you succeed, the objective will change to Defeat Fleche. |
| 6 | 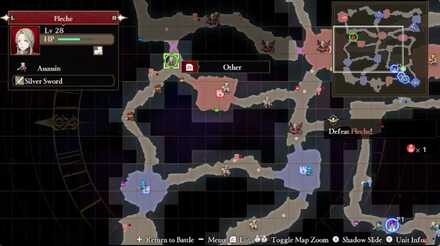 Defeat Fleche! A new Main Mission will appear to defeat the Mercenaries and prevent them from infiltrating the Allied Base. Complete this objective, then Defeat Fleche. Note that the side mission Defeating the Tricksters is optional and won't affect Byleth's recruitment at all. |
| 7 | 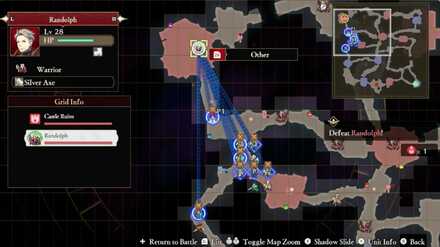 Ignore Byleth and Defeat Randolph! A new Main Mission will appear to Defeat Randolph. Complete this mission before Byleth reaches Randolph. Ignore the Side Mission to Defeat Byleth. If you defeat Byleth, you will not be able to recruit them. |
| 8 | 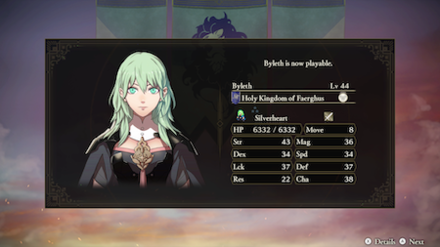 Byleth and Jeralt Joins Your Party! If you successfully defeat Randolph without defeating Byleth, the battle will end, and both Byleth and Jeralt will join your party! |
A Trick of the Goddess Support and Romance Conversations
In Camp
 Dedue Dedue
|
Prompt: | Indeed. He was terribly despondent when he saw it break this time. | ||
|---|---|---|---|---|
| Answers: | Reactions: | |||
| Suggest he get a new one. | None | |||
| Come up with a solution. | +1 Support with Ashe | |||
 Sylvain Sylvain
|
Prompt: | At this rate, the only things the Imperial army can offer them are losing battles and table scraps, right? | ||
| Answers: | Reactions: | |||
| Maybe they owe the Empire. | None | |||
| Maybe the want to avoid the Kingdom. | +1 Support with Sylvain | |||
| No idea. | TBD | |||
 Annette Annette
|
Prompt: | But I'm worried we wouldn't notice if one of them happened to be a spy. | ||
| Answers: | Reactions: | |||
| That's true. | +1 Support with Annette | |||
| It'll be fine. | None | |||
 Linhardt Linhardt
|
Prompt: | It will be such a pain if they expect me to persuade the Imperial forces on this coming front. | ||
| Answers: | Reactions: | |||
| That's the plan. | +1 Support with Linhardt | |||
| That's not the plan. | None | |||
 Bernadetta Bernadetta
|
Prompt: | Or maybe not. I've been holed up so much, I don't know where we are anymore! | ||
| Answers: | Reactions: | |||
| Tell her we're getting closer. | None | |||
| Lie a little. | +1 Support with Bernadetta | |||
 Petra Petra
|
Prompt: | Almost no one in Fodlan remembers.. This is good in its own way, I think. | ||
| Answers: | Reactions: | |||
| Question her. | None | |||
| Agree with her. | +1 Support with Petra | |||
 Raphael Raphael
|
Prompt: | But barging into someone else's homeland and trashing the place just doesn't feel right. | ||
| Answers: | Reactions: | |||
| Tell him we don't have a choice. | None | |||
| Tell him you feel the same. | +1 Support with Raphael | |||
 Marianne Marianne
|
Prompt: | ... | ||
| Answers: | Reactions: | |||
| Ask if she's all right. | None | |||
| Stay silent. | +1 Support with Marianne | |||
 Seteth Seteth
|
Prompt: | He is already an excellent leader, especially for one so young. I am happy to advise him, whether he needs it or not. | ||
| Answers: | Reactions: | |||
| Ask how he knows so much. | +1 Support with Seteth | |||
| Tell him he's young too. | None | |||
 Shamir Shamir
|
Prompt: | They're saying Garreg Mach's as good as ours, but I'm not so sure. | ||
| Answers: | Reactions: | |||
| Taking it back will be difficult. | +1 Support with Shamir | |||
| Taking it back will be easy. | None | |||
Between Battles
| There doesn't appear to be any conversations that affect Support between this Chapter's battles. |
Fire Emblem Warriors: Three Hopes Related Guides

Story Walkthrough: List of Chapters
All Story Walkthroughs
All Paralogues
Comment
1  Anonymous over 3 years
I could be wrong about this… Rodrigue dies in this chapter even when playing on casual mode of any game difficulty as it is part of the story if the player defeats Fleche, Byleth, Randolph, and Jeralt.
Author

Chapter 12 Walkthrough - A Trick of the Goddess (Azure Gleam)
Please participate in our site
improvement survey
03/2026
improvement survey
03/2026
Would you assist in
improving Game8's site?
improving Game8's site?

×
We are listening to our users' valuable opinions and discussing how to act on them.
The information collected through this survey will be used for the purpose of improving our services. In addition, the information will only be disclosed a part of a statistic in a format that will not allow identification of personal information.
Begin Survey
Not Now
×
Please rate each item regarding Game8.co's Advertisements.
Amount of Ads
Very Dissatisfied
Somewhat Dissatisfied
Fine
Somewhat Satisfied
Highly Satisfied
Placement of Ads
Timing of Ad Display
Ad Loading Speed
Safeness of Ads
Content of Ads
×
Please rate each item regarding Game8.co's Quality of Articles.
Amount of information
Very Dissatisfied
Somewhat Dissatisfied
Fine
Somewhat Satisfied
Highly Satisfied
Frequency of updates
Speed of new information
Accuracy of articles
Understandibility of articles
Readability of sentences
×
Please rate each item regarding Game8.co's Usability of the Site.
Ease of finding information
Very Dissatisfied
Somewhat Dissatisfied
Fine
Somewhat Satisfied
Highly Satisfied
Loading Speed
Use of Color
Font Size
Visibility of Images
Easy to Understand Layout
×
Please rate each item regarding Game8.co's Message Boards, Comments.
Ease of Writing
Very Dissatisfied
Somewhat Dissatisfied
Fine
Somewhat Satisfied
Highly Satisfied
Readability
Ease in Finding Information
Comment Quality
Comment Quantity
Admin Response
×
Please rate each item regarding Game8.co's Site's new design.
Please rate our site's new design
Very Dissatisfied
Somewhat Dissatisfied
Fine
Somewhat Satisfied
Highly Satisfied
Do you think that the website's design change makes the site easier to use?
Has the new design made it easier for you to find information on the site?
Has the new design improved the overall visual appeal of the site?
How would you rate your overall satisfaction with the new design of the site?
×
How likely are you to recommend Game8 to someone you know?
Very Unlikely
0
1
2
3
4
5
6
7
8
9
10
Very Likely
If you have other opinions regarding potential improvement to the website, please share them with us. We would appreciate your honest opinion.
Note: This is a free response section, so you can proceed without entering anything.
Note: Please be sure not to enter any kind of personal information into your response.
Note: Please be sure not to enter any kind of personal information into your response.
×
Thank You
×
Thank you for participating in our survey! Your answers will help us to improve the quality of our website and services.
We hope you continue to make use of Game8.
We hope you continue to make use of Game8.
Close
Rankings
- We could not find the message board you were looking for.
Gaming News


![Monster Hunter Stories 3 Review [First Impressions] | Simply Rejuvenating](https://img.game8.co/4438641/2a31b7702bd70e78ec8efd24661dacda.jpeg/thumb)
Popular Games

Genshin Impact Walkthrough & Guides Wiki
Honkai: Star Rail Walkthrough & Guides Wiki
Umamusume: Pretty Derby Walkthrough & Guides Wiki
Pokemon Pokopia Walkthrough & Guides Wiki
Resident Evil Requiem (RE9) Walkthrough & Guides Wiki
Monster Hunter Wilds Walkthrough & Guides Wiki
Wuthering Waves Walkthrough & Guides Wiki
Arknights: Endfield Walkthrough & Guides Wiki
Pokemon FireRed and LeafGreen (FRLG) Walkthrough & Guides Wiki
Pokemon TCG Pocket (PTCGP) Strategies & Guides Wiki


Recommended Games
Diablo 4: Vessel of Hatred Walkthrough & Guides Wiki
Cyberpunk 2077: Ultimate Edition Walkthrough & Guides Wiki
Fire Emblem Heroes (FEH) Walkthrough & Guides Wiki
Yu-Gi-Oh! Master Duel Walkthrough & Guides Wiki
Super Smash Bros. Ultimate Walkthrough & Guides Wiki
Pokemon Brilliant Diamond and Shining Pearl (BDSP) Walkthrough & Guides Wiki
Elden Ring Shadow of the Erdtree Walkthrough & Guides Wiki
Monster Hunter World Walkthrough & Guides Wiki
The Legend of Zelda: Tears of the Kingdom Walkthrough & Guides Wiki
Persona 3 Reload Walkthrough & Guides Wiki


All rights reserved
© Nintendo / INTELLIGENT SYSTEMS © KOEI TECMO GAMES CO., LTD. Fire Emblem and Nintendo Switch are trademarks of Nintendo. © Nintendo.
The copyrights of videos of games used in our content and other intellectual property rights belong to the provider of the game.
The contents we provide on this site were created personally by members of the Game8 editorial department.
We refuse the right to reuse or repost content taken without our permission such as data or images to other sites.
Rodrigue dies in this chapter even when playing on casual mode of any game difficulty as it is part of the story (the player has to defeat Fleche, Byleth, Randolph, and Jeralt).