 Crossed Roads
This survey will take about 1 minute.
Your answers will help us to improve our website.
Fire Emblem Warriors Three Hopes
Chapter 06 Walkthrough - The Leader's Stratagem (Golden Wildfire)
Check out our:
★ Story Walkthrough for how to get S Rank Rewards and the Best Responses to Support Conversations!
★ Character Tier List / Class Tier List for party building!
★ List of Characters for guides on recruiting all characters and their best classes.

The Leader's Stratagem is Chapter 06 of the Golden Wildfire Route in Fire Emblem Warriors Three Hopes. Read on to learn about the different quests, survey spots, rewards, and support conversations within the chapter, as well as our walkthrough for its main quest!
| ⮜ Previous Chapter | Next Chapter ⮞ |
|---|---|
| Chapter 5: The Golden Guardian |
Chapter 7: A Contest of Beasts |
List of Contents
The Leader's Stratagem Recruitable Characters
| All Recruitable Characters in The Leader's Stratagem | ||
|---|---|---|
 Bernadetta Bernadetta
|
||
Bernadetta can be recruited using the Persuade Strategy during the Battle Prep part of the main quest. You need at least 10 Strategy Points to recruit her.
Recruitment Guide: How to Recruit Units
The Leader's Stratagem Quests, Survey Spots, and Rewards
The Leader's Stratagem Quests
| Quest | Type | Rewards |
|---|---|---|
| Besieging the Imperial Army | Main |
S Rank Reward: Golden Apple x1
First Time Reward: Intermediate Seal x1 |
| Secure Derdriu | Side |
S Rank Reward: Intermediate Seal x1
Capture Reward: Training Points Recovered: 1 |
| Attack the Imperial Camp | Side |
S Rank Reward: Wolf Fangs x1
Capture Reward: Activity Points Recovered: 1 |
| Establish a Siege Base | Side |
S Rank Reward: Blessed Bow x1
Capture Reward: 3,000 G |
| Defend Daphnel | Side |
S Rank Reward: Heavy Spear x1
Capture Reward: Activity Points Recovered: 1 |
| Interfere with the Imperial Army | Side |
S Rank Reward: Miracle Bean x1
Capture Reward: Training Points Recovered: 1 |
| Capture the Thieves - Golden Deer | Extra | No Fixed Rewards |
| A Grave Threat - Golden Deer | Extra | No Fixed Rewards |
| A Grave Threat- Golden Deer | Extra | No Fixed Rewards |
The Leader's Stratagem Survey Spots
| Side Mission | Survey Spot | Type | Reward / Conditions |
|---|---|---|---|
| Secure Derdriu | Lake | Choice | Reward: Morale Up for two Units of choice |
| Secure Derdriu | Tent | Visit | Reward: Basic Building Material x38 and Recruit Training Gear x30 |
| Attack the Imperial Camp | House | Pay |
Gold Required: 1000 G
Reward: Basic Building Material x38, Beginner Combat Manual x20, and Storage Bag x10 |
| Attack the Imperial Camp | Tent | Visiit | Reward: Imperial Formation Inntel |
| Establish a Siege Base | Cave | Meet Conditions |
Survey Conditions: Total Enemies defeated in this chapter must be over 2000
Reward: Owl Feather x2 |
| Establish a Siege Base | House | Meet Conditions |
Survey Conditions: Trade 5 Smithing Stone
Reward: Dexterity Ring |
| Establish a Siege Base | Ruins | Visit | Reward: Basic Building Material x38 and Humble Furnishings x10 |
| Establish a Siege Base | Tent | Choice |
Survey Conditions: Choose between watching a contest of Strength or Try their Local Delciacies
Reward: Training Points Recovered: 1 or Activity Points Recovered: 1 |
| Defend Daphnel | Cave | Choice | Reward: Raise Sword Combat Art Level for a unit. |
| Defend Daphnel | Forest | Choice | Reward: Killer Knuckles or Killer Tome |
| Defend Daphnel | Bridge | Visit | Reward: Basic Building Material x38 and Apprentice Smithing Set x15 |
| Interfere with the Imperial Army | House | Visit | Reward: Sutler's License x15, Squire's Insignia x15 |
| Interfere with the Imperial Army | Cave | Meet Conditions |
Survey Conditions: Must complete all side missions in this area.
Reward: Light up the Beacon |
Besieging the Imperial Army Strategies and Walkthrough
Recommended Strategies for Besieging the Imperial Army
| Strategy | Description | Cost |
|---|---|---|
| Persuade Bernadetta | Convince an enemy general to join your army. | 10 |
| Light the Beacon | Light beacons to confuse the enemy and temporarily halt the enemy advance. | 20 (GW) / 30 (AG) |
| Mounted Surge | Summon a mounted unit to engage the enemy. Reinforcements will deploy periodically. | 10 |
| Assign Staff Officers | Slightly strengthen allies for a period of time at the start of battle. | 10 |
Besieging the Imperial Army Objectives
| Victory Condition | Defeat Condition |
|---|---|
| Defeat Ferdinand. | None. |
|
Main Objectives
1. Defeat the Archers and pursue the Imperial Army! 2. Don't let Ferdinand retreat. 3. Search the strongholds for the sniper, Bernadetta! 4. Defeat Bernadetta!/ Defeat and recruit Bernadetta! 5. Break through Jeralt's defenses and pursue Ferdinand! 6. Defeat Byleth! 7. Defeat Ladislava! Side Objectives ・ Face and defeat Byleth! ・ Prevent the Pegasus Knight squadron from breaking the siege! |
|
Besieging the Imperial Army Walkthrough
| Objectives | |
|---|---|
| 1 | 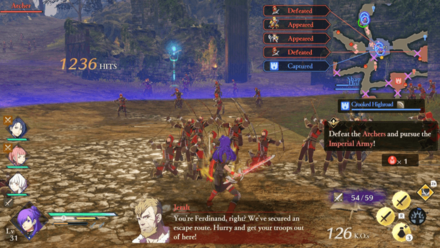 Once the battle begins, send your allies towards the nearby enemies and begin engaging them. Jeralt's Mercenaries will appear to the south, but they will be inaccessible for the moment. |
| 2 | Defeat the archers. Don't worry about Ferdinand at the moment. He can't get away just yet. Note that at this point, it's best to keep your allies closer to the center. |
| 3 | 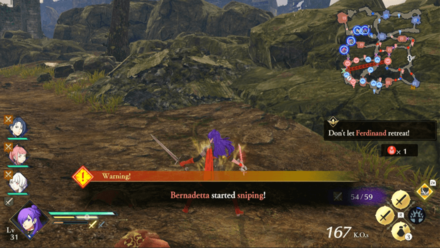 Once the archers are defeated, Bernadetta will begin sniping the field, causing area of effect attacks. |
| 4 | 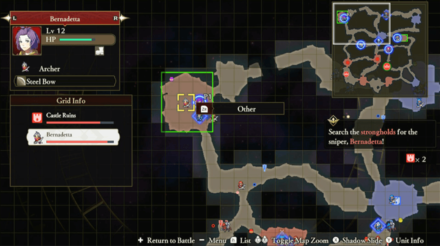 Bernadetta can be found in the Castle Ruins to the northwest of the map. If you chose the strategy to recruit her, this is your chance! |
| 5 | 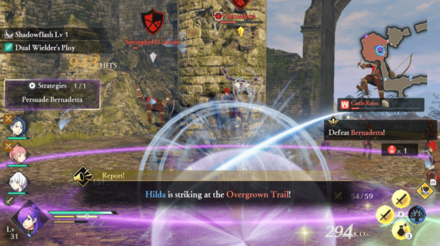 Quickly take her out and she will be recruited. While you're fighting her, have your allies take over the other strongholds. |
| 6 | 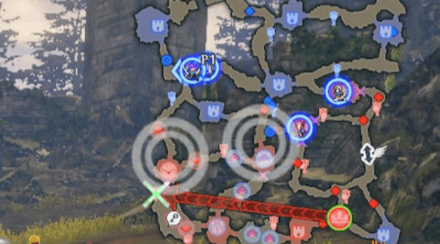 Jeralt and Alois will open the gates. Your allies should be nearby to quickly intercept and take them down. With Shez likely being your most powerful character, keep them near the center. |
| 7 | 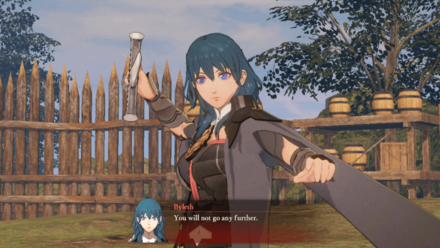 Before you can defeat Jeralt and Alois, Byleth will appear. This begins an optional mission to take them down. If you're not strong enough just yet, attack Byleth with multiple allies at your side. |
| 8 | 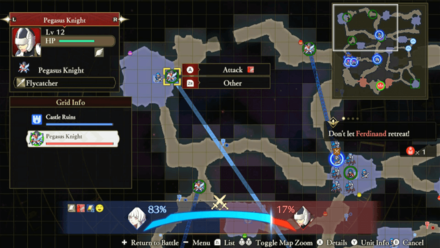 Have at least one ally hold Ferdinand back in the south while you deal with Byleth. At this point, Pegasus Riders will join the fray, beginning an optional mission. Your allies should be close enough to take most of them out fairly quickly. Having an Archer or Bow user is great for this side mission! |
| 9 | 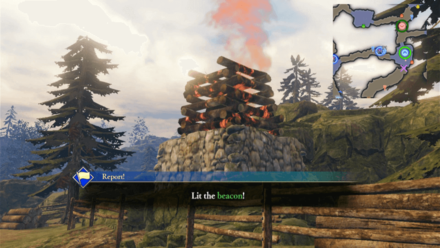 Help defeat Jeralt and Alois. By this time, you can use the Light the Beacon strategy to help give you the upper hand. This gives you more time to fight. You should be able to finish off Jeralt and Alois at the same time as the Pegasus Knights! |
| 10 | 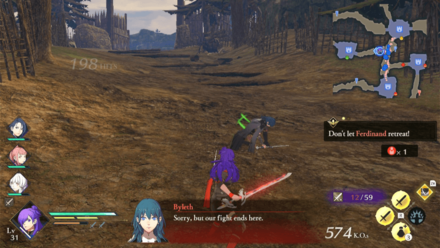 If you haven't fought Byleth yet, this is your chance. Head to their location and quickly take them down. You'll need to break pots afterwards to compensate for any resources you use. |
| 11 |  Focus your attention now on Ferdinand! But don't finish all your resources. He's not the final battle of this quest. |
| 12 | 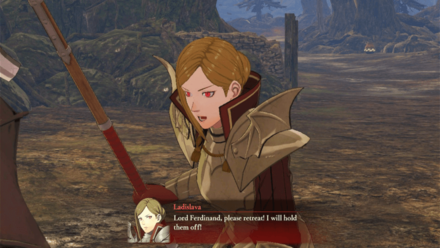 Once Ferdinand is down, Ladislava will come out to try and save the day. Unleash everything you have to defeat her! This will end the Quest. |
The Leader's Stratagem Support and Romance Conversations
In Camp
 Claude Claude
|
Prompt: | There's not a moment to lose. I'm counting on you, Shez. | ||
|---|---|---|---|---|
| Answers: | Reactions: | |||
| Reassure him. | +1 Support with Claude. | |||
| Tell him he needs to give it his all | None | |||
 Holst Holst
|
Prompt: | That's right. No matter how many enemies descend upon us, I won't let anyone lay a finger on you. | ||
| Answers: | Reactions: | |||
| Leave quietly.. | None | |||
| Compliment their close relationship. | +1 Support with Holst | |||
 Lorenz Lorenz
|
Prompt: | That they carried on whilst keeping me in the dark fills me with such a sense of emptiness. | ||
| Answers: | Reactions: | |||
| Comfort him. | None | |||
| Encourage him. | +1 Support with Lorenz | |||
 Ignatz Ignatz
|
Prompt: | If they'd stayed with the Empire, we would've had to face Count Gloucester in battle. | ||
| Answers: | Reactions: | |||
| Sympathize. | +1 Support with Ignatz | |||
| Express confusion. | None | |||
 Marianne Marianne
|
Prompt: | But the idea of annihilating the Imperial army is just so... | ||
| Answers: | Reactions: | |||
| Sympathize. | +1 Support with Marianne | |||
| Encourage her. | None | |||
 Leonie Leonie
|
Prompt: | And apparently one of them's already in Leicester. We could end up facing them at some point. | ||
| Answers: | Reactions: | |||
| Ask if she knows anyone in those companies. | None | |||
| Ask what companies they hired. | +1 Support with Leonie | |||
 Linhardt Linhardt
|
Prompt: | To be perfectly honest, he is much more suited to defense than offense, but I imagine he volunteered himself to lead the army. | ||
| Answers: | Reactions: | |||
| Doubt that statement. | +1 Support with Linhardt | |||
| Agree with him. | None | |||
 Balthus Balthus
|
Prompt: | I've got a half-brother here, not to mention friends and some other people I'm indebted to. So I'm glad things worked out this way. | ||
| Answers: | Reactions: | |||
| Ask why he was with the Empire. | None | |||
| Ask about the people he knows here. | +1 Support with Balthus | |||
Between Battles
|
Claude
|
Prompt: | I'm dancing as fast as I can here, but there's no end in sight. And these feet are starting to get tired. | ||
|---|---|---|---|---|
| Answers: | Reactions: | |||
| Assure him he can do it. | None | |||
| Tell him you'll get through it together. | +1 Support with Claude | |||
Fire Emblem Warriors: Three Hopes Related Guides

Story Walkthrough: List of Chapters
All Story Walkthroughs
All Paralogues
Author

Chapter 06 Walkthrough - The Leader's Stratagem (Golden Wildfire)
Please participate in our site
improvement survey
03/2026
improvement survey
03/2026
Would you assist in
improving Game8's site?
improving Game8's site?

×
We are listening to our users' valuable opinions and discussing how to act on them.
The information collected through this survey will be used for the purpose of improving our services. In addition, the information will only be disclosed a part of a statistic in a format that will not allow identification of personal information.
Begin Survey
Not Now
×
Please rate each item regarding Game8.co's Advertisements.
Amount of Ads
Very Dissatisfied
Somewhat Dissatisfied
Fine
Somewhat Satisfied
Highly Satisfied
Placement of Ads
Timing of Ad Display
Ad Loading Speed
Safeness of Ads
Content of Ads
×
Please rate each item regarding Game8.co's Quality of Articles.
Amount of information
Very Dissatisfied
Somewhat Dissatisfied
Fine
Somewhat Satisfied
Highly Satisfied
Frequency of updates
Speed of new information
Accuracy of articles
Understandibility of articles
Readability of sentences
×
Please rate each item regarding Game8.co's Usability of the Site.
Ease of finding information
Very Dissatisfied
Somewhat Dissatisfied
Fine
Somewhat Satisfied
Highly Satisfied
Loading Speed
Use of Color
Font Size
Visibility of Images
Easy to Understand Layout
×
Please rate each item regarding Game8.co's Message Boards, Comments.
Ease of Writing
Very Dissatisfied
Somewhat Dissatisfied
Fine
Somewhat Satisfied
Highly Satisfied
Readability
Ease in Finding Information
Comment Quality
Comment Quantity
Admin Response
×
Please rate each item regarding Game8.co's Site's new design.
Please rate our site's new design
Very Dissatisfied
Somewhat Dissatisfied
Fine
Somewhat Satisfied
Highly Satisfied
Do you think that the website's design change makes the site easier to use?
Has the new design made it easier for you to find information on the site?
Has the new design improved the overall visual appeal of the site?
How would you rate your overall satisfaction with the new design of the site?
×
How likely are you to recommend Game8 to someone you know?
Very Unlikely
0
1
2
3
4
5
6
7
8
9
10
Very Likely
If you have other opinions regarding potential improvement to the website, please share them with us. We would appreciate your honest opinion.
Note: This is a free response section, so you can proceed without entering anything.
Note: Please be sure not to enter any kind of personal information into your response.
Note: Please be sure not to enter any kind of personal information into your response.
×
Thank You
×
Thank you for participating in our survey! Your answers will help us to improve the quality of our website and services.
We hope you continue to make use of Game8.
We hope you continue to make use of Game8.
Close
Rankings
- We could not find the message board you were looking for.
Gaming News


![Monster Hunter Stories 3 Review [First Impressions] | Simply Rejuvenating](https://img.game8.co/4438641/2a31b7702bd70e78ec8efd24661dacda.jpeg/thumb)
Popular Games

Genshin Impact Walkthrough & Guides Wiki
Honkai: Star Rail Walkthrough & Guides Wiki
Umamusume: Pretty Derby Walkthrough & Guides Wiki
Pokemon Pokopia Walkthrough & Guides Wiki
Resident Evil Requiem (RE9) Walkthrough & Guides Wiki
Monster Hunter Wilds Walkthrough & Guides Wiki
Wuthering Waves Walkthrough & Guides Wiki
Arknights: Endfield Walkthrough & Guides Wiki
Pokemon FireRed and LeafGreen (FRLG) Walkthrough & Guides Wiki
Pokemon TCG Pocket (PTCGP) Strategies & Guides Wiki


Recommended Games
Diablo 4: Vessel of Hatred Walkthrough & Guides Wiki
Cyberpunk 2077: Ultimate Edition Walkthrough & Guides Wiki
Fire Emblem Heroes (FEH) Walkthrough & Guides Wiki
Yu-Gi-Oh! Master Duel Walkthrough & Guides Wiki
Super Smash Bros. Ultimate Walkthrough & Guides Wiki
Pokemon Brilliant Diamond and Shining Pearl (BDSP) Walkthrough & Guides Wiki
Elden Ring Shadow of the Erdtree Walkthrough & Guides Wiki
Monster Hunter World Walkthrough & Guides Wiki
The Legend of Zelda: Tears of the Kingdom Walkthrough & Guides Wiki
Persona 3 Reload Walkthrough & Guides Wiki


All rights reserved
© Nintendo / INTELLIGENT SYSTEMS © KOEI TECMO GAMES CO., LTD. Fire Emblem and Nintendo Switch are trademarks of Nintendo. © Nintendo.
The copyrights of videos of games used in our content and other intellectual property rights belong to the provider of the game.
The contents we provide on this site were created personally by members of the Game8 editorial department.
We refuse the right to reuse or repost content taken without our permission such as data or images to other sites.