Chapter 07 Walkthrough - A Contest of Beasts (Golden Wildfire)
Check out our:
★ Story Walkthrough for how to get S Rank Rewards and the Best Responses to Support Conversations!
★ Character Tier List / Class Tier List for party building!
★ List of Characters for guides on recruiting all characters and their best classes.

A Contest of Beasts is Chapter 07 of the Golden Wildfire Route in Fire Emblem Warriors Three Hopes. Read on to learn about the different quests, survey spots, rewards, and support conversations within the chapter, as well as our walkthrough for its main quest!
| ⮜ Previous Chapter | Next Chapter ⮞ |
|---|---|
| Chapter 6: The Leader's Stratagem |
Chapter 8: What Makes a King |
List of Contents
A Contest of Beasts Recruitable Characters
| All Recruitable Characters in A Contest of Beasts | ||
|---|---|---|
 Petra Petra
|
||
Petra can be recruited using the Persuade Strategy during the Battle Prep part of the main quest. You need at least 10 Strategy Points to recruit her.
Recruitment Guide: How to Recruit Units
A Contest of Beasts Quests, Survey Spots, and Rewards
A Contest of Beasts Quests
| Quest | Type | Rewards |
|---|---|---|
| The Battle at Gronder Field | Main |
S Rank Reward: Miracle Bean x1
First Time Reward: Advanced Seal X1 |
| Evacuate Imperiled Citizens | Side |
S Rank Reward: Exorcist's Tome x1
Capture Reward: 3.600 G |
| Hands-On Training | Side |
S Rank Reward: Hammer x1
Capture Reward: Activity Points Recovered: 1 |
| Seize the Abandoned Castle | Side |
S Rank Reward: Advanced Seal x1
Capture Reward: Training Points Recovered: 1 |
| March for Gronder Field | Side |
S Rank Reward: Large Bullion x1
Capture Reward: Activity Points Recovered: 1 |
| Launch an Ambush | Side |
S Rank Reward: Ambrosia x1
Capture Reward: Training Points Recovered: 1 |
| An Unexpected Encounter | Extra | No Fixed Rewards |
| Capture the Thieves | Extra | No Fixed Rewards |
| A Grave Threat | Extra | No Fixed Rewards |
| Right Where They're Wanted | Paralogue |
S Rank Reward: Holst's Chosen x1
First Time Reward: Leicester Dicers Corps x1 |
A Contest of Beasts Survey Spots
| Side Mission | Survey Spot | Type | Reward / Conditions |
|---|---|---|---|
| Evacuate Imperiled Citizen | Tent | Visit | Reward: Leicester's Elite Archers |
| Evacuate Imperiled Citizen | Stronghold | Visit | Reward: Quality Building Material x41 and Veteran Training Gear x30 |
| Evacuate Imperiled Citizen | House | Pay |
Gold Required: 1000 G
Reward: Advanced Seal x3 |
| Evacuate Imperiled Citizen | Spring | Choice | Reward: Support Up between two allies of choice |
| Hands-On Training | Stronghold | Visit | Reward: Coordination |
| Hands-On Training | House | Visit | Reward: Quality Building Material x41, Standard Combat Manual x20, and Basic Furnishings x15 |
| Hands-On Training | Bridge | Meet Conditions |
Survey Conditions: Must attain Battle Rank S on any difficulty.
Reward: 4800 G |
| Seize the Abandoned Castle | Tent | Visit | Reward: Quality Building Material x41 and Merchant's License x25 |
| Seize the Abandoned Castle | House | Meet Conditions |
Survey Conditions: Must have a Swordmaster
Reward: Crestological Mysteries |
| Seize the Abandoned Castle | Ruins | Meet Conditions |
Survey Conditions: Unit with Lck 17 or higher.
Reward: Killer Lance +6 |
| Seize the Abandoned Castle | Bridge | Meet Condition |
Survey Conditions: Trade 3 Poultry
Reward: Black-Sand Steel x10 |
| March for Gronder Field | House | Choice | Reward: Rocky Burdock or Fruit of Life |
| March for Gronder Field | Tent | Visit | Reward: Quality Building Material x41, Knight's Insignia x15, and Storage Chest x15 |
| Launch an Ambush | Cave | Choice | Reward: Experience Gem or Knowledge Gem |
| Launch an Ambush | Mine | Visit | Reward: Quality Building Material x41 and Artisan Smithing Set x20 |
The Battle at Gronder Field Strategies and Walkthrough
Recommended Strategies for The Battle at Gronder Field
| Strategy | Description | Cost |
|---|---|---|
| Persuade Petra | Convince an enemy general to join your army. | 10 |
| Leicester's Elite Archers | Increase the might of ballista attacks. | 20 |
| Hire Mercenaries | Summon mercenaries to engage the enemy force. Reinforcements will deploy periodcally. | 10 |
| Assign Healers | Assign a healer unit to periodically heal allies. | 10 |
The Battle at Gronder Field Objectives
| Victory Condition | Defeat Condition |
|---|---|
| Defeat Count Bergliez. | None. |
|
Main Objectives
1. Seize the strongholds and defeat the enemy's vanguard! 2. Defeat Monica! 3. Defeat Petra/Defeat and Recruit Petra 4. Defeat Jeralt and Alois! 5. Lure Count Bergliez to the Fortress of the Plains! 6. Lure Byleth to the Triple-Gated Stronghold! 7. Defeat Caspar and seize the ballistae in the Central Hill! 8. Defeat Count Bergliez! 9. Defeat Byleth! Side Objectives ・ Defeat the Cavalier and their allies targeting allied strongholds! ・ Defeat the Brawler and their allies targeting allied strongholds! |
|
The Battle at Gronder Field Walkthrough
| Objectives | |
|---|---|
| 1 | 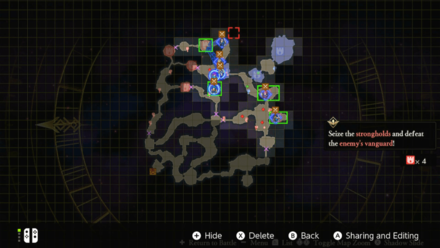 It will be quite simple to take over the enemy strongholds, almost too easy. We would suggest taking some time to remove some of the base camps as well to reduce the number of enemies in the area. You will have enough allies to spread them over the map so don't cluster them all in one space. |
| 2 | 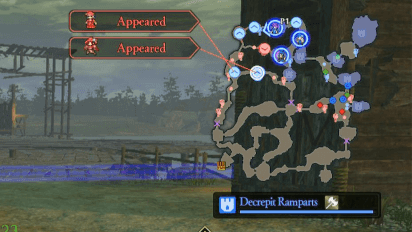 Once you've taken over the strongholds, Monica and her allies will appear on the northwestern side of the map! Send an ally in the area to that side. Keep a set on the eastern side. |
| 3 | A Cavalier and their allies will also begin to approach your strongholds. We do recommend using the allies not in combat to take them on. . |
| 4 | 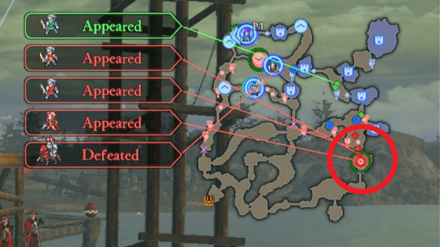 Not too long after, Petra and her allies will appear on the Southeastern side of the map. Your allies should be ready to intercept her. If you chose to recruit her, this will be your chance! It's recommended you keep at least one controllable character in each area. |
| 5 | 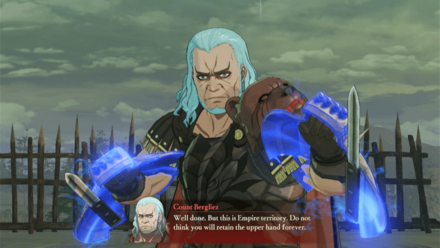 Split your allies to take on Monica and Petra. If the Cavalier is still up, leave at least one ally on them. Once you've defeated Monica and recruited Petra, Count Bergliez will make his appearance, along with a large number of soldiers. |
| 6 | 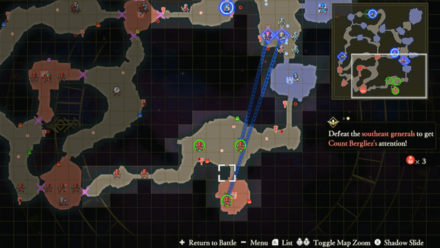 Despite these large numbers, your focus wiill be to the southeast, where you will need to defeat 3 generals with Holst's help. Do not send all your allies to the southeast though as you will need allies to the west and in the center. |
| 7 | 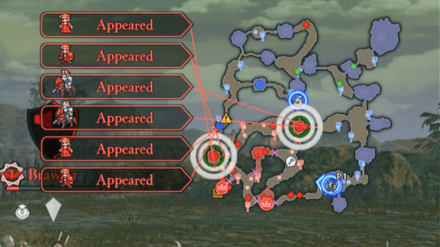 Alois and Jeralt will open the gates, giving you access to them. Defeat them as quickly as you can! |
| 8 | 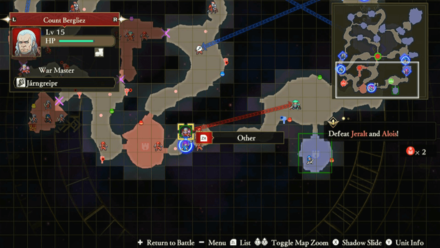 At this point, Count Bergliez will begin heading towards the Fortress of the Plains. Even if you're not there, as long as an ally is in the area he will be lured towards the Fortress. Once he's locked in, a side mission will begin. Send any allies not fighting Alois and Jeralt to deal with the Brawler heading to your strongholds. |
| 9 | 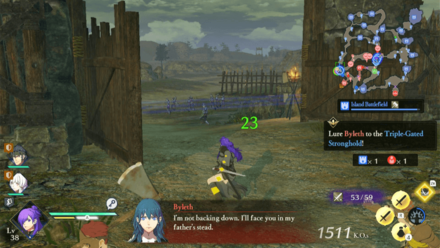 Once you have defeated all current enemies and locked the Count in the fortress, Byleth will appear. You'll need to do the same and lure them into another fortress. |
| 10 | 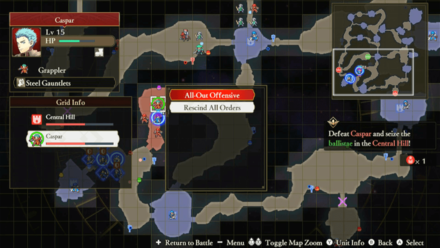 With everyone locked up, all that's left is to face Caspar in the remaining sealed stronghold. Order an All-Out Offensive to make it quick! Do not finish your resource. There are two more fights after this. |
| 11 | 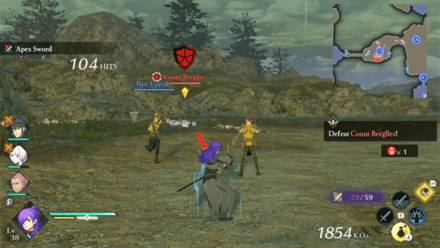 The Count will manage to leave the stronghold. Chase him down and order another All-Out Offensive. Once beaten, a cutscene will play before the final battle! |
| 12 | 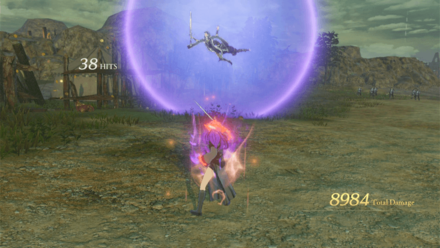 Upon regaining control of Shez, run towards Byleth. They will escape and you'll need to take them down. Defeating them will end the Quest. |
A Contest of Beasts Support and Romance Conversations
In Camp
 Claude Claude
|
Prompt: | I knew opinions would be split, but now I'm wondering if it's all right to move forward with it. | ||
|---|---|---|---|---|
| Answers: | Reactions: | |||
| Optimistically say it'll be fine. | +1 Support with Claude. | |||
| Encourage him to be confident. | None | |||
 Hilda Hilda
|
Prompt: | He was super energetic, but I can't remember his name for the life of me. What was it again? | ||
| Answers: | Reactions: | |||
| Linhardt? | None | |||
| Caspar? | +1 Support with Hilda | |||
 Raphael Raphael
|
Prompt: | Which means if we win, we can eat to our heart's content, right? | ||
| Answers: | Reactions: | |||
| Spur him on. | +1 Support with Raphael | |||
| Raise doubts. | None | |||
 Lysithea Lysithea
|
Prompt: | Which means I need to fight even harder to make up for that. | ||
| Answers: | Reactions: | |||
| Chide her for taking on too much. | +1 Support with Lysithea | |||
| Cheer her on. | None | |||
 Leonie Leonie
|
Prompt: | Plus, we might run into Jeralt's Mercenaries again. | ||
| Answers: | Reactions: | |||
| Agree that you might. | +1 Support with Leonie | |||
| Ask why she cares. | None | |||
 Holst Holst
|
Prompt: | No doubt you want the same, Shez, but could you leave him to me? | ||
| Answers: | Reactions: | |||
| Let Holst fight him. | None | |||
| Don't forgo this opportunity. | +1 Support with Holst | |||
 Bernadetta Bernadetta
|
Prompt: | I'm not supposed to be here! You can't force me to fight! No way, no how! | ||
| Answers: | Reactions: | |||
| Comfort her. | +1 Support with Bernadetta | |||
| Persuade her. | None | |||
 Balthus Balthus
|
Prompt: | Heard the Alliance leader went and made you a general, yeah? Bet that put some coin in your pocket! | ||
| Answers: | Reactions: | |||
| Tell him he's right.. | None | |||
| Play it down. | +1 Support with Balthus | |||
 Shamir Shamir
|
Prompt: | The question is whether they'll try to intercept us or fortify their defenses. What do you think? | ||
| Answers: | Reactions: | |||
| They'll move to intercept. | +1 Support with Shamir | |||
| They'll strengthen their defences. | None | |||
Between Battles
 Arval Arval
|
Prompt: | Hasn't the decision already been made? At this point, you should be free to speak your mind. | ||
|---|---|---|---|---|
| Answers: | Reactions: | |||
| Express support for the attack. | +1 Support with Leonie | |||
| Suggest an attack is premature. | +1 Support with Ignatz | |||
|
Hilda
|
Prompt: | And there he goes. My brother certainly can move fast when he puts his mind to it .. | ||
| Answers: | Reactions: | |||
| Suggest waiting for him to come back. | None. | |||
| Suggest going after him. | +1 Support with Hilda | |||
|
Hilda
|
Prompt: | Well, there he goes. Again. | ||
| Answers: | Reactions: | |||
| Take a positive spin on things. | +1 Support with Holst | |||
| Play the pessimist. | +1 Support with Hilda | |||
Fire Emblem Warriors: Three Hopes Related Guides
Story Walkthrough: List of Chapters
All Story Walkthroughs
 Crossed Roads
All Paralogues
Author

Chapter 07 Walkthrough - A Contest of Beasts (Golden Wildfire)
Rankings
- We could not find the message board you were looking for.
Gaming News

![Monster Hunter Stories 3 Review [First Impressions] | Simply Rejuvenating](https://img.game8.co/4438641/2a31b7702bd70e78ec8efd24661dacda.jpeg/show)


![Monster Hunter Stories 3 Review [First Impressions] | Simply Rejuvenating](https://img.game8.co/4438641/2a31b7702bd70e78ec8efd24661dacda.jpeg/thumb)
Popular Games

Genshin Impact Walkthrough & Guides Wiki
Honkai: Star Rail Walkthrough & Guides Wiki
Umamusume: Pretty Derby Walkthrough & Guides Wiki
Pokemon Pokopia Walkthrough & Guides Wiki
Resident Evil Requiem (RE9) Walkthrough & Guides Wiki
Monster Hunter Wilds Walkthrough & Guides Wiki
Wuthering Waves Walkthrough & Guides Wiki
Arknights: Endfield Walkthrough & Guides Wiki
Pokemon FireRed and LeafGreen (FRLG) Walkthrough & Guides Wiki
Pokemon TCG Pocket (PTCGP) Strategies & Guides Wiki


Recommended Games
Diablo 4: Vessel of Hatred Walkthrough & Guides Wiki
Cyberpunk 2077: Ultimate Edition Walkthrough & Guides Wiki
Fire Emblem Heroes (FEH) Walkthrough & Guides Wiki
Yu-Gi-Oh! Master Duel Walkthrough & Guides Wiki
Super Smash Bros. Ultimate Walkthrough & Guides Wiki
Pokemon Brilliant Diamond and Shining Pearl (BDSP) Walkthrough & Guides Wiki
Elden Ring Shadow of the Erdtree Walkthrough & Guides Wiki
Monster Hunter World Walkthrough & Guides Wiki
The Legend of Zelda: Tears of the Kingdom Walkthrough & Guides Wiki
Persona 3 Reload Walkthrough & Guides Wiki


All rights reserved
© Nintendo / INTELLIGENT SYSTEMS © KOEI TECMO GAMES CO., LTD. Fire Emblem and Nintendo Switch are trademarks of Nintendo. © Nintendo.
The copyrights of videos of games used in our content and other intellectual property rights belong to the provider of the game.
The contents we provide on this site were created personally by members of the Game8 editorial department.
We refuse the right to reuse or repost content taken without our permission such as data or images to other sites.