 Crossed Roads
This survey will take about 1 minute.
Your answers will help us to improve our website.
Fire Emblem Warriors Three Hopes
Chapter 07 Walkthrough - The Triumph of Valor (Scarlet Blaze)
Check out our:
★ Story Walkthrough for how to get S Rank Rewards and the Best Responses to Support Conversations!
★ Character Tier List / Class Tier List for party building!
★ List of Characters for guides on recruiting all characters and their best classes.
The Triumph of Valor is Chapter 07 of the Scarlet Blaze Route in Fire Emblem Warriors Three Hopes. Read on to learn about the different quests, survey spots, rewards, and support conversations within the chapter, as well as our walkthrough for its main quest!
| ⮜ Previous Chapter | Next Chapter ⮞ |
|---|---|
| Chapter 6: Bridge of Betrayal |
Chapter 8: The Maiden's Peril |
List of Contents
The Triumph of Valor Recruitable Characters
| All Recruitable Characters in The Triumph of Valor | ||
|---|---|---|
 Raphael Raphael
|
 Lysithea Lysithea
|
 Marianne Marianne
|
All characters listed in this table can be recruited using the Persuade Strategy during the Battle Prep part of the main quest. You need at least 10 Strategy Points each to recruit all characters to your party.
Ignatz is required in order to recruit Raphael to your party.
Recruitment Guide: How to Recruit Units
The Triumph of Valor Quests, Survey Spots, and Rewards
The Triumph of Valor Quests
| Quest | Type | Rewards |
|---|---|---|
| The Blitz of Riegan | Main |
S Rank Reward: Miracle Bean x1
First Time Reward: Advanced Seal x1 |
| Pursue the Riegan Troops | Side |
S Rank Reward: Horseslayer x1
Capture Reward: Training Points Recovered: 1 |
| Breach Gloucester Territory | Side |
S Rank Reward: Advanced Seal x1
Capture Reward: Activity Points Recovered: 1 |
| Save Isolated Allied Troops | Side |
S Rank Reward: Inverted Tome x1
Capture Reward: Training Points Recovered: 1 |
| Rendezvous with the Bergliez Squadron | Side |
S Rank Reward: Large Bullion x1
Capture Reward: 3,600 G |
| Hold the Bridgehead | Side |
S Rank Reward: White Verona x1
Capture Reward: Activity Points Recovered: 1 |
| An Incurable Shut-In | Paralogue |
S Rank Reward: Varley Archers x1
First Time Reward: Ailell Pomegranate x1 |
| A Grand Day for the Opera Company | Paralogue |
S Rank Reward: Opera Co. Volunteers x1
First Time Reward: Golden Apple x1 |
The Triumph of Valor Survey Spots
| Side Mission | Survey Spot | Type | Reward / Conditions |
|---|---|---|---|
| Pursue the Riegan Troops | House | Meet Condition |
Survey Conditions: Must have a Mage
Reward: Crestological Mysteries |
| Pursue the Riegan Troops | Mine | Meet Condition |
Survey Conditions: Must attain Battle Rank S on any difficulty.
Reward: Black-Sand Steel x30 |
| Pursue the Riegan Troops | Stronghold | Visit | Reward: Quality Building Material x41, Veteran Training Gear x30 |
| Breach Gloucester Territory | House | Visit | Reward: Morale Up for two selected units. |
| Breach Gloucester Territory | House | Visit | Reward: Quality Building Material x41, Standard Combat Manual x20, Basic Furnishings x15 |
| Breach Gloucester Territory | Tent | Pay |
Gold Required: 1,000 G
Reward: Advanced Seal x3 |
| Save Isolated Allied Troops | Ruins | Visit | Reward: Quality Building Material x41, Merchant's License x25, Storage Chest x15 |
| Save Isolated Allied Troops | Tent | Visit | Reward: Imperial Holy Blessing |
| Save Isolated Allied Troops | Forest | Choice | Reward: Ailell Pomegranate or Speed Carrot |
| Rendezvous with the Bergliez Squadron | House | Visit | Reward: Quality Material x41, Artisan Smithing Set x20 |
| Rendezvous with the Bergliez Squadron | Tent | Meet Condition |
Survey Conditions: Trade 3 Wild Game
Reward: Bergliez Onslaught |
| Hold the Bridgehead | Tower | Visit | Reward: Quality Building Material x41, Knight's Insignia x15 |
| Hold the Bridgehead | Stronghold | Meet Condition |
Survey Conditions: Present a Unit with Str 20 or higher.
Reward: Killing Edge+6 |
| Hold the Bridgehead | House | Choice | Reward: Experience Gem or Knowledge Gem |
The Blitz of Riegan Strategies and Walkthrough
Recommended Strategies for The Blitz of Riegan
| Strategy | Description | Cost |
|---|---|---|
| Persuade Raphael | Convince an enemy general to join your army. | 10 |
| Persuade Lysithea | Convince an enemy general to join your army. | 10 |
| Persuade Marianne | Convince an enemy general to join your army. | 10 |
The Blitz of Riegan Objectives
| Victory Condition | Defeat Condition |
|---|---|
| The Bergliez Army retreats. | The Bergliez Generals are routed. |
|
Main Objectives
1. Seize the strongholds and defeat the intercepting forces! 2. Defeat Marianne! / Defeat and recruit Marianne! 3. Defeat Raphael! / Defeat and Recruit Raphael! 4. Seize the strongholds and secure an escape route for the Bergliez Army! 5. Defeat Hilda! 6. Defeat Lysithea! / Defeat and recruit Lysithea! 7. Defeat the enemies surrounding the Bergliez Army! 8. Defeat one of the enemies to determine the escape route for the Bergliez Army! / Help the Bergliez Army reach the evacuation point! 9. Defeat Claude 10. Defeat Byleth! Side Objectives ・ Seize the strongholds to prevent enemy reinforcements from appearing! ・ Seize the strongholds to stop the catapults! ・ Defeat Jeralt! ・ Defeat Alois and stop their pursuit. |
|
The Blitz of Riegan Walkthrough
| Objectives | |
|---|---|
| 1 | 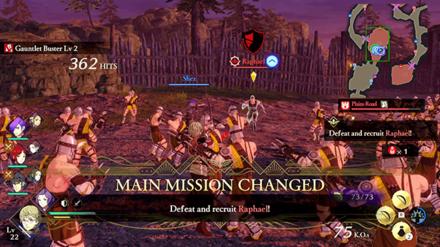 The main quest starts with your team at the southwestern part of the map. Have half of your team move east, and another half north to capture each of the strongholds available. If you are planning to recruit Raphael, have Ignatz join the party moving north. |
| 2 | Meanwhile Marianne will be defending the stronghold to your east. To recruit both characters, Initiate the Persuade strategies before defeating them. |
| 3 | Seize the strongholds and secure an escape route for the Bergliez Army! Once the map opens up after taking down the first two strongholds, you'll have to push forward to open up an escape route for the Bergliez Army. Hilda will be waiting at the northwestern stronghold. Since Ignatz is among the members you should have sent north, he'll be a good match against Hilda too. |
| 4 | 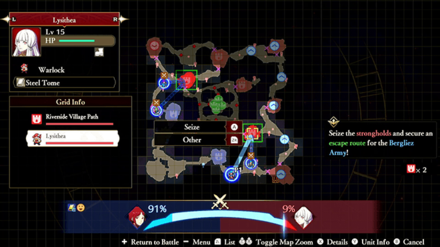 Lysithea will be in the next stronghold for the group that headed east. This will be your chance to persuade Lysithea to join your team too. |
| 5 | 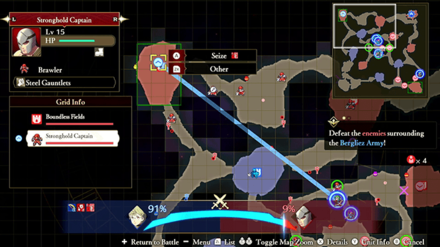 With Lysithea recruited and Hilda defeated, Hilda will retreat and enemies will appear to attack the Bergliez Army. Send most of your troops in to protect them. Keep one or two members ready to seize the strongholds on the opposite corners of the map to prevent more enemies from appearing. |
| 6 | 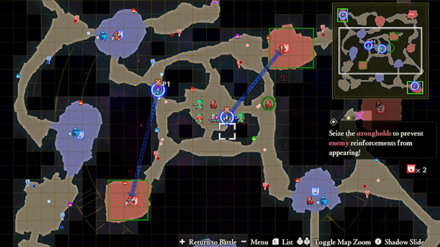 After some time, the enemy will also unleash catapults. Carefully make your way to both while making sure not to ignore the health of the Bergliez Army. |
| 7 | 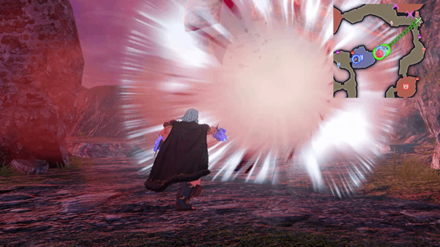 Defeat one of the enemies to determine the escape route for the Bergliez Army! / Help the Bergliez Army reach the evacuation point! Once the enemies surrounding the Bergliez army has been eliminated, you'll have to make your way out safely. However, Jeralt's mercenaries will arrive attempting to block your way out. Normally you'd have to choose which path to break out through, but by Initiating the Bergliez Onslaught strategy, Count Bergliez will determine his own path. |
| 8 |  Jeralt himself will also make an appearance on the southwest part of the map. You can take him out to complete the side mission. |
| 9 | 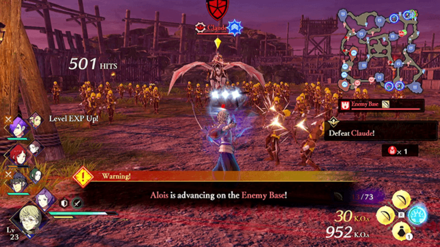 Defeat Claude! After Count Bergliez breaks open a new path towards Claude, the Ashen Demon will appear near the center of the map. Count Bergliez will fight Byleth himself so you should focus your efforts on defeating Claude at the northeast part of the map. |
| 10 | Alois will also appear shortly afterwards. You can take him out to clear the side mission but he will retreat if Claude is beaten first. |
| 11 | 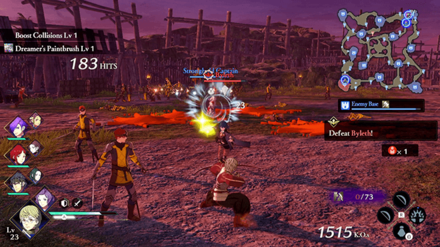 Defeat Byleth! Eventually the Alliance will fall back and leave things to Byleth. Thanks to Count Bergliez, Byleth will have been weakened. Defeat Byleth to end the quest. |
The Triumph of Valor Support and Romance Conversations
In Cutscenes
 Ferdinand Ferdinand
|
Prompt: | I mean no offense, but if time is truly so short, why do we waste it dithering in council? We should embark on our rescue mission straightaway | ||
|---|---|---|---|---|
| Answers: | Reactions: | |||
| Agree with Ferdinand | +1 Support with Ferdinand | |||
| Pull him back. | +1 Support with Petra | |||
In Camp
 Edelgard Edelgard
|
Prompt: | Tell me, what's your impression of the man? | ||
|---|---|---|---|---|
| Answers: | Reactions: | |||
| Say it's positive. | +1 Support with Edelgard | |||
| Say it's negative. | None | |||
 Caspar Caspar
|
Prompt: | War isn't just about two sides smashing into each other - much as I'd like it to be. You've also got sieges, rescues, logistics, defense, and so much more. | ||
| Answers: | Reactions: | |||
| Express admiration for his growth. | None | |||
| Claim you also need some self-reflection. | +1 Support with Caspar | |||
 Hapi Hapi
|
Prompt: | It's fun to discover new things. Like, did you know there might be some trees that only grow here? | ||
| Answers: | Reactions: | |||
| Might be? | None | |||
| Ask if she likes trees. | +1 Support with Hapi | |||
 Constance Constance
|
Prompt: | But I was incredibly relieved that House Gloucester did not meet with ruin. | ||
| Answers: | Reactions: | |||
| Ask her why. | None | |||
| Guess her reason. | +1 Support with Constance | |||
 Manuela Manuela
|
Prompt: | Oh, dear. So terribly sorry. Just checking the condition of my throat, is all! | ||
| Answers: | Reactions: | |||
| Flatter her voice. | +1 Support with Manuela | |||
| Flatter her beauty. | +1 Support with Manuela | |||
| Stare at her unblinking. | +2 Support with Manuela | |||
 Lorenz Lorenz
|
Prompt: | To fight in vain is to bring suffering upon one's people. That is a thought neither I nor my father could ever stomach. | ||
| Answers: | Reactions: | |||
| Compliment Lorenz. | +1 Support with Ferdinand | |||
| Comfort him instead. | +1 Support with Lorenz | |||
 Monica Monica
|
Prompt: | You think Claude is plotting something else? Because if so... | ||
| Answers: | Reactions: | |||
| Agree that he's up to something. | None | |||
| Tell her she's worrying over nothing. | +1 Support with Monica | |||
 Jeritza Jeritza
|
Prompt: | Perhaps he can slay me if we cross blades. | ||
| Answers: | Reactions: | |||
| Predict who would win the showdown. | None | |||
| Encourage him to back off. | +1 Support with Jeritza | |||
 Balthus Balthus
|
Prompt: | Heard the emperor went and made you a general, yeah? Bet that put some coin in your pocket! | ||
| Answers: | Reactions: | |||
| Tell him he's right. | None | |||
| Play it down. | +1 Support with Balthus | |||
 Ignatz Ignatz
|
Prompt: | ... | ||
| Answers: | Reactions: | |||
| Ask him what's wrong. | None | |||
| Try to cheer him up. | +1 Support with Ignatz | |||
 Ashe Ashe
|
Prompt: | I suppose that makes me selfish, huh? I can follow orders if it involves taking Alliance lives, but I hate the idea of hurting people from the Kingdom. | ||
| Answers: | Reactions: | |||
| Sympathize with him. | None | |||
| Encourage him. | +1 Support with Ashe | |||
 Dorothea Dorothea
|
Prompt: | It's almost like we're part of someone else's script. | ||
| Answers: | Reactions: | |||
| Agree with her. | None | |||
| Disagree with her. | +1 Support with Dorothea | |||
Between Battles
| There doesn't appear to be any conversations that affect Support between this Chapter's battles. |
Paralogues
An Incurable Shut-In
 Bernadetta Bernadetta
|
Prompt: | Ok, well, I’m not much good at dealing with things, and certainly not with…you know. Matters. | ||
|---|---|---|---|---|
| Answers: | Reactions: | |||
| Back her up. | +1 Support with Bernadetta | |||
| Berate her. | +1 Support with Monica | |||
Fire Emblem Warriors: Three Hopes Related Guides
Story Walkthrough: List of Chapters
All Story Walkthroughs
All Paralogues
Author

Chapter 07 Walkthrough - The Triumph of Valor (Scarlet Blaze)
Please participate in our site
improvement survey
03/2026
improvement survey
03/2026
Would you assist in
improving Game8's site?
improving Game8's site?

×
We are listening to our users' valuable opinions and discussing how to act on them.
The information collected through this survey will be used for the purpose of improving our services. In addition, the information will only be disclosed a part of a statistic in a format that will not allow identification of personal information.
Begin Survey
Not Now
×
Please rate each item regarding Game8.co's Advertisements.
Amount of Ads
Very Dissatisfied
Somewhat Dissatisfied
Fine
Somewhat Satisfied
Highly Satisfied
Placement of Ads
Timing of Ad Display
Ad Loading Speed
Safeness of Ads
Content of Ads
×
Please rate each item regarding Game8.co's Quality of Articles.
Amount of information
Very Dissatisfied
Somewhat Dissatisfied
Fine
Somewhat Satisfied
Highly Satisfied
Frequency of updates
Speed of new information
Accuracy of articles
Understandibility of articles
Readability of sentences
×
Please rate each item regarding Game8.co's Usability of the Site.
Ease of finding information
Very Dissatisfied
Somewhat Dissatisfied
Fine
Somewhat Satisfied
Highly Satisfied
Loading Speed
Use of Color
Font Size
Visibility of Images
Easy to Understand Layout
×
Please rate each item regarding Game8.co's Message Boards, Comments.
Ease of Writing
Very Dissatisfied
Somewhat Dissatisfied
Fine
Somewhat Satisfied
Highly Satisfied
Readability
Ease in Finding Information
Comment Quality
Comment Quantity
Admin Response
×
Please rate each item regarding Game8.co's Site's new design.
Please rate our site's new design
Very Dissatisfied
Somewhat Dissatisfied
Fine
Somewhat Satisfied
Highly Satisfied
Do you think that the website's design change makes the site easier to use?
Has the new design made it easier for you to find information on the site?
Has the new design improved the overall visual appeal of the site?
How would you rate your overall satisfaction with the new design of the site?
×
How likely are you to recommend Game8 to someone you know?
Very Unlikely
0
1
2
3
4
5
6
7
8
9
10
Very Likely
If you have other opinions regarding potential improvement to the website, please share them with us. We would appreciate your honest opinion.
Note: This is a free response section, so you can proceed without entering anything.
Note: Please be sure not to enter any kind of personal information into your response.
Note: Please be sure not to enter any kind of personal information into your response.
×
Thank You
×
Thank you for participating in our survey! Your answers will help us to improve the quality of our website and services.
We hope you continue to make use of Game8.
We hope you continue to make use of Game8.
Close
Rankings
- We could not find the message board you were looking for.
Gaming News


![Monster Hunter Stories 3 Review [First Impressions] | Simply Rejuvenating](https://img.game8.co/4438641/2a31b7702bd70e78ec8efd24661dacda.jpeg/thumb)
Popular Games

Genshin Impact Walkthrough & Guides Wiki
Honkai: Star Rail Walkthrough & Guides Wiki
Umamusume: Pretty Derby Walkthrough & Guides Wiki
Pokemon Pokopia Walkthrough & Guides Wiki
Resident Evil Requiem (RE9) Walkthrough & Guides Wiki
Monster Hunter Wilds Walkthrough & Guides Wiki
Wuthering Waves Walkthrough & Guides Wiki
Arknights: Endfield Walkthrough & Guides Wiki
Pokemon FireRed and LeafGreen (FRLG) Walkthrough & Guides Wiki
Pokemon TCG Pocket (PTCGP) Strategies & Guides Wiki


Recommended Games
Diablo 4: Vessel of Hatred Walkthrough & Guides Wiki
Cyberpunk 2077: Ultimate Edition Walkthrough & Guides Wiki
Fire Emblem Heroes (FEH) Walkthrough & Guides Wiki
Yu-Gi-Oh! Master Duel Walkthrough & Guides Wiki
Super Smash Bros. Ultimate Walkthrough & Guides Wiki
Pokemon Brilliant Diamond and Shining Pearl (BDSP) Walkthrough & Guides Wiki
Elden Ring Shadow of the Erdtree Walkthrough & Guides Wiki
Monster Hunter World Walkthrough & Guides Wiki
The Legend of Zelda: Tears of the Kingdom Walkthrough & Guides Wiki
Persona 3 Reload Walkthrough & Guides Wiki


All rights reserved
© Nintendo / INTELLIGENT SYSTEMS © KOEI TECMO GAMES CO., LTD. Fire Emblem and Nintendo Switch are trademarks of Nintendo. © Nintendo.
The copyrights of videos of games used in our content and other intellectual property rights belong to the provider of the game.
The contents we provide on this site were created personally by members of the Game8 editorial department.
We refuse the right to reuse or repost content taken without our permission such as data or images to other sites.