 Crossed Roads
This survey will take about 1 minute.
Your answers will help us to improve our website.
Fire Emblem Warriors Three Hopes
Final Chapter Walkthrough - A Path Forward (Scarlet Blaze)
Check out our:
★ Story Walkthrough for how to get S Rank Rewards and the Best Responses to Support Conversations!
★ Character Tier List / Class Tier List for party building!
★ List of Characters for guides on recruiting all characters and their best classes.
A Path Forward is the final chapter of the Scarlet Blaze Route in Fire Emblem Warriors Three Hopes. Read on to learn about the different quests, survey spots, rewards, and support conversations within the chapter, as well as our walkthrough for its main quest!
| ⮜ Previous Chapter | Next Chapter ⮞ |
|---|---|
| Chapter 14: A Clash of Ambitions (If Byleth is defeated) Chapter 16: Into the Chasm (If Byleth is recruited) |
- |
List of Contents
A Path Forward Recruitable Characters
| All Recruitable Characters in A Path Forward | ||
|---|---|---|
| There are no recruitable characters in this chapter. | ||
Recruitment Guide: How to Recruit Units
A Path Forward Quests, Survey Spots, and Rewards
A Path Forward Quests
| Quest | Type | Rewards |
|---|---|---|
| The Defense of Garreg Mach | Main |
S Rank Reward: Hauteclere+10 x1
First Time Reward: Master Seal x1 |
A Path Forward Survey Spots
| There are no Survey Spots in this Chapter. |
The Defense of Garreg Mach Strategies and Walkthrough
Recommended Strategies for The Defense of Garreg Mach
| Strategy | Description | Cost |
|---|---|---|
| Twin Jewels of the Empire | Set Hubert and Ferdinand loose on the enemy. | 30 |
| Ingenious Formation | Begin the battle in a special formation | 10 |
The Defense of Garreg Mach Objectives
| Victory Condition | Defeat Condition |
|---|---|
| Defeat Rhea and Thales. | Either group of your units is routed. |
|
Main Objectives
1. Defeat the Falcon Knights and aid Count Varley! 2. Defeat Myson, who is conjuring the Wall of Darkness! 3. Find the warp floor in the lower monastery walls! 4. Find and activate the controls in the middle monastery walls! 5. Defeat Catherine! 6. Use the warp floor to warp to the upper monastery walls and defeat Myson! 7. Defeat Cyril and cut a path to Garreg Mach Monastery! 8. Defeat Thales! 9. Defeat Rhea / Defeat the Immaculate One! 10. Defeat Rhea and Thales, and lead the Adrestian Empire to victory! Side Objectives ・ Defeat the Gremories and stop the magic assault on Count Varley! ・ Seize the strongholds to stop the catapults! ・ Seize the strongholds and stop the ballistae and fire orbs! |
|
The Defense of Garreg Mach Walkthrough
| Objectives | |
|---|---|
| * |  The team we brought to the final battle includes: Shez, Hubert, Ferdinand, Edelgard, Byleth, Caspar, Bernadetta, and Balthus. We recommend having Edelgard among the troops on the east side of the map. |
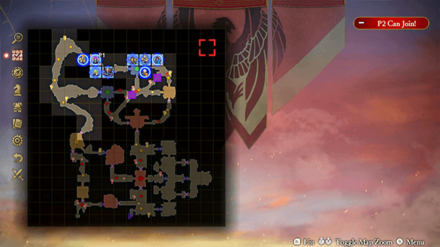
| 1 | 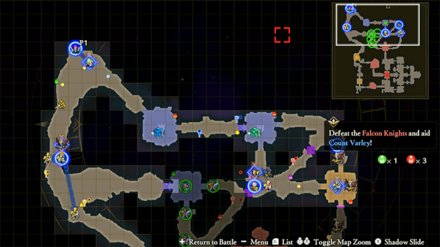 Defeat the Falcon Knights and aid Count Varley! The team will start at the northern part of the map split into two flanks, one for the west and one for the east. Have each team press forward taking out enemy commanders on their respective paths. |
| 2 | 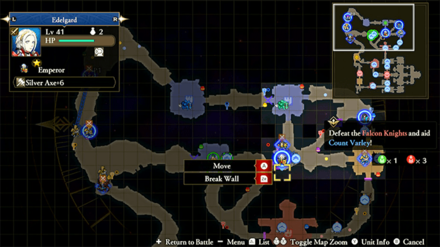 A prompt will appear suggesting a heavily armored unit may be able to break open a path to help rescuing count Varley. If you brought Edelgard on the east flank, this should be easy for her to accomplish. |
| 3 | Maintain Count Varley's safety by having a bow-wielder such as Bernadetta be nearby at all times. Falcon Knights will often appear in an attempt to attack Count Varley, so a Sniper or Bow Knight can serve as a good defense. Have the rest of the team pressing forward. |
| 4 | 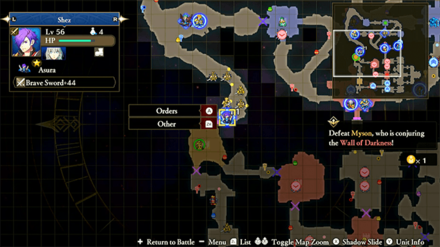 Find the warp floor in the lower monastery walls! Those Who Slither in the Dark will have a battalion deployed right outside where Myson is stationed, take them out before rushing in to strike down Myson himself. However, when his HP is low enough, he will warp away. |
| 5 | 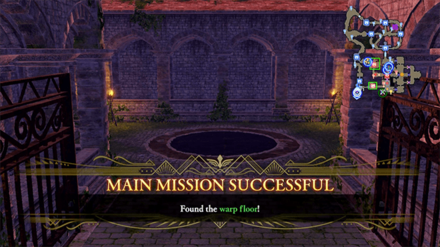 You will have to find the warp floor he has escaped to, have your western flank proceed south to find the warp floor on the southeastern-most corner of the map. |
| 6 | 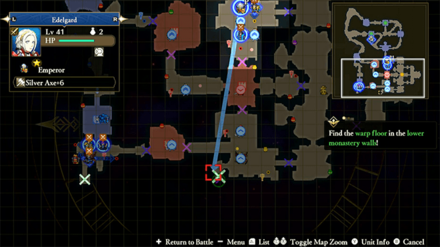 Find and activate the controls in the middle monastery walls! You will also need to find the controls within the middle monastery walls which should just be at the southern-most part of the map. Have your eastern flank make their way there. |
| 7 | 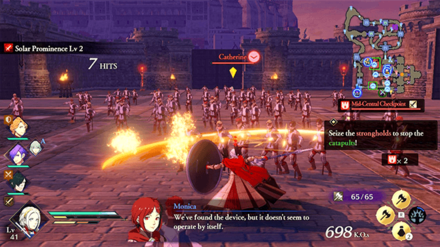 Defeat Catherine! As your eastern flank continues south, they will face Thunder Catherine. Take her out to progress further. |
| 8 | 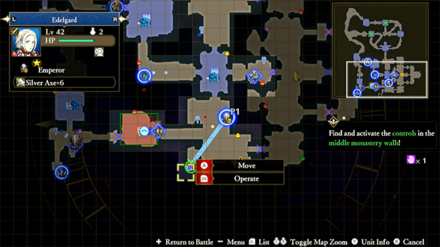 Use the warp floor to warp to the upper monastery walls and defeat Myson! With Catherine slain, have several troops move in to operate the warp controls, and have the others seize the strongholds that disable the catapults. |
| 9 | 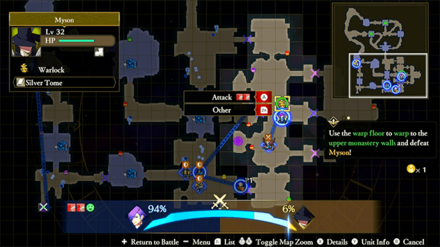 Defeat Cyril and cut a path to Garreg Mach Monastery! Your western flank should now be able to use the warp floor. Command them to warp over! Chase down Myson and take him down once and for all. His allies will activate ballistae and fire orbs in an attempt to protect him, but you should have the rest of your troops deal with those. |
| 10 | With Myson defeated, the dark barriers will dissipate allowing your team to reunite and Count Varley to strategically retreat. Cyril and about a dozen other Knights of the Church of Seiros will make their appearance to try and swarm you. With the rest of your team here, you should be able to deal with them, no problem. But just in case, you can initiate the strategy Twin Jewels of the Empire. |
| 11 |  Defeat Thales! Once Cyril has fallen, your team will make their way to Garreg Mach to have the final showdowns against the leaders of Those Who Slither in the Dark, and the Church themselves. First up will be Thales. Defeat him to open the path to the cathedral where Rhea is. |
| 12 | 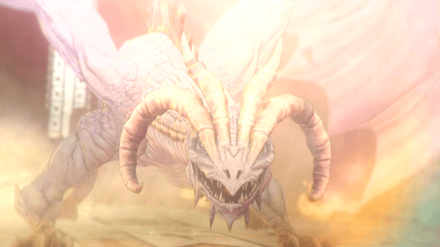 Defeat Rhea / Defeat the Immaculate One! Once Rhea has been backed into a corner, she will reveal her true form as the Immaculate one. You'll need the whole team to shred down her Stun Gauges and deal significant damage. |
| 13 |
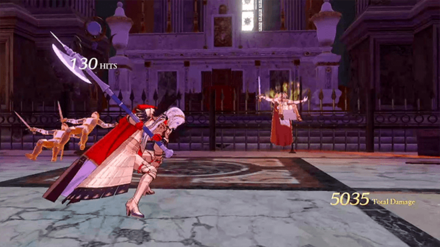 Defeat Rhea and Thales, and lead the Adrestian Empire to victory! After The Immaculate One has been defeated, Rhea will revert back to her human form for you to finish off. However, Thales will also make his reappearance. With both of your enemies in the same room, take the opportunity to strike down those who oppose you and secure the victory for the Adrestian Empire! |
A Path Forward Support and Romance Conversations
In Camp
 Edelgard Edelgard
|
Prompt: | Though I fear Hubert's confidence in you is probably shattered. (Only appears if you recruited Byleth in Chapter 10: Shifting History.) | ||
|---|---|---|---|---|
| Answers: | Reactions: | |||
| Show understanding. | None | |||
| Express disappointment. | +1 Support with Edelgard | |||
 Hubert Hubert
|
Prompt: | The question is, would you truly find such a conclusion satisfactory? (Only appears if you defeated Byleth in Chapter 10: Shifting History.) | ||
| Answers: | Reactions: | |||
| Say you have no problem with it. | None | |||
| Say you wouldn't be satisfied. | +1 Support with Hubert | |||
 Ferdinand Ferdinand
|
Prompt: | Unfortunately, our opponents are far more familiar with the monastery than we are. This will be a most arduous battle. | ||
| Answers: | Reactions: | |||
| Assure him it'll be fine. | None | |||
| Express concern too. | +1 Support with Ferdinand | |||
 Linhardt Linhardt
|
Prompt: | Everything has been utterly insufferable. Though I suppose that's to be expected in a war. | ||
| Answers: | Reactions: | |||
| Press him on that. | +1 Support with Linhardt | |||
| Agree, walking's the worst. | None | |||
 Bernadetta Bernadetta
|
Prompt: | Not that I'm against it. I can't wait to see him cry! | ||
| Answers: | Reactions: | |||
| Encourage her. | +1 Support with Bernadetta | |||
| Prioritize his safety. | None. | |||
 Monica Monica
|
Prompt: | He must not be allowed to cause any more trouble for her. Therefore, you and I are going to end him. | ||
| Answers: | Reactions: | |||
| Agree wholeheartedly. | +1 Support with Monica | |||
| Suggest he might not show up. | None | |||
 Ashe Ashe
|
Prompt: | And I still haven't figured out. I wonder if I ever will. | ||
| Answers: | Reactions: | |||
| Assure him he will. | +1 Support with Ashe | |||
| Express doubt. | None. | |||
 Lorenz Lorenz
|
Prompt: | The Alliance is pursuing the Kingdom army. I only hope they emerge victorious. (Only appears if you recruited Byleth in Chapter 10: Shifting History.) | ||
| Answers: | Reactions: | |||
| Ask if he's worried about the Alliance. | +1 Support with Lorenz | |||
| Ask if he wants to return to the Alliance. | None | |||
 Raphael Raphael
|
Prompt: | You must feel the same way, right? C'mon, you can tell me. | ||
| Answers: | Reactions: | |||
| Agree with him. | +1 Support with Raphael | |||
| Disagree with him. | None | |||
 Jeralt Jeralt
|
Prompt: | Hope nothing weird happened to you back then. Though...I have my concerns. | ||
| Answers: | Reactions: | |||
| Say you don't know. | +1 Support with Jeralt | |||
| Say you aren't worried about it. | None | |||
 Leonie Leonie
|
Prompt: | What about you? Do you ever think about that stuff? Or do you just focus on fighting? | ||
| Answers: | Reactions: | |||
| Say you think about it. | None | |||
| Say you focus on fighting. | +1 Support with Leonie | |||
 Constance Constance
|
Prompt: | Feel free to use me as a decoy, or make me pretend to surrender, or have me sabotage them from underground. I care not what I do. | ||
| Answers: | Reactions: | |||
| Refuse | None | |||
| Comment on her suggestions. | +1 Support with Constance | |||
 Hapi Hapi
|
Prompt: | I know it's got historical significance, but is it really worth sacrificing so many lives over? | ||
| Answers: | Reactions: | |||
| Suggest it has hidden secrets. | +1 Support with Hapi | |||
| Say it's sacred ground. | None | |||
 Manuela Manuela
|
Prompt: | And now here we are... | ||
| Answers: | Reactions: | |||
| Symphatize with her. | +1 Support with Manuela | |||
| Say you're in the same boat. | None | |||
 Byleth Byleth
|
Prompt: | I was so confused when you got caught in that strange magic and vanished. | ||
| Answers: | Reactions: | |||
| Apologize for attacking them. | None | |||
| Thank them for not killing you. | +1 Support with Byleth | |||
Between Battles
| There doesn't appear to be any conversations that affect Support between this Chapter's battles. |
Fire Emblem Warriors: Three Hopes Related Guides
Story Walkthrough: List of Chapters
All Story Walkthroughs
All Paralogues
Author

Final Chapter Walkthrough - A Path Forward (Scarlet Blaze)
Please participate in our site
improvement survey
03/2026
improvement survey
03/2026
Would you assist in
improving Game8's site?
improving Game8's site?

×
We are listening to our users' valuable opinions and discussing how to act on them.
The information collected through this survey will be used for the purpose of improving our services. In addition, the information will only be disclosed a part of a statistic in a format that will not allow identification of personal information.
Begin Survey
Not Now
×
Please rate each item regarding Game8.co's Advertisements.
Amount of Ads
Very Dissatisfied
Somewhat Dissatisfied
Fine
Somewhat Satisfied
Highly Satisfied
Placement of Ads
Timing of Ad Display
Ad Loading Speed
Safeness of Ads
Content of Ads
×
Please rate each item regarding Game8.co's Quality of Articles.
Amount of information
Very Dissatisfied
Somewhat Dissatisfied
Fine
Somewhat Satisfied
Highly Satisfied
Frequency of updates
Speed of new information
Accuracy of articles
Understandibility of articles
Readability of sentences
×
Please rate each item regarding Game8.co's Usability of the Site.
Ease of finding information
Very Dissatisfied
Somewhat Dissatisfied
Fine
Somewhat Satisfied
Highly Satisfied
Loading Speed
Use of Color
Font Size
Visibility of Images
Easy to Understand Layout
×
Please rate each item regarding Game8.co's Message Boards, Comments.
Ease of Writing
Very Dissatisfied
Somewhat Dissatisfied
Fine
Somewhat Satisfied
Highly Satisfied
Readability
Ease in Finding Information
Comment Quality
Comment Quantity
Admin Response
×
Please rate each item regarding Game8.co's Site's new design.
Please rate our site's new design
Very Dissatisfied
Somewhat Dissatisfied
Fine
Somewhat Satisfied
Highly Satisfied
Do you think that the website's design change makes the site easier to use?
Has the new design made it easier for you to find information on the site?
Has the new design improved the overall visual appeal of the site?
How would you rate your overall satisfaction with the new design of the site?
×
How likely are you to recommend Game8 to someone you know?
Very Unlikely
0
1
2
3
4
5
6
7
8
9
10
Very Likely
If you have other opinions regarding potential improvement to the website, please share them with us. We would appreciate your honest opinion.
Note: This is a free response section, so you can proceed without entering anything.
Note: Please be sure not to enter any kind of personal information into your response.
Note: Please be sure not to enter any kind of personal information into your response.
×
Thank You
×
Thank you for participating in our survey! Your answers will help us to improve the quality of our website and services.
We hope you continue to make use of Game8.
We hope you continue to make use of Game8.
Close
Rankings
- We could not find the message board you were looking for.
Gaming News


![Monster Hunter Stories 3 Review [First Impressions] | Simply Rejuvenating](https://img.game8.co/4438641/2a31b7702bd70e78ec8efd24661dacda.jpeg/thumb)
Popular Games

Genshin Impact Walkthrough & Guides Wiki
Honkai: Star Rail Walkthrough & Guides Wiki
Umamusume: Pretty Derby Walkthrough & Guides Wiki
Pokemon Pokopia Walkthrough & Guides Wiki
Resident Evil Requiem (RE9) Walkthrough & Guides Wiki
Monster Hunter Wilds Walkthrough & Guides Wiki
Wuthering Waves Walkthrough & Guides Wiki
Arknights: Endfield Walkthrough & Guides Wiki
Pokemon FireRed and LeafGreen (FRLG) Walkthrough & Guides Wiki
Pokemon TCG Pocket (PTCGP) Strategies & Guides Wiki


Recommended Games
Diablo 4: Vessel of Hatred Walkthrough & Guides Wiki
Cyberpunk 2077: Ultimate Edition Walkthrough & Guides Wiki
Fire Emblem Heroes (FEH) Walkthrough & Guides Wiki
Yu-Gi-Oh! Master Duel Walkthrough & Guides Wiki
Super Smash Bros. Ultimate Walkthrough & Guides Wiki
Pokemon Brilliant Diamond and Shining Pearl (BDSP) Walkthrough & Guides Wiki
Elden Ring Shadow of the Erdtree Walkthrough & Guides Wiki
Monster Hunter World Walkthrough & Guides Wiki
The Legend of Zelda: Tears of the Kingdom Walkthrough & Guides Wiki
Persona 3 Reload Walkthrough & Guides Wiki


All rights reserved
© Nintendo / INTELLIGENT SYSTEMS © KOEI TECMO GAMES CO., LTD. Fire Emblem and Nintendo Switch are trademarks of Nintendo. © Nintendo.
The copyrights of videos of games used in our content and other intellectual property rights belong to the provider of the game.
The contents we provide on this site were created personally by members of the Game8 editorial department.
We refuse the right to reuse or repost content taken without our permission such as data or images to other sites.
There is a support conversation in the camp for Bernadetta. Prompt: "Not that I'm against it. I can't wait to see him cry!" Choice 1: "Encourage her" (+1 Support points with Bernadetta) Choice 2: "Prioritize his safety"