 Crossed Roads
This survey will take about 1 minute.
Your answers will help us to improve our website.
Fire Emblem Warriors Three Hopes
Chapter 12 Walkthrough - The Rising Darkness (Scarlet Blaze)
Check out our:
★ Story Walkthrough for how to get S Rank Rewards and the Best Responses to Support Conversations!
★ Character Tier List / Class Tier List for party building!
★ List of Characters for guides on recruiting all characters and their best classes.
The Rising Darkness is Chapter 12 of the Scarlet Blaze Route in Fire Emblem Warriors Three Hopes. Read on to learn about the different quests, survey spots, rewards, and support conversations within the chapter, as well as our walkthrough for its main quest!
| ⮜ Previous Chapter | Next Chapter ⮞ |
|---|---|
| Chapter 11: Heroic Bloodlines |
Chapter 13: Severing the Past |
List of Contents
The Rising Darkness Recruitable Characters
| All Recruitable Characters in The Rising Darkness | ||
|---|---|---|
 Leonie Leonie
|
||
Leonie can be recruited using the Persuade Strategy during the Battle Prep part of the main quest. You need at least 30 Strategy Points to recruit her to your party. You'll also have to make sure to keep her safe for the duration of the main quest.
Note that if you killed Jeralt in Chapter 10: Shifting History, Leonie will not be recruited even if you used the Persuade Strategy.
Recruitment Guide: How to Recruit Units
The Rising Darkness Quests, Survey Spots, and Rewards
The Rising Darkness Quests
| Quest | Type | Rewards |
|---|---|---|
| The Pacification of Hrym | Main |
S Rank Reward: Scythe of Sariel x1
First Time Reward: Master Seal x1 |
| Clear a Path | Side |
S Rank Reward: Arrow of Indra x1
Capture Reward: 6,600 G |
| Prevent the Bandit's Escape | Side |
S Rank Reward: Extra Large Bullion x1
Capture Reward: Activity Points Recovered: 1 |
| Rescue the Villagers | Side |
S Rank Reward: Brave Tome x1
Capture Reward: Training Points Recovered: 1 |
| Vigilante Crisis | Side |
S Rank Reward: Master Seal x1
Capture Reward: 6,600 G |
| Restore Order in Hrym's Territory | Side |
S Rank Reward: Miracle Bean x1
Capture Reward: Training Points Recovered: 1 |
| Recover the Supplies | Side |
S Rank Reward: Brave Axe x1
Capture Reward: 6,600 G |
| A Disquieting Report | Side |
S Rank Reward: Heretic's Tome x1
Capture Reward: Activity Points Recovered: 1 |
| Enshrouded Memories | Paralogue |
S Rank Reward: Timotheos Magi Corps x1
First Time Reward: Talisman x1 |
| The Ashen Wolves' Reunion | Paralogue |
S Rank Reward: Mockingbird's Thieves x1
First Time Reward: Nuvelle Fliers Corps x1 |
The Rising Darkness Survey Spots
| Side Mission | Survey Spot | Type | Reward / Conditions |
|---|---|---|---|
| Clear a Path | House | Pay |
Gold Required: 1,000 G
Reward: Tome of Comely Saints |
| Clear a Path | Stronghold | Visit | Reward: Lavish Building Material x16, Elite Training Gear x6, Storage Compartment x6. |
| Prevent the Bandit's Escape | House | Visit | Reward: Lavish Building Material x16, Advanced Combat Manual x12 |
| Prevent the Bandit's Escape | Stronghold | Choice | Reward: Mountslayer Magic Corps or Wingrender Archers |
| Prevent the Bandit's Escape | Tent | Visit | Reward: Morale Up for two selected units |
| Rescue the Villagers | House | Visit | Reward: Axes Combat Arts Level Up |
| Rescue the Villagers | Forest | Choice | Reward: Owl Feather or Baby's Breath |
| Rescue the Villagers | Tent | Visit | Reward: Lavish Building Material x16, Purveyor's License x10 |
| Vigilante Crisis | Cave | Choice | Reward: Smithing Stone or Arcane Crystal |
| Vigilante Crisis | House | Visit | Reward: Rally the Vigilantes |
| Restore Order in Hrym's Territory | Stronghold | Visit | Reward: Lavish Building Material x16, Luxurious Furnishings x6 |
| Restore Order in Hrym's Territory | Tent | Meet Condition |
Survey Conditions: Must attain Battle Rank S on any difficulty.
Reward: Item Shop Restocked |
| Restore Order in Hrym's Territory | House | Pay |
Gold Required: 2,000 G
Reward: Master Seal x3 |
| Restore Order in Hrym's Territory | Spring | Visit | Reward: Lck +5 to a selected unit. |
| Recover the Supplies | Mine | Meet Condition |
Survey Conditions: Must have a War Master class unit.
Reward: Mythril x20 |
| Recover the Supplies | Ruins | Visit | Reward: Build Bridge |
| A Disquieting Report | Tent | Meet Condition |
Survey Conditions: Trade 3 Agarthium
Reward: Free Forge Uses: 10 |
| A Disquieting Report | Stronghold | Visit | Reward: Lavish Building Material x16, Hero's Insignia x6, Master Smithing Set x12 |
| A Disquieting Report | House | Meet Condition |
Survey Conditions: Must complete all side missions in this area.
Reward: Acquire the Dancer Class |
The Pacification of Hrym Strategies and Walkthrough
Recommended Strategies for The Pacification of Hrym
| Strategy | Description | Cost |
|---|---|---|
| Build Bridge | Build a bridge to create a new path. | 20 (SB) / 30 (GW) |
| Rally the Vigilantes | Summon vigilantes to protect the citizenry's evacuation point. | 20 |
| Persuade Leonie | Convince an allied general to join your army. | 30 |
If you killed Jeralt in Chapter 10: Shifting History, you can switch the Persuade Leonie with a different strategy.
The Pacification of Hrym Objectives
| Victory Condition | Defeat Condition |
|---|---|
| Rescue the Citizens. | The Evacuation Shelter is captured. |
|
Main Objectives
1. Defeat the Wyvern Lord and rescue Hanneman! 2. Defeat Pallardo! / Defeat the real Pallardo! 3. Defeat Metodey 4. Defeat the Demonic Beast! 5. Escort Leonie to the Evacuation Shelter and recruit them! 6. Defeat Solon! Side Objectives ・ Defeat the Thieves and rescue the Citizens! ・ Defeat Pallardo's subordinate and reclaim the stolen goods! ・ Defeat the Thieves and rescue the Citizens! ・ Defeat the Mysterious Mages to bring down the Wall of Darkness! |
|
The Pacification of Hrym Walkthrough
| Objectives | |
|---|---|
| * | We recommend bringing in a pair of Sword-wielders, Lance-wielders, Bow-wielders, and Gauntlet-wielders for this quest. |
| 1 | 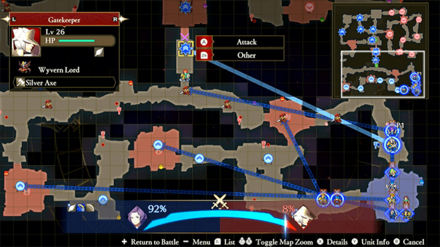 Defeat the Wyvern Lord and rescue Hanneman! Your team starts at the southeast corner of the map. Have most of your troops seize the strongholds to the west, while having at least 2 troops going straight for Leonie's rescue. We recommend having a bow knight such as Bernadetta head straight for the Wyvern Lord gatekeeper. |
| 2 | Soon after the quest starts, Thieves will appear targeting innocent citizens. Make sure to deal with them accordingly. With the chaos quelled, continue moving north to rescue Hanneman. Taking out the Wyvern Lords in this area will allow you to progress further north. |
| 3 | 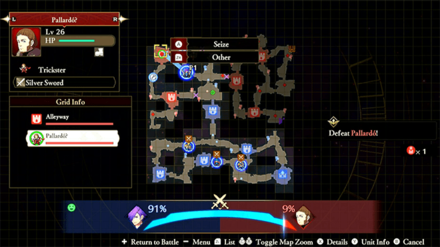 Defeat Pallardo! / Defeat the real Pallardo! After rescuing Hanneman, "Pallardo" will seemingly appear in the northwest corner of the map. You'll have to make your way to him and take him down. |
| 4 | A Thief will also appear smuggling some stolen goods. Have a mounted troop apprehend him before he makes his escape. This will also be your chance to initiate the Build Bridge strategy that will help you traverse the map a bit better. |
| 5 | 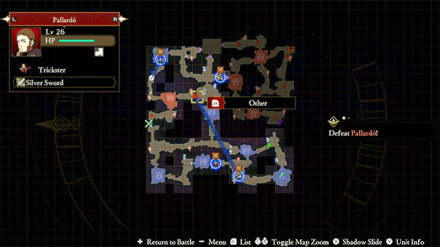 After defeating Pallardo in the northwest stronghold, you'll learn that it was a double. The real Pallardo will reveal himself close to the center of the map and will try to make an escape. You can send a mounted unit to go after him, or warp to the nearby stronghold and apprehend him yourself! |
| 6 | 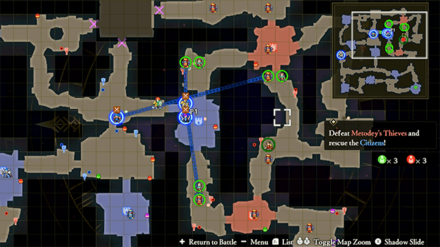 Defeat Metodey! With Pallardo out of the way, the northeast section of the map where Metoday is hiding will open up. Have your troops make their way there. Three more citizens will be found being harassed by Thieves. Take care of them while also setting up the positions to surround Metodey. |
| 7 | Defeat the Demonic Beast! After rescuing the second batch of civilians, you should be in a good position to defeat Metodey. After he falls, a Demonic beast will appear in the middle of the battlefield. Before you send all of your troops to attack it, make sure you have a unit lower the drawbridge on the east side of the map for easier traversal. |
| 8 | Escort Leonie to the Evacuation Shelter and recruit them! Leonie will notice that she's been poisoned, and Edelgard will ask to have her escorted to safety. This will be your chance to initiate the Persuade Leonie strategy. Note that this strategy only works if you did not kill Jeralt in Chapter 10: Shifting History. |
| 9 | Defeat Solon! Once the Demonic Beast has been defeated, Solon will appear at the northern part of the map, revealing himself as the mastermind behind this attack. Send one of your troops towards Solon with the rest standing back. Solon will trap those who make it to the northern stronghold with dark magic so you'll need some troops on the outside to protect the evacuation shelter. You can also initiate the Rally the Vigilantes strategy to give the evacuation shelter a bit more protection. |
| 10 | Defeating Solon will end the quest, so if you're having trouble keeping the Evacuation center safe, you can also focus all of your attention to defeating Solon. |
The Rising Darkness Support and Romance Conversations
In Cutscenes
 Hubert Hubert
|
Prompt: | It seems certain parties were not at all happy with that particular arrangement. | ||
|---|---|---|---|---|
| Answers: | Reactions: | |||
| Suggest ignoring the revolt entirely. | None. | |||
| Suggest returning to quell the revolt. | +1 Support with Edelgard | |||
In Camp
 Edelgard Edelgard
|
Prompt: | But based on the reports, things are only going to get worse from here on. Be ready. | ||
|---|---|---|---|---|
| Answers: | Reactions: | |||
| Say you're used to this. | None | |||
| Say you're nervous. | +1 Support with Edelgard | |||
 Ferdinand Ferdinand
|
Prompt: | When you are a noble, the people in your territory feel like your own precious children. | ||
| Answers: | Reactions: | |||
| Tease him for calling them children. | None | |||
| Tease him about being a noble. | +1 Support with Ferdinand | |||
 Linhardt Linhardt
|
Prompt: | And the war is going to stretch on even longer because of this, right? All I can do is sigh, really. | ||
| Answers: | Reactions: | |||
| Suggest he transfer posts. | None | |||
| Suggest he take temporary leave. | +1 Support with Linhardt | |||
 Caspar Caspar
|
Prompt: | Well, I'm sure things in the west will be fine with my father there. Not like when we were fighting the Alliance. | ||
| Answers: | Reactions: | |||
| Agree with him. | +1 Support with Caspar | |||
| Worry about Count Bergliez. | None | |||
 Bernadetta Bernadetta
|
Prompt: | I have no idea where we are... The Alliance? Or are we in the Empire? | ||
| Answers: | Reactions: | |||
| Commiserate with her. | +1 Support with Bernadetta | |||
| Tell her where you are. | None | |||
 Petra Petra
|
Prompt: | I am having a better time fighting in this situation. What about you? | ||
| Answers: | Reactions: | |||
| Definitely better. | +1 Support with Petra | |||
| Definitely worse. | None. | |||
 Monica Monica
|
Prompt: | No, that is something else entirely! We cannot allow it to stand! | ||
| Answers: | Reactions: | |||
| Agree with her. | +1 Support with Monica | |||
| Ask for clarification | None. | |||
 Mercedes Mercedes
|
Prompt: | Oh... Um, I'm sorry. I think I need some time alone right now. (Prompt only appears if you killed Annette in Chapter 11: Heroic Bloodlines.) | ||
| Answers: | Reactions: | |||
| Worry about her. | +1 Support with Mercedes | |||
| Agree to leave her alone. | TBD | |||
 Ignatz Ignatz
|
Prompt: | That can't be a coincidence. There must be something more to this than meets the eye. | ||
| Answers: | Reactions: | |||
| Ask what he thinks is happening. | +1 Support with Ignatz | |||
| Just agree with it. | None | |||
 Lysithea Lysithea
|
Prompt: | But how do these ordinary, run-of-the-mill ruffians manage to coordinate such widespread chaos? | ||
| Answers: | Reactions: | |||
| Ask what she is hinting at. | None. | |||
| Suggest there's a mastermind. | +1 Support with Lysithea | |||
 Yuri Yuri
|
Prompt: | We need to consider what approach they'll take while we're dealing with the riots. | ||
| Answers: | Reactions: | |||
| Agree wholeheartedly. | +1 Support with Yuri. | |||
| Tell him to focus on the riots. | None. | |||
 Balthus Balthus
|
Prompt: | Ordelia territory's in bad shape, yeah? Bah, I just wanna go help 'em. | ||
| Answers: | Reactions: | |||
| Ask him why. | None. | |||
| Offer to help him out. | +1 Support with Balthus | |||
 Constance Constance
|
Prompt: | But now, we've mobilized our forces and prioritized aiding the people, rather than the war itself. I feel misty-eyed with gratitude. | ||
| Answers: | Reactions: | |||
| Express relief. | None. | |||
| Express shock about her past. | +1 Support with Constance | |||
 Hapi Hapi
|
Prompt: | It's like I sense...darkness? Or something like that. It's hard to put into words. | ||
| Answers: | Reactions: | |||
| Ask about the darkness. | +1 Support with Hapi | |||
| Say you sense it too. | None. | |||
 Manuela Manuela
|
Prompt: | I'm a bit worried about him. That old geezer is prone to the most spectacular blunders. | ||
| Answers: | Reactions: | |||
| Sympathize with her. | None. | |||
| Worry about him. | +1 Support with Manuela | |||
 Byleth Byleth
|
Prompt: | It doesn't matter who we're up against. I'll cut them down all the same. | ||
| Answers: | Reactions: | |||
| Waver in the face of their determination. | None. | |||
| Respond undaunted. | +1 Support with Byleth | |||
Between Battles
| There doesn't appear to be any conversations that affect Support between this Chapter's battles. |
Paralogues
The Ashen Wolves' Reunion
|
Constance
|
Prompt: | Even your condemnation is far too kind. I was of no help whatsoever. | ||
|---|---|---|---|---|
| Answers: | Reactions: | |||
| Stick up for them | +1 Support with Hapi | |||
| Pile on! | +1 Support with Constance | |||
Fire Emblem Warriors: Three Hopes Related Guides
Story Walkthrough: List of Chapters
All Story Walkthroughs
All Paralogues
Author

Chapter 12 Walkthrough - The Rising Darkness (Scarlet Blaze)
Please participate in our site
improvement survey
03/2026
improvement survey
03/2026
Would you assist in
improving Game8's site?
improving Game8's site?

×
We are listening to our users' valuable opinions and discussing how to act on them.
The information collected through this survey will be used for the purpose of improving our services. In addition, the information will only be disclosed a part of a statistic in a format that will not allow identification of personal information.
Begin Survey
Not Now
×
Please rate each item regarding Game8.co's Advertisements.
Amount of Ads
Very Dissatisfied
Somewhat Dissatisfied
Fine
Somewhat Satisfied
Highly Satisfied
Placement of Ads
Timing of Ad Display
Ad Loading Speed
Safeness of Ads
Content of Ads
×
Please rate each item regarding Game8.co's Quality of Articles.
Amount of information
Very Dissatisfied
Somewhat Dissatisfied
Fine
Somewhat Satisfied
Highly Satisfied
Frequency of updates
Speed of new information
Accuracy of articles
Understandibility of articles
Readability of sentences
×
Please rate each item regarding Game8.co's Usability of the Site.
Ease of finding information
Very Dissatisfied
Somewhat Dissatisfied
Fine
Somewhat Satisfied
Highly Satisfied
Loading Speed
Use of Color
Font Size
Visibility of Images
Easy to Understand Layout
×
Please rate each item regarding Game8.co's Message Boards, Comments.
Ease of Writing
Very Dissatisfied
Somewhat Dissatisfied
Fine
Somewhat Satisfied
Highly Satisfied
Readability
Ease in Finding Information
Comment Quality
Comment Quantity
Admin Response
×
Please rate each item regarding Game8.co's Site's new design.
Please rate our site's new design
Very Dissatisfied
Somewhat Dissatisfied
Fine
Somewhat Satisfied
Highly Satisfied
Do you think that the website's design change makes the site easier to use?
Has the new design made it easier for you to find information on the site?
Has the new design improved the overall visual appeal of the site?
How would you rate your overall satisfaction with the new design of the site?
×
How likely are you to recommend Game8 to someone you know?
Very Unlikely
0
1
2
3
4
5
6
7
8
9
10
Very Likely
If you have other opinions regarding potential improvement to the website, please share them with us. We would appreciate your honest opinion.
Note: This is a free response section, so you can proceed without entering anything.
Note: Please be sure not to enter any kind of personal information into your response.
Note: Please be sure not to enter any kind of personal information into your response.
×
Thank You
×
Thank you for participating in our survey! Your answers will help us to improve the quality of our website and services.
We hope you continue to make use of Game8.
We hope you continue to make use of Game8.
Close
Rankings
- We could not find the message board you were looking for.
Gaming News


![Monster Hunter Stories 3 Review [First Impressions] | Simply Rejuvenating](https://img.game8.co/4438641/2a31b7702bd70e78ec8efd24661dacda.jpeg/thumb)
Popular Games

Genshin Impact Walkthrough & Guides Wiki
Honkai: Star Rail Walkthrough & Guides Wiki
Umamusume: Pretty Derby Walkthrough & Guides Wiki
Pokemon Pokopia Walkthrough & Guides Wiki
Resident Evil Requiem (RE9) Walkthrough & Guides Wiki
Monster Hunter Wilds Walkthrough & Guides Wiki
Wuthering Waves Walkthrough & Guides Wiki
Arknights: Endfield Walkthrough & Guides Wiki
Pokemon FireRed and LeafGreen (FRLG) Walkthrough & Guides Wiki
Pokemon TCG Pocket (PTCGP) Strategies & Guides Wiki


Recommended Games
Diablo 4: Vessel of Hatred Walkthrough & Guides Wiki
Cyberpunk 2077: Ultimate Edition Walkthrough & Guides Wiki
Fire Emblem Heroes (FEH) Walkthrough & Guides Wiki
Yu-Gi-Oh! Master Duel Walkthrough & Guides Wiki
Super Smash Bros. Ultimate Walkthrough & Guides Wiki
Pokemon Brilliant Diamond and Shining Pearl (BDSP) Walkthrough & Guides Wiki
Elden Ring Shadow of the Erdtree Walkthrough & Guides Wiki
Monster Hunter World Walkthrough & Guides Wiki
The Legend of Zelda: Tears of the Kingdom Walkthrough & Guides Wiki
Persona 3 Reload Walkthrough & Guides Wiki


All rights reserved
© Nintendo / INTELLIGENT SYSTEMS © KOEI TECMO GAMES CO., LTD. Fire Emblem and Nintendo Switch are trademarks of Nintendo. © Nintendo.
The copyrights of videos of games used in our content and other intellectual property rights belong to the provider of the game.
The contents we provide on this site were created personally by members of the Game8 editorial department.
We refuse the right to reuse or repost content taken without our permission such as data or images to other sites.