 Crossed Roads
This survey will take about 1 minute.
Your answers will help us to improve our website.
Fire Emblem Warriors Three Hopes
Chapter 14 Walkthrough - A Clash of Ambitions (Scarlet Blaze)
Check out our:
★ Story Walkthrough for how to get S Rank Rewards and the Best Responses to Support Conversations!
★ Character Tier List / Class Tier List for party building!
★ List of Characters for guides on recruiting all characters and their best classes.
A Clash of Ambitions is Chapter 14 of the Scarlet Blaze Route in Fire Emblem Warriors Three Hopes. Read on to learn about the different quests, survey spots, rewards, and support conversations within the chapter, as well as our walkthrough for its main quest!
| ⮜ Previous Chapter | Next Chapter ⮞ |
|---|---|
| Chapter 13: Severing the Past |
Final Chapter: A Path Forward |
List of Contents
How to Unlock A Clash of Ambitions
Defeat Byleth and Kill Jeralt in Chapter 10
You can only unlock Chapter 14: A Clash of Ambitions if you defeated Byleth and killed Jeralt in Chapter 10: Shifting History.
Chapter 10 Walkthrough - Shifting History
A Clash of Ambitions Recruitable Characters
| All Recruitable Characters in A Clash of Ambitions | ||
|---|---|---|
| There are no recruitable characters in this chapter. | ||
Recruitment Guide: How to Recruit Units
A Clash of Ambitions Quests, Survey Spots, and Rewards
A Clash of Ambitions Quests
| Quest | Type | Rewards |
|---|---|---|
| Showdown at Ailell | Main |
S Rank Reward: Black Pearl x1
First Time Reward: Master Seal x1 |
| Rout the Attacking Knights | Side |
S Rank Reward: Sword of Zoltan+10 x1
Capture Reward: 7,800 G |
| Chaos in Albany | Side |
S Rank Reward: Fruit of Life x1
Capture Reward: Training Points Recovered: 1 |
| Ride for Charon | Side |
S Rank Reward: Master Seal x1
Capture Reward: 7,800 G |
| The Alliance Army's Reinforcements | Side |
S Rank Reward: Bow of Zoltan+10 x1
Capture Reward: Activity Points Recovered: 1 |
| Secure the Ambush Point | Side |
S Rank Reward: Extra Large Bullion x1
Capture Reward: Activity Points Recovered: 1 |
| Defend Daphnel Territory | Side |
S Rank Reward: Axe of Zoltan+10 x1
Capture Reward: Training Points Recovered: 1 |
| Eliminate the Scouts | Side |
S Rank Reward: Lance of Zoltan+10 x1
Capture Reward: 7,800 G |
| Like Cats and Dogs | Paralogue |
S Rank Reward: Hevring Prayer Troops x1
First Time Reward: Berglie Squadron x1 |
A Clash of Ambitions Survey Spots
| Side Mission | Survey Spot | Type | Reward / Conditions |
|---|---|---|---|
| Rout the Attacking Knights | Tent | Meet Condition |
Survey Conditions: Defeat a total of 2000 enemies in this chapter.
Reward: Free Forge Uses: 10 |
| Rout the Attacking Knights | Mine | Visit | Reward: Smithing Stone x30 |
| Chaos in Albany | House | Visit | Reward: Def +5 to a selected unit. |
| Chaos in Albany | Forest | Choice | Reward: Agile Dexterity Ring or Lightning Speed Ring |
| Chaos in Albany | House | Visit | Reward: Lavish Building Material x16, Luxurious Furnishings x6 |
| Ride for Charon | Cave | Visit | Reward: Lance Combat Arts Level Up |
| Ride for Charon | Mine | Meet Condition |
Survey Conditions: Must complete all side missions in this area.
Reward: Agarthium x10 |
| The Alliance Army's Reinforcements | House | Visit | Reward: Lavish Building Material x16, Elite Training Gear x6 |
| The Alliance Army's Reinforcements | House | Visit | Reward: Morale Up for two selected units |
| The Alliance Army's Reinforcements | Cave | Visit | Reward: Summon Alliance Wyverns |
| Secure the Ambush Point | Tent | Visit | Reward: Alliance Sniper Fusillade |
| Secure the Ambush Point | Mine | Visit | Reward: Lavish Building Material x16, Master Smithing Set x12 |
| Defend Daphnel Territory | Mine | Choice | Reward: Mythril or Umbral Steel |
| Defend Daphnel Territory | Tent | Visit | Reward: Lavish Building Material x16, Purveyor's License x10, Storage Compartment x6 |
| Eliminate the Scouts | Cave | Visit | Reward: Lavish Building Material x16, Advanced Combat Manual x12, Hero's Insignia x6. |
| Eliminate the Scouts | Tent | Pay |
Gold Required: 2,000 G
Reward: Item Shop Restocked |
Showdown at Ailell Strategies and Walkthrough
Recommended Strategies for Showdown at Ailell
| Strategy | Description | Cost |
|---|---|---|
| Decimate Alliance Snipers | Use the imperial mages waiting in ambush to launch a surprise attack on the enemy reinforcements. | 30 |
| Relentless Formation | Begin the battle in an offensive formation | 10 |
| High Spirits | Strengthen units stationed in allied strongholds. | 10 |
| Stronghold Sabotage | Decrease the durability of all enemy strongholds at the beginning of battle. | 10 |
Showdown at Ailell Objectives
| Victory Condition | Defeat Condition |
|---|---|
| The Kingdom and Church of Seiros Army and the Aliiance Army are defeated. | All ally strongholds are captured. |
|
Main Objectives
1. Seize the strongholds and defeat both enemy armies' frontline forces! 2. Defeat Flayn! 3. Defeat Felix! 4. Defeat Sylvain! 5. Seize the strongholds and defeat both enemy armies' rear guards! 6. Defeat Dedue! 7. Defeat Hilda! 8. Defeat Claude! 9. Defeat Seteth! 10. Defeat Dimitri! 11. Defeat Byleth once and for all! Side Objectives ・ Defeat the Alliance Army reinforcements! ・ Seize all the strongholds! |
|
Showdown at Ailell Walkthrough
| Objectives | |
|---|---|
| * | We recommend bringing a pair of Sword-wielders, Bow-wielders, and Axe-wielders for this quest. This map also has terrain that can deal damage to your grounded units. Having a flying unit such as Caspar will help avoid unnecessary damage. |
| 1 | 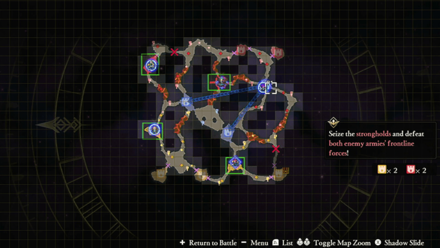 Seize the strongholds and defeat both enemy armies' frontline forces! Order your controlled units to seize the five strongholds in the map. Assign the AI-controlled units to guard the two strongholds. |
| 2 | 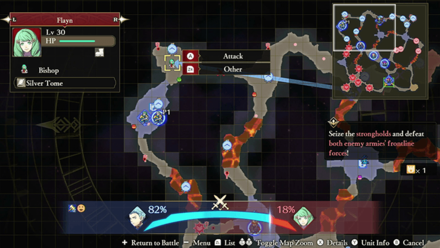 Defeat Flayn! Once Flayn appears on the top-left corner, use the controlled unit nearby to defeat her. You can also assign two AI-controlled units to help out. |
| 3 | 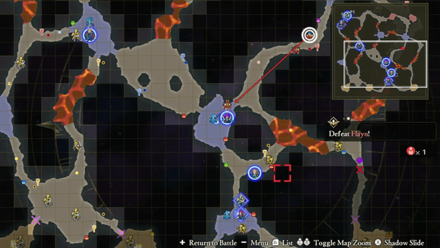 Defeat Felix! Felix will appear near the eastern ally stronghold. Assign a controlled unit to stop him from going to the stronghold. |
| * | 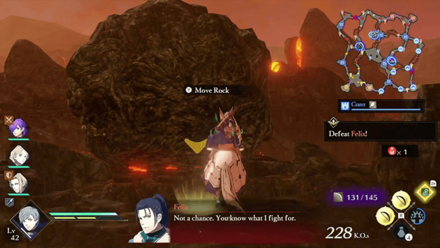 Optional: Move the rock to create a path You can move the rock on the center of the map to create a path to one of the enemy stronghold. However, doing so spawns enemies if you move it too early. |
| 4 | 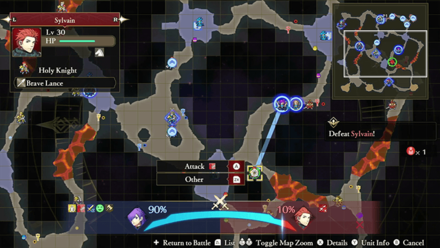 Defeat Sylvain! Sylvain will appear on the same area where you have defeated Felix. Use your controlled unit to defeat him. |
| 5 | 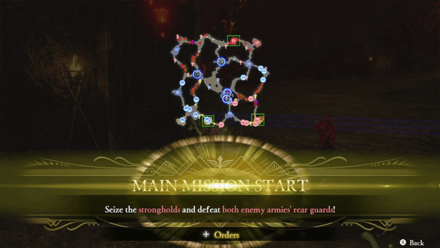 Seize the strongholds and defeat both enemy armies' rear guards! Assign your controlled units to seize the three enemy strongholds on the map. Do this quickly as Claude will send in Alliance reinforcements in the center of the map to seize the ally strongholds. |
| 6 | 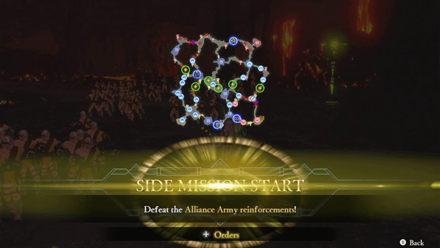 Side Mission: Defeat the Alliance Army reinforcements! Six Alliance enemies will appear on the center of the map. Assign AI-controlled units to defeat them and use the remaining controlled units to defend the strongholds near the area where they appeared. Use your controlled unit to take down the remaining strongholds. |
| 7 | 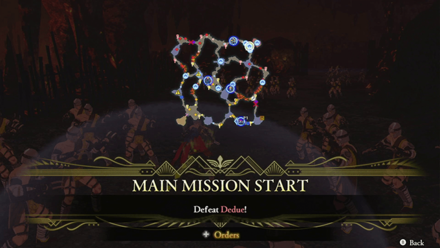 Defeat Dedue! Assign the controlled unit on the top part of the map to defeat Dedue. You can use this time to defeat the remaining Alliance Army reinforcements to complete the side mission. |
| 8 | 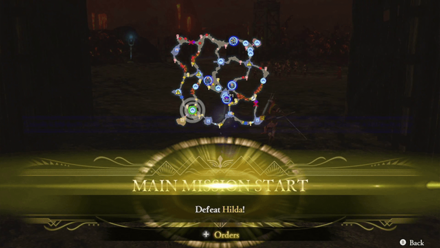 Defeat Hilda! Hilda will appear at the same on the bottom-left corner of the map. You can use Shadow Slide to teleport Shez near the ally stronghold to defeat her. If you have selected the Decimate Alliance Snipers strategy, you can activate it at this time to remove snipers in the area. Do not move your controlled unit yet after defeating Hilda. |
| 9 | 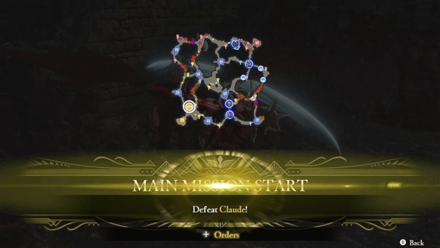 Defeat Claude! Claude will appear on the same area where you have defeated Hilda. Use Shez or a controlled unit with an advantage against him to defeat him. |
| 10 | 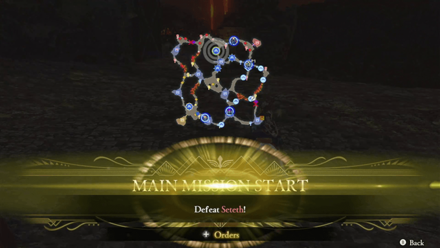 Defeat Seteth! Seteth will appear near the center of the map after you defeat Dedue. Assign a bow-wielding controlled unit on the top part of the map to defeat him. |
| 11 | Defeat Dimitri! Dimitri will appear from the enemy stronghold on the top-right corner of the map. Assign controlled units nearby to stop him from heading down to seize the ally strongholds. Use the other controlled units to seize the remaining strongholds to complete the side mission. |
| 12 | 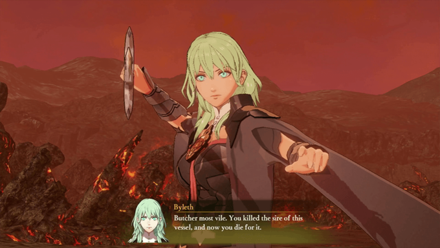 Defeat Byleth once and for all! Byleth will appear in the area where you defeated Dimitri. Assign an All-Out Offensive to order all units to overwhelm Byleth and finish the battle. |
A Clash of Ambitions Support and Romance Conversations
In Cutscenes
 Hubert Hubert
|
Prompt: | What is it, Ferdinand? Is Garreg Mach in danger? | ||
|---|---|---|---|---|
| Answers: | Reactions: | |||
| Realize what he's getting at. | +1 Support with Ferdinand | |||
| Fail to see the implications. | None | |||
In Camp
 Edelgard Edelgard
|
Prompt: | All that is left is to vanquish the Central Chruch and the Kingdom, who obstinately persist in their opposition to us. | ||
|---|---|---|---|---|
| Answers: | Reactions: | |||
| Express concern about the Alliance. | +1 Support with Edelgard | |||
| Express concern about those who slither in the dark. | None | |||
|
Hubert
|
Prompt: | Do you truly not know anything? | ||
| Answers: | Reactions: | |||
| Remain silent. | None | |||
| Say something even though you don't know. | +1 Support with Hubert | |||
 Linhardt Linhardt
|
Prompt: | But I'm not so sure. They say bad things come in threes. That means more trouble is on the way. | ||
| Answers: | Reactions: | |||
| Take an optimistic view. | None | |||
| Proclaim you'll deal with anything that happens. | +1 Support with Linhardt | |||
 Caspar Caspar
|
Prompt: | Ugh, I just don't know what to do. | ||
| Answers: | Reactions: | |||
| Express concern for Caspar's brother. | None | |||
| Speculate how this will affect Caspar. | +1 Support with Caspar | |||
 Bernadetta Bernadetta
|
Prompt: | It'll be OK...right? | ||
| Answers: | Reactions: | |||
| Reassure her. | +1 Support with Bernadetta | |||
| Express doubt. | None | |||
 Dorothea Dorothea
|
Prompt: | Though really, that shouldn't change the fact that they're all people with families and lives. | ||
| Answers: | Reactions: | |||
| Reassure her. | None | |||
| Say it doesn't matter who it is. | +1 Support with Dorothea | |||
 Monica Monica
|
Prompt: | And there may be more who secretly oppose Her Majesty's plan, even if they show outward support. | ||
| Answers: | Reactions: | |||
| Claim they must be stamped out. | +1 Support with Monica | |||
| Claim they must be accepted regardless. | None | |||
 Ashe Ashe
|
Prompt: | I don't know if I'd be able to defeat him in battle. | ||
| Answers: | Reactions: | |||
| Say he could win. | None | |||
| Say he probably couldn't win. | +1 Support with Ashe | |||
| Say he doesn't have to fight. | None | |||
 Mercedes Mercedes
|
Prompt: | Do you remember the girl who fought alongside me at Arianrhod...and lost her life in the process? | ||
| Answers: | Reactions: | |||
| Say you remember her. | +1 Support with Mercedes | |||
| Say you don't remember. | None | |||
 Lorenz Lorenz
|
Prompt: | The issue is what happens after we win. I am concerned about the relationship between the Empire and the Alliance. | ||
| Answers: | Reactions: | |||
| Agree there's cause for concern. | None | |||
| Take an optimistic stance. | +1 Support with Lorenz | |||
 Raphael Raphael
|
Prompt: | I've heard he's ridiculously strong. I wonder which of us would come out on top. | ||
| Answers: | Reactions: | |||
| Say Dimitri's stronger. | +1 Support with Raphael | |||
| Say Raphael's stronger. | None | |||
 Ignatz Ignatz
|
Prompt: | But now I feel strangely clam, even though we're facing a major fight. | ||
| Answers: | Reactions: | |||
| Praise him. | +1 Support with Ignatz | |||
| Warn him. | None | |||
 Lysithea Lysithea
|
Prompt: | If their aim is to throw Fodlan into chaos, then the best way to stop that would be... | ||
| Answers: | Reactions: | |||
| To bring peace to Fodlan. | None | |||
| To unify Fodlan. | +1 Support with Lysithea | |||
 Marianne Marianne
|
Prompt: | I wouldn't be of any use back home anyway. I have no idea what he's thinking. | ||
| Answers: | Reactions: | |||
| Say he must have his reasons | None | |||
| Say he must be worried about her. | +1 Support with Marianne | |||
 Balthus Balthus
|
Prompt: | I've had a hankerin' to really let someone have it. And it looks like I'll be finally getting my wish. | ||
| Answers: | Reactions: | |||
| Say you feel the same. | +1 Support with Balthus | |||
| Stare in confusion. | None | |||
 Hapi Hapi
|
Prompt: | Yeah, which is exactly why I decided to help you. I dunno how much I can really do, though. | ||
| Answers: | Reactions: | |||
| Side with Hapi. | +1 Support with Hapi | |||
| Side with Constance. | +1 Support with Constance | |||
 Manuela Manuela
|
Prompt: | But Lady Rhea wouldn't possibly appear on the front lines herself...right? | ||
| Answers: | Reactions: | |||
| Say it's a possibility. | +1 Support with Manuela | |||
| Say she probably won't. | None | |||
 Jeritza Jeritza
|
Prompt: | A pointless battle. I hope the next will satisfy me. | ||
| Answers: | Reactions: | |||
| Suggest it will. | +1 Support with Jeritza | |||
| Suggest it won't. | None | |||
 Shamir Shamir
|
Prompt: | But if it did... Hm. | ||
| Answers: | Reactions: | |||
| Ask her to finish her though. | None | |||
| Give a vague response. | +1 Support with Shamir | |||
Between Battles
| There doesn't appear to be any conversations that affect Support between this Chapter's battles. |
Fire Emblem Warriors: Three Hopes Related Guides
Story Walkthrough: List of Chapters
All Story Walkthroughs
All Paralogues
Author

Chapter 14 Walkthrough - A Clash of Ambitions (Scarlet Blaze)
Please participate in our site
improvement survey
03/2026
improvement survey
03/2026
Would you assist in
improving Game8's site?
improving Game8's site?

×
We are listening to our users' valuable opinions and discussing how to act on them.
The information collected through this survey will be used for the purpose of improving our services. In addition, the information will only be disclosed a part of a statistic in a format that will not allow identification of personal information.
Begin Survey
Not Now
×
Please rate each item regarding Game8.co's Advertisements.
Amount of Ads
Very Dissatisfied
Somewhat Dissatisfied
Fine
Somewhat Satisfied
Highly Satisfied
Placement of Ads
Timing of Ad Display
Ad Loading Speed
Safeness of Ads
Content of Ads
×
Please rate each item regarding Game8.co's Quality of Articles.
Amount of information
Very Dissatisfied
Somewhat Dissatisfied
Fine
Somewhat Satisfied
Highly Satisfied
Frequency of updates
Speed of new information
Accuracy of articles
Understandibility of articles
Readability of sentences
×
Please rate each item regarding Game8.co's Usability of the Site.
Ease of finding information
Very Dissatisfied
Somewhat Dissatisfied
Fine
Somewhat Satisfied
Highly Satisfied
Loading Speed
Use of Color
Font Size
Visibility of Images
Easy to Understand Layout
×
Please rate each item regarding Game8.co's Message Boards, Comments.
Ease of Writing
Very Dissatisfied
Somewhat Dissatisfied
Fine
Somewhat Satisfied
Highly Satisfied
Readability
Ease in Finding Information
Comment Quality
Comment Quantity
Admin Response
×
Please rate each item regarding Game8.co's Site's new design.
Please rate our site's new design
Very Dissatisfied
Somewhat Dissatisfied
Fine
Somewhat Satisfied
Highly Satisfied
Do you think that the website's design change makes the site easier to use?
Has the new design made it easier for you to find information on the site?
Has the new design improved the overall visual appeal of the site?
How would you rate your overall satisfaction with the new design of the site?
×
How likely are you to recommend Game8 to someone you know?
Very Unlikely
0
1
2
3
4
5
6
7
8
9
10
Very Likely
If you have other opinions regarding potential improvement to the website, please share them with us. We would appreciate your honest opinion.
Note: This is a free response section, so you can proceed without entering anything.
Note: Please be sure not to enter any kind of personal information into your response.
Note: Please be sure not to enter any kind of personal information into your response.
×
Thank You
×
Thank you for participating in our survey! Your answers will help us to improve the quality of our website and services.
We hope you continue to make use of Game8.
We hope you continue to make use of Game8.
Close
Rankings
- We could not find the message board you were looking for.
Gaming News


![Monster Hunter Stories 3 Review [First Impressions] | Simply Rejuvenating](https://img.game8.co/4438641/2a31b7702bd70e78ec8efd24661dacda.jpeg/thumb)
Popular Games

Genshin Impact Walkthrough & Guides Wiki
Honkai: Star Rail Walkthrough & Guides Wiki
Umamusume: Pretty Derby Walkthrough & Guides Wiki
Pokemon Pokopia Walkthrough & Guides Wiki
Resident Evil Requiem (RE9) Walkthrough & Guides Wiki
Monster Hunter Wilds Walkthrough & Guides Wiki
Wuthering Waves Walkthrough & Guides Wiki
Arknights: Endfield Walkthrough & Guides Wiki
Pokemon FireRed and LeafGreen (FRLG) Walkthrough & Guides Wiki
Pokemon TCG Pocket (PTCGP) Strategies & Guides Wiki


Recommended Games
Diablo 4: Vessel of Hatred Walkthrough & Guides Wiki
Cyberpunk 2077: Ultimate Edition Walkthrough & Guides Wiki
Fire Emblem Heroes (FEH) Walkthrough & Guides Wiki
Yu-Gi-Oh! Master Duel Walkthrough & Guides Wiki
Super Smash Bros. Ultimate Walkthrough & Guides Wiki
Pokemon Brilliant Diamond and Shining Pearl (BDSP) Walkthrough & Guides Wiki
Elden Ring Shadow of the Erdtree Walkthrough & Guides Wiki
Monster Hunter World Walkthrough & Guides Wiki
The Legend of Zelda: Tears of the Kingdom Walkthrough & Guides Wiki
Persona 3 Reload Walkthrough & Guides Wiki


All rights reserved
© Nintendo / INTELLIGENT SYSTEMS © KOEI TECMO GAMES CO., LTD. Fire Emblem and Nintendo Switch are trademarks of Nintendo. © Nintendo.
The copyrights of videos of games used in our content and other intellectual property rights belong to the provider of the game.
The contents we provide on this site were created personally by members of the Game8 editorial department.
We refuse the right to reuse or repost content taken without our permission such as data or images to other sites.
Every moment of this battle hurt, nothing felt right In my heart that is, gameplay wise it was rather straightforward as long as you make sure to micro-manage all units and have your playable units be one of each weapon type