Chapter 06 Walkthrough - Conspiracy in the Air (Azure Gleam)
Check out our:
★ Story Walkthrough for how to get S Rank Rewards and the Best Responses to Support Conversations!
★ Character Tier List / Class Tier List for party building!
★ List of Characters for guides on recruiting all characters and their best classes.

Conspiracy in the Air is of the Azure Gleam Route in Fire Emblem Warriors Three Hopes. Read on to learn about the different quests, survey spots, rewards, and support conversations within the chapter, as well as our walkthrough for its main quest!
| ⮜ Previous Chapter | Next Chapter ⮞ |
|---|---|
| Chapter 5: Skirmish in the Fog |
Chapter 7: The King Awakens |
List of Contents
Conspiracy in the Air Recruitable Characters
| All Recruitable Characters in Conspiracy in the Air | ||
|---|---|---|
 Bernadetta Bernadetta
|
||
Bernadetta can be recruited using the Persuade Bernadetta Strategy during the Battle Prep part of the main quest. You need at least 10 Strategy Points to recruit her.
Recruitment Guide: How to Recruit Units
Conspiracy in the Air Quests, Survey Spots, and Rewards
Conspiracy in the Air Quests
| Quest | Type | Rewards |
|---|---|---|
| Assault on Arundel Territory | Main |
S Rank Reward: Rocky Burdock x1
First Time Reward: Intermediate Seal x1 |
| Purge the Imperial Bandits | Side |
S Rank Reward: Intermediate Seal x1
Capture Reward: Training Points Recovered: 1 |
| The Gaspard Soldiers' Scheme | Side |
S Rank Reward: Armorslayer x1
Capture Reward: Activity Points Recovered: 1 |
| Hold the Camp | Side |
S Rank Reward: Defender's Tome x1
Capture Reward: 3,000 G |
| Build a Kingdom Army Base | Side |
S Rank Reward: Blessed Bow x1
Capture Reward: Training Points Recovered: 1 |
| A Clash in Gillingr | Side |
S Rank Reward: Speed Carrot x1
Capture Reward: Activity Points Recovered: 1 |
| Capture the Thieves - Blue Lions | Extra | No Fixed Rewards |
Conspiracy in the Air Survey Spots
| Side Mission | Survey Spot | Type | Reward / Conditions |
|---|---|---|---|
| Purge the Imperial Bandits | House | Meet Conditions |
Survey Conditions: Trade 1 Tasty Baked Treat
Reward: Owl Feather x2 |
| Purge the Imperial Bandits | Stronghold | Visit | Reward: Basic Building Material x38, Beginner Combat Manual x20 |
| Purge the Imperial Bandits | Gate | Visit | Reward: Morale Up for two Units of choice |
| Purge the Imperial Bandits | Stronghold | Meet Conditions |
Survey Conditions: Defeat 2,000 enemies in Chapter 06.
Reward: Dexterity Ring x1 |
| The Gaspard Soldiers' Scheme | Stronghold | Visit | Reward: Basic Building Material x38, Recruit Training Gear x 30, and Storage Bag x10 |
| The Gaspard Soldiers' Scheme | Tent | Visit | Reward: Group Ice (Batallion) |
| Hold the Camp | House | Visit | Reward: Sutler's License x15 and Squire's Insignia x15 |
| Hold the Camp | House | Visit |
Survey Conditions: Search for training gear at the flea market or search for activity items at the flea market.
Reward: Activity Points Recovered: 1 (for choosing activities) or Training Points Recovered: 1 (for choosing training gear) |
| Build a Kingdom Army Base | House | Meet Conditions |
Survey Conditions: Trade x3 Smithing Stone
Reward: Basic Building Material x38 and Humble Furnishings x10 |
| Build a Kingdom Army Base | Gate | Visit | Reward: Magic Level Up for a selected unit. |
| Build a Kingdom Army Base | Stronghold | Visit | Reward: Retribution |
| A Clash in Gillingr | Mine | Meet Conditions |
Survey Conditions: Must attain Battle Rank S on any difficulty.
Reward: Black-Sand Steel x30 |
| A Clash in Gillingr | Mine | Visit | Reward: Basic Building Material x38 and Apprentice Smithing Set x15 |
| A Clash in Gillingr | Mine | Choice | Reward: Killing Edge or Killer Axe |
Assault on Arundel Territory Strategies and Walkthrough
Recommended Strategies for Assault on Arundel Territory
| Strategy | Description | Cost |
|---|---|---|
| Persuade Bernadetta | Convince an enemy general to join your army. | 10 |
| Retribution | Summon an armored unit to protect and important stronghold. | 20 |
| Group Ice | Attack using powerful ice magic. | 20 |
Assault on Arundel Territory Objectives
| Victory Condition | Defeat Condition |
|---|---|
| Defeat Byleth and the Death Knight. | Either group of your units is routed. |
|
Main Objectives
1. Defeat the Imperial Army vanguard! 2. Seize the strongholds on the perimeter to draw the enemy army's attention! 3. Seize all central strongholds before the Connecting Stronghold falls! 4. Defeat Bernadetta! / Defeat and Recruit Bernadetta! 5. Trap the Death Knight in the Windmill Village Ruins! 6. Defeat Jeralt and their allies to stop the Death Knight from being freed! 7. Defeat the Death Knight! 8. Defeat Byleth! Side Objectives ・ Defeat the Priests and prevent the Death Knight from being healed! ・ Defeat the Jeralt's Mercenaries reinforcements. |
|
Assault on Arundel Territory Walkthrough
| Objectives | |
|---|---|
| 1 | Before the battle starts, make sure you have Hapi as one of your controllable unit since she is stronger against most enemies on the map. Make sure you have sword-, lance-, and gauntlet-users too! |
| 2 | Defeat the Imperial Army vanguard! Order your units to attack marked enemies on the map. Make sure to order your units to attack enemies they're strong against! |
| 3 | 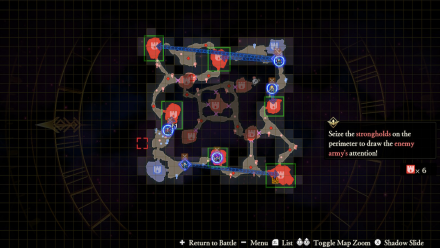 Seize the strongholds on the perimeter to draw the enemy army's attention! Again, order your units to seize the makred strongholds on the map. |
| 4 | Seize all central strongholds before the Connecting Stronghold falls! It is important that you do not fight the Death Knight and Byleth this time because they're incredibly strong and bulky. Defeat the Stronghold Captains in the marked strongholds instead. |
| 5 | 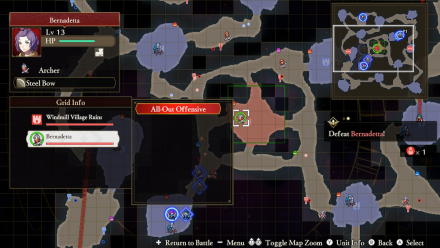 Defeat Bernadetta! / Defeat and Recruit Bernadetta! Launch an All Out Offensive on Bernadetta. If you chose the strategy 'Persuade Bernadetta', you can recruit her after defeating her in battle. Just don't forget to initiate the strategy by long pressing the |
| 6 | 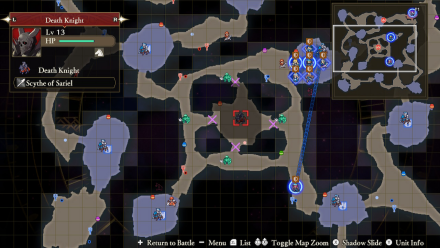 Trap the Death Knight in the Windmill Village Ruins! Let the Death Knight enter the central stronghold. Make sure no ally is in the stronghold so you can trap the Death Knight. |
| 7 | 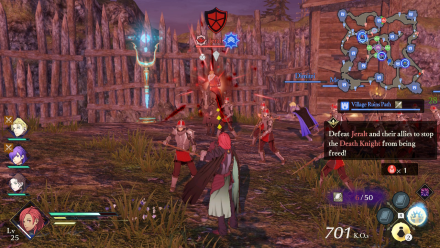 Defeat Jeralt and their allies to stop the Death Knight from being freed! Order your units to attack Jeralt's allies. Have Shez or another sword-user attack Alois and the Brigands on the southern area of the map. |
| 8 | 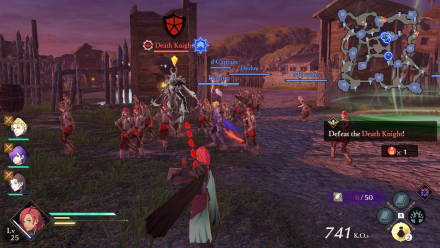 Defeat the Death Knight! Launch an All Out Offensive on the Death Knight. Use either Hapi or a Gauntlet-wielder to fight him so you can deplete his stun gauge easily. |
| 9 | Defeat the Priests and prevent the Death Knight from being healed! Have two units deal with the Priests marked on the map to prevent the Death Knight from being healed. |
| 10 | 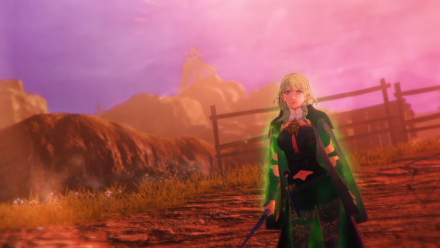 Defeat Byleth! Before taking on Byleth, warp to the southern stronghold to defeat the brigands there. Afterwards, warp back to the stronghold where Byleth is and defeat her. |
Conspiracy in the Air Support and Romance Conversations
In Camp
 Annette Annette
|
Prompt: | We're doing fine enough for now, ourselves, but there's no telling what might happen in the future. | ||
|---|---|---|---|---|
| Answers: | Reactions: | |||
| Tell her to focus. | +1 Support with Annette | |||
| Laugh it off. | None. | |||
 Seteth Seteth
|
Prompt: | By the by, do you know anything about the leader of Jeralt's mercenaries? | ||
| Answers: | Reactions: | |||
| Tell him what you know. | +1 Support with Seteth | |||
| Say you don't know much. | None. | |||
 Sylvain Sylvain
|
Prompt: | But the Kingdom needs him right now, both militarily and politically | ||
| Answers: | Reactions: | |||
| Ask what he means. | +1 Support with Sylvain | |||
| Say you don't know much. | None | |||
 Dorothea Dorothea
|
Prompt: | I'm not sure I can bring myself to fight for Faerghus. Not with my whole heart anyway, but if I have to, I'll do it to hasten the end of this war. | ||
| Answers: | Reactions: | |||
| Cheer her up. | None | |||
| Chide her. | +1 Support with Dorothea | |||
 Petra Petra
|
Prompt: | We had no choice but to be taking Dorothea's life. It is so cruel. (Prompt only appears if you did not recruit Dorothea in Chapter 5: Skirmish in the Fog) | ||
| Answers: | Reactions: | |||
| Tell her it had to be done. | TBD | |||
| Nod. | +1 Support with Petra | |||
Between Battles
| There doesn't appear to be any conversations that affect Support between this Chapter's battles. |
Fire Emblem Warriors: Three Hopes Related Guides

Story Walkthrough: List of Chapters
All Story Walkthroughs
All Paralogues
Author
Chapter 06 Walkthrough - Conspiracy in the Air (Azure Gleam)
improvement survey
03/2026
improving Game8's site?

Your answers will help us to improve our website.
Note: Please be sure not to enter any kind of personal information into your response.

We hope you continue to make use of Game8.
Rankings
- We could not find the message board you were looking for.
Gaming News
Popular Games

Genshin Impact Walkthrough & Guides Wiki

Honkai: Star Rail Walkthrough & Guides Wiki

Umamusume: Pretty Derby Walkthrough & Guides Wiki

Pokemon Pokopia Walkthrough & Guides Wiki

Resident Evil Requiem (RE9) Walkthrough & Guides Wiki

Monster Hunter Wilds Walkthrough & Guides Wiki

Wuthering Waves Walkthrough & Guides Wiki

Arknights: Endfield Walkthrough & Guides Wiki

Pokemon FireRed and LeafGreen (FRLG) Walkthrough & Guides Wiki

Pokemon TCG Pocket (PTCGP) Strategies & Guides Wiki
Recommended Games

Diablo 4: Vessel of Hatred Walkthrough & Guides Wiki

Cyberpunk 2077: Ultimate Edition Walkthrough & Guides Wiki

Fire Emblem Heroes (FEH) Walkthrough & Guides Wiki

Yu-Gi-Oh! Master Duel Walkthrough & Guides Wiki

Super Smash Bros. Ultimate Walkthrough & Guides Wiki

Pokemon Brilliant Diamond and Shining Pearl (BDSP) Walkthrough & Guides Wiki

Elden Ring Shadow of the Erdtree Walkthrough & Guides Wiki

Monster Hunter World Walkthrough & Guides Wiki

The Legend of Zelda: Tears of the Kingdom Walkthrough & Guides Wiki

Persona 3 Reload Walkthrough & Guides Wiki
All rights reserved
© Nintendo / INTELLIGENT SYSTEMS © KOEI TECMO GAMES CO., LTD. Fire Emblem and Nintendo Switch are trademarks of Nintendo. © Nintendo.
The copyrights of videos of games used in our content and other intellectual property rights belong to the provider of the game.
The contents we provide on this site were created personally by members of the Game8 editorial department.
We refuse the right to reuse or repost content taken without our permission such as data or images to other sites.
 Crossed Roads


![Monster Hunter Stories 3 Review [First Impressions] | Simply Rejuvenating](https://img.game8.co/4438641/2a31b7702bd70e78ec8efd24661dacda.jpeg/thumb)


Childe her +1 dorothea (you won't get Petra question.)