Chapter 05 Walkthrough - Skirmish in the Fog (Scarlet Blaze)
Check out our:
★ Story Walkthrough for how to get S Rank Rewards and the Best Responses to Support Conversations!
★ Character Tier List / Class Tier List for party building!
★ List of Characters for guides on recruiting all characters and their best classes.

Skirmish in the Fog is Chapter 05 of the Scarlet Blaze Route in Fire Emblem Warriors Three Hopes. Read on to learn about the different quests, survey spots, rewards, and support conversations within the chapter, as well as our walkthrough for its main quest!
| ⮜ Previous Chapter | Next Chapter ⮞ |
|---|---|
| Chapter 4: The Struggle Commences |
Chapter 6: Bridge of Betrayal |
List of Contents
Skirmish in the Fog Recruitable Characters
| All Recruitable Characters in Skirmish in the Fog | ||
|---|---|---|
 Ashe Ashe
|
||
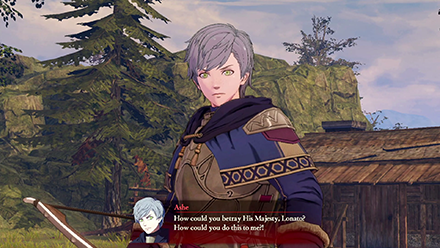
Ashe can be recruited using the Persuade Strategy during the Battle Prep part of the main quest. You need at least 20 Strategy Points to recruit him.
Recruitment Guide: How to Recruit Units
Skirmish in the Fog Quests, Survey Spots, and Rewards
Skirmish in the Fog Quests
| Quest | Type | Rewards |
|---|---|---|
| The Battle of Magdred | Main |
S Rank Reward: Speed Carrot x1
First Time Reward: Intermediate Seal x1 |
| Recapture the Storehouse | Side |
S Rank Reward: Intermediate Seal x1
Capture Reward: Training Points Recovered: 1 |
| Save the Gaspard Archers | Side |
S Rank Reward: Steel Tome x1
Capture Reward: Activity Points Recovered: 1 |
| Defend the Rowe Stronghold | Side |
S Rank Reward: Bullion x1
Capture Reward: Activity Points Recovered: 1 |
| Crush the Kingdom Army | Side |
S Rank Reward: Ailell Pomegranate x1
Capture Reward: Training Points Recovered: 1 |
| A Grave Threat - Black Eagles | Extra | No Fixed Rewards |
| An Unexpected Encounter | Extra | No Fixed Rewards |
Skirmish in the Fog Survey Spots
| Side Mission | Survey Spot | Type | Reward / Conditions |
|---|---|---|---|
| Recapture the Storehouse | House | Visit | Reward: Basic Building Material x38, Recruit Training Gear x30 |
| Recapture the Storehouse | Stronghold | Meet Conditions |
Survey Conditions: Must complete all side missions in this area.
Reward: Torch |
| Recapture the Storehouse | Mine | Meet Conditions |
Survey Conditions: Must have the Armored Knight class.
Reward: Smithing Stone x30 |
| Save the Gaspard Archers | Tent | Visit | Reward: Suppressive Archer Fire |
| Save the Gaspard Archers | House | Meet Conditions |
Survey Conditions: Exchange 3 Albinean Herring
Reward: Basic Building Material x38, Squire's Insignia x15, Storage Bag x10 |
| Defend the Rowe Stronghold | Gate | Visit | Reward: Basic Building Material x38, Sutler's License x15 |
| Defend the Rowe Stronghold | House | Meet Conditions |
Survey Conditions: Exchange 3 Peach Currant
Reward: Peach Sorbet x1 |
| Crush the Kingdom Army | Stronghold | Visit | Reward: Basic Building Material x38, Apprentice Smithing Set x15, and Humble Furnishings x10 |
| Crush the Kingdom Army | Cave | Choice | Reward: Hire either a Battalion of Cavaliers or a Battalion of Archers. |
| Crush the Kingdom Army | House | Visit | Reward: Selected unit +5 Str |
The Battle of Magdred Strategies and Walkthrough
Recommended Strategies for The Battle of Magdred
| Strategy | Description | Cost |
|---|---|---|
| Torch | Light a torch, improving visibility in the fog. | 20 |
| Persuade Ashe | Convince an enemy general to join your army. | 20 (SB) / 30 (GW) |
The Battle of Magdred Objectives
| Victory Condition | Defeat Condition |
|---|---|
| Rescue Lonato. | Lonato is routed. |
|
Main Objectives
1. Find Lonato in one of the strongholds! 2. Defeat the Armored Knights and aid the Gaspard General! 3. Defeat Ingrid! 4. Get to Lonato! 5. Defeat the Mercenaries and aid Lonato! 6. Defeat Ashe! / Defeat and recruit Ashe! 7. Defeat Byleth! 8. Defeat Jeralt and Alois! Side Objectives ・ Defeat the Mercenaries and aid the Gaspard Militia. ・ Face and defeat Byleth! |
|
The Battle of Magdred Walkthrough
| Objectives | |
|---|---|
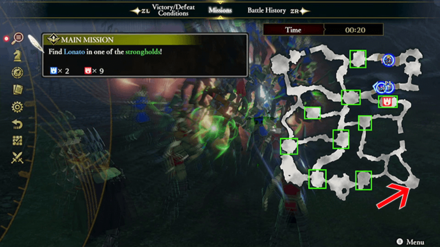
| 1 |  Find Lonato in one of the strongholds! The main quest starts with your characters at the top-right corner of the map. You'll be prompted to check each of the 9 strongholds to try and find where Lonato is. However his true location will be the southeast corner of the map. |
| 2 | It will still be worth it to clear out the strongholds though to have more troops on your side. You'll also have to assign units to target the Armored Knights the Mercenaries, and Ingrid to help protect the Gaspard Troops. |
| 3 |  Get to Lonato! Have one or two troops make their way to Lonato's location as you continue clearing out the other enemies on the map. |
| 4 |  Defeat Ashe! / Defeat and recruit Ashe! After Lonato has been rescued, Ashe will appear at the southern part of the map. This will be your chance to defeat and recruit him if you used the Persuade Ashe strategy. |
| 5 | After defeating Ashe, Byleth and the rest of Jeralt's mercenaries will appear on the north side of the map. You will have to confront and defeat Byleth but don't ignore Lonato. |
| 6 | You can order an all-out offensive against Byleth but try to keep 1 or 2 units close to Lonato ready to defend him in case the enemy approaches. |
| 7 | Once enough damage is dealt to Byleth, Jeralt will appear from the East Side of the map and Alois will appear from the southwest side of the map. Command several of units to target them but keep 1 or 2 units against Byleth and at least 1 unit defending Lonato. |
| 8 | After bringing Byleth's health down enough, he will retreat completing the Face and defeat Byleth! side mission. |
| 9 | Defeat Jeralt and Alois! Once Byleth has been driven away, you can return your focus to the Main Mission to take out Jeralt and Alois! |
Skirmish in the Fog Support and Romance Conversations
In Camp
 Edelgard Edelgard
|
Prompt: | Though I suppose you're used to this sort of thing? | ||
|---|---|---|---|---|
| Answers: | Reactions: | |||
| Say it's no big deal. | None | |||
| Express amazement at how nice things are here. | +1 Support with Edelgard | |||
 Hubert Hubert
|
Prompt: | By the way, do you recall his adopted son who was a student at the Officers Academy? | ||
| Answers: | Reactions: | |||
| Say you remember | +1 Support with Hubert | |||
| Say you don't remember | None | |||
 Linhardt Linhardt
|
Prompt: | It appears the time of peaceful, lazy days are over. | ||
| Answers: | Reactions: | |||
| Tell him those days ended long ago for you. | None | |||
| Agree wholeheartedly. | +1 Support with Linhardt | |||
 Bernadetta Bernadetta
|
Prompt: | You don't think he's chasing me, right? Please say no! | ||
| Answers: | Reactions: | |||
| Deny it emphatically. | +1 Support with Bernadetta | |||
| Say that you don't know. | None | |||
 Dorothea Dorothea
|
Prompt: | They probably view each other the same way I look at the nobility, I guess. | ||
| Answers: | Reactions: | |||
| Say this might be different. | +1 Support with Dorothea | |||
| Agree with her. | None | |||
 Petra Petra
|
Prompt: | Which do you more dislike? Hot or cold? | ||
| Answers: | Reactions: | |||
| Say you don't like the heat. | None | |||
| Say you don't like the cold. | +1 Support with Petra | |||
 Constance Constance
|
Prompt: | Still, it's a move awash in calculated self-interest... I wonder if everyone will still accept me afterward. | ||
| Answers: | Reactions: | |||
| Claim that you accept her. | None | |||
| Say it depends on her efforts. | +1 Support with Constance | |||
 Manuela Manuela
|
Prompt: | You don't look hurt... Don't tell me you came here just to talk to little old me? | ||
| Answers: | Reactions: | |||
| Nod yes. | +1 Support with Manuela | |||
| Deny it. | None | |||
Between Battles
 Hubert Hubert
|
Prompt: | And of course, we are undertaking all of this in the midst of painstaking preparations for war. | ||
|---|---|---|---|---|
| Answers: | Reactions: | |||
| Recall Lord Arundel. | None | |||
| Ask for a reminder of who Lord Arundel is. | -1 Support with Hubert | |||
 Hubert Hubert
|
Prompt: | We believe they possess the same power as you. | ||
| Answers: | Reactions: | |||
| Refuse to believe it. | None | |||
| Accept the truth of Hubert's words. | +1 Support with Hubert | |||
Fire Emblem Warriors: Three Hopes Related Guides

Story Walkthrough: List of Chapters
All Story Walkthroughs
All Paralogues
Comment
Author
Chapter 05 Walkthrough - Skirmish in the Fog (Scarlet Blaze)
improvement survey
03/2026
improving Game8's site?

Your answers will help us to improve our website.
Note: Please be sure not to enter any kind of personal information into your response.

We hope you continue to make use of Game8.
Rankings
- We could not find the message board you were looking for.
Gaming News
Popular Games

Genshin Impact Walkthrough & Guides Wiki

Honkai: Star Rail Walkthrough & Guides Wiki

Umamusume: Pretty Derby Walkthrough & Guides Wiki

Pokemon Pokopia Walkthrough & Guides Wiki

Resident Evil Requiem (RE9) Walkthrough & Guides Wiki

Monster Hunter Wilds Walkthrough & Guides Wiki

Wuthering Waves Walkthrough & Guides Wiki

Arknights: Endfield Walkthrough & Guides Wiki

Pokemon FireRed and LeafGreen (FRLG) Walkthrough & Guides Wiki

Pokemon TCG Pocket (PTCGP) Strategies & Guides Wiki
Recommended Games

Diablo 4: Vessel of Hatred Walkthrough & Guides Wiki

Cyberpunk 2077: Ultimate Edition Walkthrough & Guides Wiki

Fire Emblem Heroes (FEH) Walkthrough & Guides Wiki

Yu-Gi-Oh! Master Duel Walkthrough & Guides Wiki

Super Smash Bros. Ultimate Walkthrough & Guides Wiki

Pokemon Brilliant Diamond and Shining Pearl (BDSP) Walkthrough & Guides Wiki

Elden Ring Shadow of the Erdtree Walkthrough & Guides Wiki

Monster Hunter World Walkthrough & Guides Wiki

The Legend of Zelda: Tears of the Kingdom Walkthrough & Guides Wiki

Persona 3 Reload Walkthrough & Guides Wiki
All rights reserved
© Nintendo / INTELLIGENT SYSTEMS © KOEI TECMO GAMES CO., LTD. Fire Emblem and Nintendo Switch are trademarks of Nintendo. © Nintendo.
The copyrights of videos of games used in our content and other intellectual property rights belong to the provider of the game.
The contents we provide on this site were created personally by members of the Game8 editorial department.
We refuse the right to reuse or repost content taken without our permission such as data or images to other sites.
 Crossed Roads


![Monster Hunter Stories 3 Review [First Impressions] | Simply Rejuvenating](https://img.game8.co/4438641/2a31b7702bd70e78ec8efd24661dacda.jpeg/thumb)


