 Crossed Roads
This survey will take about 1 minute.
Your answers will help us to improve our website.
Fire Emblem Warriors Three Hopes
Chapter 10 Walkthrough - Shifting History (Scarlet Blaze)
Check out our:
★ Story Walkthrough for how to get S Rank Rewards and the Best Responses to Support Conversations!
★ Character Tier List / Class Tier List for party building!
★ List of Characters for guides on recruiting all characters and their best classes.

Shifting History is Chapter 10 of the Scarlet Blaze Route in Fire Emblem Warriors Three Hopes. Read on to learn about the different quests, survey spots, rewards, and support conversations within the chapter, as well as our walkthrough for its main quest!
| ⮜ Previous Chapter | Next Chapter ⮞ |
|---|---|
| Chapter 9: Unrest in Enbarr |
Chapter 11: Heroic Bloodlines |
List of Contents
Shifting History Recruitable Characters
| All Recruitable Characters in Shifting History | ||
|---|---|---|
 Yuri Yuri
|
 Byleth (F) Byleth (F)
|
 Jeralt Jeralt
|
Yuri can be recruited using the Persuade Strategy during the Battle Prep part of the main quest. You need at least 20 Strategy Points to recruit him to your party.
Recruiting Byleth and Jeralt requires choosing the Resonant Lightning strategy, keeping Baron Mateus alive, choosing not to defeat Byleth in the side mission, and defeating Alois and Rodrigue as quickly as possible.
Recruitment Guide: How to Recruit Units
Shifting History Quests, Survey Spots, and Rewards
Shifting History Quests
| Quest | Type | Rewards |
|---|---|---|
| Subjugation of the Western Kingdom | Main |
S Rank Reward: Goddess Icon x1
First Time Reward: Master Seal x1 |
| Maintain Arianrhod's Perimiter | Side |
S Rank Reward: Foreign Tome x1
Capture Reward: 5,400 G |
| Rescue the Citizens of Elidure | Side |
S Rank Reward: Wo Dao x1
Capture Reward: Training Points Recovered: 1 |
| Rendezvous with the Vanguard | Side |
S Rank Reward: Devil Sword x1
Capture Reward: Activity Points Recovered: 1 |
| Seize Dominic Territory | Side |
S Rank Reward: Premium Magic Herbs x1
Capture Reward: 5,400 G |
| Crush the Kingdom's Reserves | Side |
S Rank Reward: Master Seal x1
Capture Reward: Activity Points Recovered: 1 |
| Mage Maneuvers | Side |
S Rank Reward: Extra Large Bullion x1
Capture Reward: Training Points Recovered: 1 |
Shifting History Survey Spots
| Side Mission | Survey Spot | Type | Reward / Conditions |
|---|---|---|---|
| Maintain Arianrhod's Perimiter | House | Visit | Reward: Lavish Building Material x16, Elite Training Gear x10 |
| Maintain Arianrhod's Perimiter | Gate | Choice | Reward: Brigid Mercenaries or Albinean Vagabonds |
| Maintain Arianrhod's Perimiter | House | Pay |
Gold Required: 1,500 G
Reward: Lavender x2, Rose x2, Lily x2 |
| Rescue the Citizens of Elidure | Stronghold | Visit | Reward: Lavish Building Material x16, Advanced Combat Manual x12, Storage Compartment x6 |
| Rescue the Citizens of Elidure | Estate | Meet Condition |
Survey Conditions: Must have the Swordmaster Class
Reward: Master Seal x3 |
| Rendezvous with the Vanguard | House | Meet Condition |
Survey Conditions: Must complete all side missions in this area.
Reward: Recovery Boost |
| Rendezvous with the Vanguard | Stronghold | Visit | Reward: Lavish Building Material x16, Master Smithing Set x12 |
| Seize Dominic Territory | House | Meet Condition |
Survey Conditions: Must attain Battle Rank S on any difficulty.
Reward: Training Points Recovered: 1 |
| Seize Dominic Territory | Tower | Choice | Reward: Cursed Ashiya Sword or Abyssal Tome |
| Seize Dominic Territory | Ruins | Visit | Reward: Gain +5 Mag for a selected unit. |
| Crush the Kingdom's Reserves | Cave | Battle |
Survey Conditions: Lend a hand or refuse.
Reward: Crush the Kingdom's Reserves |
| Crush the Kingdom's Reserves | House | Choice | Reward: Golden Apple or Fruit of Life |
| Crush the Kingdom's Reserves | House | Visit | Reward: Lavish Building Material x16, Hero's Insignia x6, Luxurious Furnishings x6 |
| Crush the Kingdom's Reserves | Forest | Visit | Reward: Raises a selected unit's combat art level for Bows. |
| Mage Maneuvers | House | Meet Conditions |
Survey Conditions: Show a Character with 22 Cha or higher.
Reward: Prayer Ring x1 |
| Mage Maneuvers | Tent | Visit | Reward: Resonant Lightning |
| Mage Maneuvers | Tower | Visit | Reward: Lavish Building Material x16, Purveyor's License x10 |
Subjugation of the Western Kingdom Strategies and Walkthrough
Recommended Strategies for Subjugation of the Western Kingdom
| Strategy | Description | Cost |
|---|---|---|
| Resonant Lightning | Attack using powerful lightning magic. This strategy will significantly turn the tide of battle. | 30 |
| Persuade Yuri | Convince an enemy general to join your army. | 20 |
| Built Up | Begin the battle with additional allied strongholds secured. | 10 |
Subjugation of the Western Kingdom Objectives
| Victory Condition | Defeat Condition |
|---|---|
| Defeat Rodrigue. | None. |
|
Main Objectives
1. Defeat Baron Mateus! 2. Seize the strongholds around Baron Mateus! 3. Seize the northwestern strongholds! 4. Defeat Yuri! / Defeat and recruit Yuri! 5. Advance to the enemy base! 6. Defeat Alois! 7. Defeat Rodrigue! Side Objectives ・ Aid all of the Sorcery Engineers! ・ Defeat the Paladins and aid Randolph! ・ Defeat Byleth ・ Seize the strongholds to prevent enemy reinforcements from appearing! |
|
Subjugation of the Western Kingdom Walkthrough
| Objectives | |
|---|---|
| * | We recommend bringing in a pair of Sword-wielders, Lance-wielders, Axe-wielders, and Tome-wielders for this quest. This battle will be done over a large map, we also recommend having mounted units for fast traversal. |
| 1 | 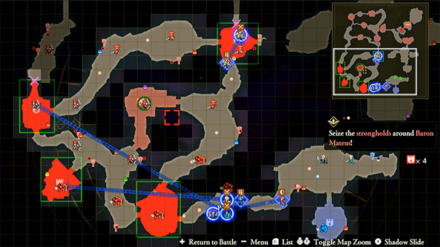 Seize the strongholds around Baron Mateus! The Main Quest starts with the team on the southwestern corner of the map with nowhere to go but west. Despite the main quest suggesting to defeat Baron Mateus, we actually don't recommend slaying him in battle. Instead, distribute your troops accordingly while targeting the four outer strongholds. |
| 2 | With all surrounding strongholds seized, Mateus will surrender. The path to the northwestern strongholds will open up. Slowly move your team north while clearing enemies along the way. |
| 3 | 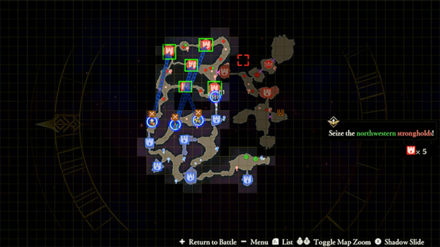 Seize the northwestern strongholds! As you proceed north, Sorcery Engineers will present themselves in between each of the strongholds ready to help the Empire. However, the Kingdom will also send Swordmasters to attack them. Have some of your troops continuing to target the strongholds, with some attacking the Swordmasters. Defending the Sorcery Engineers is necessary to initiate the Resonant Lightning strategy. This will help deal with a lot of enemies on the field. |
| 4 | 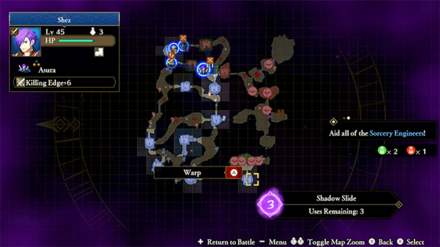 Four Paladins will appear back on the southeast corner where you started and will make their attack towards Randolph. Warp over with Shez and defend them while the rest of the team wraps seizing the strongholds in the northwest. |
| 5 | 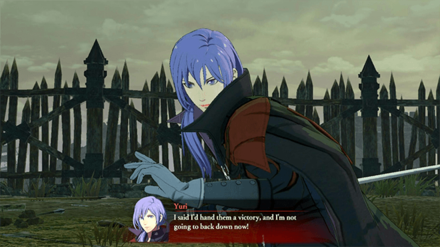 Defeat Yuri! / Defeat and recruit Yuri! After all five of the strongholds in the northwest have been seized. The Ashen Demon will appear and move west from the northeastern section of the map. It is unwise to face against them now. Instead focus your attention on Yuri who will also appear from the east. If you intend to persuade him, this is your chance. If you want to get an S Rank for this quest, try to defeat 1,800 enemies before defeating and recruiting Yuri. |
| 6 | Advance to the enemy base! With Yuri out of the way, the Empire will also finish its preparations on the southeast corner of the map. A bridge has been formed across the shoal that will allow you to corner Rodrigue from two sides. Move your troops accordingly. |
| 7 | With your troops on the way, Mateus will try to redeem himself by destroying the bridge that Byleth had just crossed, effectively isolating them from Rodrigue. Byleth will now have to take the long way round with the rest of you. |
| 8 | 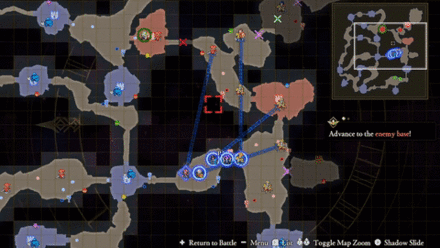 Defeat Alois! A side mission will appear indicating you have to defeat Byleth. However, if you intend to recruit Byleth, do not defeat them. Instead you'll have to make your way to Alois and Rodrigue faster than they can to recruit them. |
| 9 | 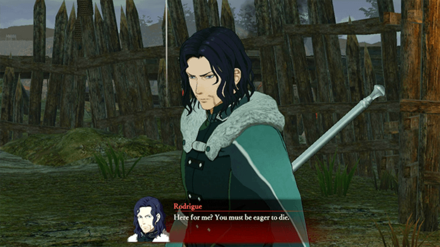 Defeat Rodrigue! Byleth will catch-up fairly quickly, so don't waste any time heading for Rodrigue. Take him out swiftly before Byleth arrives to end the quest! The battle will end at this objective if you did not defeat Byleth. |
| * | 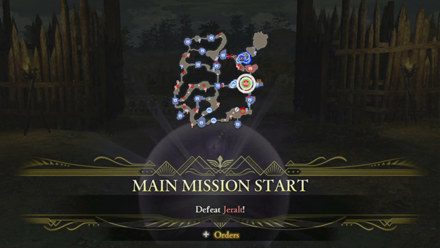 Defeat Jeralt! If you have defeated Byleth, Jeralt will appear at the right corner of the map. Assign two AI controlled units to guard Randolph and Fleche and assign the remaining units to defeat Jeralt. |
Shifting History Support and Romance Conversations
In Camp
 Dorothea Dorothea
|
Prompt: | Hehe, everyone's so much more relaxed and upbeat now. I feel the same, of course. | ||
|---|---|---|---|---|
| Answers: | Reactions: | |||
| Make a serious comment. | None | |||
| Crack a joke. | +1 Support with Dorothea | |||
 Petra Petra
|
Prompt: | Yes. Home was very good. I went to the ocean and forest like when I was a child. I also said hello to the spirits. | ||
| Answers: | Reactions: | |||
| Ask about the ocean. | +1 Support with Petra | |||
| Ask about the spirits. | None | |||
 Monica Monica
|
Prompt: | Have you come to ask me for a favor? | ||
| Answers: | Reactions: | |||
| Ask her to stop calling you her savior. | +1 Support with Monica | |||
| Shrug it off. | None | |||
 Lysithea Lysithea
|
Prompt: | Ever after we came all this way to Enbarr, too. I'm quite disappointed, if I'm being honest. | ||
| Answers: | Reactions: | |||
| Console her. | None | |||
| Encourage her to not lose hope. | +1 Support with Lysithea | |||
 Marianne Marianne
|
Prompt: | But my adoptive father wouldn't allow it. He said I needed to concentrate on working for the Empire right now... | ||
| Answers: | Reactions: | |||
| Ask Marianne what his intentions are. | None | |||
| Guess his intentions. | +1 Support with Marianne | |||
 Balthus Balthus
|
Prompt: | And obviously I wasn't gonna pick any fights since I'm working closely with Her Majesty. | ||
| Answers: | Reactions: | |||
| Show your surprise. | +1 Support with Balthus | |||
| Say you don't believe him. | None | |||
 Hapi Hapi
|
Prompt: | I'm glad I managed to get back in time. | ||
| Answers: | Reactions: | |||
| Ask what she was doing. | +1 Support with Hapi | |||
| Show surprise. | None | |||
 Manuela Manuela
|
Prompt: | And while I was working, I got numerous ardent propositions form men in the court. | ||
| Answers: | Reactions: | |||
| Take her seriously. | +1 Support with Manuela | |||
| Beat her to the punchline. | None | |||
 Jeritza Jeritza
|
Prompt: | Thunder Catherine... The king of Faerghus... And Archbishop Rhea... | ||
| Answers: | Reactions: | |||
| Inquire about the archbishop's skill. | None | |||
| Wish him luck in battle. | +1 Support with Jeritza | |||
 Shamir Shamir
|
Prompt: | No need to worry. I'm not going to betray you. | ||
| Answers: | Reactions: | |||
| Not worried at all. | None | |||
| OK, yeah, definitely worried. | +1 Support with Shamir | |||
Between Battles
| There doesn't appear to be any conversations that affect Support between this Chapter's battles. |
Fire Emblem Warriors: Three Hopes Related Guides

Story Walkthrough: List of Chapters
All Story Walkthroughs
All Paralogues
Comment
2  Anonymous over 3 years
Alright, I was able to do it, but I had to play in a kind of stupid way. Instead of logically splitting up my forces based on advantage, I had to send them all together to deal with one line of enemies, while I tore through the map fighting everything else. Even doing that, I still had to farm kills on the constantly spawning enemies around Yuri, since the "soft time limit" with Byleth starts after he's defeated.
Author

Chapter 10 Walkthrough - Shifting History (Scarlet Blaze)
Please participate in our site
improvement survey
03/2026
improvement survey
03/2026
Would you assist in
improving Game8's site?
improving Game8's site?

×
We are listening to our users' valuable opinions and discussing how to act on them.
The information collected through this survey will be used for the purpose of improving our services. In addition, the information will only be disclosed a part of a statistic in a format that will not allow identification of personal information.
Begin Survey
Not Now
×
Please rate each item regarding Game8.co's Advertisements.
Amount of Ads
Very Dissatisfied
Somewhat Dissatisfied
Fine
Somewhat Satisfied
Highly Satisfied
Placement of Ads
Timing of Ad Display
Ad Loading Speed
Safeness of Ads
Content of Ads
×
Please rate each item regarding Game8.co's Quality of Articles.
Amount of information
Very Dissatisfied
Somewhat Dissatisfied
Fine
Somewhat Satisfied
Highly Satisfied
Frequency of updates
Speed of new information
Accuracy of articles
Understandibility of articles
Readability of sentences
×
Please rate each item regarding Game8.co's Usability of the Site.
Ease of finding information
Very Dissatisfied
Somewhat Dissatisfied
Fine
Somewhat Satisfied
Highly Satisfied
Loading Speed
Use of Color
Font Size
Visibility of Images
Easy to Understand Layout
×
Please rate each item regarding Game8.co's Message Boards, Comments.
Ease of Writing
Very Dissatisfied
Somewhat Dissatisfied
Fine
Somewhat Satisfied
Highly Satisfied
Readability
Ease in Finding Information
Comment Quality
Comment Quantity
Admin Response
×
Please rate each item regarding Game8.co's Site's new design.
Please rate our site's new design
Very Dissatisfied
Somewhat Dissatisfied
Fine
Somewhat Satisfied
Highly Satisfied
Do you think that the website's design change makes the site easier to use?
Has the new design made it easier for you to find information on the site?
Has the new design improved the overall visual appeal of the site?
How would you rate your overall satisfaction with the new design of the site?
×
How likely are you to recommend Game8 to someone you know?
Very Unlikely
0
1
2
3
4
5
6
7
8
9
10
Very Likely
If you have other opinions regarding potential improvement to the website, please share them with us. We would appreciate your honest opinion.
Note: This is a free response section, so you can proceed without entering anything.
Note: Please be sure not to enter any kind of personal information into your response.
Note: Please be sure not to enter any kind of personal information into your response.
×
Thank You
×
Thank you for participating in our survey! Your answers will help us to improve the quality of our website and services.
We hope you continue to make use of Game8.
We hope you continue to make use of Game8.
Close
Rankings
- We could not find the message board you were looking for.
Gaming News


![Monster Hunter Stories 3 Review [First Impressions] | Simply Rejuvenating](https://img.game8.co/4438641/2a31b7702bd70e78ec8efd24661dacda.jpeg/thumb)
Popular Games

Genshin Impact Walkthrough & Guides Wiki
Honkai: Star Rail Walkthrough & Guides Wiki
Umamusume: Pretty Derby Walkthrough & Guides Wiki
Pokemon Pokopia Walkthrough & Guides Wiki
Resident Evil Requiem (RE9) Walkthrough & Guides Wiki
Monster Hunter Wilds Walkthrough & Guides Wiki
Wuthering Waves Walkthrough & Guides Wiki
Arknights: Endfield Walkthrough & Guides Wiki
Pokemon FireRed and LeafGreen (FRLG) Walkthrough & Guides Wiki
Pokemon TCG Pocket (PTCGP) Strategies & Guides Wiki


Recommended Games
Diablo 4: Vessel of Hatred Walkthrough & Guides Wiki
Cyberpunk 2077: Ultimate Edition Walkthrough & Guides Wiki
Fire Emblem Heroes (FEH) Walkthrough & Guides Wiki
Yu-Gi-Oh! Master Duel Walkthrough & Guides Wiki
Super Smash Bros. Ultimate Walkthrough & Guides Wiki
Pokemon Brilliant Diamond and Shining Pearl (BDSP) Walkthrough & Guides Wiki
Elden Ring Shadow of the Erdtree Walkthrough & Guides Wiki
Monster Hunter World Walkthrough & Guides Wiki
The Legend of Zelda: Tears of the Kingdom Walkthrough & Guides Wiki
Persona 3 Reload Walkthrough & Guides Wiki


All rights reserved
© Nintendo / INTELLIGENT SYSTEMS © KOEI TECMO GAMES CO., LTD. Fire Emblem and Nintendo Switch are trademarks of Nintendo. © Nintendo.
The copyrights of videos of games used in our content and other intellectual property rights belong to the provider of the game.
The contents we provide on this site were created personally by members of the Game8 editorial department.
We refuse the right to reuse or repost content taken without our permission such as data or images to other sites.
I couldn’t but went back with Byleth and Shez in the party and cleaned up with the reward. Otherwise you have to jump units until the bridge between Rodrigue is down then farm those around Rodrigue.