Chapter 04 Walkthrough - To War! (Azure Gleam)
Check out our:
★ Story Walkthrough for how to get S Rank Rewards and the Best Responses to Support Conversations!
★ Character Tier List / Class Tier List for party building!
★ List of Characters for guides on recruiting all characters and their best classes.
To War! is Chapter 04 of the Azure Gleam Route in Fire Emblem Warriors Three Hopes. Read on to learn about the different quests, survey spots, rewards, and support conversations within the chapter, as well as our walkthrough for its main quest!
| ⮜ Previous Chapter | Next Chapter ⮞ |
|---|---|
| Chapter 3: Crisis in Fhirdiad |
Chapter 5: Skirmish in the Fog |
List of Contents
To War! Recruitable Characters
| All Recruitable Characters in To War! | ||
|---|---|---|
 Petra Petra
|
 Hapi Hapi
|
|
Petra and Hapi can be recruited using the Persuade Strategy during the Battle Prep part of the main quest. Both characters require 10 Strategy Points each to recruit them.
Recruitment Guide: How to Recruit Units
To War! Quests, Survey Spots, and Rewards
To War! Quests
| Quest | Type | Rewards |
|---|---|---|
| Deliverance in the Valley of Torment | Main |
S Rank Reward: Ambrosia x1
First Time Reward: Rusted Sword x1 |
| Bandits on the Road | Side |
S Rank Reward: Mace x1
Capture Reward: 1800 G |
| Break the Resistance | Side |
S Rank Reward: Intermediate Seal x1
Capture Reward: Training Points Recovered: 1 |
| Rescue the Believers | Side |
S Rank Reward: Bullion x1
Capture Reward: Activity Points Recovered:1 |
To War! Survey Spots
| Side Mission | Survey Spot | Type | Reward / Conditions |
|---|---|---|---|
| Bandits on the Road | Stronghold | Visit | Reward: Crude Building Material x10 |
| Bandits on the Road | House | Visit | Reward: Floral Adornment x1 |
| Break the Resistance | Stronghold | Visit |
Survey Conditions: Must complete all side missions in this area.
Reward: 2,400 G |
| Break the Resistance | Cave | Meet Conditions |
Survey Conditions: Exchange 3 Chickpeas
Reward: Crude Building Material x10 |
| Rescue the Believers | Cave | Choice | Reward: Strength Ring or Speed Ring |
| Rescue the Believers | Ruins | Visit | Reward: Crude Building Material x10 |
| Rescue the Believers | Bridge | Visit | Reward: Gather the Believers |
Deliverance in the Valley of Torment Strategies and Walkthrough
Recommended Strategies for Deliverance in the Valley of Torment
| Strategy | Description | Cost |
|---|---|---|
| Persuade Hapi | Convince an enemy general to join your army. | 10 (SB) / 20 (GW) |
| Persuade Petra | Convince an enemy general to join your army. | 10 |
| Assign Healers | Assign a healer unit to periodically heal allies. | 10 |
Deliverance in the Valley of Torment Objectives
| Victory Condition | Defeat Condition |
|---|---|
| Rhea reaches the evacuation point. | Rhea is routed. |
|
Main Objectives
1. Escort Rhea to the evacuation point. 2. Defeat Hapi! / Defeat and recruit Hapi! 3. Defeat the Mages before the stronghold is blockaded! 4. Seize the strongholds and aid Seteth and Catherine. 5. Aid Cyril 6. Block the lava and secure a path for Seteth and Catherine. 7. Escort Rhea to the evacuation point! 8. Defeat Petra / Defeat and recruit Petra! 9. Defeat Hubert! Side Objectives There are no side objectives for this quest. |
|
Deliverance in the Valley of Torment Walkthrough
| Objectives | |
|---|---|
| 1 | Escort Rhea to the evacuation point. Have somebody guard Rhea to prevent her from being routed. We recommend having Dedue in this battle as an Armored Knight because of his high defensive stats! |
| 2 | Defeat Hapi! / Defeat and recruit Hapi! If you selected "Persuade Hapi" as a strategy, defeating her will make her join your forces. Don't forget to long press the |
| 3 | 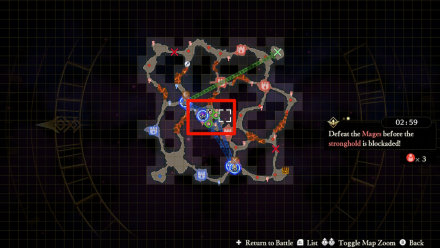 Defeat the Mages before the stronghold is blockaded! Defeat the mages marked on the center of the map. |
| 4 | 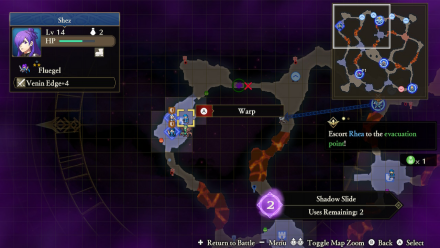 Seize the strongholds and aid Seteth and Catherine. Order two of your units to defend Seteth and another two units to defend Catherine on the opposite side of the map. |
| 5 | 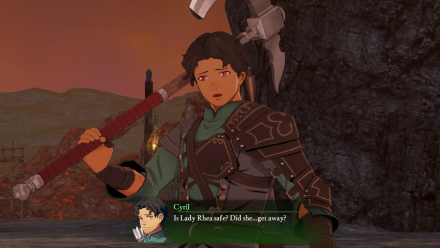 Aid Cyril. Shadow jump to a stronghold near Cyril and defend him from enemies. |
| 6 | 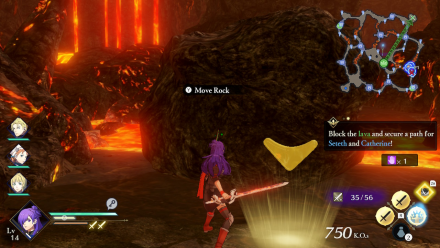 Block the lava and secure a path for Seteth and Catherine. Use your shadow jump to warp to a stronghold near the 'X's on the map and move the boulder to secure a path for Seteth and Catherine. |
| 7 | 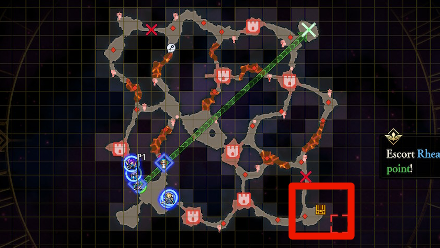 Escort Rhea to the evacuation point! Have another unit take the key from an enemy up north, then open the chest on the lower right corner of the map to get a Bullion. |
| 8 | Defeat Petra / Defeat and recruit Petra! Don't forget to initiate the strategy to be able to recruit Petra! |
| 9 | Defeat Hubert! Launch an All Out Offensive on Hubert to make the fight easier. |
To War! Support and Romance Conversations
In Camp
 Sylvain Sylvain
|
Prompt: | I'm gonna guess you've never been to Ailell. That's the only way you could say that with a straight face. | ||
|---|---|---|---|---|
| Answers: | Reactions: | |||
| Ask about Ailell. | +1 Support with Sylvain. | |||
| Chastise Sylviain. | +1 Support with Ashe. | |||
 Annette Annette
|
Prompt: | So, we're going to be at war soon, huh? It honestly hasn't quite hit me yet. | ||
| Answers: | Reactions: | |||
| Say you feel the same. | +1 Support with Annette. | |||
| Say it'll happen fast. | None. | |||
 Felix Felix
|
Prompt: | It's no simple matter to secure goods and land for extra people. There's been some civil unrest, which has led to a rise in bandit attacks. | ||
| Answers: | Reactions: | |||
| Propose practical countermeasures. | +1 Support with Felix. | |||
| Sympathize with him. | None. | |||
 Ingrid Ingrid
|
Prompt: | It sounds like you've presided over a great number of battles. We'll be counting on you for this next one too. | ||
| Answers: | Reactions: | |||
| Give a reassuring response. | +1 Support with Ingrid. | |||
| Give a humble response. | None. | |||
Between Battles
| There doesn't appear to be any conversations that affect Support between this Chapter's battles. |
Fire Emblem Warriors: Three Hopes Related Guides

Story Walkthrough: List of Chapters
All Story Walkthroughs
All Paralogues
Author
Chapter 04 Walkthrough - To War! (Azure Gleam)
improvement survey
03/2026
improving Game8's site?

Your answers will help us to improve our website.
Note: Please be sure not to enter any kind of personal information into your response.

We hope you continue to make use of Game8.
Rankings
- We could not find the message board you were looking for.
Gaming News
Popular Games

Genshin Impact Walkthrough & Guides Wiki

Honkai: Star Rail Walkthrough & Guides Wiki

Umamusume: Pretty Derby Walkthrough & Guides Wiki

Pokemon Pokopia Walkthrough & Guides Wiki

Resident Evil Requiem (RE9) Walkthrough & Guides Wiki

Monster Hunter Wilds Walkthrough & Guides Wiki

Wuthering Waves Walkthrough & Guides Wiki

Arknights: Endfield Walkthrough & Guides Wiki

Pokemon FireRed and LeafGreen (FRLG) Walkthrough & Guides Wiki

Pokemon TCG Pocket (PTCGP) Strategies & Guides Wiki
Recommended Games

Diablo 4: Vessel of Hatred Walkthrough & Guides Wiki

Cyberpunk 2077: Ultimate Edition Walkthrough & Guides Wiki

Fire Emblem Heroes (FEH) Walkthrough & Guides Wiki

Yu-Gi-Oh! Master Duel Walkthrough & Guides Wiki

Super Smash Bros. Ultimate Walkthrough & Guides Wiki

Pokemon Brilliant Diamond and Shining Pearl (BDSP) Walkthrough & Guides Wiki

Elden Ring Shadow of the Erdtree Walkthrough & Guides Wiki

Monster Hunter World Walkthrough & Guides Wiki

The Legend of Zelda: Tears of the Kingdom Walkthrough & Guides Wiki

Persona 3 Reload Walkthrough & Guides Wiki
All rights reserved
© Nintendo / INTELLIGENT SYSTEMS © KOEI TECMO GAMES CO., LTD. Fire Emblem and Nintendo Switch are trademarks of Nintendo. © Nintendo.
The copyrights of videos of games used in our content and other intellectual property rights belong to the provider of the game.
The contents we provide on this site were created personally by members of the Game8 editorial department.
We refuse the right to reuse or repost content taken without our permission such as data or images to other sites.
 Crossed Roads


![Monster Hunter Stories 3 Review [First Impressions] | Simply Rejuvenating](https://img.game8.co/4438641/2a31b7702bd70e78ec8efd24661dacda.jpeg/thumb)


