 under the page's title to be notified of any updates!
This survey will take about 1 minute.
Your answers will help us to improve our website.
Crimson Desert
All Puzzle Solutions
☆ Best: Side Quests | Weapons | Armor | Skills
★ Controls | Best Items | What to Do First
☆ Characters: Damiane | Oongka | Kliff

This is a list of all Puzzles and their solutions in Crimson Desert. See how to solve each puzzle type and where to find them in this guide.
 Attention! |
We are currently rushing out guides as quickly as possible. More details will be added here soon! |
|---|
Main Story Puzzles Solutions
| Click to Jump to a Chapter | ||
|---|---|---|
| Prologue | Chapter 1 | Chapter 2 |
| Chapter 3 | Chapter 4 | Chapter 5 |
Prologue Puzzles
| # | Puzzle and Solution | |
|---|---|---|
| 0.1 |
 |
|
|
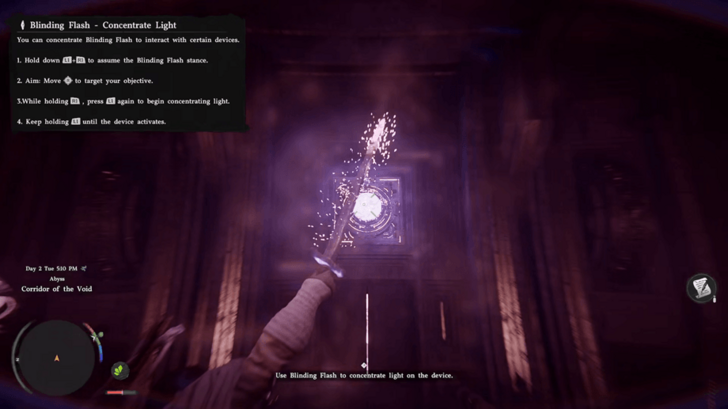
Use Blinding Flash on the Light Device (Unknown Space)
A prompt to press L1+R1/LB+RB will appear, which activates the Blinding Flash skill. You must aim it at the light above the door to open it. |
||
Prologue: Dead of Night Walkthrough
Chapter 1 Puzzles
| # | Puzzle and Solution | |
|---|---|---|
| 1.1 |
|
|
|
Open the Building Door (Polar Opposites)
Attach Axiom Force to one end of a dial and walk around it to rotate it into the correct position. Once both dials are aligned and directing energy to the door, it will open. |
||
| 1.2 |
|
|
|
Skybridge Puzzle (Abyss Without Balance)
Use the Axiom Force on the orb in the center to activate the skybridge. Slowly rotate it using the D-pad until you hear a loud charging sound and the orb starts glowing, then stop immediately. This will charge the skybridge, causing it to open after a few seconds in that position. |
||
| 1.3 |
 |
|
|
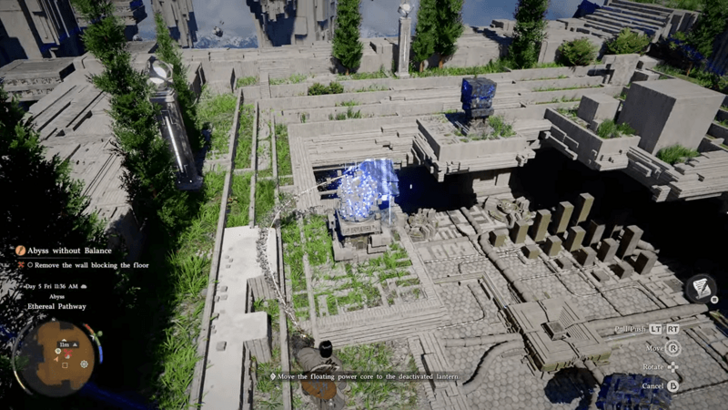
Remove the Wall Blocking the Floor (Abyss Without Balance)
Use the Axiom Force to grab one floating cube in the middle and bring it to the box in front to remove the invisible wall. |
||
| 1.4 |
 |
|
|
Place the Abyss Cell to the Power Outlet (Abyss Without Balance)
Jump down and bring the diamond-shaped object to the power outlet on the right wall. |
||
| 1.5 |
|
|
|
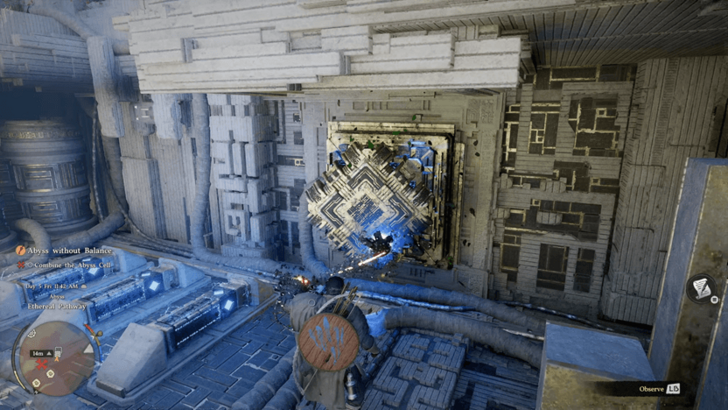
Synthesize the Abyss Cell (Abyss Without Balance)
Learn Force Palm from the hologram and use it on the the diamond to synthesize the abyss cell synthesize the Abyss Cell, slamming it into the slot. |
||
| 1.6 |
|
|
|
Activate the Abyss Power Supply (Abyss Without Balance)
Hang on the middle of the powered device and use Force Palm to activate the power, and its light will switch from golden to white. |
||
Chapter 1 The First Encounter Walkthrough
Chapter 2 Puzzles
| # | Puzzle and Solution | |
|---|---|---|
| 2.1 |
|
|
|
Abyss Cresset Block Puzzle (Reunion)
Use Force Palm to push the middle block, left block, and then the right block. |
||
Chapter 2 Golden Greed Walkthrough
Chapter 3 Puzzles
| # | Puzzle and Solution | |
|---|---|---|
| 3.1 |
 |
|
|
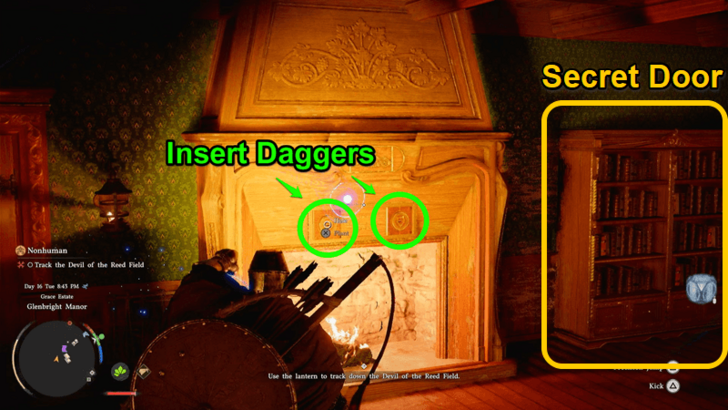
Glenbright Manor Basement (Traces in the Manor)
The manor basement can be accessed through a ladder in a secret room upstairs. To unlock it, obtain the two Golden Daggers by the statue and place them in the slots above the fireplace. |
||
Chapter 3 Howling Hill Walkthrough
Chapter 4 Puzzles
| # | Puzzle and Solution | |
|---|---|---|
| 4.1 |
 |
|
|
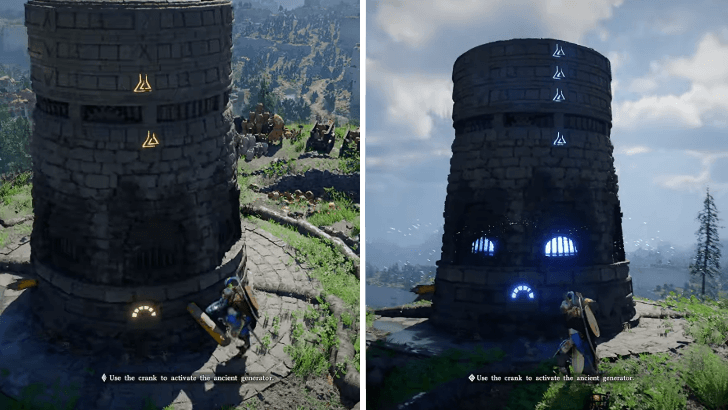
Activate the Ancient Generator (Kilnden Workshop)
Start with the crank on the dial pointing diagonally left to move the top symbol. Use the bar holds to rotate the ring and align it to be at the top of the first symbol. Then move the crank to the middle to select the symbol below it to do the same. Turn the crank fully right to control the bottom symbol and move the bars it to align all 4 to complete the puzzle. |
||
| 4.2 |
 |
|
|
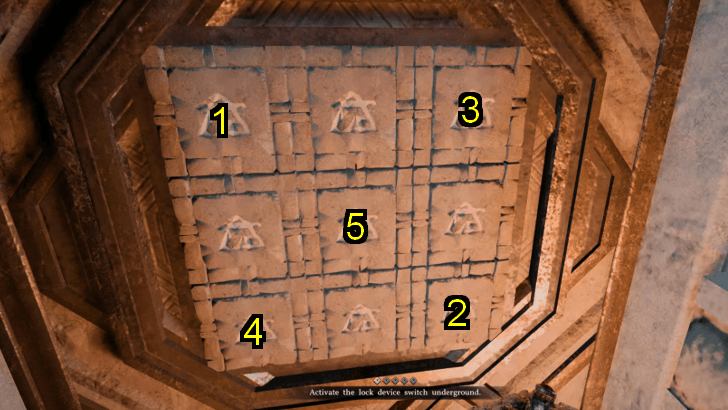
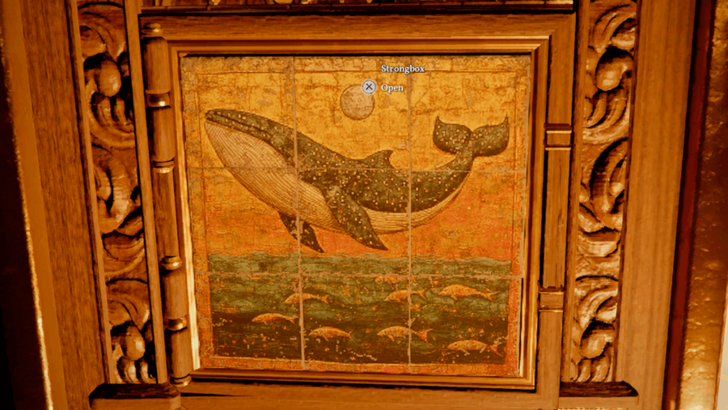
Strongbox Lock Device Puzzle (Gate to the Otherworld)
You must activate each square in order so that all symbols light up at the same time. Each block you push down alternates the blocks it is connected to up and down. Press the panels in the correct order: top left, bottom right, top right, bottom left, and center. |
||
| 4.3 |
 |
|
|
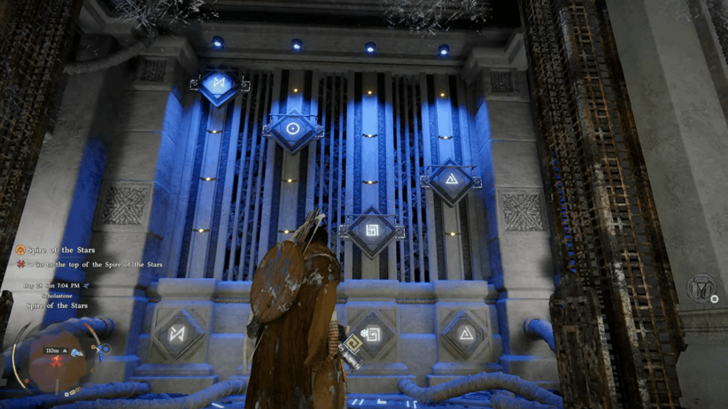
Spire of the Stars Puzzle (Spire of the Stars)
The correct order is to place the first shape at the topmost position, the second shape at the second notch, the third shape at the bottommost position, and the fourth shape at the third notch. With the correct order, the elevator in the center will automatically begin to work and bring you up. |
||
| 4.4 |
|
|
|
Abyss Pillar Platform Puzzle (Obsession and Madness)
Select and activate the central pillar first, to move the platforms you are standing on towards it. Continue moving the platforms by selecting and operating on the pillar nearest to it. Carefully walk along the pillar to find the Axiom Force slot for the next ones, and move all the way to the end. |
||
Chapter 4 The Price of Knowledge Walkthrough
Chapter 5 Puzzles
| # | Puzzle and Solution | |
|---|---|---|
| 5.1 |
|
|
|
Church's Relic Puzzle (Secret at the Church)
Light up all the blocks in the following order: Lower right box, upper left box, lower left box, upper right box. |
||
| 5.2 |
|
|
|
Pillar of Radiance Puzzle (Secret at the Church)
The easiest way to solve this puzzle is to turn the disks and wait for them to light up to know they are in place. You only need to move the first and second outer rings to solve it. |
||
| 5.3 |
 |
|
|
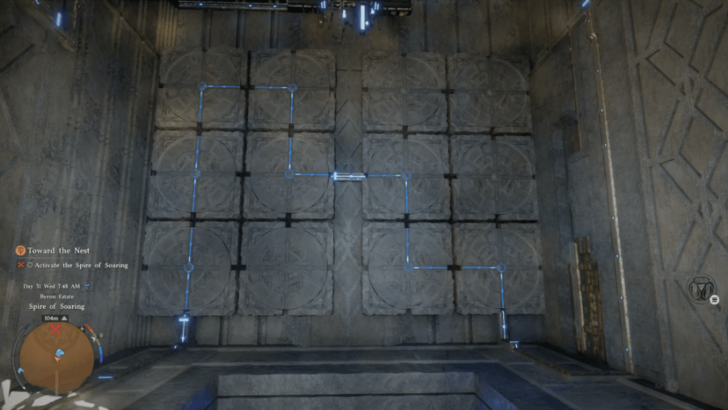
Power Flow Puzzle (Toward the Nest)
In the same level where you first came in, move the circular blocks to guide the power on the other side. You must have the same pattern as the image above to solve it. |
||
| 5.4 |
 |
|
|
Rotate the Circular Block (Toward the Nest)
Rotate the Circular Block to get the power running on this floor. Simply rotate the Circular Block clockwise twice to solve it. |
||
| 5.5 |
|
|
|
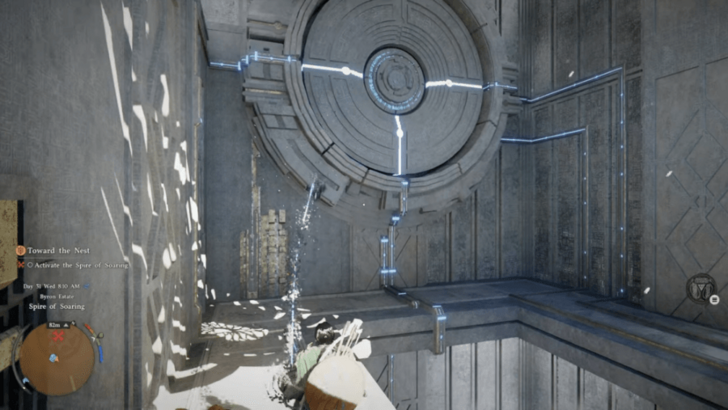
Activate the Skybridge (Toward the Nest)
Point the first Sphere towards the orange spot on the other side. This will activate the ring and you can use it to get to a higher elevation and reach the other Spheres. Activate the two Spheres on each side using the same method as the first one. Go down to the starting area to connect the pipes on each side. You can find them by tracing the yellow light using the Blinding Sword. |
||
Chapter 5 Guest Unbidden Walkthrough
Side Quest Puzzle Guides
| Jump to a Side Quest Type | |
|---|---|
| Ancient Ruins | Faction Quests |
Ancient Ruins Puzzle Solutions
| # | Puzzle and Solution | |
|---|---|---|
| 1 |
 |
 |
|
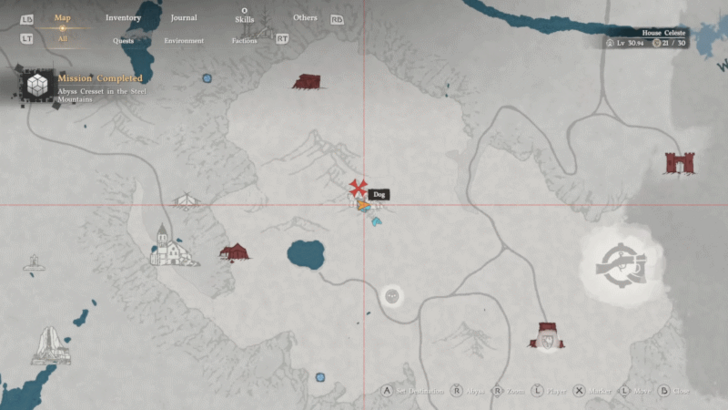
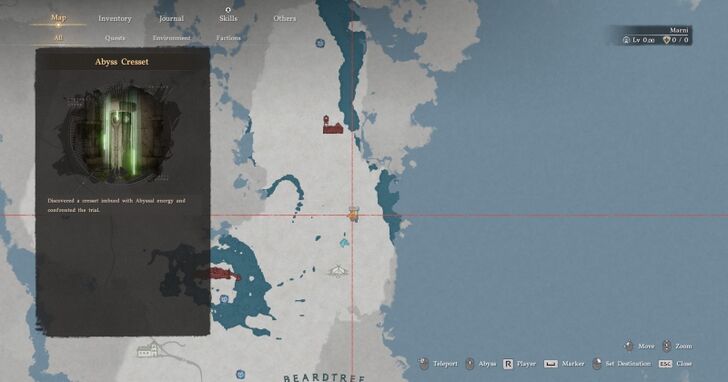
Steel Mountains Ruins
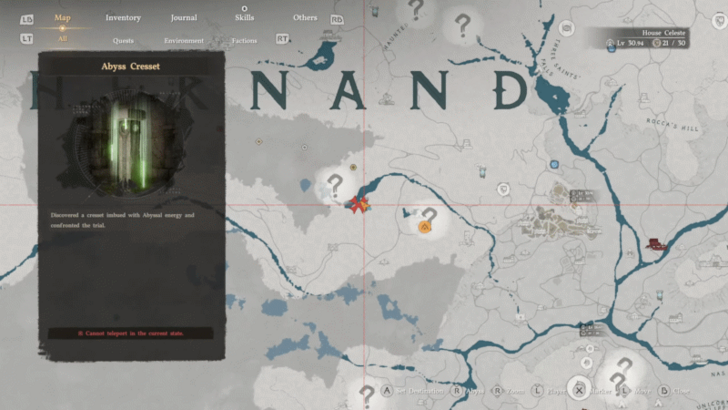
Beside the locked door are a set of bells and notes stuck on the board. Follow the note symbols and hit the bell with the corresponding symbol to complete the puzzle and unlock the Abyss Cresset. |
||
| 2 |
 |
 |
|
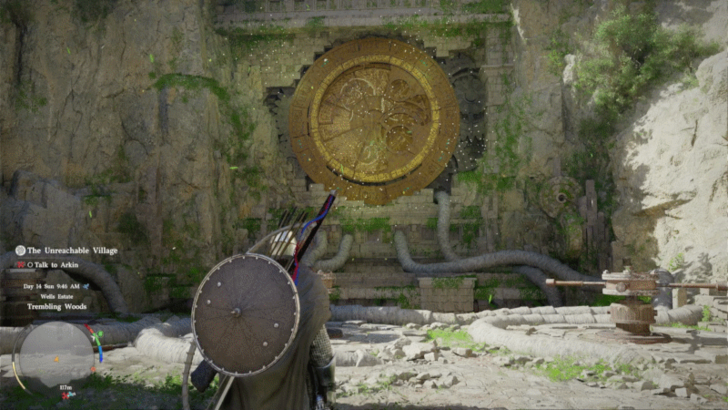
Trembling Woods Ruins
Solve the Trembling Woods mural puzzle by turning the horizontal wheels to align the images. While one wheel rotates the base mural itself, the other two wheels manipulate mechanical overlays that hide or reveal specific sections. |
||
| 3 |
 |
 |
|
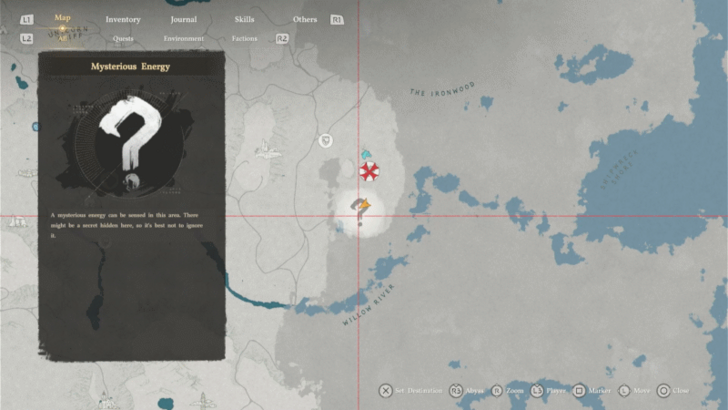
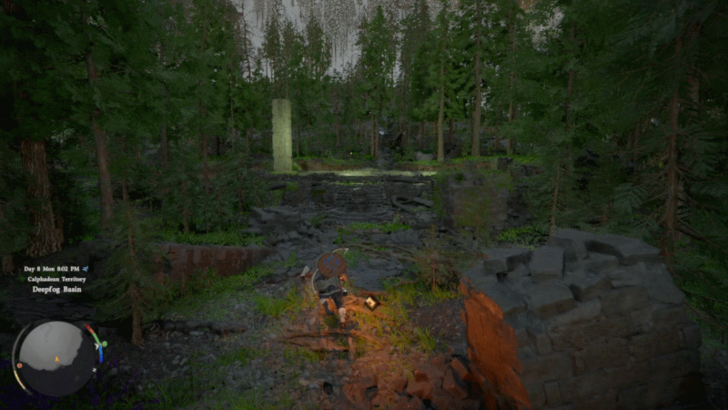
Deepfog Basin Everfrost Ruins
Use the Stab skill on the pedestal to move the pillars' height. There are four slots on the pedestal and each slot will change a different set of pillars. |
||
| 4 |
 |
 |
|
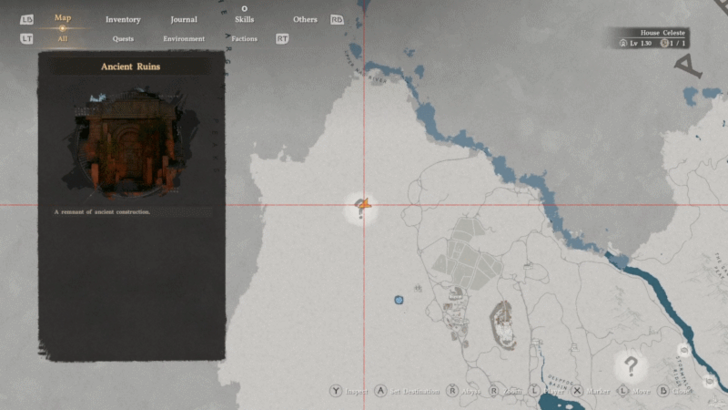
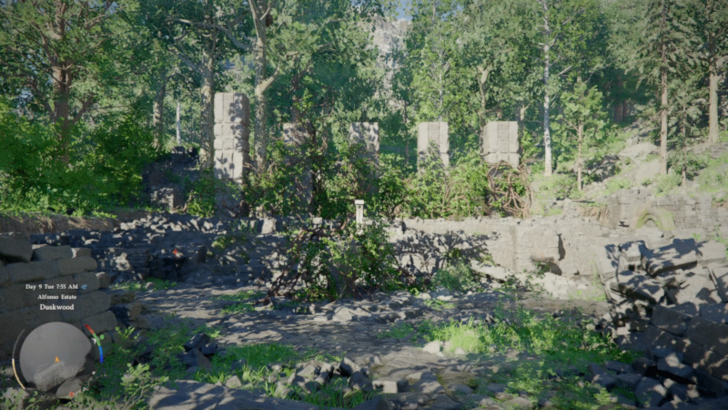
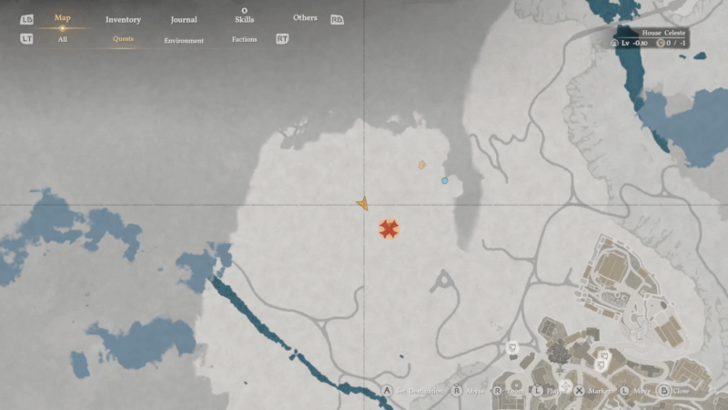
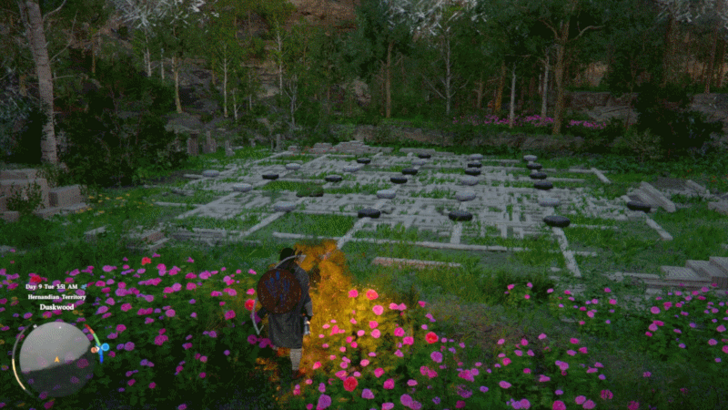
Duskwood Hill Ruins
Match the height of the pillars to solve this puzzle. Use Blinding Flash to burn off the vines and Stab to interact with the pedestal in the middle. Insert your sword in the different pedestal slots and rotate it to change the height of the pillars. |
||
| 5 |
 |
 |
|
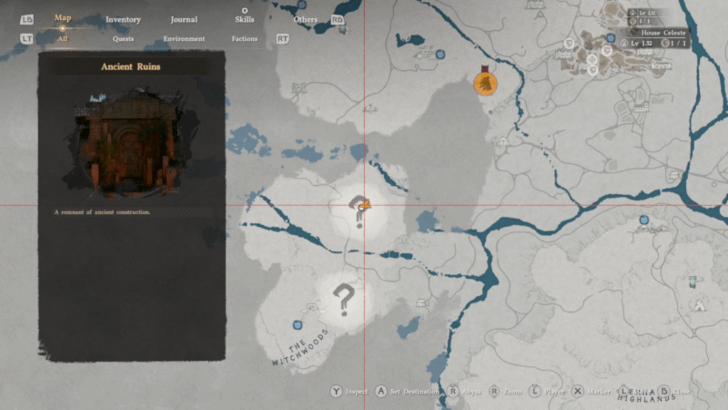
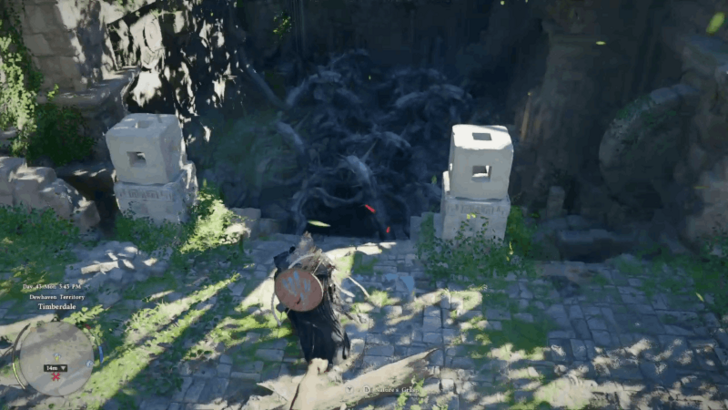
Timberdale Cliff Ruins
Use Force Palm of Force Current to press the different buttons to direct the power from one end of the puzzle to the other. Solve the three puzzles to unlock the Abyss Cresset. |
||
| 6 |
 |
 |
|
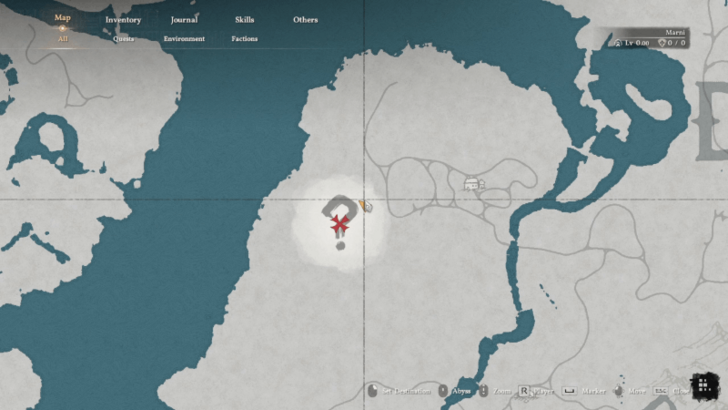
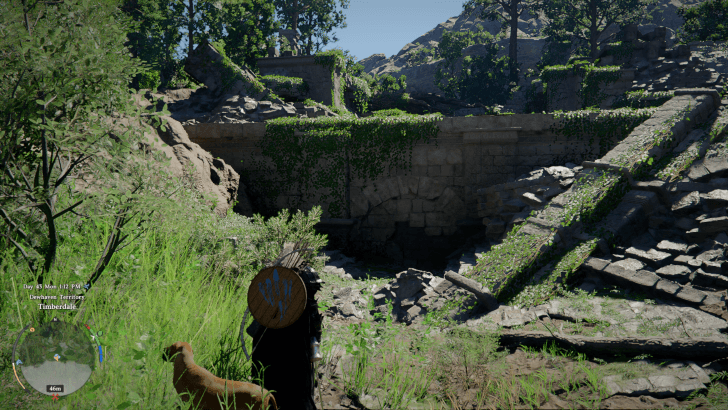
Timberdale Gorge Ruins
Destroy the wall in front of the stairs with Turning Slash to drain the water and access the ruins. Press the wall buttons using Force Palm to connect the power starting with the center buttons, rightside buttons, then the leftside buttons. |
||
| 7 |
 |
 |
|
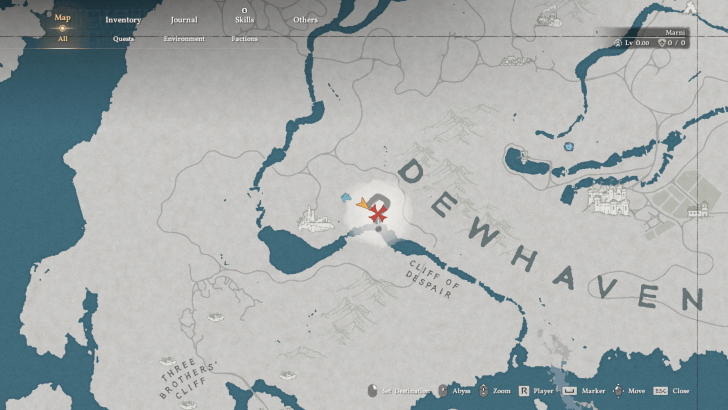
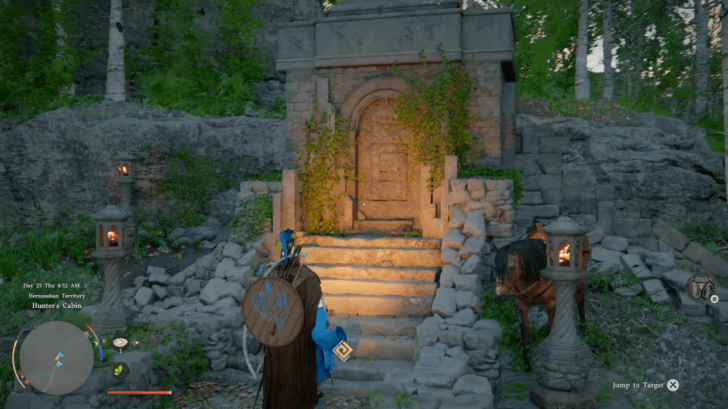
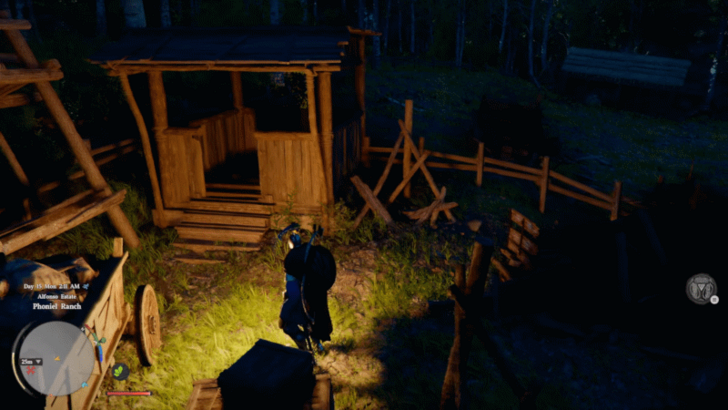
Hunter's Cabin Ruins
The cemetery in the Hunter's Cabin is surrounded by lit lanterns. Use Blinding Flash to light the remaining two unlit lanterns in the area to solve the puzzle. |
||
| 8 |
 |
 |
|
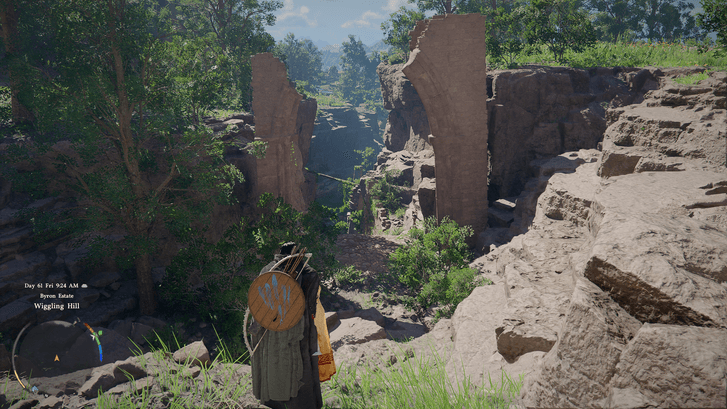
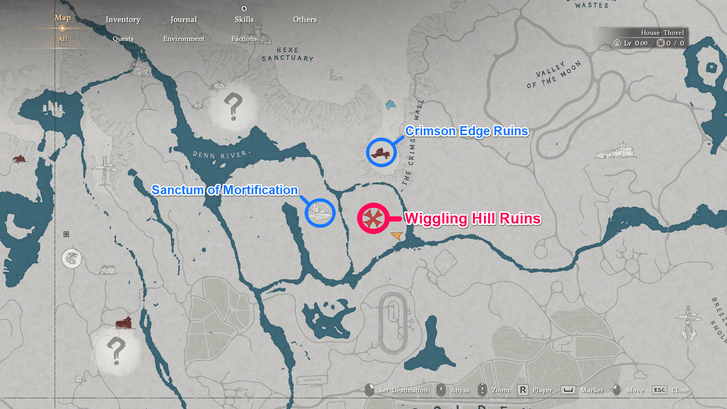
Wiggling Hill Ruins
Light the lanterns around the area then use Nature's Snare to lift the Flood Device and drain the water from the ruins. |
||
| 9 |
 |
 |
|
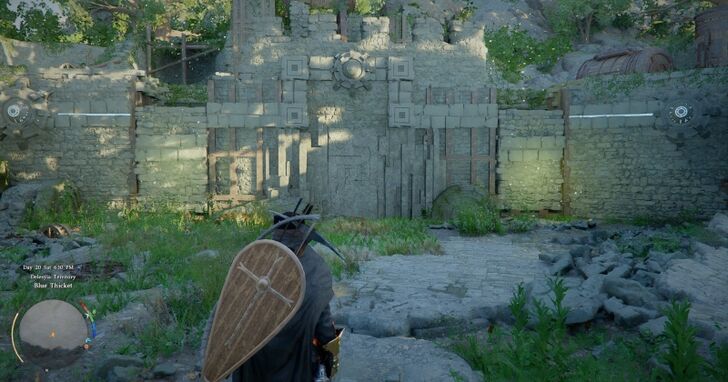
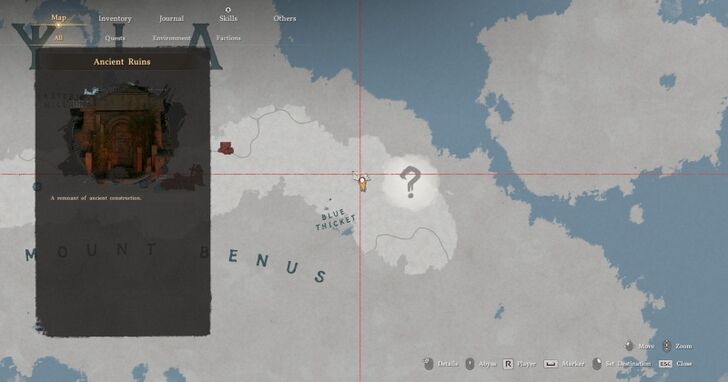
Blue Thicket Ruins
To solve Blue Thicket Ruins, use Nature's Grasp to lift the two stone walls and wait for them to drop to reveal the Abyss Cresset. |
||
| 10 |
 |
 |
|
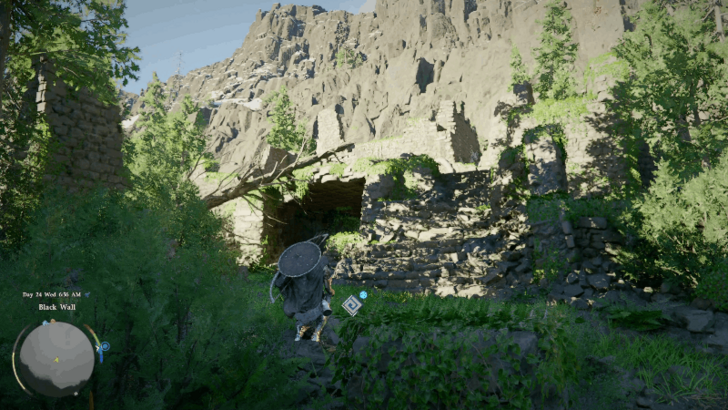
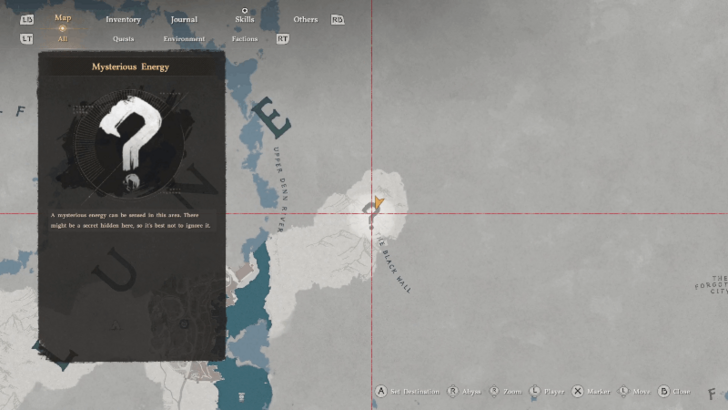
Black Wall Ruins
Enter the small ruins and use Nature's Grasp on the wall at the right. This activates a short cutscene showing the location of the Abyss Cresset nearby and completes the challenge, Unravel the Secret of the Ancient Ruins. |
||
| 11 |
 |
 |
|
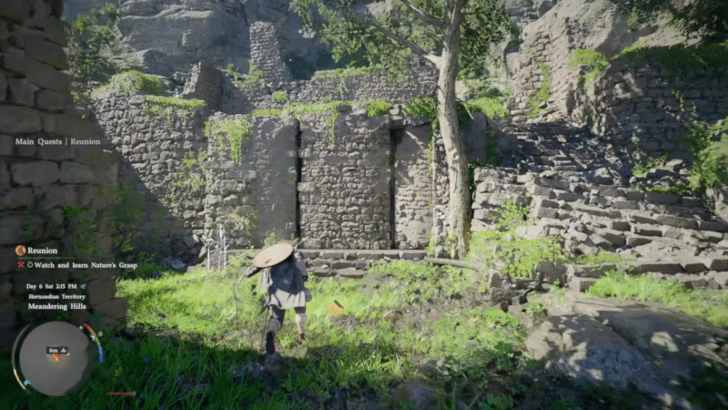
Meandering Hills Ruins
Use Nature's Grasp to lift the stone gate that blocks the entrance to the ruins. Then, use Focus Palm on the giant buttons inside to have each of them pressed at the same time to unlock the Abyss Cresset. |
||
| 12 |
 |
 |
|
Duskwood Waterside Ruins
Align any five stones of the same color on the grid to complete the challenge. The line may be vertical, horizontal, or diagonal. White or Black Stones can be moved anywhere. |
||
| 13 |
 |
 |
|
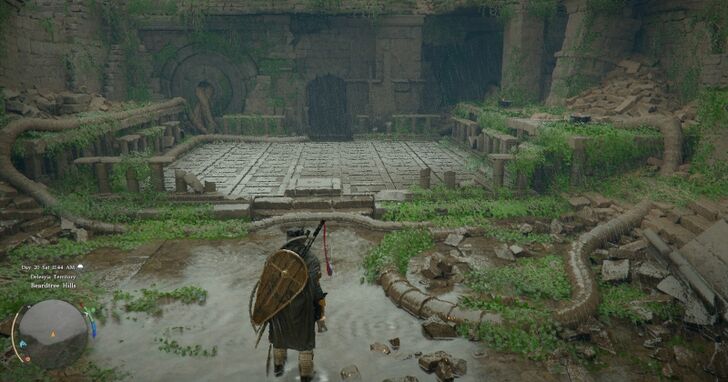
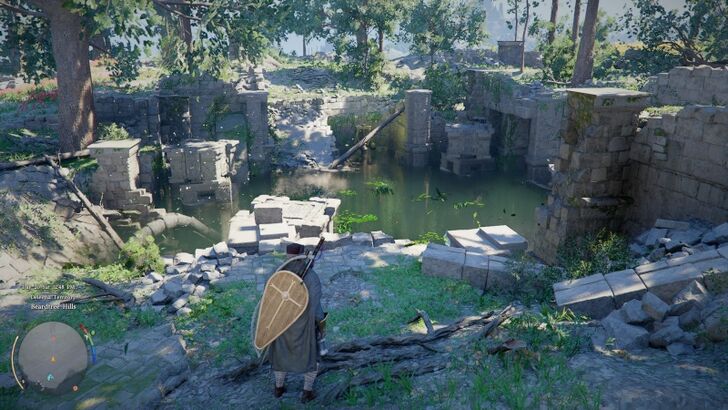
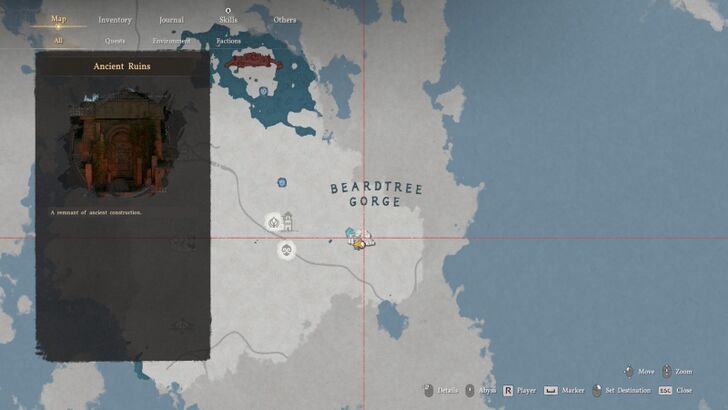
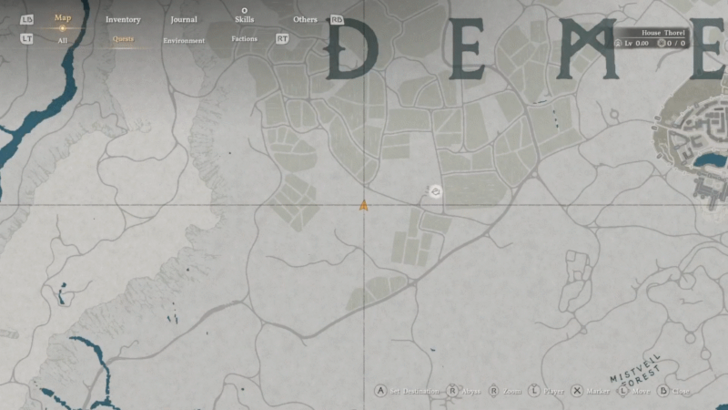
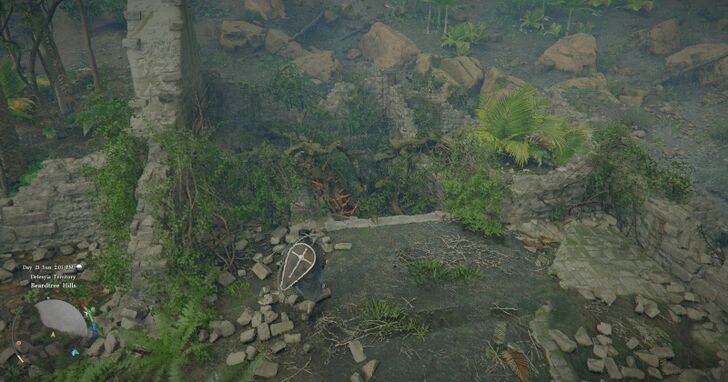
Beardtree Hills Rock Ruins
Solve the Beardtree Hills Rock Ruins puzzle by connecting the same symbols without stepping on the same platform twice or without having overlapping platform paths. |
||
| 14 |
 |
 |
|
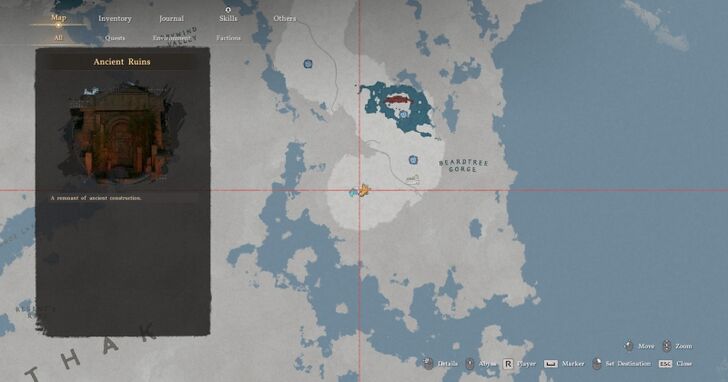
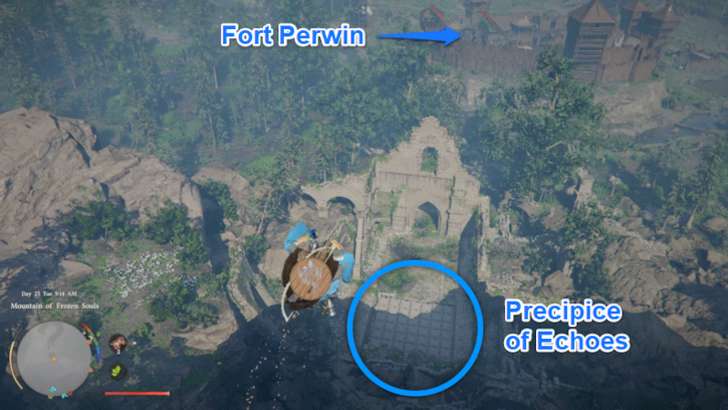
Precipice of Echoes Ruins
Complete the puzzle by stepping on a sequence of tiles that links two identical icons. After stepping on a tile with a symbol, you must navigate through the grid to step on the tile with the identical symbol. Stepping on an already pressed tile or the wrong symbol tile will reset the puzzle. |
||
| 15 |
 |
 |
|
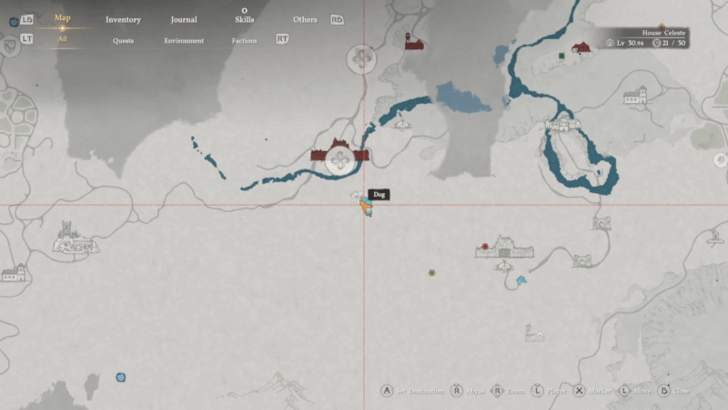
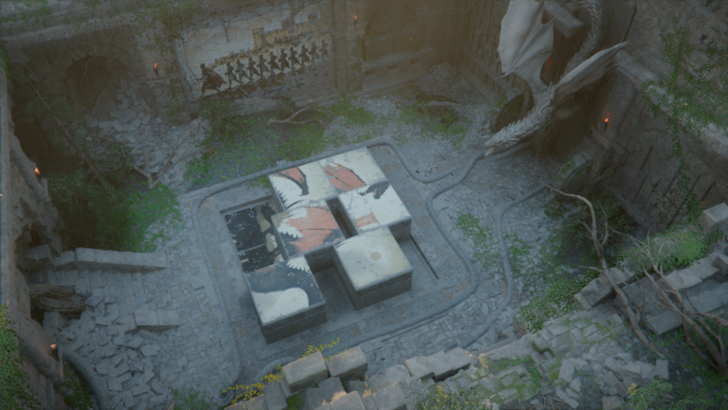
Deepfog Basin Dragon Head Ruins
The goal in the Deepfog Basin Dragon Head Ruins is to complete a sliding image puzzle. Use the Stab One-Handed Skill to move each individual tile. Organize the tiles correctly to reveal the full artwork and unlock the Abyss Cresset. |
||
| 16 |
 |
 |
|
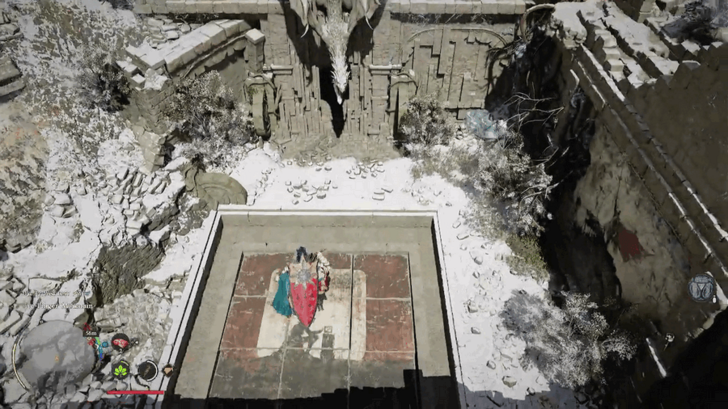
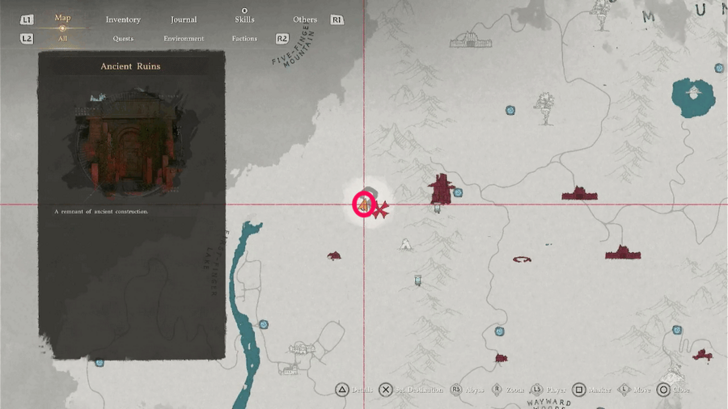
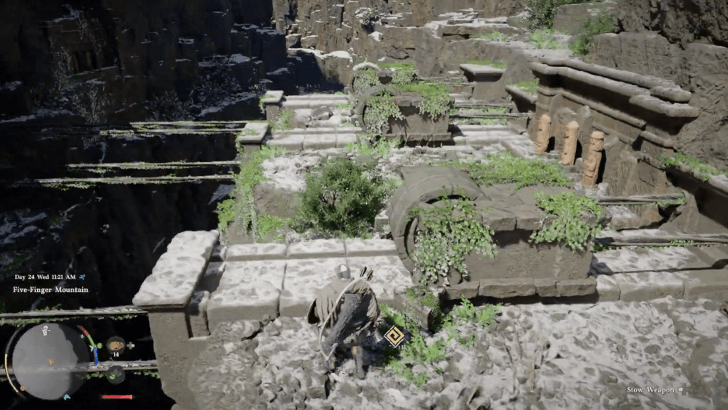
Five-Finger Mountain Icy Ruins
Form the correct image by solving the sliding square puzzle on the floor. Manually move the pieces around by pushing and pulling them. |
||
| 17 |
 |
 |
|
Five-Finger Mountain Valley Ruins
There are three stones you need to push, each one revealing a statue across the chasm. At the center of the monument is a statue holding glowing weapons: a sword, a shield, and a battle axe. You need to push a stone to reveal a statue, then shoot the statue to rotate it and find the correct weapon. |
||
| 18 |
 |
 |
|
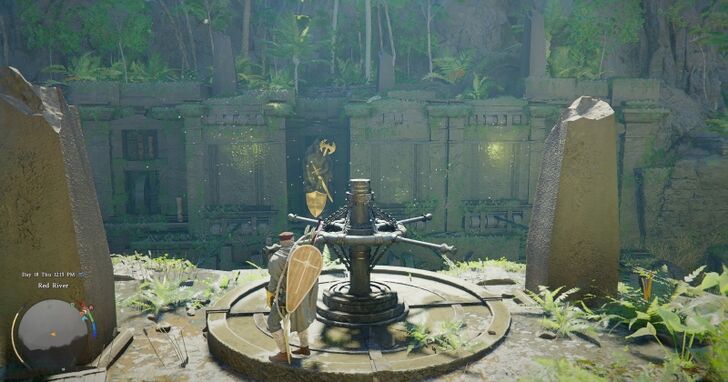
Red River Ruins
Open the statue gates by pushing the horizontal wheel. Then, use the bow to rotate the statues until they glow blue or are showing the correct faces. |
||
| 19 |
 |
 |
|
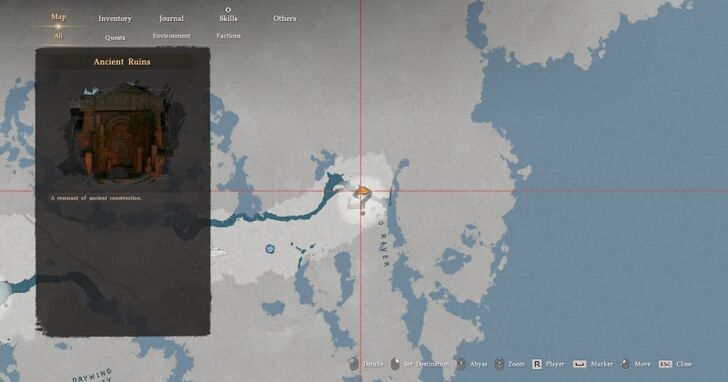
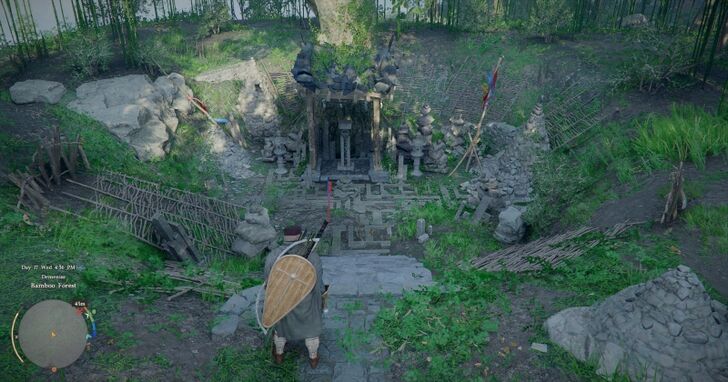
Bamboo Forest Seonangdang Ruins
Solve the Bamboo Forest Seonangdang puzzle by finding and placing 3 stones on the pile at the middle of the shrine. |
||
| 20 |
 |
 |
|
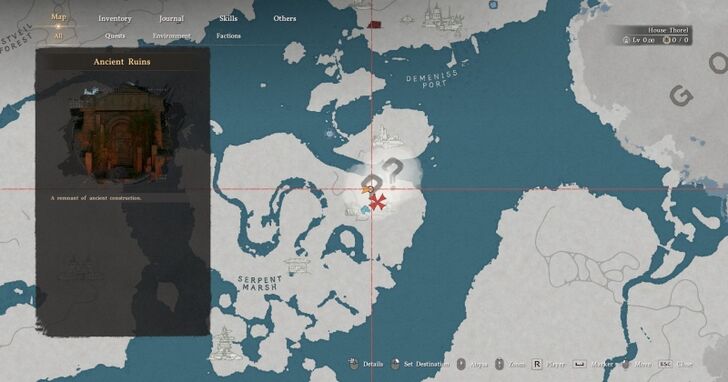
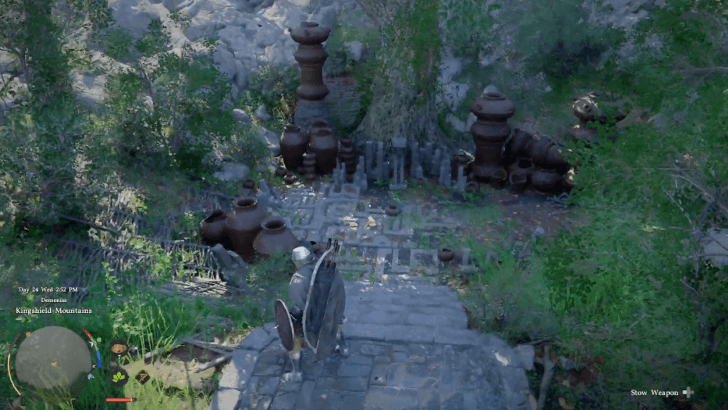
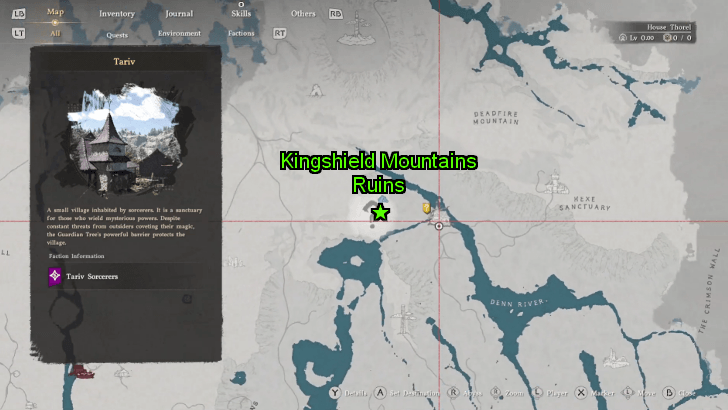
Kingshield Mountains Ruins
Stack four sturdy pots on top of each other in front of the Abyss Cresset to obtain the Abyss Artifact from it. |
||
| 21 |
 |
 |
|
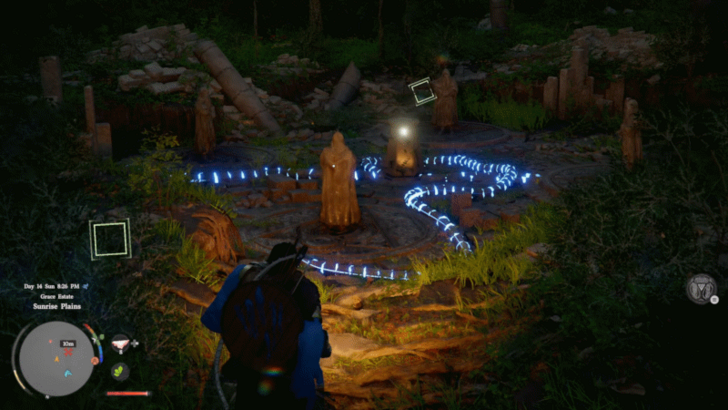
Sunrise Plains Ruins
To complete the Sunrise Plains puzzle, rotate the statues using the dials behind them until every statue is facing Abyss Cresset at the center. |
||
| 22 |
 |
 |
|
Golden Plains Ruins
With Blinding Flash, burn the vines in front of the middle statue. This reveals the fourth statue. Rotate the middle and left statues so that all statues face the center at the same time. |
||
| 23 |
 |
 |
|
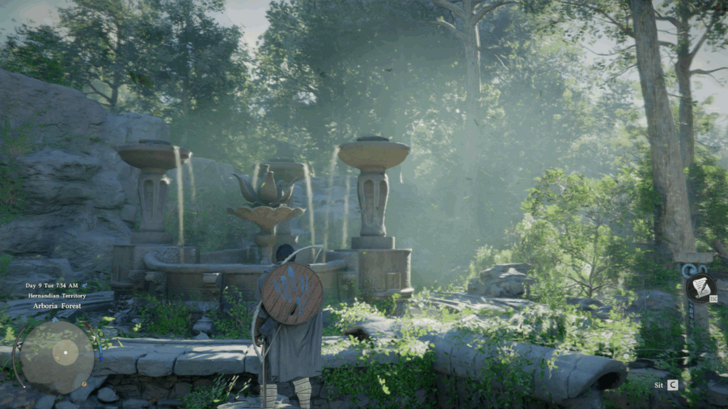
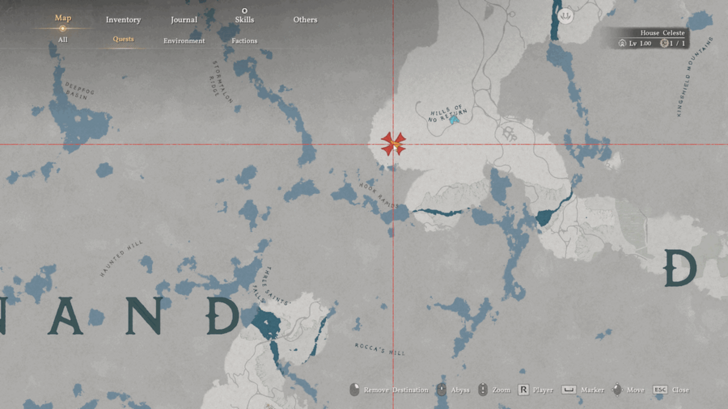
Arboria Forest Ruins
To complete the Arboria Forest Ruins Puzzle, rotate the statues until all water is falling into the fountain. You can rotate them by thrusting your weapon into the notches on the statue's base by pressing RB + Y or Left Shift + Right Click. |
||
| 24 |
 |
 |
|
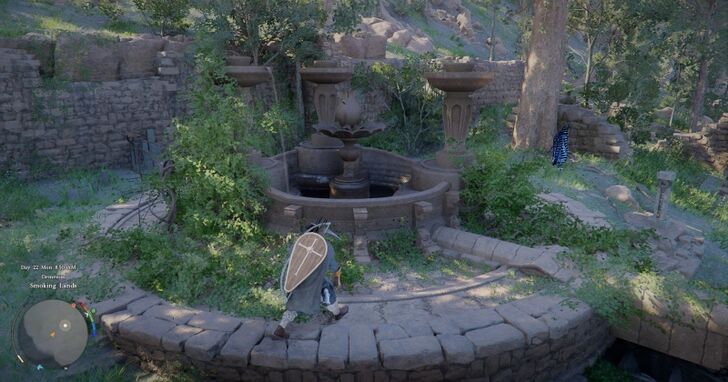
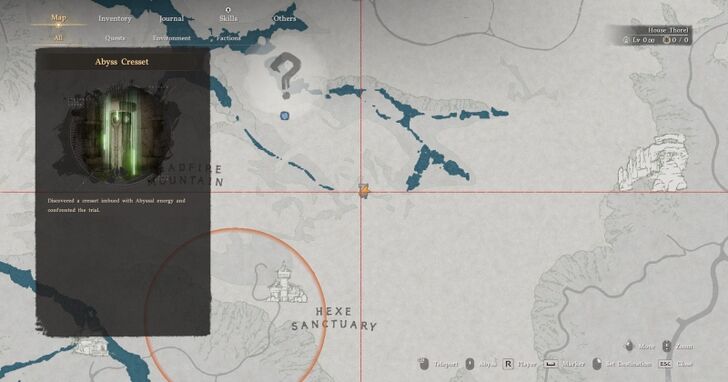
Fuming Lands Ruins
To complete the Fuming Lands Ruins, clear the bushes and rotate the water fountains towards the well. |
||
| 25 |
 |
 |
|
Beardtree Hills Sunflower Ruins
Solve Beardtree Hills Sunflower Ruins by spinning the turbines with Focus and Nature's Snare to drain the water and reveal the Abyss Cresset. |
||
| 26 |
 |
 |
|
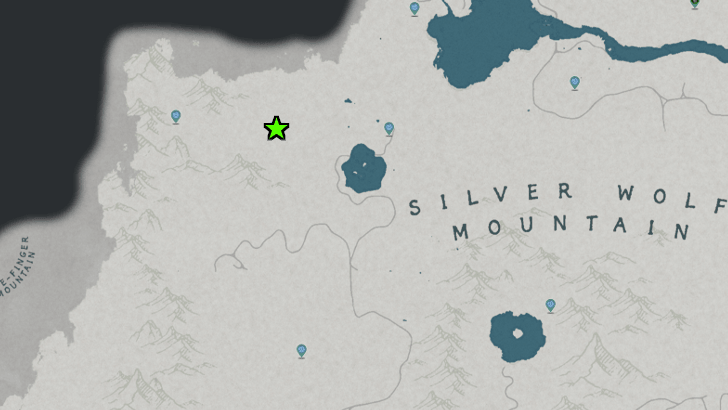
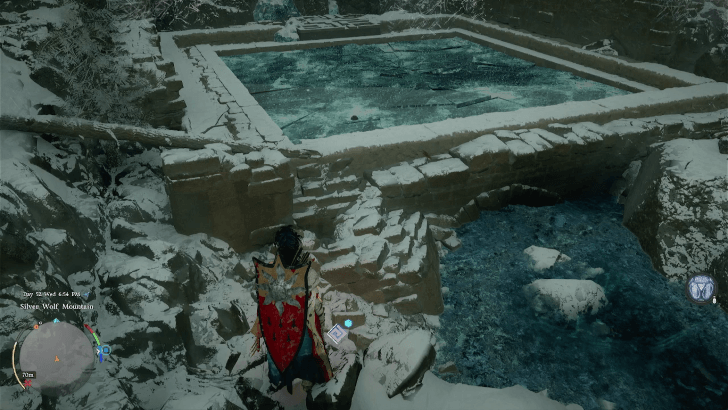
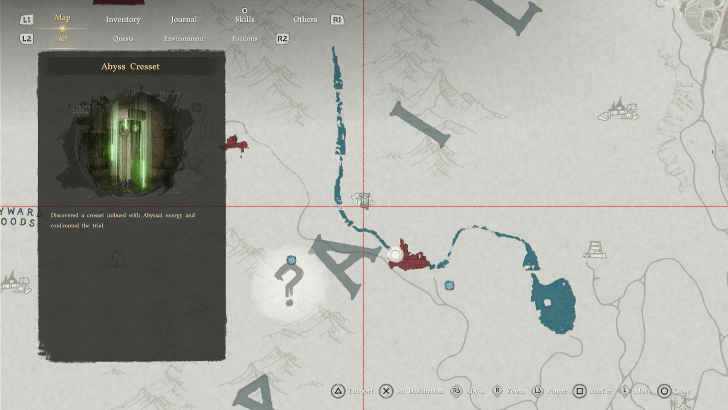
Silver Wolf Mountain Ruins
Solve the puzzle in the Silver Wolf Mountain by breaking the ice and draining the water from the ruins. Use Nature's Snare near the mechanism submerged in the water until it drains the water and unlock the Abyss Cresset. |
||
| 27 |
 |
 |
|
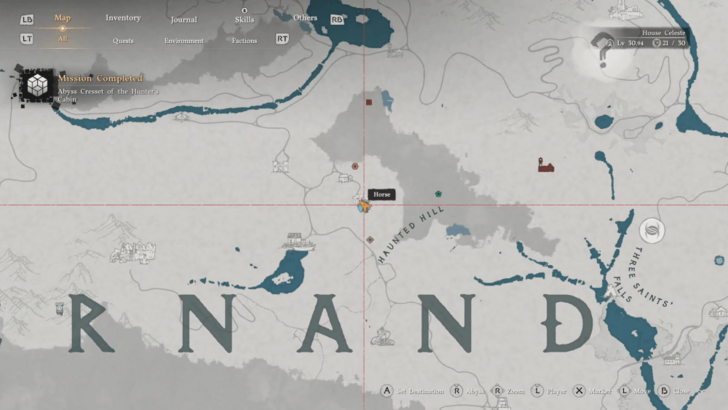
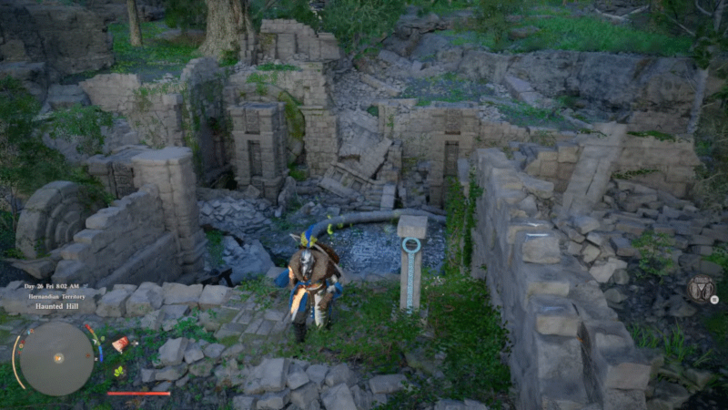
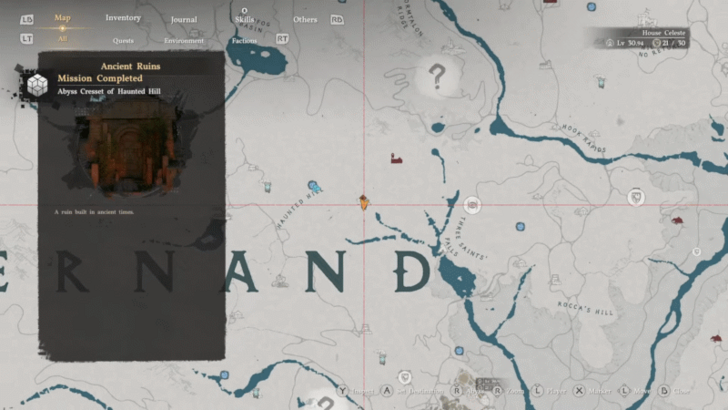
Haunted Hill Ruins
Solve the puzzle in the Haunted Hill by draining the water from the ruins. Use Focus near the mechanism submerged in the water until it drains the water and unlock the Abyss Cresset. |
||
| 28 |
 |
 |
|
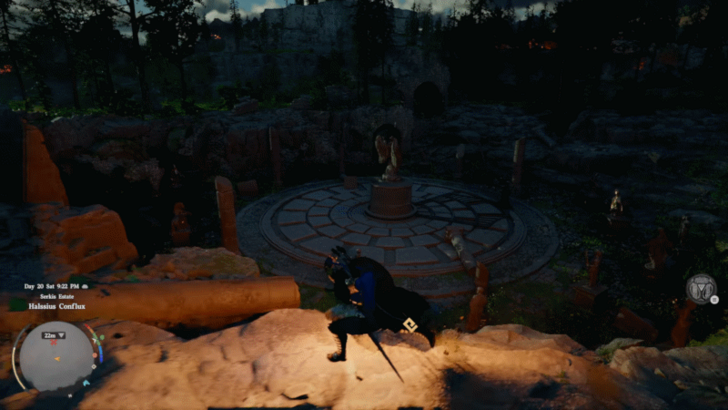
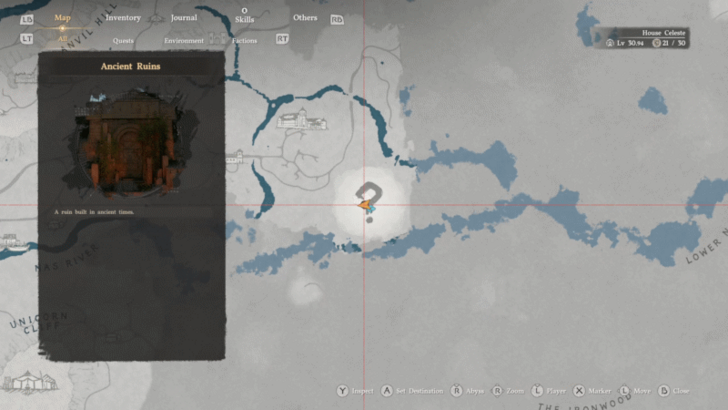
Halssius Conflux Ruins
To complete the Hallsius Conflux Puzzle, rotate the central dial to match the symbols of the illuminated statues. |
||
| 29 |
 |
 |
|
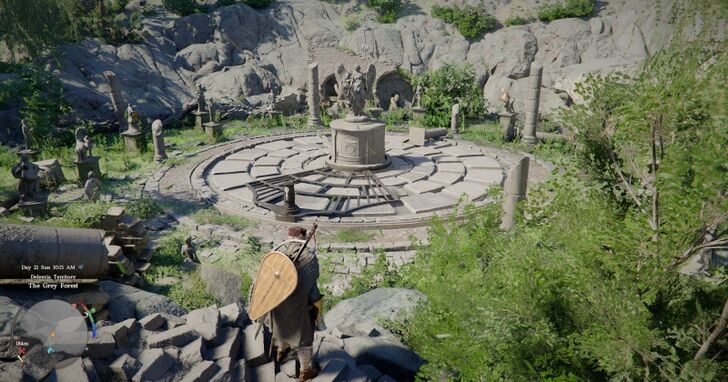
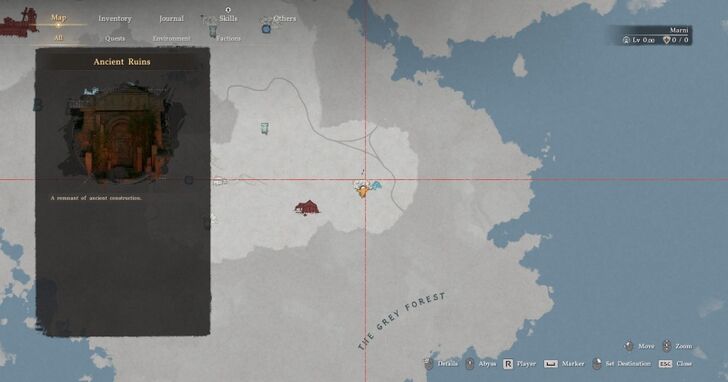
The Grey Forest Ruins
Solve the Grey Forest Ruins by dragging the mechanism to the symbols illuminated by the yellow light beam. |
||
| 30 |
 |
 |
|
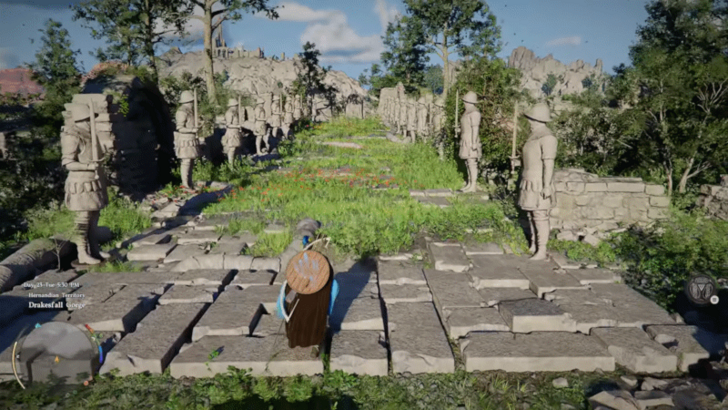
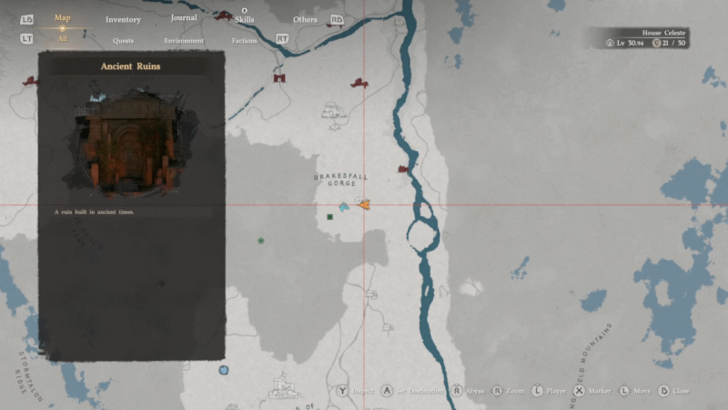
Drakesfall Gorge Ruins
Stand on the stone floor at the opposite side of the large statue and the Abyss Cresset to start a minigame of “Green Light, Red Light.” Get to the Abyss Cresset without getting spotted to complete the puzzle. |
||
| 31 |
 |
 |
|
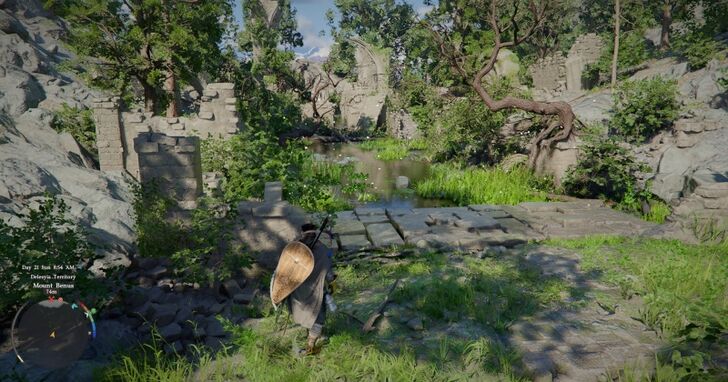
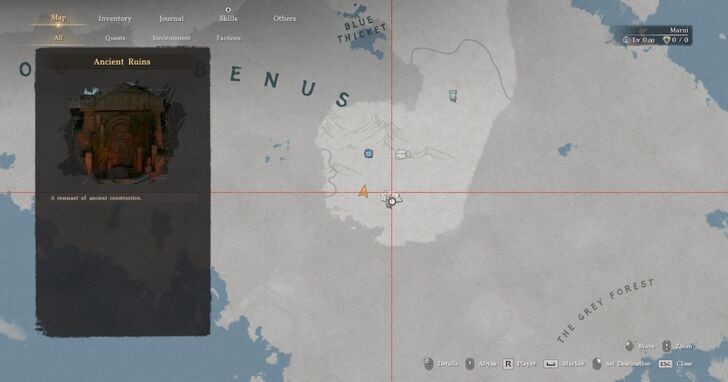
Mount Benus Ruins
Complete the Mount Benus Ruins by reaching the statue and only moving when it's not looking. |
||
| 32 |
 |
 |
|
Dragon's Stone Chamber Ruins
There are three dials inside these ruins that you must rotate to a certain direction to open the door containing the Abyss Cresset. Investigate the mural and find the clues in Anvil Hillside Terrace. |
||
| 33 |
 |
 |
|
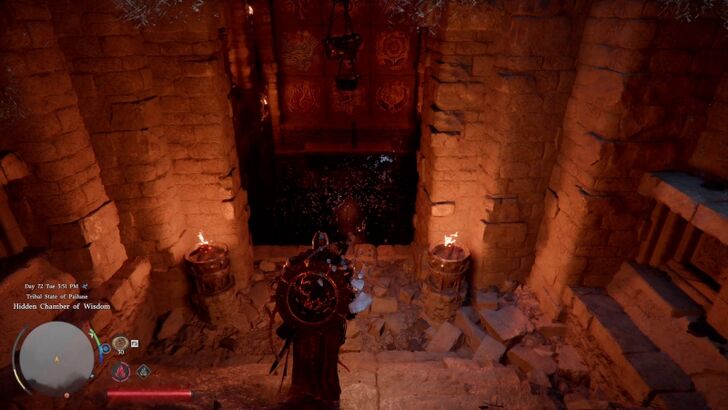
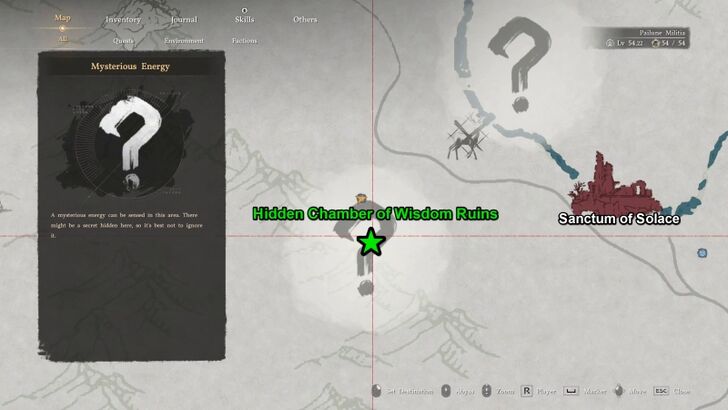
Hidden Chamber of Wisdom Ruins
Push the correct buttons in the Hidden Chamber of Wisdom Ruins to reveal the Abyss Cresset. The symbols for the correct buttons are found on the locations marked on the chamber's map. |
||
| 34 |
 |
 |
|
Secret Chamber of the Golden Plains Ruins
Solve the wall puzzle at the end of the ruins. Hit the buttons in any order: Grape, Horse, Pomegranate, Bird, and Fish. Doing so will lower the wall to reveal the Abyss Artifact. |
||
| 35 |
 |
 |
|
The Screaming Vault Ruins
Rotate each dial found in the cells of the Screaming Vault Ruins to the correct position to solve the puzzle and unlock the Abyss Cresset. A mural depicting the three scarecrow locations in the nearby farmland can be found in the ruins. Find each scarecrow to find out the puzzle solution. |
||
| 36 |
 |
 |
|
Memory-Laden Ruins
Solve the Memory-Laden Ruins by crossing the spikes trap and pressing the four correct buttons. The symbols are found scattered near Red River. |
||
| 37 |
 |
 |
|
Azure Moon Labyrinth Ruins
Activate the correct buttons at the end of the labyrinth. A mural within the labyrinth shows the location of five trees in Pororin showing the right buttons to press. Use the visual aid above to solve the puzzle. |
||
※ Click on the Ancient Ruin's name to see a full guide.
All Ancient Ruins Challenge Puzzle Solutions
Faction Quest Puzzle Solutions
| # | Puzzle and Solution | |
|---|---|---|
| 1 |
|
|
|
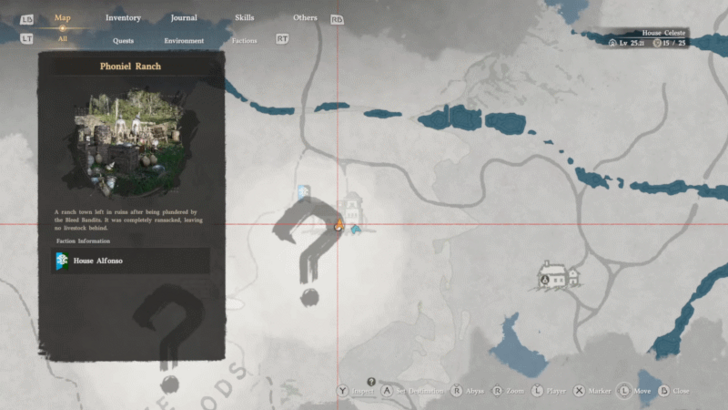
Extract the Relic Crane Puzzle
Faction Quest: Sealed in Stone, House Roberts Operate the crane controls by the window, and bring it down to clamp on the grey buried relic using the D-pad. Once the crane is attached onto the relic, press up on the D-pad to extract it from the stone. |
||
| 1 |
 |
|
|
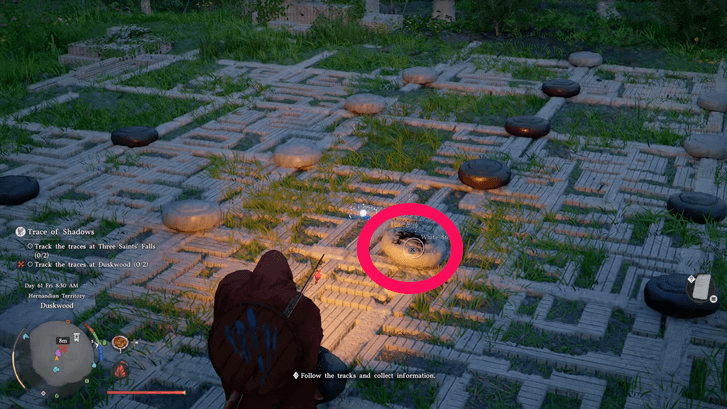
Trace of Shadows Puzzle
Faction Quest: Trace of Shadows, Secret of the Lost Seal Use the Lantern to find the white stone with a black mark in the middle of the checkerboard. Lift up the stone to find the two clues. Pick up the Clue From Duskwood and examine its contents. Do the same for the Piece from Duskwood and flip it to show its back side to complete the objective. |
||
| 1 |
 |
|
|
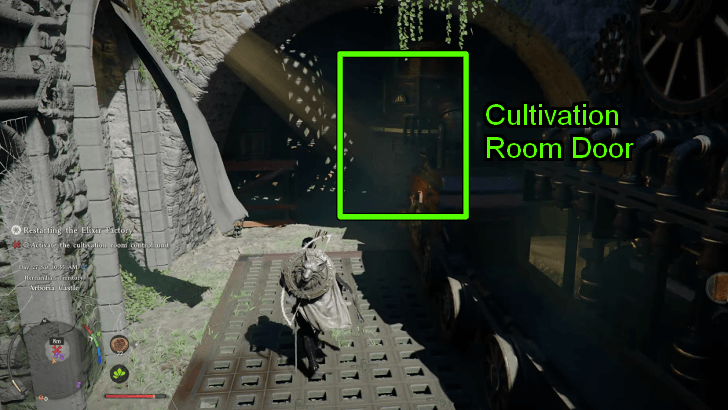
Arboria Castle Elixir Factory Puzzle
Faction Quest: Restarting the Elixir Factory, Abandoned Factory Restore the Abandoned Factory by activating a series of machinery to obtain three perfect elixirs and a Fertilizer Sprayer. Start by activating the cultivation room control unit. |
||
| 3.1 |
|
|
|
Glenbright Manor Basement
Faction Quest: Traces in the Manor, Chapter 3 The manor basement can be accessed through a ladder in a secret room upstairs. To unlock it, obtain the two Golden Daggers by the statue and place them in the slots above the fireplace. |
||
List of Faction Quests (Side Quests)
Strongbox Puzzle Solutions
| # | Puzzle and Solution | |
|---|---|---|
| 1 |
|
|
|
Bluemont Manor Strongbox 1
Solution: Press the buttons in this order: ・2・2・2・4・3・3・3・3・2・1・1・1・1 Reward: Oath of Darnkess |
||
| 2 |
|
|
|
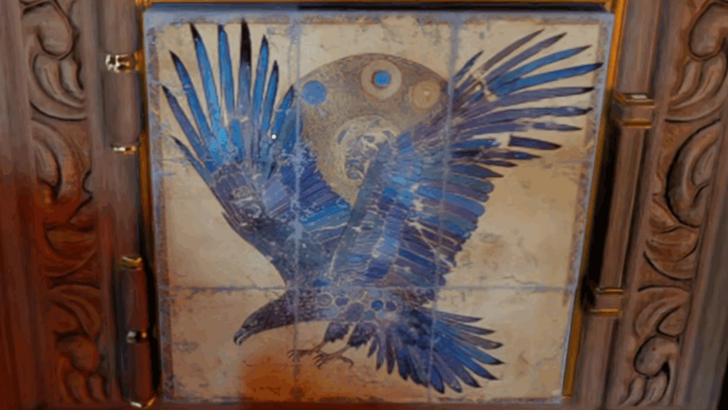
Church of West Demeniss Strongbox
Solution: Press the boxes in this order: ・1. Press the lower right box. ・2. Press the upper left box. ・3. Press the lower left box. ・4. Press the upper right box. Reward: Dagger of Radiance |
||
| 3 |
|
|
|
Hernand Castle Strongbox
Solution: Press the keys in this order: ・1. Top 1st Key ・2. Bottom 4th Key ・3. Bottom 3rd Key ・4. Bottom 4th Key ・5. Top 3rd Key ・6. Bottom 1st Key ・7. Top 3rd Key Reward: Recipe: Lavish Meal |
||
| 4 |
|
|
|
Bluemont Manor Strongbox 2
Solution: Scroll the wheels from left to right: ・1st Wheel: 5 Scrolls ・2nd Wheel: 2 Scrolls ・3rd Wheel: 4 Scrolls ・4th Wheel: 3 Scrolls ・5th Wheel: 5 Scrolls Reward: Finely Crafted Gold Necklace |
||
| 5 |
|
|
|
Hillside Manor Strongbox
Solution: Scroll the wheels from left to right: ・1st Wheel: 2 Scrolls ・2nd Wheel: 3 Scrolls ・3rd Wheel: 4 Scrolls ・4th Wheel: 5 Scrolls ・5th Wheel: 5 Scrolls Reward: Saint's Necklace |
||
| 6 |
 |
|
|
Lioncrest Manor Strongbox
Solution: This puzzle may be arranged differently for other players so there is no one solution, but this puzzle is simple, as you only need to rotate each square to match the final image above. You can take as many turns as you need to solve this. Reward: Engraved Gold Earring |
||
| 7 |
|
|
|
Mudridge Cabin Strongbox
Solution: Move the squares: ・1. Move center right square down ・2. Move center square right ・3. Move center left square right ・4. Move bottom left square up ・5. Move bottom center square left ・6. Move center square down ・7. Move center left square right ・8. Move bottom left square up ・9. Move bottom center square left ・10. Move bottom right square left Reward: Flower Petal Earring |
||
| 8 |
|
|
|
Southern Court Strongbox
Solution: Press the buttons in this order: ・1. Press 1st button ・2. Press 2nd button Reward: Witch's Earring |
||
| 9 |
|
|
|
Azerian Manor Strongbox
Solution: Press the buttons in this order: ・1・1・2・2・2・3・3・3 Reward: Ancient Earring |
||
| 10 |
 |
|
|
Sungrove Manor Strongbox
Solution: This puzzle spawns in a random formation every time, so there is no one solution. However, this puzzle is simple, as you only need to rotate each square to match the final image above. You can take as many turns as you need to solve this. Reward: Sungrove Manor Key |
||
| 11 |
|
|
|
Western Court Strongbox
Solution: Bottom center square → ・Bottom left square → ・Center left square ↓ ・Center square ← ・Center right square ← ・Bottom right square ↑ ・Bottom center square → ・Bottom left square → ・Center left square ↓ ・Center square ← ・Bottom center square ↑ ・Bottom left square → ・Center left square ↓ ・Center square ← ・Bottom center square ↑ ・Bottom right square ← Reward: Karanda's Necklace |
||
| 12 |
|
|
|
Reventine Monastery Strongbox
Solution: Move the squares: ・Center right square ↓ ・Center square → ・Bottom center square ↑ ・Bottom left square → ・Center left square ↓ ・Center square ← ・Bottom center square ↑ ・Bottom right square ← ・Center right square ↓ ・Center square → ・Bottom center square ↑ ・Bottom left square → ・Center left square ↓ ・Center square ← ・Center right square ← ・Bottom right square ↑ Reward: Reventine Monastery Exclusive Document |
||
| 13 |
|
|
|
Arboria Castle Strongbox
Solution: Scroll each wheel the specified amount of times, then hit the switch on the right. ・1st Wheel: Scroll 3 times ・2nd Wheel: Scroll 4 times ・3rd Wheel: Scroll 5 times ・4th Wheel: Scroll 4 times ・5th Wheel: Scroll 2 times Reward: Equipment Manual |
||
| 14 |
|
|
|
Stellen Manor Strongbox 1
Solution: Press the keys in this order: ・1. Bottom 1st Key ・2. Bottom 3rd Key ・3. Bottom 4th Key ・4. Bottom 2nd Key ・5. Bottom 1st Key ・6. Bottom 3rd Key ・7. Bottom 4th Key Reward: Stellen Manor Closet Key |
||
| 15 |
|
|
|
Stellen Manor Strongbox 2
Solution: Scroll each wheel the specified amount of times, then hit the switch on the right. ・1st Wheel: Scroll 2 times ・2nd Wheel: Scroll 5 times ・3rd Wheel: Scroll 5 times ・4th Wheel: Scroll 4 times ・5th Wheel: Scroll 3 times Reward: Finely Crafted Gold Ring |
||
| 16 |
|
|
|
City of Demeniss Strongbox 1
Solution: Scroll the wheels as indicated then hit the switch on the right: ・1st Wheel: Scroll 3 times ・2nd Wheel: Scroll 4 times ・3rd Wheel: Scroll 2 times ・4th Wheel: Scroll 5 times ・5th Wheel: Scroll 2 times Reward: Recipe: Meal |
||
| 17 |
|
|
|
Brookfield Manor Strongbox
Solution: Hit the keys in this order: ・1. Top 3rd key ・2. Bottom 3rd key ・3. Bottom 4th key ・4. Bottom 5th key ・5. Bottom 4th key ・6. Bottom 3rd key ・7. Bottom 5th key Reward: Recipe: Extravagant Meal |
||
| 18 |
|
|
|
Demeniss Castle Strongbox
Solution: Press the buttons in this order: ・4・4・4・4・1・1・1・1・2・2・3・3・3・3 Reward: Ogre's Ring |
||
| 19 |
|
|
|
Demeniss Tribunal Strongbox
Solution: Hit the keys in this order: ・1. Bottom 3rd key ・2. Bottom 1st key ・3. Top 2nd key ・4. Bottom 3rd key ・5. Bottom 2nd key ・6. Top 3rd key ・7. Top 1st key Reward: Golden Deer's Tear |
||
| 20 |
|
|
|
City of Demeniss Strongbox 2
Solution: Strike the keys in this order: ・1. Top 1st key ・2. Bottom 2nd key ・3. Top 2nd key ・4. Bottom 3rd key ・5. Bottom 2nd key Reward: Tarivian Necklace |
||
| 21 |
 |
|
|
Windmere Manor Strongbox
Solution: This puzzle may be arranged differently for other players so there is no one solution, but this puzzle is simple, as you only need to rotate each square to match the final image above. You can take as many turns as you need to solve this. Reward: Mark of Darkness |
||
| 22 |
|
|
|
Eastern Court Strongbox
Solution: Turn the dial in the indicated directions until the strongbox opens: ・1. Turn the dial right until you hear a light clicking which ends in a loud clack. ・2. Turn the dial left until you hear the same thing. This should open the strongbox. Reward: Necklace of Lightning |
||
| 23 |
|
|
|
Delesyia Castle Strongbox
Solution: Turn the dial in the indicated directions until the strongbox opens: ・1. Turn the dial right until you hear a light clicking which ends in a loud clack. ・2. Turn the dial left until you hear the same thing. This should open the strongbox. Reward: White Horn's Earring |
||
| 24 |
|
|
|
Eastern Hills Strongbox
Solution: Scroll the wheels the indicated amount of times, then hit the switch on the right to open: ・1st Wheel: Scroll down 6 times ・2nd Wheel: Scroll down 5 times ・3rd Wheel: Scroll down 4 times ・4th Wheel: Scroll down 3 times ・5th Wheel: Scroll down 2 times Reward: Relic of Darkness |
||
| 25 |
|
|
|
Whisperleaf Fortress Strongbox
Solution: Make sure all 9 buttons are pressed down and lighting up. Press the following buttons to solve: ・1. Press top left button ・2. Press top right button ・3. Press bottom left button Reward: Ring of Lightning |
||
All Strongbox Puzzle Solutions
Other Puzzle Guides
| # | Puzzle and Solution | |
|---|---|---|
| 1 |
 |
|
|
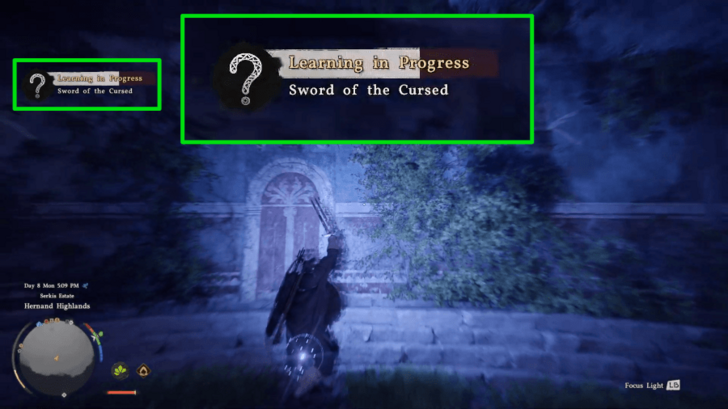
Sword of the Cursed
Examine the entrance of the Dragon's Stone Chamber to learn the memory. |
||
| 2 |
|
|
|
Sealed Ancient Gate Puzzle
Activate the elevator and use the alignment device to control the pillar and unlock the three sockets on the ceiling. |
||
| 3 |
 |
|
|
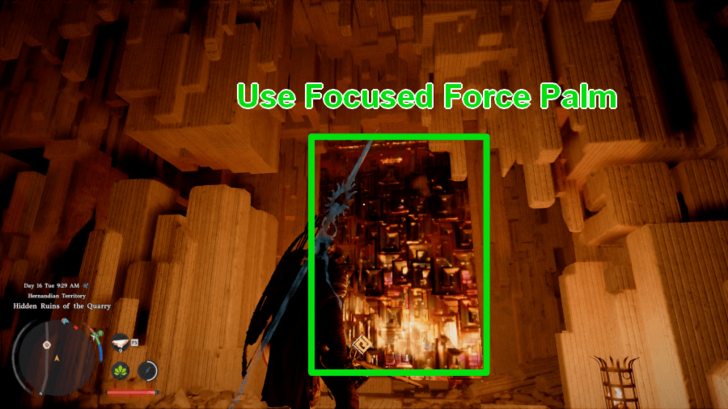
Hidden Ruins of the Quarry
Remove the relic in Karin Quarry. Enter the hole and use Focused Force Palm on the Bismuth Wall. Collect the materials afterward. |
||
Crimson Desert Related Guides

| Crimson Desert Wiki Contents | |
|---|---|
 Walkthrough Walkthrough |
 Faction Quests (Side Quests) Faction Quests (Side Quests) |
 Weapons Weapons |
 Characters Characters |
 Bosses Bosses |
 News and Game Info News and Game Info |
 Interactive Map Interactive Map
|
 List of Abyss Gear List of Abyss Gear |
 Armor Armor |
 Accessories Accessories |
 Items Items |
 Gatherables Gatherables |
 Challenges Challenges |
 Skills Skills |
 Food Food |
 Dyes Dyes |
 Collectibles Collectibles |
 Elixirs Elixirs |
 Tools Tools |
 Mounts Mounts |
 Crafting Manuals Crafting Manuals |
 Puzzles Puzzles |
 Pets Pets |
 Factions Factions |
Comment
Author

All Puzzle Solutions
Please participate in our site
improvement survey
04/2026
improvement survey
04/2026
Would you assist in
improving Game8's site?
improving Game8's site?

×
We are listening to our users' valuable opinions and discussing how to act on them.
The information collected through this survey will be used for the purpose of improving our services. In addition, the information will only be disclosed a part of a statistic in a format that will not allow identification of personal information.
Begin Survey
Not Now
×
Please rate each item regarding Game8.co's Advertisements.
Amount of Ads
Very Dissatisfied
Somewhat Dissatisfied
Fine
Somewhat Satisfied
Highly Satisfied
Placement of Ads
Timing of Ad Display
Ad Loading Speed
Safeness of Ads
Content of Ads
×
Please rate each item regarding Game8.co's Quality of Articles.
Amount of information
Very Dissatisfied
Somewhat Dissatisfied
Fine
Somewhat Satisfied
Highly Satisfied
Frequency of updates
Speed of new information
Accuracy of articles
Understandibility of articles
Readability of sentences
×
Please rate each item regarding Game8.co's Usability of the Site.
Ease of finding information
Very Dissatisfied
Somewhat Dissatisfied
Fine
Somewhat Satisfied
Highly Satisfied
Loading Speed
Use of Color
Font Size
Visibility of Images
Easy to Understand Layout
×
Please rate each item regarding Game8.co's Message Boards, Comments.
Ease of Writing
Very Dissatisfied
Somewhat Dissatisfied
Fine
Somewhat Satisfied
Highly Satisfied
Readability
Ease in Finding Information
Comment Quality
Comment Quantity
Admin Response
×
Please rate each item regarding Game8.co's Site's new design.
Please rate our site's new design
Very Dissatisfied
Somewhat Dissatisfied
Fine
Somewhat Satisfied
Highly Satisfied
Do you think that the website's design change makes the site easier to use?
Has the new design made it easier for you to find information on the site?
Has the new design improved the overall visual appeal of the site?
How would you rate your overall satisfaction with the new design of the site?
×
How likely are you to recommend Game8 to someone you know?
Very Unlikely
0
1
2
3
4
5
6
7
8
9
10
Very Likely
If you have other opinions regarding potential improvement to the website, please share them with us. We would appreciate your honest opinion.
Note: This is a free response section, so you can proceed without entering anything.
Note: Please be sure not to enter any kind of personal information into your response.
Note: Please be sure not to enter any kind of personal information into your response.
×
Thank You
×
Thank you for participating in our survey! Your answers will help us to improve the quality of our website and services.
We hope you continue to make use of Game8.
We hope you continue to make use of Game8.
Close
Rankings
- We could not find the message board you were looking for.
Gaming News

![Forza Horizon 6 Review [Preview] | Beautiful Roads With a Whole Lot of Oversteer](https://img.game8.co/4460981/a7254c24945c43fbdf6ad9bea52b5ce9.png/show)


![Forza Horizon 6 Review [Preview] | Beautiful Roads With a Whole Lot of Oversteer](https://img.game8.co/4460981/a7254c24945c43fbdf6ad9bea52b5ce9.png/thumb)
Popular Games

Genshin Impact Walkthrough & Guides Wiki
Crimson Desert Walkthrough & Guides Wiki
Umamusume: Pretty Derby Walkthrough & Guides Wiki
Honkai: Star Rail Walkthrough & Guides Wiki
Monster Hunter Stories 3: Twisted Reflection Walkthrough & Guides Wiki
Wuthering Waves Walkthrough & Guides Wiki
The Seven Deadly Sins: Origin Walkthrough & Guides Wiki
Pokemon TCG Pocket (PTCGP) Strategies & Guides Wiki
Pokemon Pokopia Walkthrough & Guides Wiki
Zenless Zone Zero Walkthrough & Guides Wiki


Recommended Games
Monster Hunter World Walkthrough & Guides Wiki
Fire Emblem Heroes (FEH) Walkthrough & Guides Wiki
Pokemon Brilliant Diamond and Shining Pearl (BDSP) Walkthrough & Guides Wiki
Super Smash Bros. Ultimate Walkthrough & Guides Wiki
Diablo 4: Vessel of Hatred Walkthrough & Guides Wiki
Cyberpunk 2077: Ultimate Edition Walkthrough & Guides Wiki
Yu-Gi-Oh! Master Duel Walkthrough & Guides Wiki
Elden Ring Shadow of the Erdtree Walkthrough & Guides Wiki
The Legend of Zelda: Tears of the Kingdom Walkthrough & Guides Wiki
Persona 3 Reload Walkthrough & Guides Wiki


All rights reserved
© Pearl Abyss Corp. All Rights Reserved.
The copyrights of videos of games used in our content and other intellectual property rights belong to the provider of the game.
The contents we provide on this site were created personally by members of the Game8 editorial department.
We refuse the right to reuse or repost content taken without our permission such as data or images to other sites.