This survey will take about 1 minute.
Your answers will help us to improve our website.
Crimson Desert
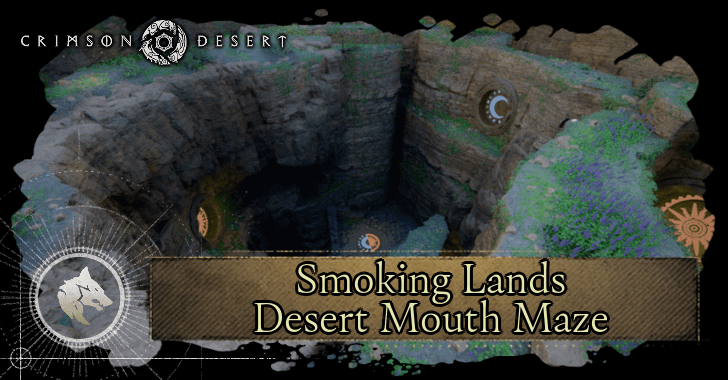
Celestial Maze: Smoking Lands Desert Mouth Puzzle Solution
☆ Best: Side Quests | Weapons | Armor | Skills
★ Controls | Best Items | What to Do First
☆ Characters: Damiane | Oongka | Kliff
Solve the Celestial Maze puzzle by flipping ten symbols once with Force Palm in Crimson Desert. Check this guide to find all symbol locations and what to do in the secret room behind one of the symbols.
List of Contents
Celestial Maze Puzzle Solution
| Celestial Maze Puzzle Tips |
|---|
|
|
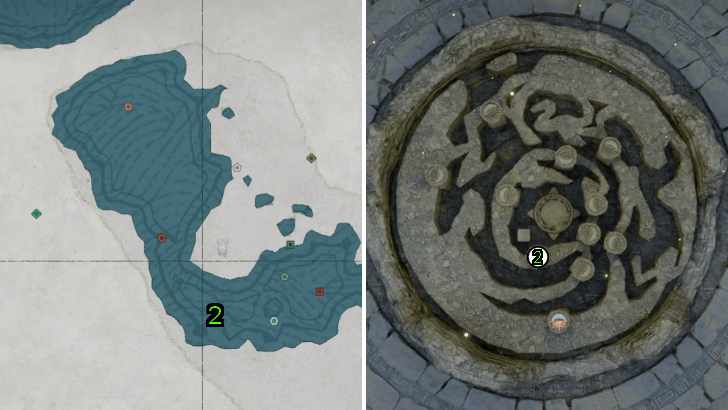
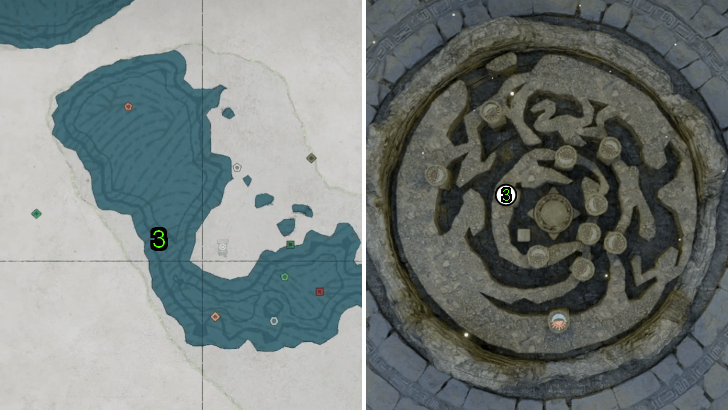
Use Map Markers to Track the Symbols
| Maze Model | 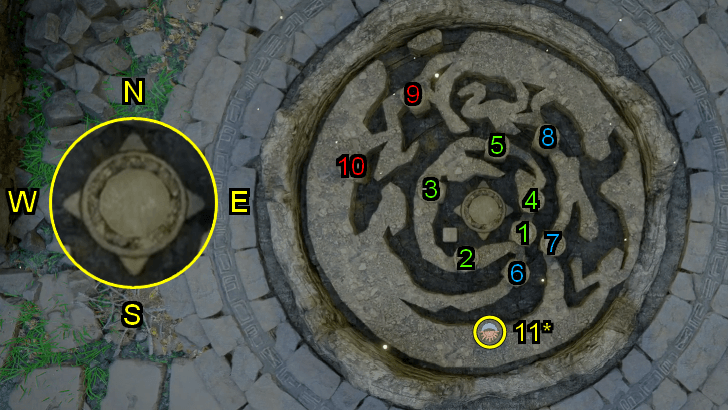 |
|---|---|
| Map Markers |  |
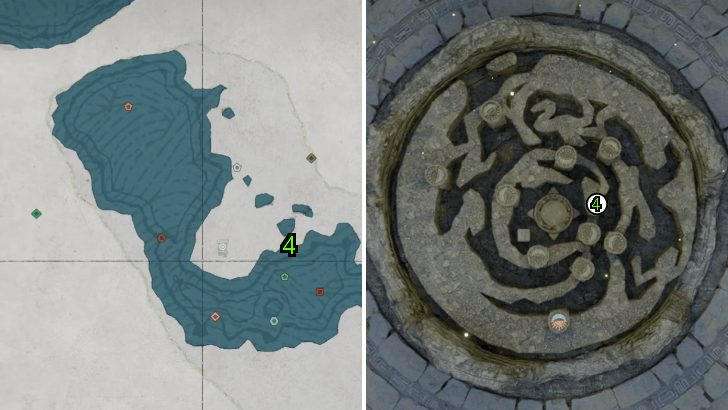
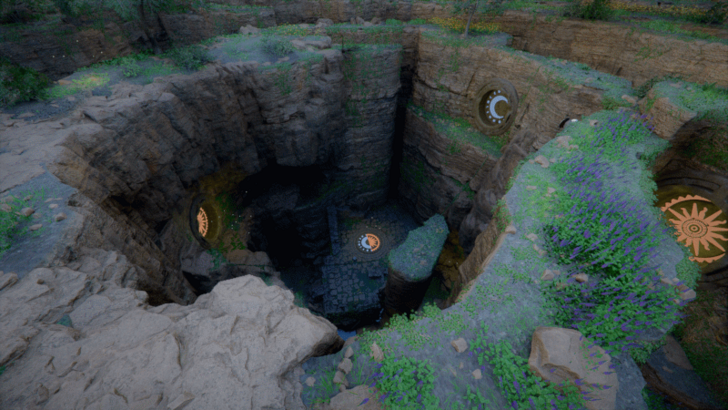
Arriving at the center of the gorge, you will see a large stone scale model of the Celestial Maze. The double-sided tokens with sun and moon symbols represent the 10 symbols you need to flip once with Force Palm to complete the challenge.
The world map does not offer an accurate view of the maze, so it is recommended to use map markers to keep track of your progress. Refer to the compass at the middle as a visualization of the four directions: north, south, east, and west.
The “eleventh symbol”, which is the one already activated on the model, does not need to be flipped, but it does hide a secret room.
The Symbols' Sides Change Depending on the Time of Day
Depending on the time of day, the symbols on the plates will be reversed. For example, if a plate has the moon symbol during daytime, it will switch to a sun symbol at night. Despite this change, you still need to flip them once with Force Palm to light them up on the scale model.
Note that this guide shows the puzzle solution of the Celestial Maze during daytime.
Flip All 10 Symbols with Force Palm Once
To complete the Celestial Maze, you need to flip 10 symbols with Force Palm once to light them up on the scale model. This guide divides the symbols by the maze's inner, middle, and outer rings for easier tracking.
Inner Ring Symbols (1–5)
| Locations | Directions |
|---|---|
 Symbol 1 |
 Southeast of the scale model. Aside from Force Palm, you can use Force Current to flip the symbol from a distance. |
 Symbol 2 |
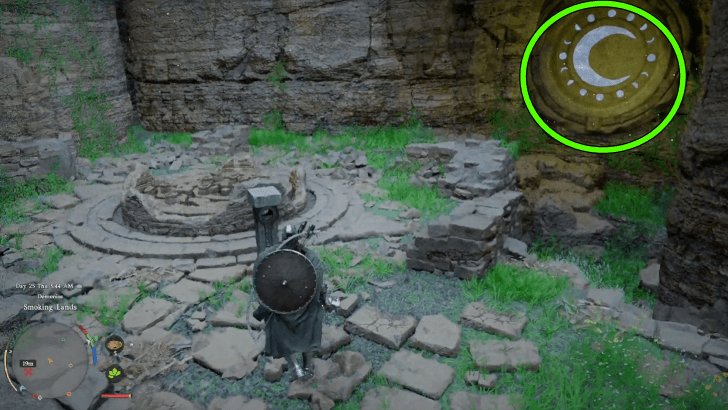
 Slightly southwest of the scale model, tucked in a pocket of the cliff facing the Abyss Cresset. |
 Symbol 3 |
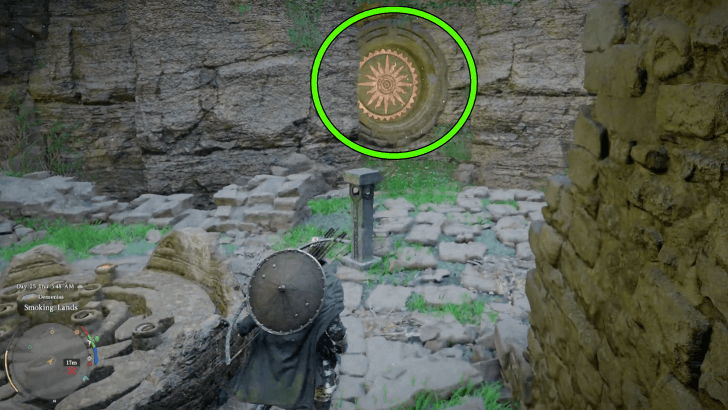
 Slightly northwest of the scale model above a cliff face. A vine stretches overhead, leading to the symbol. |
 Symbol 4 |
East of the scale model, directly in front of Symbol 3 on a higher cliff face. Face away from Symbol 3 and look up to see Symbol 4. |
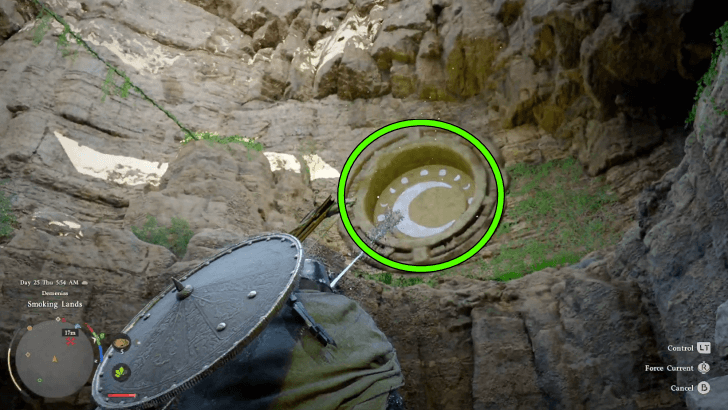
 Symbol 5 |
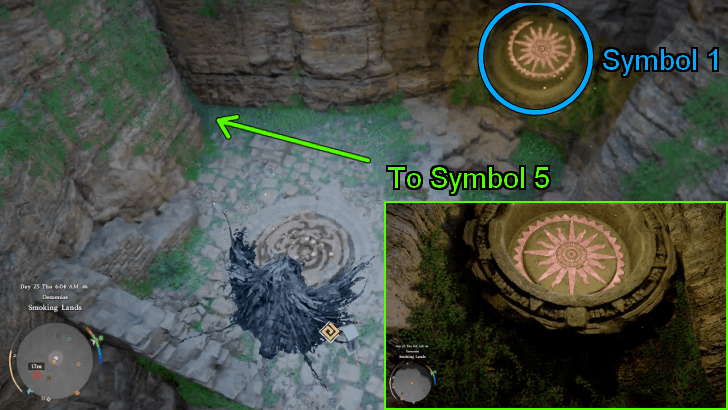 North of the scale model. Face Symbol 1 and look left to see a narrow crevice. Walk inside to see Symbol 5. |
Middle Ring Symbols (6–8)
| Symbol | Directions |
|---|---|
 Symbol 6 |
Southeast of the scale model, past the inner ring of the gorge. Climb up the column between Symbols 1 and 2. Climb up again until you reach the top, overlooking the gorge. Symbol 6 is tucked in the corner. |
 Symbol 7 |
Northeast of Symbol 6 in the chasm just past it. After flipping Symbol 6, walk slightly ahead to see Symbol 7. |
 Symbol 8 |
Symbol 8 is north of Symbol 7, so you can walk along the ground to reach it. From the scale model, this is past the wall east of Symbol 5. |
Outer Ring Symbols (9–10)
| Symbol | Directions |
|---|---|
 Symbol 9 |
Northeast of the scale model, in the outermost ring set between Symbols 3 and 5. At the very top, you should see Symbol 9 tucked in a corner with spores on the patch of grass below it. |
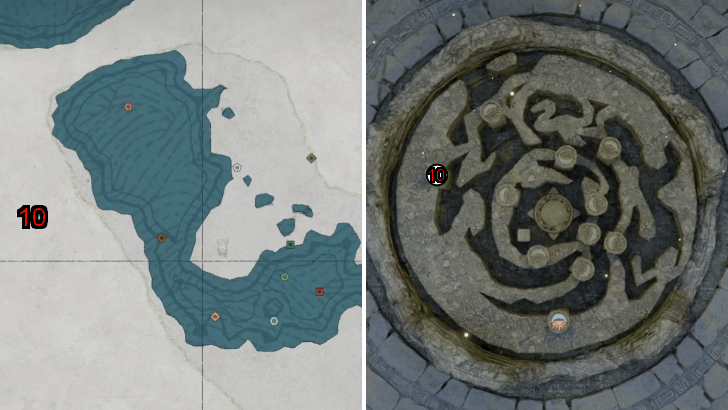 Symbol 10 |
Safely go past the spore patch in front of Symbol 9 and drop into the hole ahead. Walk into the crevice and take a left into a passage where Symbol 10 is hidden. |
After flipping and lighting up all 10 symbols with Force Palm, a short cutscene will play where the scale model will flip to a sun-and-moon symbol. Return to the surface to take the Abyss Artifact from the Abyss Cresset.
Celestial Maze Secret Room Behind Symbol 11
| Steps | Directions |
|---|---|
| 1 | 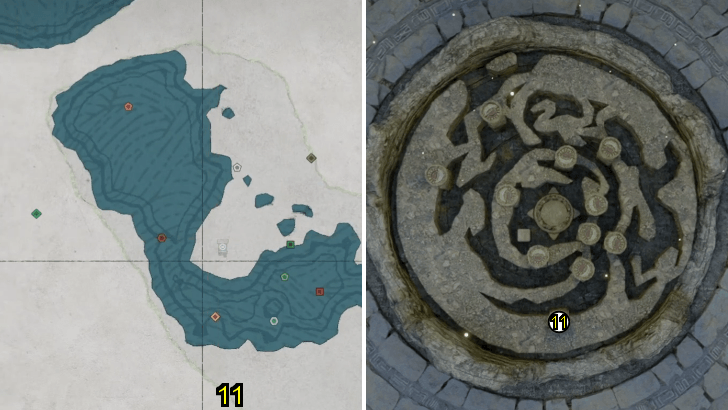 Symbol 11 is found in an underground portion of the maze, directly south of the scale model. To find it, you need to locate a hole near Symbol 7. |
| 2 | Facing north of the scale model, climb the cliff to gain some leverage to glide toward the wall where Symbol 4 is located, which is the plate on the topmost cliff face of the maze's inner ring. |
| 3 | Walk along the top of the cliff, passing by Symbol 7. Looking down, you will see a gaping hole. Glide safely into it, then hug left in the passage to find Symbol 11 inside a cave. Use Force Current while standing in front of the plate to push it, sliding you inside the secret room. |
There is a secret room past the plate corresponding to the eleventh symbol, which is the one pre-activated on the maze's scale model. Inside the room is a common chest (with random loot), unlit torches, and a large pedestal at the center.
Currently, the secret room's purpose is unknown. We will update this guide once more information has been gathered about it.
Celestial Maze Puzzle Location
North of Deadfire Mountain in Crimson Desert
| Location | Map |
|---|---|
 |
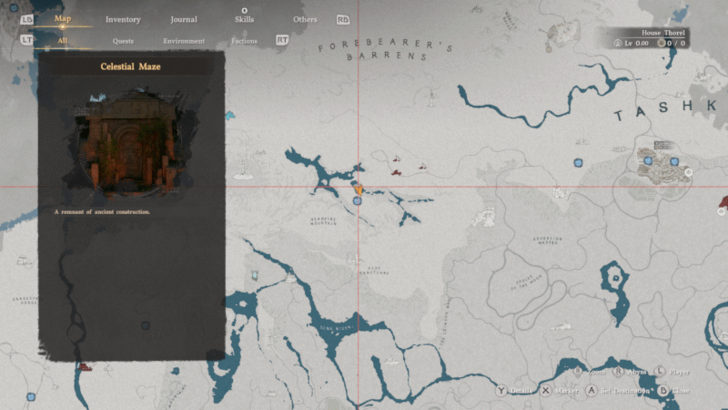 |
The Celestial Maze, also known as the Smoking Lands Desert Map Maze, is located in the Smoking Lands, north of Deadfire Mountain. This maze lies within the Crimson Desert region, far west of the town of Tommaso in Tashkalp.
Crimson Desert Interactive Map
Celestial Maze Puzzle and Challenge Rewards
Puzzle Completion Rewards
| Rewards |
|---|
| ・ Abyss Artifact x1 |
Solving the Celestial Maze puzzle and challenge unlocks an Abyss Cresset which you can interact with to claim an Abyss Artifact and activate a fast travel point.
How to Fast Travel: All Fast Travel Points
Crimson Desert Related Guides
Exploration Challenges
| Abyss | Secret Places | Ancient Ruins | |||
| Sanctums | Spires | Mazes |
Mastery Challenges
| Sword | Shield | ||||
| Bow | Spear | ||||
| Two-Handed Weapon | Rapier and Shield | Gun | |||
Combat Challenges
| Training | Operation |
Life Challenges
| Hunting | Life | ||
| Above the Law | Challenges and Changes |
Minigame Challenges
| Duel | Mind Games |
Other Maze Puzzles
| Ancient Rift Maze | Maze of Burhum | Maze of Dawnreach |
Comment
Author

Celestial Maze: Smoking Lands Desert Mouth Puzzle Solution
Please participate in our site
improvement survey
04/2026
improvement survey
04/2026
Would you assist in
improving Game8's site?
improving Game8's site?

×
We are listening to our users' valuable opinions and discussing how to act on them.
The information collected through this survey will be used for the purpose of improving our services. In addition, the information will only be disclosed a part of a statistic in a format that will not allow identification of personal information.
Begin Survey
Not Now
×
Please rate each item regarding Game8.co's Advertisements.
Amount of Ads
Very Dissatisfied
Somewhat Dissatisfied
Fine
Somewhat Satisfied
Highly Satisfied
Placement of Ads
Timing of Ad Display
Ad Loading Speed
Safeness of Ads
Content of Ads
×
Please rate each item regarding Game8.co's Quality of Articles.
Amount of information
Very Dissatisfied
Somewhat Dissatisfied
Fine
Somewhat Satisfied
Highly Satisfied
Frequency of updates
Speed of new information
Accuracy of articles
Understandibility of articles
Readability of sentences
×
Please rate each item regarding Game8.co's Usability of the Site.
Ease of finding information
Very Dissatisfied
Somewhat Dissatisfied
Fine
Somewhat Satisfied
Highly Satisfied
Loading Speed
Use of Color
Font Size
Visibility of Images
Easy to Understand Layout
×
Please rate each item regarding Game8.co's Message Boards, Comments.
Ease of Writing
Very Dissatisfied
Somewhat Dissatisfied
Fine
Somewhat Satisfied
Highly Satisfied
Readability
Ease in Finding Information
Comment Quality
Comment Quantity
Admin Response
×
Please rate each item regarding Game8.co's Site's new design.
Please rate our site's new design
Very Dissatisfied
Somewhat Dissatisfied
Fine
Somewhat Satisfied
Highly Satisfied
Do you think that the website's design change makes the site easier to use?
Has the new design made it easier for you to find information on the site?
Has the new design improved the overall visual appeal of the site?
How would you rate your overall satisfaction with the new design of the site?
×
How likely are you to recommend Game8 to someone you know?
Very Unlikely
0
1
2
3
4
5
6
7
8
9
10
Very Likely
If you have other opinions regarding potential improvement to the website, please share them with us. We would appreciate your honest opinion.
Note: This is a free response section, so you can proceed without entering anything.
Note: Please be sure not to enter any kind of personal information into your response.
Note: Please be sure not to enter any kind of personal information into your response.
×
Thank You
×
Thank you for participating in our survey! Your answers will help us to improve the quality of our website and services.
We hope you continue to make use of Game8.
We hope you continue to make use of Game8.
Close
Rankings
- We could not find the message board you were looking for.
Gaming News


![Forza Horizon 6 Review [Preview] | Beautiful Roads With a Whole Lot of Oversteer](https://img.game8.co/4460981/a7254c24945c43fbdf6ad9bea52b5ce9.png/thumb)
![Borderlands Mobile Review [Playtest] | The Same Borderlands Made Easy](https://img.game8.co/4465500/aac0c880a39ec5cd46073e49d18f3ed5.png/thumb)
Popular Games

Genshin Impact Walkthrough & Guides Wiki
Crimson Desert Walkthrough & Guides Wiki
Umamusume: Pretty Derby Walkthrough & Guides Wiki
Honkai: Star Rail Walkthrough & Guides Wiki
Monster Hunter Stories 3: Twisted Reflection Walkthrough & Guides Wiki
Wuthering Waves Walkthrough & Guides Wiki
The Seven Deadly Sins: Origin Walkthrough & Guides Wiki
Pokemon TCG Pocket (PTCGP) Strategies & Guides Wiki
Pokemon Pokopia Walkthrough & Guides Wiki
Zenless Zone Zero Walkthrough & Guides Wiki


Recommended Games
Fire Emblem Heroes (FEH) Walkthrough & Guides Wiki
Pokemon Brilliant Diamond and Shining Pearl (BDSP) Walkthrough & Guides Wiki
Super Smash Bros. Ultimate Walkthrough & Guides Wiki
Diablo 4: Vessel of Hatred Walkthrough & Guides Wiki
Cyberpunk 2077: Ultimate Edition Walkthrough & Guides Wiki
Yu-Gi-Oh! Master Duel Walkthrough & Guides Wiki
Elden Ring Shadow of the Erdtree Walkthrough & Guides Wiki
Monster Hunter World Walkthrough & Guides Wiki
The Legend of Zelda: Tears of the Kingdom Walkthrough & Guides Wiki
Persona 3 Reload Walkthrough & Guides Wiki


All rights reserved
© Pearl Abyss Corp. All Rights Reserved.
The copyrights of videos of games used in our content and other intellectual property rights belong to the provider of the game.
The contents we provide on this site were created personally by members of the Game8 editorial department.
We refuse the right to reuse or repost content taken without our permission such as data or images to other sites.