This survey will take about 1 minute.
Your answers will help us to improve our website.
Crimson Desert
Black and White Walkthrough
☆ Best: Side Quests | Weapons | Armor | Skills
★ Controls | Best Items | What to Do First
☆ Characters: Damiane | Oongka | Kliff
This is a Black and White walkthrough for Crimson Desert. Learn how to complete Black and White and its quest rewards in this guide!
| ◄ Previous Quest | Next Quest ▶ |
|---|---|
| Uninvited Guest | Blazing Beacon |
List of Contents
Black and White Walkthrough
1. The Missing Seal
| 1.1 | Read the Unsealed Letter |
|---|---|
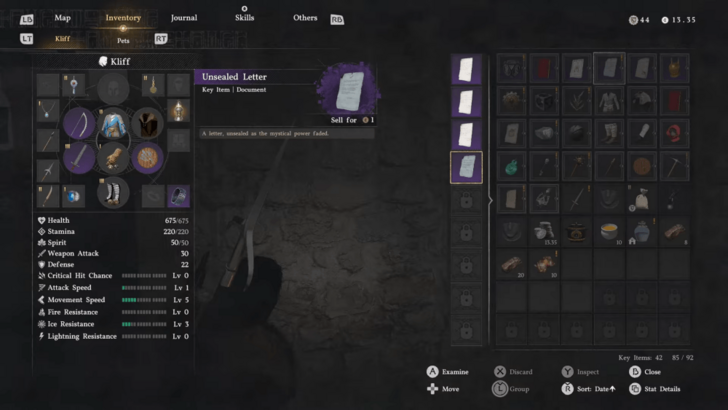 Open your inventory and read the Unsealed Letter. The letter will tell you to find the witches and ask them for their aid. |
|
| 1.2 | Go Meet the Witch |
 To meet the witch, go to Witchwood in Alfonso Estate and find Elowen the Witch . Note that she won't appear on the map. You can follow the first step of the first quest in the Witches Faction Quest to view her location on the map. |
2. Crowcaller
| 2.1 | Head to Hernand |
|---|---|
| Return to Hernand after speaking with the witch. You will find a commotion there as the castle has been infiltrated. | |
| 2.2 | Speak with the Guards |
| Talk to the guards to learn about the current situation. You will find out that the castle was attacked by "Ghosts", as the intruders vanished without a trace. | |
| 2.3 | Track the Invader |
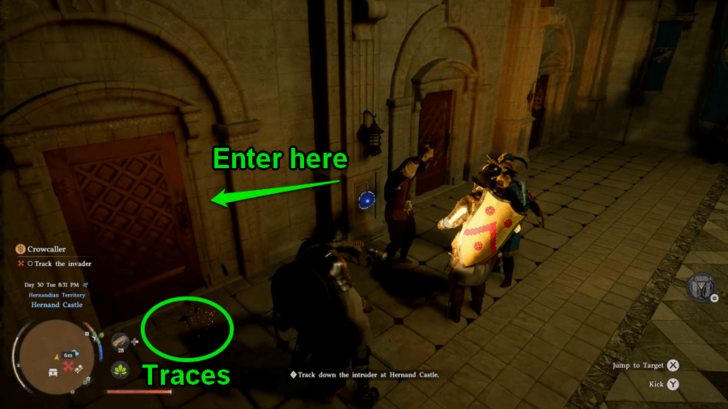 Track down the intruder with your Lantern. The trail will get you to an Abyss Gate, which leads to the Axiom Archive. |
|
| 2.4 | Move to the Axiom Archive |
| Enter through the portal to get to the Abyss and into the Axiom Archive. You will face several enemies when you get there, so prepare for combat. Head inside the Archive after the fight. |
3. The Crow's Warning
| 3.1 | Gather Clues on the Crow in Hernand |
|---|---|
| Fast travel to Hernand or just jump down and look for clues regarding the "Crow". Go to Muckroot Ranch to meet Crowcaller and his men. Defeat all of his men to progress. |
4. Bloodwind
| 4.1 | Chase After the Feathered Man |
|---|---|
| Chase down Crowcaller in the Demeniss region, specifically in the Church of West Demeniss. More of his men will wait for you there, so defeat them to force Crowcaller to come out. | |
| 4.2 | Defeat Crowcaller |
| Crowcaller will appear once you defeated all his men. Use Grappling Skills to stagger him fast and whittle down his HP quickly. He will retreat once you deplete his HP.
▶ How to Beat Crowcaller |
5. Secret at the Church
| 5.1 | Gather Information at the Orphanage |
|---|---|
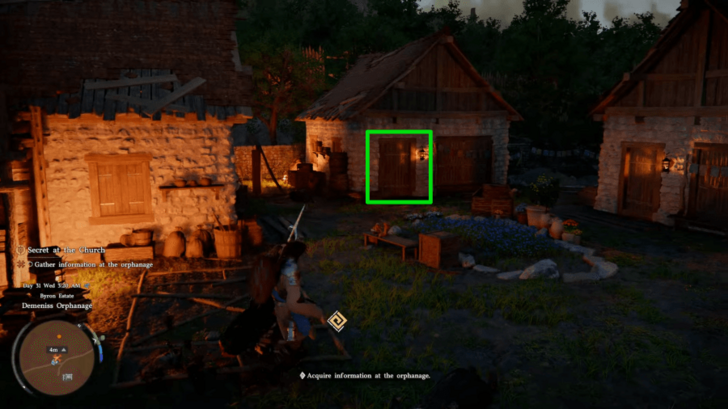 Head to the Orphanage, which should be in the same area, and gather information about Crowcaller. Enter the small house that faces a flower garden to meet Abbess Marina. |
|
| 5.2 | Obtain the Church's Relic |
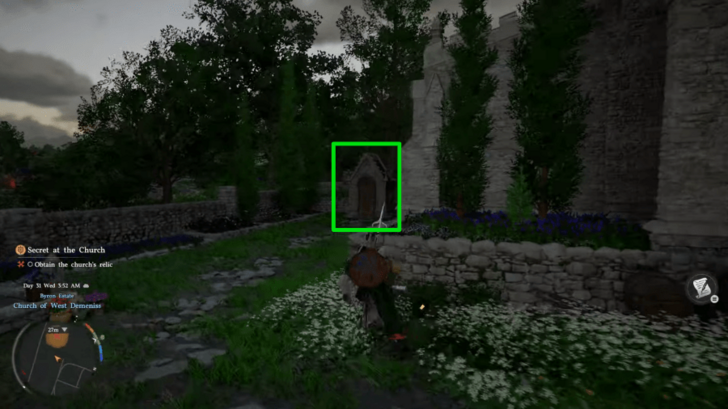 Go to the side of the church and grab the Relic in the cellar. You will need to solve a puzzle to open the safe containing the relic, which is the Dagger of Radiance. |
|
| * | Puzzle Solution |
You must light up all the blocks to open the safe and get the relic. 1. Press the lower right box. 2. Press the upper left box. 3. Press the lower left box. 4. Press the upper right box. |
|
| 5.3 | Activate the Pillar of Radiance |
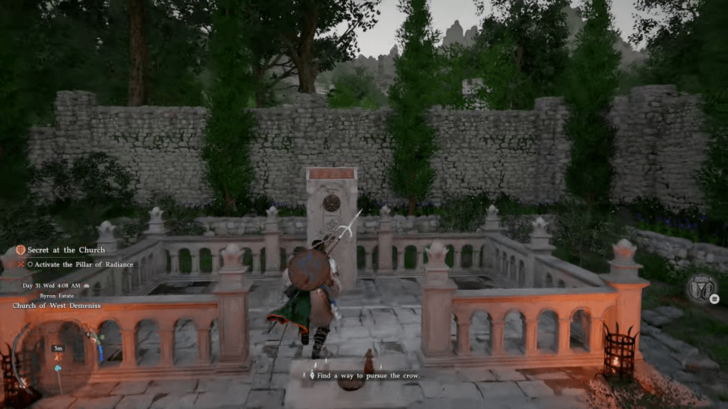 Place the Dagger of Radiance into the Pillar of Radiance pedestal. After that, examine the disks and create the image of an Eye using them. |
|
| * | Puzzle Solution |
The easiest way to solve this puzzle is to turn the disks and wait for them to light up to know they are in place. You only need to move the first and second outer rings to solve it. |
Secret at the Church Puzzle Solutions
6. Toward the Nest
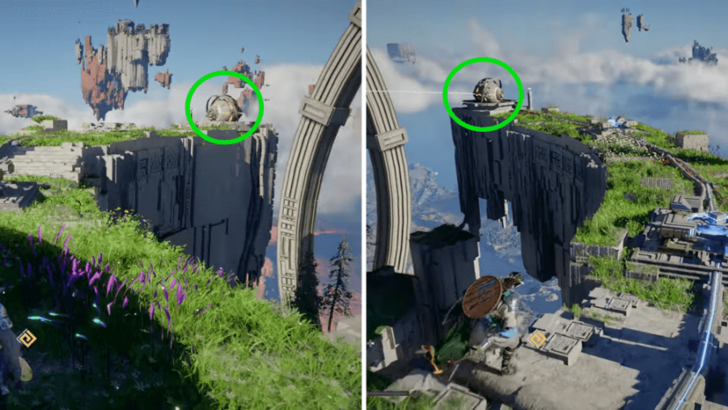
| 6.1 | Go to the Spire of Soaring |
|---|---|
| Head north of the Demeniss region to reach the Spire of Soaring. You will find the door broken, and you won't be able to get in through it. | |
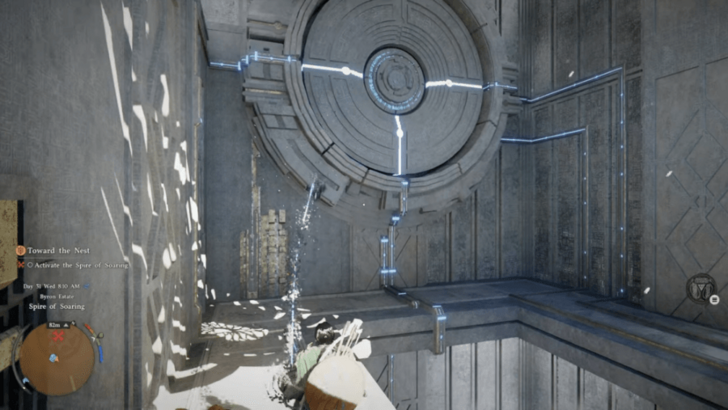
| 6.2 | Activate the Spire of Soaring |
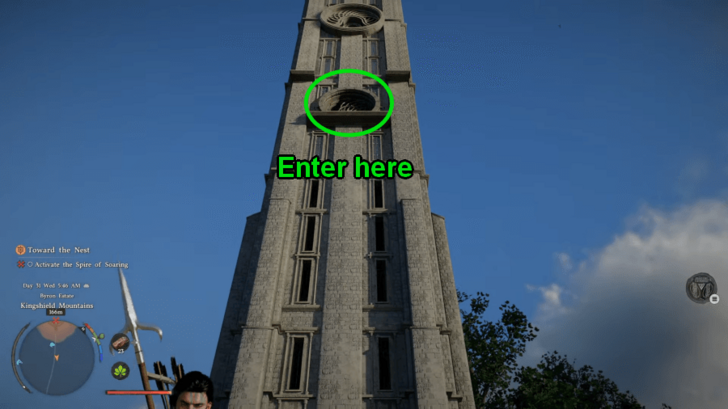 Head inside the tower through the circular window. You will need to climb the tower to get there. You can rest for a bit using the small ledges to recover stamina. |
|
| 6.3 | Let the Power Flow Through the Tower |
| The power must flow through the tower to activate it. You must solve multiple puzzles to achieve that. | |
| * | Connect the Power Using Circular Blocks |
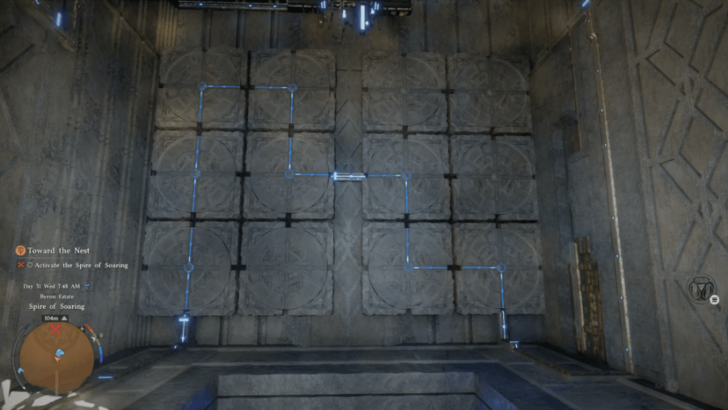 In the same level where you first came in, move the circular blocks to guide the power on the other side. You must have the same pattern as the image above to solve it. An elevator should come up here after solving this puzzle. If not, reload a save before it and try again as you won't be able to reach the top floor without the elevator. |
|
| 6.4 | Proceed to the Next Floor |
| Once you've connected the power, ride the elevator to the next floor. You will need to solve another puzzle connect the floor to the power below. | |
| * | Rotate the Circular Block |
 Rotate the Circular Block to get the power running on this floor. Simply rotate the Circular Block clockwise twice to solve it. |
|
| 6.6 | Head to the Top Floor |
| After solving the puzzle, ride the elevator again and head to the top floor. The tower will open up and take you to the Crescent Bridge in the Abyss, so do not to jump down or you'll have to restart. | |
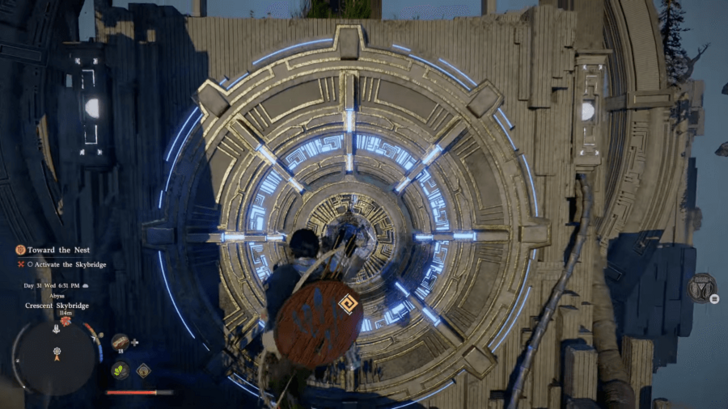
| 6.7 | Activate the Skybridge |
| To activate the Skybridge, you must restore the power on the sky island through several mechanisms in the area. Be careful of the Purple Flowers as you restore the power, as they can poison and even kill you if you let them be. ▶ How to Activate the Skybridge |
|
| * | Activate the Ring and Ride It |
Point the first Sphere towards the orange spot on the other side. This will activate the ring and you can use it to get to a higher elevation and reach the other Spheres. |
|
| * | Point the Spheres' Laser to Orange Spots |
 Activate the two Spheres on each side using the same method as the first one. The other rings should rotate if successful. |
|
| * | Connect the Two Pipes |
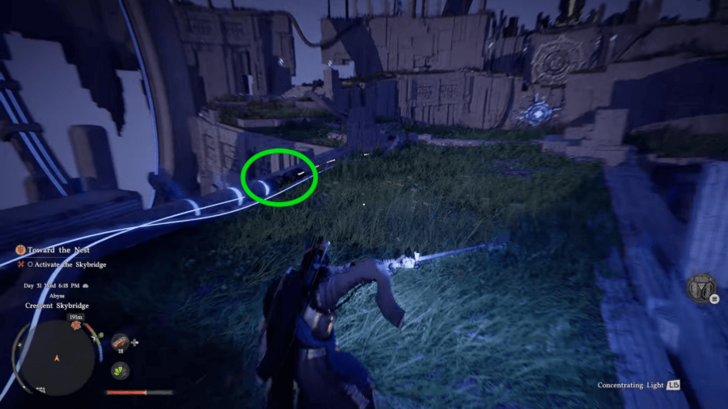 Go down to the starting area to connect the pipes on each side. You can find them by tracing the yellow light using the Blinding Sword. |
|
| * | Use Force Palm on the Main Power Switch |
 The main switch will become active once all the power is connected. Climb and use Force Palm in the middle to let the power flow on the whole island. |
|
| * | Activate the Switch to the Skybridge |
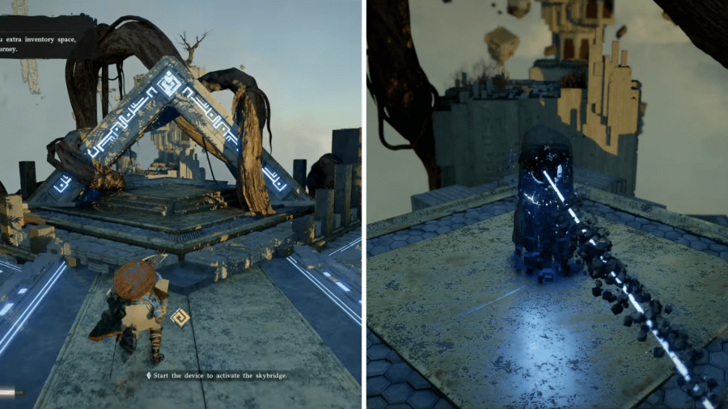 After that, pass through the triangular arc and rotate the switch until it turns blue to activate the bridge. |
|
| 6.8 | Move to the Final Battleground |
| Use the bridge to get to the Final Battleground. You will face Crowcaller and other enemies there to end things once and for all. | |
| 6.9 | Defeat Crow Brothers and Crowcaller |
Defeat Crowcaller and his men to end the quest. He will be using the mostly the same attacks, but with some additions and extra health bar. You can use the same strategy where you use Grappling Skills to beat him. You can also learn the Aerial Roll during this fight and use it against Crowcaller. ▶ How to Beat Crowcaller |
Black and White Rewards
|
・Core Blueprint:Haste x1 ・Blackwing Leather Armor x1 ・Blackwing Mask x1 ・Tauria Curved Sword x1 |
Crimson Desert Related Guides
Story Walkthrough and List of Chapters
All Chapters and Quests
Comment
Author

Black and White Walkthrough
Please participate in our site
improvement survey
04/2026
improvement survey
04/2026
Would you assist in
improving Game8's site?
improving Game8's site?

×
We are listening to our users' valuable opinions and discussing how to act on them.
The information collected through this survey will be used for the purpose of improving our services. In addition, the information will only be disclosed a part of a statistic in a format that will not allow identification of personal information.
Begin Survey
Not Now
×
Please rate each item regarding Game8.co's Advertisements.
Amount of Ads
Very Dissatisfied
Somewhat Dissatisfied
Fine
Somewhat Satisfied
Highly Satisfied
Placement of Ads
Timing of Ad Display
Ad Loading Speed
Safeness of Ads
Content of Ads
×
Please rate each item regarding Game8.co's Quality of Articles.
Amount of information
Very Dissatisfied
Somewhat Dissatisfied
Fine
Somewhat Satisfied
Highly Satisfied
Frequency of updates
Speed of new information
Accuracy of articles
Understandibility of articles
Readability of sentences
×
Please rate each item regarding Game8.co's Usability of the Site.
Ease of finding information
Very Dissatisfied
Somewhat Dissatisfied
Fine
Somewhat Satisfied
Highly Satisfied
Loading Speed
Use of Color
Font Size
Visibility of Images
Easy to Understand Layout
×
Please rate each item regarding Game8.co's Message Boards, Comments.
Ease of Writing
Very Dissatisfied
Somewhat Dissatisfied
Fine
Somewhat Satisfied
Highly Satisfied
Readability
Ease in Finding Information
Comment Quality
Comment Quantity
Admin Response
×
Please rate each item regarding Game8.co's Site's new design.
Please rate our site's new design
Very Dissatisfied
Somewhat Dissatisfied
Fine
Somewhat Satisfied
Highly Satisfied
Do you think that the website's design change makes the site easier to use?
Has the new design made it easier for you to find information on the site?
Has the new design improved the overall visual appeal of the site?
How would you rate your overall satisfaction with the new design of the site?
×
How likely are you to recommend Game8 to someone you know?
Very Unlikely
0
1
2
3
4
5
6
7
8
9
10
Very Likely
If you have other opinions regarding potential improvement to the website, please share them with us. We would appreciate your honest opinion.
Note: This is a free response section, so you can proceed without entering anything.
Note: Please be sure not to enter any kind of personal information into your response.
Note: Please be sure not to enter any kind of personal information into your response.
×
Thank You
×
Thank you for participating in our survey! Your answers will help us to improve the quality of our website and services.
We hope you continue to make use of Game8.
We hope you continue to make use of Game8.
Close
Rankings
- We could not find the message board you were looking for.
Gaming News


![Forza Horizon 6 Review [Preview] | Beautiful Roads With a Whole Lot of Oversteer](https://img.game8.co/4460981/a7254c24945c43fbdf6ad9bea52b5ce9.png/thumb)
Popular Games

Genshin Impact Walkthrough & Guides Wiki
Crimson Desert Walkthrough & Guides Wiki
Umamusume: Pretty Derby Walkthrough & Guides Wiki
Honkai: Star Rail Walkthrough & Guides Wiki
Monster Hunter Stories 3: Twisted Reflection Walkthrough & Guides Wiki
Wuthering Waves Walkthrough & Guides Wiki
The Seven Deadly Sins: Origin Walkthrough & Guides Wiki
Pokemon TCG Pocket (PTCGP) Strategies & Guides Wiki
Pokemon Pokopia Walkthrough & Guides Wiki
Zenless Zone Zero Walkthrough & Guides Wiki


Recommended Games
Monster Hunter World Walkthrough & Guides Wiki
Fire Emblem Heroes (FEH) Walkthrough & Guides Wiki
Pokemon Brilliant Diamond and Shining Pearl (BDSP) Walkthrough & Guides Wiki
Super Smash Bros. Ultimate Walkthrough & Guides Wiki
Diablo 4: Vessel of Hatred Walkthrough & Guides Wiki
Cyberpunk 2077: Ultimate Edition Walkthrough & Guides Wiki
Yu-Gi-Oh! Master Duel Walkthrough & Guides Wiki
Elden Ring Shadow of the Erdtree Walkthrough & Guides Wiki
The Legend of Zelda: Tears of the Kingdom Walkthrough & Guides Wiki
Persona 3 Reload Walkthrough & Guides Wiki


All rights reserved
© Pearl Abyss Corp. All Rights Reserved.
The copyrights of videos of games used in our content and other intellectual property rights belong to the provider of the game.
The contents we provide on this site were created personally by members of the Game8 editorial department.
We refuse the right to reuse or repost content taken without our permission such as data or images to other sites.