Chapter 3: Tephra Cave (Revisited) Walkthrough
This is a walkthrough for the Tephra Cave (Revisited) section of Xenoblade Chronicles Definitive Edition for Nintendo Switch. For a map of Tephra Cave Landmarks and Locations, as well as boss strategy and other tips and tricks, read on!
List of Contents
| Previous Section | Next Section |
|---|---|
| Colony 9 (Mechon Invasion) | Bionis' Leg |
Chapter 3: Tephra Cave (Revisited) Walkthrough
Tephra Cave
| Objectives | |
|---|---|
| 1 | Head to Tephra Cave Enter the Tephra cave as before, and proceed towards the previous exit (to the Ether Cylinder storage building). |
| 2 | 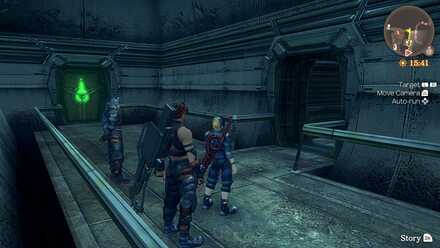 Go through the newly unlocked door in the Mag Mell Ruins The previously locked door in the Mag Mell ruins will be unlocked, allowing you through. You'll also unlock various Side Quests for extra rewards. |
| 3 | Defeat the Arachno ambush Proceed through the cave, now called Tephra Cavern and eventually encounter a cutscene. Shulk and Reyn will be separated, with you controlling Shulk. |
| 4 | Proceed further into the Arachno nest Proceed further into the nest. Since Shulk is alone, it may be difficult to use his positional arts, so take care when fighting groups of enemies. |
| 5 | 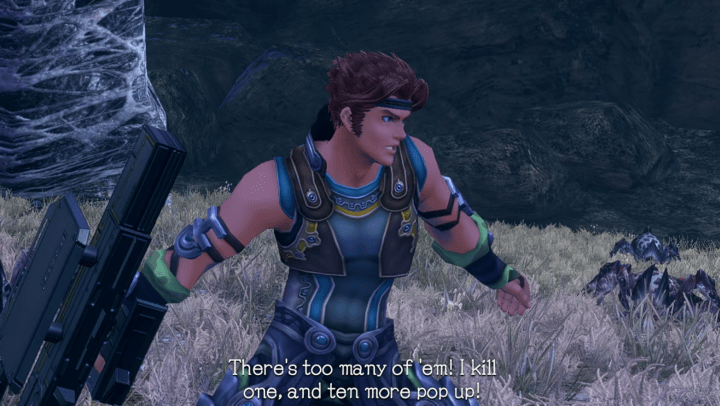 Rescue Reyn You will catch up with Reyn in a cutscene upon reaching the objective marker, and fight some enemies before encountering the boss. |
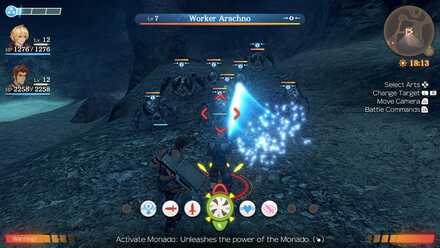
| 6 | 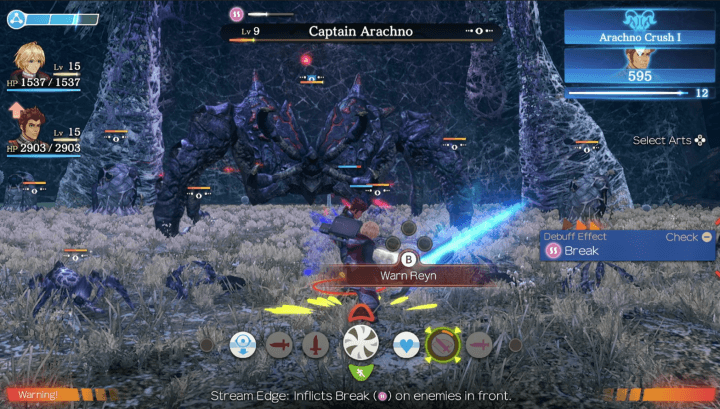 Defeat Queen Arachno The Queen Arachno fight will introduce you to the Monado Shield ability and the combat mechanic of interrupting enemy Talent Arts. Use the move to shield Reyn or Shulk when visions warn of danger. |
| 7 | Proceed to the end of the tunnel Once out of danger, turn in any pending side quests, then follow the path to the marker to emerge on Bionis' Leg and begin Chapter 4. |
Chapter 4: Bionis' Leg Walkthrough
Side Quests
The following side quests are available from this chapter:
Colony 9 Side Quests
| Quest | Location | Giver | Rewards |
|---|---|---|---|
| Mementos of a Lost Son | Ether Light | Cheryl | +200 Reputation 4500 G 1500 EXP Bomber Lancer |
| Flattened Flowers | Tranquil Square | Françoise | +100 Reputation 750 G 100 EXP Soil Gauntlets |
| Romantic Notions of a Girl | Fortress Entrance | Monica | +200 Reputation 1200 G 300 EXP Soil Boots |
| Romantic Notions of a Boy | Fortress Entrance | Andreas | +200 Reputation 1200 G 300 EXP Soil Gear |
| An Impoverished Critic | Ether Light | Leopold | +200 Reputation |
| Financial Planning | Ether Light | King Squeeze | 2500 G 500 EXP Ranger Shoes OR Quark Boots |
| Overworked and Underpaid | Ether Light | Giorgio | +100 Reputation 3000 G 300 EXP HP Up II OR Ether Def Up II |
| Paola and Narine | Tranquil Square | Narine | +250 Reputation 200 G 20000 EXP Daze Plus IV |
| The Plan - Preparation | Ether Light | Sesame | +100 Reputation 1000 G 150 EXP Critical Up II |
| The Plan - The Night Before | Ether Light | Sesame | +150 Reputation 1500 G 200 EXP Strength Up III |
| The Plan - Execution | Ether Light | Sesame | +250 Reputation 5000 G 1200 EXP Attack Stability II |
| A Young Captain's Suffering | Fortress Entrance | Emmy Leater | +150 Reputation 1100 G 180 EXP Ether Def Up III |
| A Young Captain's Rise | Fortress Entrance | Emmy Leater | +200 Reputation 1800 G 250 EXP Flame Gear |
| The Lost Pendant | Cylinder Hangar | Defence Force Soldier | +50 Reputation 950 G 100 EXP Quark Gear |
Quests in Red Text indicate Timed Quests. As these quests will expire after progressing to a certain part of the game, be sure to complete them while they are still available!
Tephra Cave Side Quests
| Quest | Location | Giver | Rewards |
|---|---|---|---|
| Missing in Action | Mag Mell Ruins | Defence Force Soldier | +100 Reputation 800 G 50 EXP Leather Top, Leather Bottoms |
| Arachno Silk Fundraising | Mag Mell Ruins | Defence Force Soldier | +100 Reputation 500 G 100 EXP Ranger Gloves |
| A Thank You | Mag Mell Ruins | Defence Force Soldier | +150 Reputation 1500 G 100 EXP Topple Resist II |
| Clearing Obstructions | Mag Mell Ruins | Defence Force Soldier | +200 Reputation 2500 G 200 EXP Bleed Defence III |
| Collection Quest 1 | Mag Mell Ruins | Defence Force Soldier | +50 Reputation 1000 G |
| Collection Quest 2 | Mag Mell Ruins | Defence Force Soldier | +50 Reputation 1500 G |
| Material Quest 1 | Mag Mell Ruins | Defence Force Soldier | +50 Reputation 1200 G |
| Material Quest 2 | Mag Mell Ruins | Defence Force Soldier | +50 Reputation 1500 G |
Quests in Red Text indicate Timed Quests. As these quests will expire after progressing to a certain part of the game, be sure to complete them while they are still available!
Maps and Collectopaedia
Tephra Cave Map
| List of Maps | |
|---|---|
Ground Floor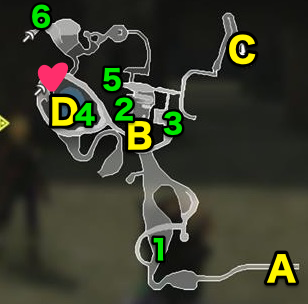 |
First Floor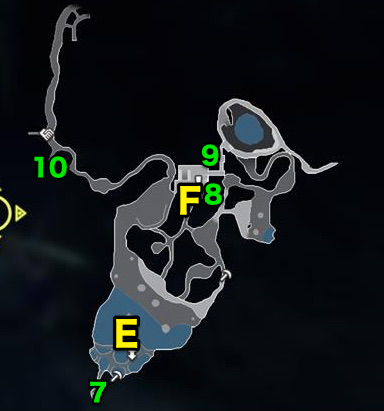 |
Second Floor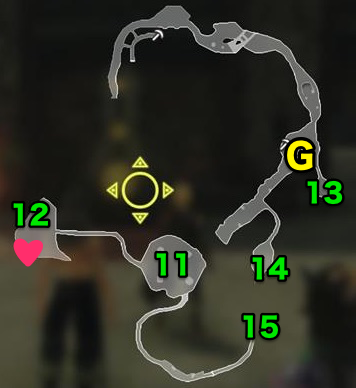 |
Third Floor |
Note: Some landmarks and locations can only be reached after completing Chapter 15: Mechonis Core.
Tephra Cave (Revisited) Landmarks and Locations
Landmarks
| A | Tephra Path |
|---|---|
| B | Mag Mell Ruins |
| C | Rear Entrance |
| D | Spring of Grief |
| E | Vilia Lake |
| F | Heavenly Window |
| G | Bafalgar Tomb |
| H | Leg Pass |
Note: Landmarks F and G can only be reached after completing Chapter 15: Mechonis Core.
Locations
| 1 | Caterpile Nest |
|---|---|
| 2 | Warehouse 2 |
| 3 | Escape Pod Bay |
| 4 | Tephra Cavern |
| 5 | Hidden Warehouse |
| 6 | Forgotten Cave |
| 7 | Emergency Warehouse |
| 8 | Soothsayer's Crypt |
| 9 | Prayer Room |
| 10 | Bone Corridor |
| 11 | Arachno Queen's Nest |
| 12 | Kneecap Hill |
| 13 | Trader's Stopover |
| 14 | Arachno Feeding Lair |
| 15 | Path of Absolution |
Note: Locations 6, 7, 8, 9, 10,13, 14, and 15 can only be reached after completing Chapter 15: Mechonis Core.
Heart-to-Hearts
| Title | Location | Char. 1 | Char. 2 | Affinity |
|---|---|---|---|---|
| The Legend of the Spider | Bone Corridor | Shulk | Reyn | Purple |
| A Scene Revisited | Kneecap Hill | Reyn | Fiora | Pink |
| Glowing in the Night | Spring of Grief | Dunban | Riki | Purple |
Tephra Cave Collectopaedia
| Fruit | Clear Almond | Bright Fig | Dark Grape | - | - |
|---|---|---|---|---|---|
| Flower | Insanity Mint | Night Tulip | - | - | - |
| Animal | Shin Newt | Cave Rat | Shin Gecko | Happy Rabbit | - |
| Bug | Brown Butterfly | Gold Caterpillar | Rumble Stonefly | - | - |
| Nature | Kneecap Rock | Confusion Ivy | Clarity Moss | - | - |
| Strange | Leaf Mystery | Steel Silk | - | - | - |
Collection Rewards
| Fruit | Lightning Attack II |
|---|---|
| Flowers | Poison Defence III |
| Animals | HP Up II |
| Bugs | Slow Resist II |
| Nature | Attack Plus II |
| Strange | Attack Stability II |
| 100% Completion | Warrior Cuisses |
Tips and Strategies
Use Future Vision To Save Your Characters From Strong Attacks
Once you begin battling the Queen Arachno, you'll gain the ability to glimpse into the future to see what attacks enemies might do. Use this knowledge to cast protective arts on your characters beforehand. If the enemy art is a Talent Art (shown in White Text), the damage can be blocked by casting Monado Shield.
Keep A Party Gauge Bar Handy To Warn Your Party Members
Additionally, Shulk can warn his allies of what is going to happen, and you can choose to have them perform an art at the cost of one bar of the Party Gauge. If they have their own defense skill, keep a bar handy to make sure they aren't helpless when Shulk's Talent Gauge is not full. For Reyn, Last Stand will prevent him from dying.
Use Area of Effect Arts Against Crowds
When ambushed by Arachnos and fighting the Queen Arachno, there will be a swarm of enemies surrounding you, and using area of effect attacks arts like Stream Edge and War Swing are good ways to soften all of them up at once.
Super Fast Leveling

There is an exploit that can be done after beating the boss of this area. Doing so can allow you to level into the 50's in a matter of minutes. If you are interested in learning about this glitch to level up your team super fast, see the guide below!
Tephra Cave Glitch: Early Game Leveling
Boss Strategy Guide
Queen Arachno

Use the Tips Above
This battle is a good chance to put in practice the tips above!
Get Rid of the Smaller Spiders
While you may not notice it they deal quite a lot of damage when stacked up. Take care of them before focusing fire on the queen.
Keep Moving
The Queen Arachno has an ability that keeps you in place, and allows her swarm to overwhelm you. Keep mobile so the crowd does not get you!
Story Walkthrough Related Links
Xenoblade Chronicles Story Walkthrough
| Prologue | The Battle of Sword Valley |
|---|---|
| Chapter 1 | Colony 9 and Tephra Cave |
| Chapter 2 | Colony 9 (Mechon Invasion) |
| Chapter 3 | Tephra Cave (Revisited) |
| Chapter 4 | Bionis' Leg |
| Chapter 5 | Colony 6 and Ether Mine |
| Chapter 6 | Satori Marsh and Bionis' Interior (1st Time) |
| Chapter 7 | Makna Forest and Frontier Village |
| Chapter 8 | Eryth Sea, Alcamoth, and High Entia Tomb |
| Chapter 9 | Prison Island (1st Time) |
| Chapter 10 | Valak Mountain |
| Chapter 11 | Sword Valley and Galahad Fortress |
| Chapter 12 | Fallen Arm |
| Chapter 13 | Mechonis Field |
| Chapter 14 | Central Factory and Agniratha |
| Chapter 15 | Mechonis Core |
| Chapter 16 | Central Factory (Revisited) |
| Chapter 17 | Bionis' Interior and Prison Island (Revisited) |
| Final Boss | Memory Space |
Author

Xenoblade Chronicles: Definitive Edition Walkthrough & Guides Wiki
Chapter 3: Tephra Cave (Revisited) Walkthrough
Rankings
Gaming News


Popular Games

Genshin Impact Walkthrough & Guides Wiki
Honkai: Star Rail Walkthrough & Guides Wiki
Monster Hunter Wilds Walkthrough & Guides Wiki
Arknights: Endfield Walkthrough & Guides Wiki
Umamusume: Pretty Derby Walkthrough & Guides Wiki
Wuthering Waves Walkthrough & Guides Wiki
Pokemon TCG Pocket (PTCGP) Strategies & Guides Wiki
Digimon Story: Time Stranger Walkthrough & Guides Wiki
Palworld Walkthrough & Guides Wiki
Zenless Zone Zero Walkthrough & Guides Wiki


Recommended Games
Fire Emblem Heroes (FEH) Walkthrough & Guides Wiki
Pokemon Brilliant Diamond and Shining Pearl (BDSP) Walkthrough & Guides Wiki
Diablo 4: Vessel of Hatred Walkthrough & Guides Wiki
Super Smash Bros. Ultimate Walkthrough & Guides Wiki
Yu-Gi-Oh! Master Duel Walkthrough & Guides Wiki
Elden Ring Shadow of the Erdtree Walkthrough & Guides Wiki
Monster Hunter World Walkthrough & Guides Wiki
The Legend of Zelda: Tears of the Kingdom Walkthrough & Guides Wiki
Persona 3 Reload Walkthrough & Guides Wiki
Cyberpunk 2077: Ultimate Edition Walkthrough & Guides Wiki


All rights reserved
© 2010 - 2020 Nintendo / MONOLITHSOFT. Xenoblade Chronicles and Nintendo Switch are trademarks of Nintendo. © 2020 Nintendo.
The copyrights of videos of games used in our content and other intellectual property rights belong to the provider of the game.
The contents we provide on this site were created personally by members of the Game8 editorial department.
We refuse the right to reuse or repost content taken without our permission such as data or images to other sites.