Chapter 7: Makna Forest and Frontier Village Walkthrough
This is a walkthrough for the Makna Forest and Frontier Village section of Xenoblade Chronicles Definitive Edition for Nintendo Switch. For a map of Makna Forest and Frontier Village Landmarks and Locations, as well as boss strategy and other tips and tricks, read on!
List of Contents
| Previous Section | Next Section |
|---|---|
| Satorl Marsh and Bionis' Interior | Eryth Sea, Alcamoth, and High Entia Tomb |
Chapter 7: Makna Forest and Frontier Village Walkthrough
Makna Forest
| Objectives | |
|---|---|
| 1 | 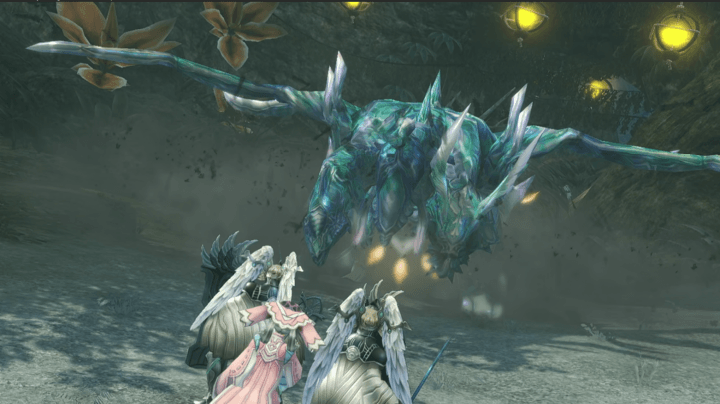 Follow the path until you reach the Nopon village. After emerging on Makna Path, you can simply follow the quest line to get to the next major checkpoint. You'll also see cutscenes introducing Melia. |
| 2 | 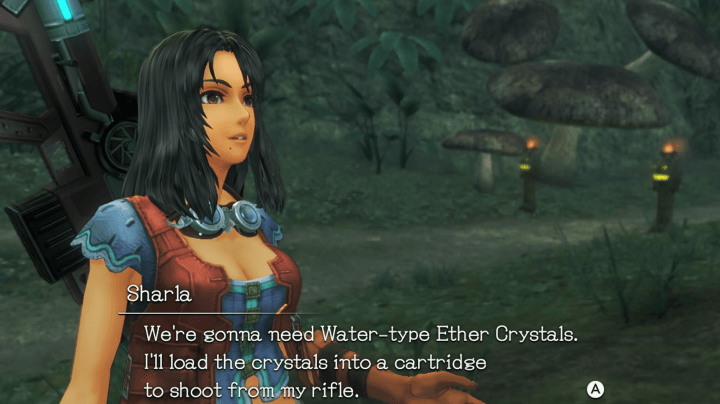 Find some Water Ether. Your quest will change before arriving at the Nopon village, and Shulk will be left alone temporarily. Follow the quest line to the Ether, and take care to avoid monsters, as Shulk alone may not be strong enough to solo them. |
| 3 | 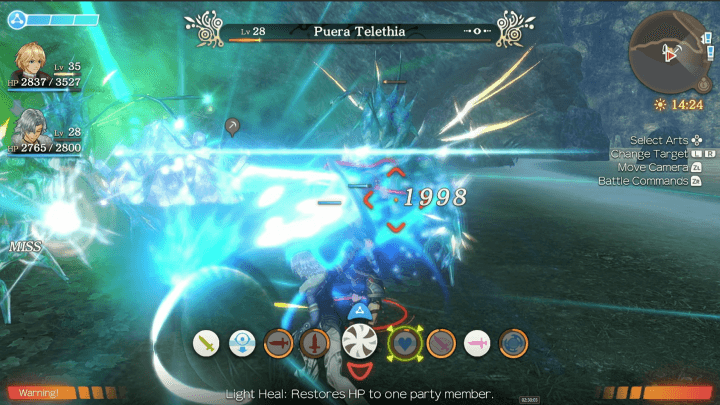 Defeat the Telethias. Following the cutscenes, you'll face off against a group of Telethias with Shulk and an NPC. They'll be hard to kill unless you use your new ability, Monado Purge. |
| 4 |  Resume your journey to the Nopon Village. After completing your errand, Melia will be available as a party member, and you'll be free to proceed to Frontier Village, home of the Nopons. |
Frontier Village
| Objectives | |
|---|---|
| 1 | 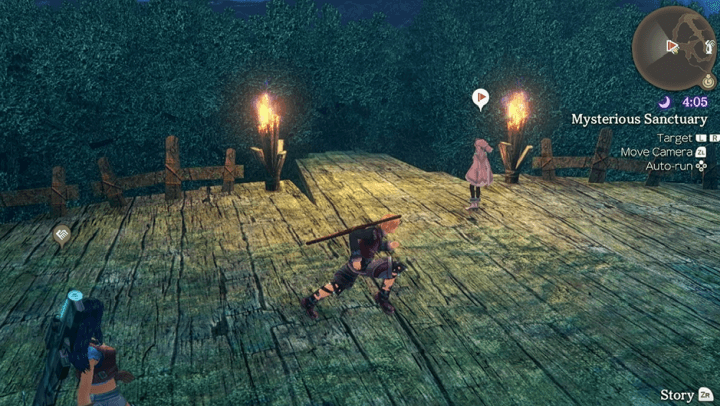 Head to the 7th floor and look for Melia. After the introductions, you'll want to explore a bit, eventually making your way to the 7th floor to speak to Melia. |
| 2 | 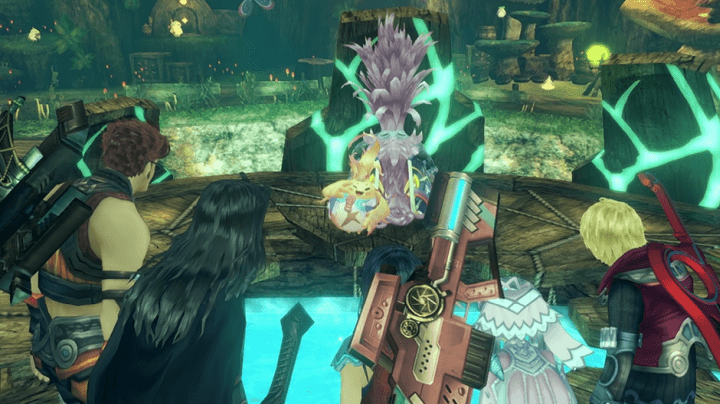 Return to the ground floor of the village. Return to the ground floor to meet your next party member, Riki the Heropon. |
| 3 | Head to the Weapon and Armor Shop. Riki will need some gear, but fortunately the Weapon and Armor shops on the ground floor and 3rd floor fo the village will have it ready for you. |
| 4 | Head out of the village and return to Makna Forest. When ready, leave the village and head out. Now that you have more party members, consider rearranging the party according to our Best Party Setup guide! |
Returning to Makna Forest
| Objectives | |
|---|---|
| 1 | Follow the dotted line until you reach the Ether Crystals. You'll need to find a source of Ether Crystals to track down the Telethia. Taking care not to attract the high-level foes milling about, go to the objective location. |
| 2 | 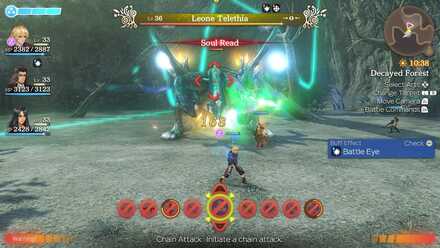 Defeat the Telethia Upon arriving at the crystal hoard, you'll confront the large Telethia with a full party. Ready Monado Purge and take it down. |
| 3 |  Head to the top of the Frontier Village and talk to the Nopon. After defeating the boss, return to the village. You'll be free to explore or do side quests, but when you're ready to proceed to the Eryth Sea, climb to the top of the village and speak to the Nopon there to teleport to the home of the High Entia. |
Chapter 8: Eryth Sea, Alcamoth, and High Entia Tomb Walkthrough
Side Quests
The following side quests are available from this chapter:
Colony 9 Side Quests
| Quest | Location | Giver | Rewards |
|---|---|---|---|
| The Old Soldier's Test | Fortress Entrance | Jan | +100 Reputation 5800 G 5000 EXP Dawn Staff |
| A Young Captain's Challenge | Fortress Entrance | Emmy Leater | +200 Reputation 3300 G 600 EXP Purity Striker, Swep Gauntlets |
| A Big Brother's Fight | Tranquil Square | Zukazu | +200 Reputation 2500 G 3000 EXP Jungle Top |
| A Little Brother's Fight | Tranquil Square | Jiroque | +200 Reputation 7500 G 1500 EXP Jungle Bottoms |
| A Place to Come Home to | Tranquil Square | Jiroque | +150 Reputation 4500 G 2500 EXP Lion Cutlass |
| Thawing Relations | Tranquil Square | Zukazu | +150 Reputation 4500 G 2500 EXP Meditor Gnasher |
| Betty's Gift | Tranquil Square | Betti | +150 Reputation 12000 G 4800 EXP Chill Plus V |
| Désirée's Apology | Ether Light | Désirée | +150 Reputation 12000 G 4800 EXP Blaze Plus V |
Quests in Red Text indicate Timed Quests. As these quests will expire after progressing to a certain part of the game, be sure to complete them while they are still available!
Colony 6 Side Quests
| Quest | Location | Giver | Rewards |
|---|---|---|---|
| A Gutsy Trader | Reconstruction HQ | Werner | +100 Reputation 4000 G 620 EXP Nopol Boots |
| Defend Colony 6 - Mechon | Reconstruction HQ | Colony 6 Residents | +100 Reputation 3000 G 1500 EXP |
Quests in Red Text indicate Timed Quests. As these quests will expire after progressing to a certain part of the game, be sure to complete them while they are still available!
Makna Forest
| Quest | Location | Giver | Rewards |
|---|---|---|---|
| Monster Quest 1 | Agni Tablet | Nopon Merchant | +50 Reputation 15000 G 15000 EXP |
| Monster Quest 2 | Agni Tablet | Nopon Merchant | +50 Reputation 9600 G 9600 EXP |
| Monster Quest 3 | Agni Tablet | Nopon Merchant | +50 Reputation 8500 G 8500 EXP |
| Monster Quest 4 | Agni Tablet | Nopon Merchant | +50 Reputation 12000 G 12000 EXP |
| Challenge | Agni Tablet | Nopon Merchant | +50 Reputation 25000 G 25000 EXP |
Quests in Red Text indicate Timed Quests. As these quests will expire after progressing to a certain part of the game, be sure to complete them while they are still available!
Frontier Village
| Quest | Location | Giver | Rewards |
|---|---|---|---|
| Leku's Food Crisis | Archaeology Level | Leku | +50 Reputation 3200 G 800 EXP Chill Defence IV |
| Hunt for a Patron | Archaeology Level | Leku | +100 Reputation 3800 G 950 EXP Blaze Defence IV |
| Heropon's Spirit | Archaeology Level | Kilaki | +150 Reputation 4300 G 1100 EXP Poison Defence IV, Kilaki's Note |
| Beat Kilaki to it! | Archaeology Level | Leku | +200 Reputation 5500 G 1500 EXP Panther Gloves |
| Lousy Lizards | Archaeology Level | Modado | +100 Reputation 7500 G 2000 EXP Jungle Top, Jungle Bottoms |
| Popularity Premonition | Archaeology Level | Leku | +200 Reputation 11000 G 2800 EXP Shell Boots |
| Making a Mixer | Pollen Works | Rono | +100 Reputation 3800 G 1200 EXP Good Footing IV |
| Materials for a Mixer | Pollen Works | Rono | - |
| Decoration Makeover | Chief's Residence | Pepa | +100 Reputation 5200 G 1050 EXP Jungle Cap |
| Hunt for Bug-Loving Friend | Nopon Tower | Kokora | +150 Reputation 3600 G 950 EXP Sky Cap |
| A Worried Bug-Lover | Nopon Tower | Deki | +100 Reputation 4200 G 1000 EXP Night Vision IV |
| Mushy Mushrooms | Sacred Altar | Kofuko | +100 Reputation 1000 G 1150 EXP Jungle Gloves, Bleed Attack II |
| Sweet Seduction | Sacred Altar | Migaga | +150 Reputation 3600 G 1000 EXP Sky Gloves, Aerial Cloak II OR Aquatic Cloak II |
| Ingredients for a Brew | Sacred Altar | Kofuko | 3400 G 850 EXP Sky Shoes, Terrain Defence II OR Auto-Heal Up III |
| Strange Noises from Below | Sacred Altar | Pipiki | +50 Reputation 5800 G 2000 EXP Panther Top |
| Musical Genius | Sacred Altar | Tati | +150 Reputation 10000 G 6500 EXP Climb Armour, Climb Leggings, Quick Step III |
| Things that Hum | Sacred Altar | Tati | - |
| Things that Rumble | Sacred Altar | Tati | - |
| Disinsectization | Sacred Altar | Rasha | +50 Reputation 3200 G 900 EXP Mist Gel, Mist Cream, Mist Sandals |
| Dadapon In Trouble | Archaeology Centre | Pachipa | +100 Reputation 3900 G 1000 EXP Poison Plus III |
| It Definitely Exist! | Archaeology Centre | Pachipa | +100 Reputation 6400 G 2000 EXP Jack Guarder |
| Kind Lupa's Grampypon | Riki's House | Lupa | +100 Reputation 3300 G 1200 EXP Panther Shoes |
| Secret Elixir Ingredients | Riki's House | Lupa | - |
| Fixing Time Mushrooms | Sacred Altar | Migaga | +50 Reputation 4000 G 1150 EXP Agility Down III |
| Pollen Orb Ingredients | Pollen Orb Storehouse | Dobadoba | +50 Reputation 5000 G 1500 EXP Panther Bottoms, First Attack Plus III |
| Secret Ingredient Hunt | Sacred Altar | Bana | +50 Reputation 5500 G 1800 EXP Aura Heal II |
| Secret Innovation | Sacred Altar | Rasha | +50 Reputation 6000 G 2100 EXP Buff Time Plus II |
| The Master's Successor | Pollen Orb Storehouse | Dobadoba | +100 Reputation 7500 G 2400 EXP Debuff Resist II |
| Monster Quest 1 - Part 1 | Nopon Tower | Nopon Villager | +50 Reputation 12500 G |
| Monster Quest 1 - Part 2 | Nopon Tower | Nopon Villager | +50 Reputation 11000 G |
| Monster Quest 1 - Part 3 | Nopon Tower | Nopon Villager | +50 Reputation 7500 G |
| Monster Quest 2 - Part 1 | Sacred Altar | Nopon Villager | +50 Reputation 10000 G |
| Monster Quest 2 - Part 2 | Sacred Altar | Nopon Villager | +50 Reputation 13000 G |
| Monster Quest 2 - Part 3 | Sacred Altar | Nopon Villager | +50 Reputation 9000 G |
| Challenge 1 | Reservoir | Nopon Villager | +50 Reputation 23000 G |
| Challenge 2 | Kyn Shopping Street | Nopon Villager | +50 Reputation 26000 G |
| Challenge 3 | Archaeology Centre | Nopon Villager | +50 Reputation 29000 G |
| Material Quest 1 | Nopon Tower | Nopon Villager | +50 Reputation 8000 G |
| Material Quest 2 | Sacred Altar | Nopon Villager | +50 Reputation 12000 G |
| Material Quest 4 | Prophecy Hut | Nopon Villager | +50 Reputation 16500 G |
| Collection Quest 1 | Sacred Altar | Nopon Villager | +50 Reputation 5000 G |
| Collection Quest 2 | Nopon Tower | Nopon Villager | +50 Reputation 10500 G |
| Collection Quest 3 | Chief's Residence | Nopon Villager | +50 Reputation 7500 G |
| Collection Quest 4 | Contemplation Terrace | Nopon Villager | +50 Reputation 9000 G |
| Search Quest 1 | Pollen Works | Nopon Villager | +50 Reputation 5000 G 3000 EXP |
| Search Quest 2 | Riki's House | Nopon Villager | +50 Reputation 4000 G 1600 EXP |
| Search Quest 3 | Sacred Altar | Nopon Villager | +50 Reputation 3800 G 1800 EXP |
Quests in Red Text indicate Timed Quests. As these quests will expire after progressing to a certain part of the game, be sure to complete them while they are still available!
Maps and Collectopaedia
Makna Forest Maps
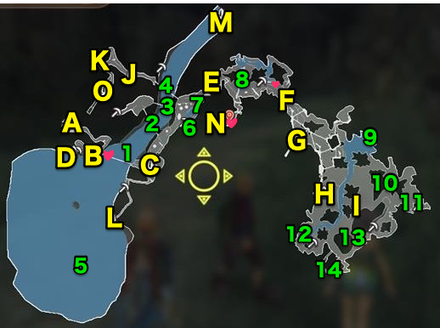 |
Makna Forest Landmarks and Locations
Landmarks
| A | Makna Path |
|---|---|
| B | Agni Tablet |
| C | Waypoint Beacon |
| D | Lakeside |
| E | Nopon Arch |
| F | Twisted Tree Gate |
| G | Village Entrance |
| H | Windmill Pavilion |
| I | Glowmoss Trihenge |
| J | Pod Landing Site |
| K | Valak Pass |
| L | Divine Sanctuary |
| M | Seahorse Islet |
| N | Sparkling Pool |
| O | King Agni's Tomb |
Note: Repaired Bridge Four is only accessible after repairing the bridge through the Quest Bridge Repair (available from Chapter 10: Valak Mountain).
Hode Lair is only accessible by taking on the Quest Beat Kilaki to it!
Locations
| 1 | Bridge One |
|---|---|
| 2 | Bridge Two |
| 3 | Bridge Three |
| 4 | Repaired Bridge Four |
| 5 | Great Makna Falls |
| 6 | Sap Cave |
| 7 | Contaminated Area |
| 8 | Eks Watering Hole |
| 9 | Clear Waterfall |
| 10 | Yellow Flower Grove |
| 11 | Decayed Forest |
| 12 | Abyss Basin |
| 13 | Precipice Bridge |
| 14 | Hode Lair |
Heart-to-Hearts
| Title | Location | Char. 1 | Char. 2 | Affinity |
|---|---|---|---|---|
| Fallen Brethren | Bridge 1 | Shulk | Melia | Green |
| Riki's Crazy Crystal Plan | Eks Watering Hole | Reyn | Riki | Purple |
| No Boys Allowed | Sparkling Pool | Sharla | Melia | Green |
Makna Forest Collectopaedia
| Veg | Schorl Mushroom | Kelp Mushroom | Honey Rhubarb | - | - |
|---|---|---|---|---|---|
| Fruit | Dark Mango | Pure Cherry | Bitter Kiwi | Juicy Grape | - |
| Flower | Enigma Lotus | Humming Nettle | Princess Daffodil | Black Iris | - |
| Animal | Ash Fox | Soft Sea Cucumber | Fossil Monkey | Venomous Lizard | - |
| Bug | Scarlet Ladybird | Shield Bug | Hades Beetle | Benign Cricket | - |
| Strange | Lemonade Sky | Forest of Gossip | Gravel Disk | - | - |
Collection Rewards
| Vegetables | Sleep Resist III |
|---|---|
| Fruit | Sky Gloves |
| Flowers | Blaze Defence III |
| Animals | Sky Shoes |
| Bugs | Slow III |
| Strange | Debuff Plus II |
| 100% Completion | Ironwall Gnasher |
Frontier Village Maps
| List of Maps | |
|---|---|
B1st Floor |
Ground Floor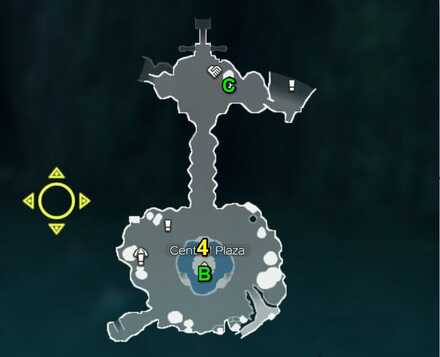 |
1st Floor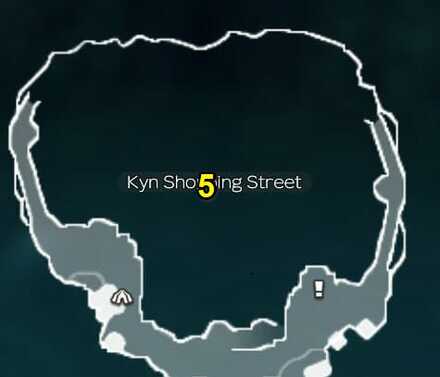 |
2nd Floor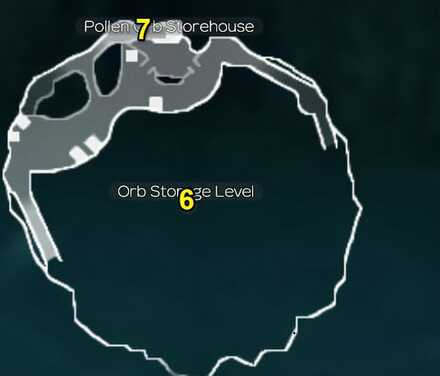 |
3rd Floor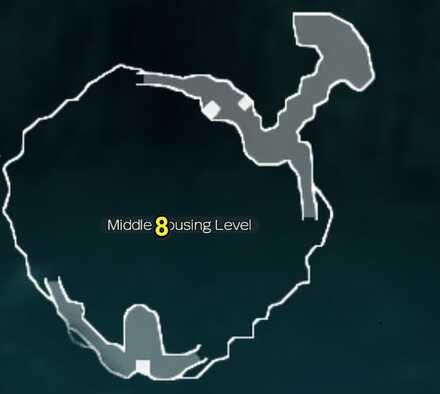 |
4th Floor |
5th Floor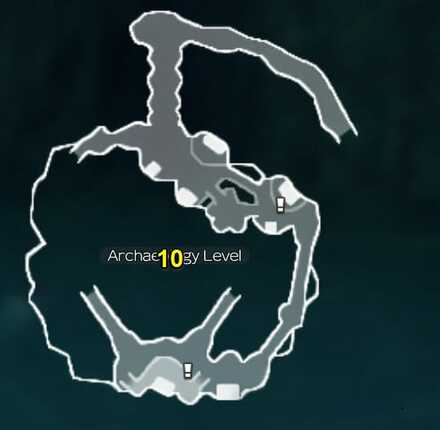 |
6th Floor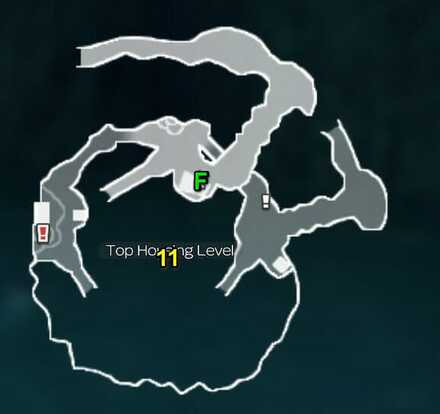 |
7th Floor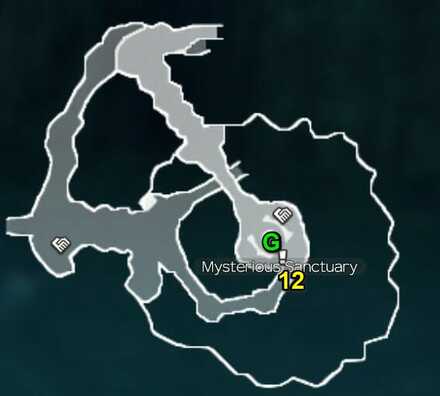 |
8th Floor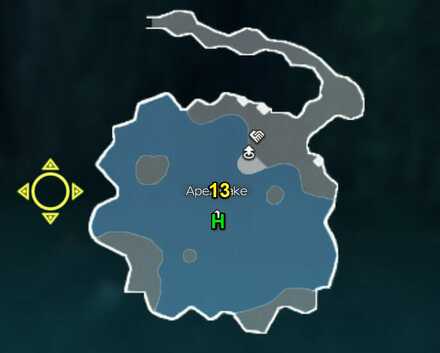 |
Frontier Village Landmarks and Locations
Landmarks
| A | Entry Bridge |
|---|---|
| B | Sacred Altar |
| C | Nopon Tower |
| D | Pollen Works |
| E | Riki's House |
| F | Chief's Residence |
| G | Prophecy Hut |
| G | Contemplation Terrace |
Locations
| 1 | Reservoir |
|---|---|
| 2 | Underground Store |
| 3 | Nopon Kitchen |
| 4 | Central Plaza |
| 5 | Kyn Shopping Street |
| 6 | Orb Storage Level |
| 7 | Pollen Orb Storehouse |
| 8 | Middle Housing level |
| 9 | Pollen Works Level |
| 10 | Archaeology Level |
| 11 | Top Housing Level |
| 12 | Mysterious Sanctuary |
| 13 | Apex Lake |
Heart-to-Hearts
| Title | Location | Char. 1 | Char. 2 | Affinity |
|---|---|---|---|---|
| At the Pollen Works | Pollen Works | Shulk | Riki | Green |
| Reawakened Memories | Prophecy Hut (Outside) | Fiora | Sharla | Purple |
| A Day Like Any Other | Nopon Tower | Fiora | Melia | Purple |
| Life's Hard for a Heropon | Riki's House | Dunban | Riki | Pink |
| True Natures | Contemplation Terrace | Dunban | Melia | Green |
| A Mysterious Sanctuary | Prophecy Hut | Riki | Melia | Green |
Frontier Village Collectopaedia
| Fruit | Spicy Nut | Crimson Citrus | - | - | - |
|---|---|---|---|---|---|
| Bug | Rainbow Bug | Empress Beetle | - | - | - |
| Strange | Rumble Box | Black Panel | - | - | - |
Collection Rewards
| Fruit | Strength Up III |
|---|---|
| Bugs | Weapon Power II |
| Strange | Agility Up III |
| 100% Completion | Half-Bloom Striker |
Tips and Strategies
Avoid Using Area Attacks
Jurassic Park Makna Forest is home to many dinosaur type enemies. These overgrown enemies have such extremely high levels that it is impossible for you to fight them at this point. The worst thing you could do is accidentally taking their aggro while exploring the dense forest.
Take Note of Enemy Types
There will be some time when you will need to explore the wilderness alone. Taking note of enemy types will let you know how to avoid enemy encounters. For some key pointers, check the following notes:
- Visual Type Enemies - Marked by an eye icon, these enemies will attack you when you land on their field of vision.
- Sound Type Enemies - These enemies rely on sound to detect enemies, make sure to stay away from them when exploring.
- Ether Type Enemies - These enemies will attack you when you use Ether Based arts near them (ether arts show a semi-transparent line on their icon).
Fighting Spike Type Enemies

Spike Type Enemies are one of the greatest nuisances you will encounter in the game. To defeat these enemies, make sure to use the Monado's Purge Art to remove their spike buff. Enemies with Spike abilities shows a spiky violet icon in their name.
Boss Strategy Guide
Telethia
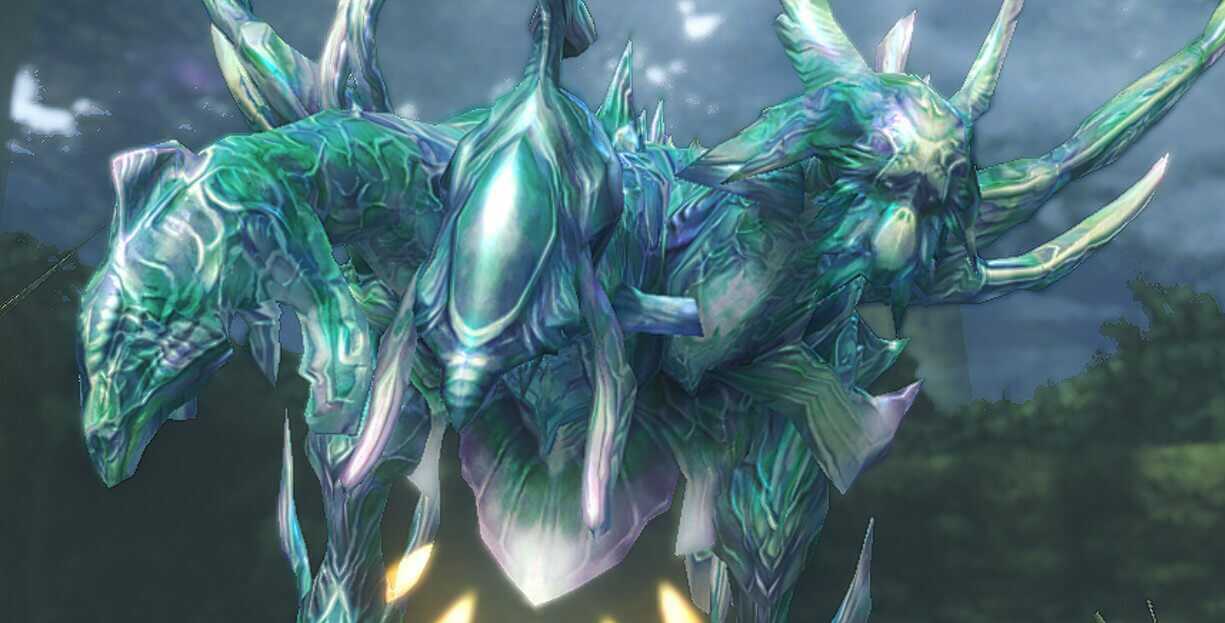
The Telethia has access to an aura called Soul Read. It is similar to the lesser Telethia you fought at the beginning of this chapter. Conserve your talent art and make sure to use Purge immediately when the Telethia uses Soul Read. The telethia has 2 talent arts: Ether Cannon II and Channel I, which can be countered by Shield (if Shield is leveled appropriately).
Suggested Characters

|
|
|
|
Aside from Shulk, the other character that is suggested for this fight is Sharla. The Telethia has access to high damaging moves like Channel I and Ether Cannon II so her Heal Bullets are really handy in this fight in restoring damage taken from these nastry attacks. Riki is a good substitute to Sharla if you can manage to keep Shield up all the time. Another good character to have is someone that can keep aggro away from Shulk and your chosen Healer, so Dunban or Reyn is good for this role.
2 Phase Battle
You will need to fight the Telethia twice during this period. The first half of the battle will be cut when the Telethia reaches 50% HP. During the 2nd battle, the Telethia will try to keep Soul Read, so keep a good balance between using Purge and Shield. Compared to other boss battles, the Telethia isn't too difficult, even if the level gap is big so don't be afraid, and just balance your art usage and this fight will be a cinch.
Story Walkthrough Related Links
Xenoblade Chronicles Story Walkthrough
| Prologue | The Battle of Sword Valley |
|---|---|
| Chapter 1 | Colony 9 and Tephra Cave |
| Chapter 2 | Colony 9 (Mechon Invasion) |
| Chapter 3 | Tephra Cave (Revisited) |
| Chapter 4 | Bionis' Leg |
| Chapter 5 | Colony 6 and Ether Mine |
| Chapter 6 | Satori Marsh and Bionis' Interior (1st Time) |
| Chapter 7 | Makna Forest and Frontier Village |
| Chapter 8 | Eryth Sea, Alcamoth, and High Entia Tomb |
| Chapter 9 | Prison Island (1st Time) |
| Chapter 10 | Valak Mountain |
| Chapter 11 | Sword Valley and Galahad Fortress |
| Chapter 12 | Fallen Arm |
| Chapter 13 | Mechonis Field |
| Chapter 14 | Central Factory and Agniratha |
| Chapter 15 | Mechonis Core |
| Chapter 16 | Central Factory (Revisited) |
| Chapter 17 | Bionis' Interior and Prison Island (Revisited) |
| Final Boss | Memory Space |
Author

Xenoblade Chronicles: Definitive Edition Walkthrough & Guides Wiki
Chapter 7: Makna Forest and Frontier Village Walkthrough
Rankings
- We could not find the message board you were looking for.
Gaming News

![Monster Hunter Stories 3 Review [First Impressions] | Simply Rejuvenating](https://img.game8.co/4438641/2a31b7702bd70e78ec8efd24661dacda.jpeg/show)


![Monster Hunter Stories 3 Review [First Impressions] | Simply Rejuvenating](https://img.game8.co/4438641/2a31b7702bd70e78ec8efd24661dacda.jpeg/thumb)
Popular Games

Genshin Impact Walkthrough & Guides Wiki
Honkai: Star Rail Walkthrough & Guides Wiki
Umamusume: Pretty Derby Walkthrough & Guides Wiki
Pokemon Pokopia Walkthrough & Guides Wiki
Resident Evil Requiem (RE9) Walkthrough & Guides Wiki
Monster Hunter Wilds Walkthrough & Guides Wiki
Wuthering Waves Walkthrough & Guides Wiki
Arknights: Endfield Walkthrough & Guides Wiki
Pokemon FireRed and LeafGreen (FRLG) Walkthrough & Guides Wiki
Pokemon TCG Pocket (PTCGP) Strategies & Guides Wiki


Recommended Games
Diablo 4: Vessel of Hatred Walkthrough & Guides Wiki
Cyberpunk 2077: Ultimate Edition Walkthrough & Guides Wiki
Fire Emblem Heroes (FEH) Walkthrough & Guides Wiki
Yu-Gi-Oh! Master Duel Walkthrough & Guides Wiki
Super Smash Bros. Ultimate Walkthrough & Guides Wiki
Pokemon Brilliant Diamond and Shining Pearl (BDSP) Walkthrough & Guides Wiki
Elden Ring Shadow of the Erdtree Walkthrough & Guides Wiki
Monster Hunter World Walkthrough & Guides Wiki
The Legend of Zelda: Tears of the Kingdom Walkthrough & Guides Wiki
Persona 3 Reload Walkthrough & Guides Wiki


All rights reserved
© 2010 - 2020 Nintendo / MONOLITHSOFT. Xenoblade Chronicles and Nintendo Switch are trademarks of Nintendo. © 2020 Nintendo.
The copyrights of videos of games used in our content and other intellectual property rights belong to the provider of the game.
The contents we provide on this site were created personally by members of the Game8 editorial department.
We refuse the right to reuse or repost content taken without our permission such as data or images to other sites.
on the 5th floor there's another location called "Archeology Centre" right on the house!