Battle System and Combat Guide | How to Fight
This is a guide to the combat system in Xenoblade Chronicles: Definitive Edition for the Nintendo Switch. Here we will explain the basic battle mechanics of XC1, such as Arts, Auto-Attacking, Aggro, the Party Gauge, Visions, and Chain Attacks.
List of Contents
Combat Basics
Initiating Battle

When you are within range of an enemy or enemies, you can initiate battle by targeting them (L/R), and then selecting the large red button that shows up where your Talent Art normally would be. Battles will also begin automatically if an enemy with an eye mark next to its name sees you, or an enemy with a sound mark hears you. Enemies with no mark next to their name will not initiate battle.
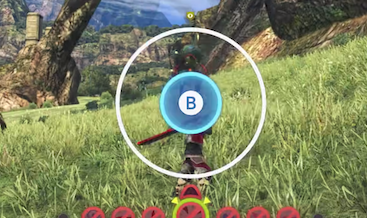
When you choose to initiate combat first, a B-Prompt will appear (known as Burst Affinity or Battle Start Affinity). Correctly timing the B button so that it touches the outer rim of the circle will lead to an increase in your party's Tension, causing all kinds of beneficial side effects. The B button can also be pressed while the ring is inside of the circle, though the effect of Burst Affinity will be slightly lowered.
Selecting a Target and Commanding Allies
Before you initiate battle, or when you are currently in battle with multiple enemies, you can select a target by using L/R to sift through your choices. Your allies will typically attack the same enemy too, although the AI wil sometimes be a bit stubborn. By hitting ZR+Up on the D-Pad, you can command your allies to focus on a single ally. Attacking enemies one by one as a team is the best strategy for mowing down a crowd.
Aggro

Aggro is a rather unique mechanic to Xenoblade Chronicles. Attacking a monster and using Arts on it will draw that enemy's Aggro, which is displayed by a red ring around the character. Whichever character has the red ring around them will be targeted by the enemy, meaning it will only attack that character, and it will constantly face their front.
Typically, you want to have a character on your party who can draw the enemy's aggro and tank the attacks (via high agility or defensive stats), allowing a character like Shulk to move freely and use moves that have bonus effects for hitting certain body parts. If you control Shulk, you will draw the enemy's attention when initiating battle, but you can make quick use of Shadow Eye to shift the focus to another ally.
Helping Fallen Allies

When allies have had certain negative status effects cast on them, like Sleep, Confuse, or Topple, they will be temporarily incapacitated. If you move your character toward them and press B when prompted, they will snap out of it. Similarly, if an ally is KO'ed, you can revive them at the cost of one bar of the Party Gauge (an ally can also revive your character). Afterwards, you can press B again to encourage them, restoring HP and increasing tension. Encouraging and helping teammates will also raise Affinity.
The Party Gauge

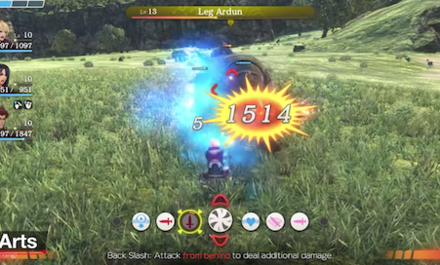
The Party Gauge is filled each time an Art hits an enemy from the correct position, or by timing the B button press correctly when it appears. Using an Art like Shulk's Back Slash from behind an enemy will deal extra damage and fill up part of the Party Gauge. Once this gauge completely fills up, your team can unleash a Chain Attack, a powerful attack where you get to choose the Arts used by each character in succession. In addition, one bar of the Party Gauge can be consumed to revive allies or warn them after Shulk sees a vision.
In some cases, it may be strategic to conserve your Party Gauge. If it seems that a party member is about to fall, you may want to hold off on a Chain Attack, since it can revive an ally (however, if the enemy can be defeated through the chain attack to end the battle, it is better to instead go for it). Or if you are in critical condition, a vision shows an ally dying, and you only have a single bar of Party Gauge, warning the ally would make it impossible for you to be revived, so you should hold off until you have more bars.
Status Effects
There are a wide array of negative and beneficial status effects that can be inflicted on both your party and your enemies. Many of your characters' Arts can cast these, so it is important to look beforehand at what they do to know how to use them.
Types of Attacks
Auto-Attack

Auto-Attacks are the normal physical attacks that a character will use automatically if they are close enough to the enemy. For most characters, landing auto-attacks on the enemy will charge their Talent Arts. The range of damage that a character's auto-attacks can do is shown in the Equipment page by looking at that character's Auto-Attack stat. It can be raised via changing weapons or equipping gems like Strength up.
Arts
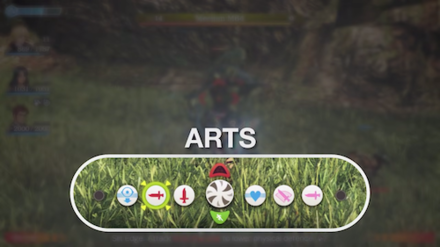
Arts are essentially active specials, and unlike auto-attacks, you will have to select Arts when you want the character you control to use one. Arts can deal damage, restore HP to party members, cast buffs or debuffs, provide protection, and more, helping to define that character's role. Arts can be classified as either Physical Arts (relying on a character's Strength stat), or Ether Arts (relying on a character's Ether stat).
Your teammates will use their attacks and arts automatically, so other than selecting the ones that they have set, you cannot choose which Arts they use outside of a Chain Attack. Arts all have cooldown, which needs to recharge before you can use them again. Additonally, using Arts to attack the enemy rapidly will increase your Aggro, making you the target of your enemy.
There are two main types of Arts: Battle Arts and Talent Arts. A character can set up to 8 Battle Arts at a time, while their Talent Art is fixed.
Battle Arts
Except for Shulk, who will always have the same Arts set, each character can set up to 8 of these. They are usable from the start of battle, and have a specific amount of cooldown, which is lowered by leveling up the Art with AP. These can have a wide array of effects, and the color of their icon indicates something about what they do.
- Red: Physical attacks that often have an additional effect, such as inflicting Bleed.
- Pink: Inflicts Break on an enemy, making them susceptible to Topple.
- Green: Inflicts Topple on an enemy (usually one who has been inflicted with Break).
- Yellow: Inflicts Daze on an enemy (usually one who has been inflicted with Topple).
- Blue: Heals or buffs party members.
- Purple: Ether attacks.
- Orange: Auras that grant some kind of boost.
Talent Arts
Each character has one of these, and it sits in the middle of their Arts. It is typically their most unique Art, and does something totally different for each character. These are black colored, and they can be chained with other Arts to increase the multiplier of whatever color came before it.
Chain Attack
A Chain Attack attack starts by allowing you to use one Art from the character you control, then it will move to the character slotted second, then the one slotted third. If the affinity between party members is high enough, a B-prompt may give you a chance to extend the chain attack and continue using Arts on the opponent. Using Arts of the same color in succession will cause a multiplier to deal more damage. This and toppling foes (Break > Topple) are the two best uses of a chain attack.
How to Fight
Set Up Your Team

While there are many different ways to form your party, the most general playstyle is to have three roles: an attacker (usually Shulk), a tank (Reyn, Dunban), and a support character. Some characters can fill more than one role, but most characters do particularly well in a specific role. The support character can also be swapped out for a more offensive character.
Setting your party up this way allows the tank to absorb the enemy's aggro while the more offensive can move around and target specific body parts, effectivelty charging the Party Meter.
Learn Your Character's Combos
Some Arts work in a manner where you can chain them consecutively to set up for a lot of damage. A common one with Shulk is to initiate battle, use Shadow Eye to lower aggro and raise Physical Arts power, hit the enemy's side with Slit Edge to decrease their physical defense, then hit them from behind with Back Slash to deal massive damage.
Use Auto-Attacks Too
While using Arts is a great way to deal a ton of enemy damage, using all of your Arts right away can draw the enemy's aggro to you, and you will be unable to do much else. It is important to space auto-attacks between Arts, especially because using auto-attacks charages Talent Arts for most characters, so making use of both will keep your options open.
Use Visions to Counter Enemies

in battle, you will get a vision before an enemy uses one of its Arts, which often inflict a ton of damage. This gives you a chance to counter it via various methods such as Monado Arts, warning a character, or even using a chain attack. 
For Talent Arts (White Text), the damage can be reduced to 1 by casting Monado Shield before the attack. For Physical Arts (Red Text). the attack can be dodged by using Monado Speed on the targeted character. Ether Arts (Blue Text) can be countered with Monado Armour, or by warning a character and having them using an Art that will nullify it.
Prepare for Mechon Fights

Most bosses, as well as a ton of enemies, are Mechon. Mechon enemies take almost no damage from physical attacks, and half damage from ether attack under normal circumstances. In order to deal with them, you'll need special gear or skills. While the Monado deals damage to Mechons as normal, the Monado Art Enchant can also be used to give allies the ability to pierce mechon armor. There are also many anti-mechon weapons that can be acquired for other party members later in the game.
Additonally, Mechons will always take normal damage when toppled. In circumstances where you can't inflict damage on Mechons, get ready for a Chain Attack, then use Break > Topple to knock them over and start dealing damage.
Fill that Party Gauge!
Chain Attacks are a central part of combat, and they are the best way to inflict tons of damage on bosses or tough enemies, so you need to fill the Party Gauge ASAP. Not only that, but having bars of Party Gauge filled also allows you to revive teammates and warn them of a vision. Filling the party gauge should always be a top priority in battle, so make sure you are not just mindlessly throwing out Arts without considering it first.
Use Chain Attacks Efficiently

Chain Attacks may feel unrewarding if used improperly. There are essentially two strategies that you should mostly use when unleashing a chain attack on an enemy.
- Use Arts of the same color in succession to deal more damage. Each successive Art of the same color increases the multiplier, which can can go as high as an 8x damage multiplier (Chain MAX). For this reason, a good team will have Arts that share colors so you can chain them.
- Use Arts that inflict status effects in a particular order to make easier work of the foes. The best example is Break, followed by Topple, which can be followed by Daze. This combo can not only stun the enemy and leave them very vulnerable, but it can break Tags, saving an ally who would be attacked in a vision.
To really get the most out of these chain attacks, your party members should all have a high affinity for each other, as this will raise the chance of each additional chain link. Do this through battling and questing together, as well as through giving presents.
Xenoblade Chronicles Definitive Edition Related Links
Beginner's Guide to Xenoblade Chronicles: Definitive Edition
Author
Xenoblade Chronicles: Definitive Edition Walkthrough & Guides Wiki
Battle System and Combat Guide | How to Fight
Rankings
- We could not find the message board you were looking for.
Gaming News


![Monster Hunter Stories 3 Review [First Impressions] | Simply Rejuvenating](https://img.game8.co/4438641/2a31b7702bd70e78ec8efd24661dacda.jpeg/thumb)
Popular Games

Genshin Impact Walkthrough & Guides Wiki
Honkai: Star Rail Walkthrough & Guides Wiki
Umamusume: Pretty Derby Walkthrough & Guides Wiki
Pokemon Pokopia Walkthrough & Guides Wiki
Resident Evil Requiem (RE9) Walkthrough & Guides Wiki
Monster Hunter Wilds Walkthrough & Guides Wiki
Wuthering Waves Walkthrough & Guides Wiki
Arknights: Endfield Walkthrough & Guides Wiki
Pokemon FireRed and LeafGreen (FRLG) Walkthrough & Guides Wiki
Pokemon TCG Pocket (PTCGP) Strategies & Guides Wiki


Recommended Games
Diablo 4: Vessel of Hatred Walkthrough & Guides Wiki
Cyberpunk 2077: Ultimate Edition Walkthrough & Guides Wiki
Fire Emblem Heroes (FEH) Walkthrough & Guides Wiki
Yu-Gi-Oh! Master Duel Walkthrough & Guides Wiki
Super Smash Bros. Ultimate Walkthrough & Guides Wiki
Pokemon Brilliant Diamond and Shining Pearl (BDSP) Walkthrough & Guides Wiki
Elden Ring Shadow of the Erdtree Walkthrough & Guides Wiki
Monster Hunter World Walkthrough & Guides Wiki
The Legend of Zelda: Tears of the Kingdom Walkthrough & Guides Wiki
Persona 3 Reload Walkthrough & Guides Wiki


All rights reserved
© 2010 - 2020 Nintendo / MONOLITHSOFT. Xenoblade Chronicles and Nintendo Switch are trademarks of Nintendo. © 2020 Nintendo.
The copyrights of videos of games used in our content and other intellectual property rights belong to the provider of the game.
The contents we provide on this site were created personally by members of the Game8 editorial department.
We refuse the right to reuse or repost content taken without our permission such as data or images to other sites.