Chapter 14: Central Factory and Agniratha Walkthrough
This is a walkthrough for the Central Factory and Agniratha section of Xenoblade Chronicles Definitive Edition for Nintendo Switch. For a map of Central Factory and Agniratha Landmarks and Locations, as well as boss strategy and other tips and tricks, read on!
List of Contents
| Previous Section | Next Section |
|---|---|
| Mechonis Field | Mechonis Core |
Chapter 14: Central Factory and Agniratha Walkthrough
Central Factory
| Objectives | |
|---|---|
| 1 | 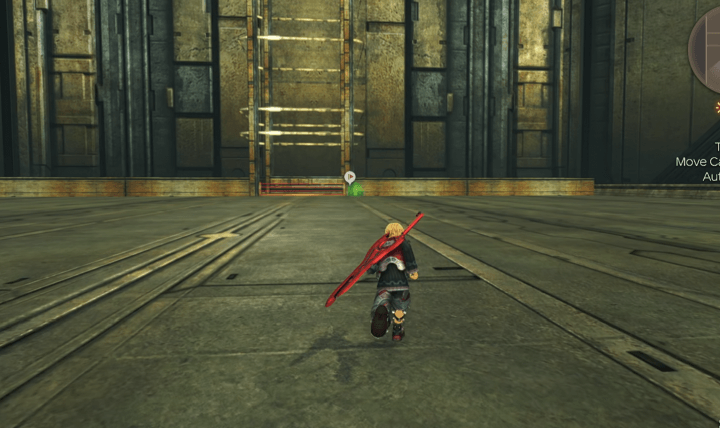 Board the lift to the Central Factory. Follow the quest guide from Mechonis Field to the lift that leads into the Central Factory. Upon arrival, you'll need to activate several pillars to unlock the transporter to Agniratha. |
| 2 | 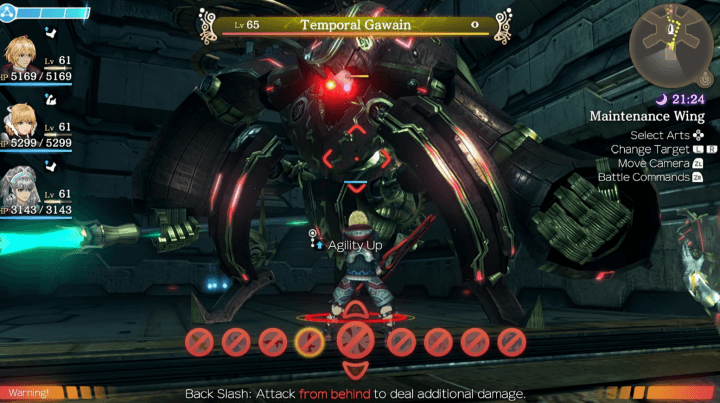 Lower the Barriers in the Maintenance Wing. Enter the Maintenance Wing and use the switch to deactivate the electrical barriers. The Hangar Access Control Panel will deploy multiple Mass Produced Face enemies and the unique Temporal Gawain. These are optional to fight but hide some loot. |
| 3 | Ascend to the Central Warehouse and find the Factory Vent. Activate the Central Warehouse Lift to ascend to the next level, then continue following the quest line until you reach the Factory Vent, which will need some explosives to blow open. |
| 5 | 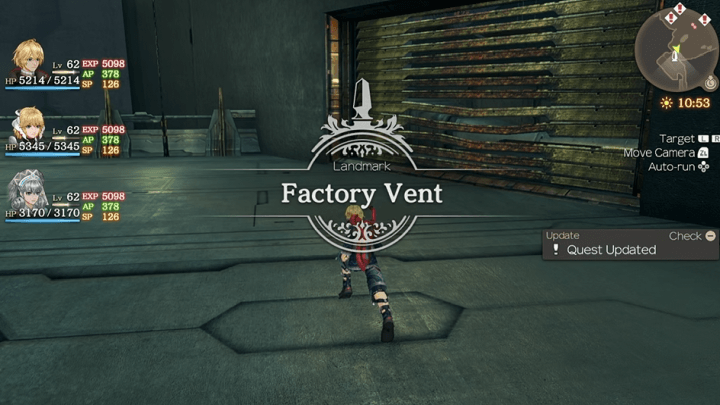 Break open the Factory Vent. Head to each point designated by the quest line to obtain materials needed to open the Factory Vent. Elite Mechons guard the materials, so be prepared for a fight. Try to dispatch weaker enemies first before engaging, such as the Mechons stationed above the M97 Commander. |
| 8 | 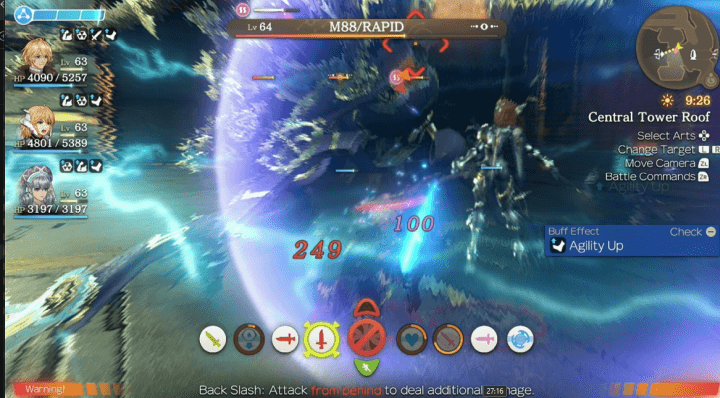 Breach the vent and disable the barriers. After gathering the materials, return to the Factory Vent and blow it open with your brand-new bomb. Follow the path through there and then take a detour to disable barriers blocking your way with a switch. Be prepared for an ambush from Fairy and RAPID-type Mechons. |
| 11 | Use the transporter. With the transporter unlocked, just step inside to visit the Mechon capital of Agniratha. |
Agniratha
| Objectives | |
|---|---|
| 1 |  Head to the Central Tower and enter the Data Centre. Your first destination in the Machina capital city is the Central Tower and the Data Centre. The lobby of the Central Tower contains multiple terminals that assign Side Quests and sell useful gear to upgrade with. |
| 2 | 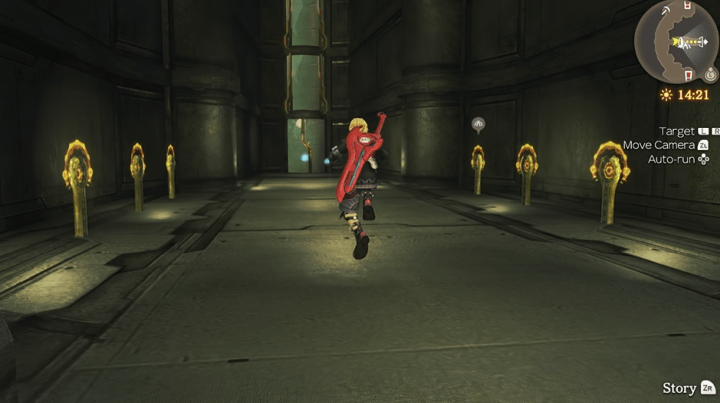 Leave the Data Centre and activate the Control Platforms After the cutscenes at the Data Centre, you'll need to activate four control platforms to unlock another transporter. The four platforms are guarded by Face Mechons or Elites, so prepare to battle. |
| 3> | Return to the Data Centre, then go to the Legislative District. After unlocking all four control platforms, you'll need to return to the Data Centre, then make your way to the Legislative District. It can be accessed easily from the 1st Control Platform landmark. |
| 4 | Head to the Transporter, then prepare for a boss fight. |
| 10 |  Defeat Jade Face. It's time to settle things with Jade Face! Keep your Chain Attacks handy and prepare to endure his many ether-based Arts. |
| 11 | 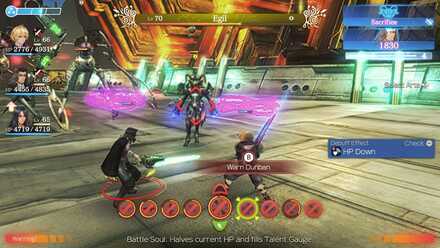 Defeat Egil Take the fight to the leader of the Mechon, Egil, in his Machina form. He should go down quickly if you can manage his escorts and keep them from sacrificing themselves to disrupt your party. |
| 12 | 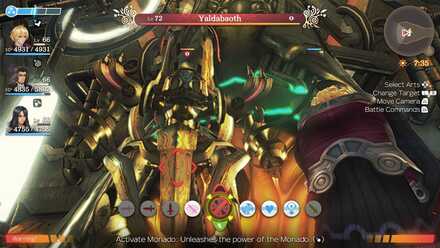 Defeat Yaldabaoth Egil will retreat to his Mechon form, Yaldabaoth, for an unwinnable battle, focus on survival to keep the party alive until a cutscene ends the chapter. |
Chapter 15: Mechonis Core Walkthrough
Side Quests
The following side quests are available from this chapter:
Central Factory Side Quests
| Quest | Location | Giver | Rewards |
|---|---|---|---|
| Eliminate the Backup! | Storage Depot | Surprise Quest | 24500 G 23500 EXP Blaze Attack IV, Paralysis Resist IV |
| Daring Assault | Mechon Factory | Surprise Quest | 27000 G 20000 EXP Retrieved Armour, Retrieved Leggings |
| Roof Battle | 2F - Training Ground Roof | Surprise Quest | 30000 G 38500 EXP Chill Attack IV, Arts Seal Resist IV |
Quests in Red Text indicate Timed Quests. As these quests will expire after progressing to a certain part of the game, be sure to complete them while they are still available!
Agniratha Side Quests
| Quest | Location | Giver | Rewards |
|---|---|---|---|
| Civil Protection 1 - 1 | Central Tower | Civil Protection Terminal | 43500 G |
| Civil Protection 1 - 2 | Central Tower | Civil Protection Terminal | 38500 G |
| Civil Protection 1 - 3 | Central Tower | Civil Protection Terminal | 40000 G |
| Civil Protection 2 - 1 | Central Tower | Civil Protection Terminal | 36000 G |
| Civil Protection 2 - 2 | Central Tower | Civil Protection Terminal | 41500 G |
| Civil Protection 2 - 3 | Central Tower | Civil Protection Terminal | 39500 G |
| Military Status 1 - 1 | Central Tower | Military Status Terminal | 79000 G |
| Military Status 1 - 2 | Central Tower | Military Status Terminal | 68500 G |
| Military Status 2 - 1 | Central Tower | Military Status Terminal | 75000 G |
| Military Status 2 - 2 | Central Tower | Military Status Terminal | 83500 G |
| Agniratha Beautification 1 | Central Tower | City Planning Terminal | 51000 G |
| Agniratha Beautification 2 | Central Tower | City Planning Terminal | 53500 G |
| Telethia Investigation 1 | Central Tower | Strategic Intel Terminal | 27000 G 25000 EXP |
| Telethia Investigation 2 | Central Tower | Strategic Intel Terminal | 22500 G 30000 EXP |
Quests in Red Text indicate Timed Quests. As these quests will expire after progressing to a certain part of the game, be sure to complete them while they are still available!
Fallen Arm Side Quests
| Quest | Location | Giver | Rewards |
|---|---|---|---|
| The History of the Capital | Junks | Zilex | +500 Reputation 16800 G 14500 EXP M100 Helm, M100 Arms, Slow IV |
Quests in Red Text indicate Timed Quests. As these quests will expire after progressing to a certain part of the game, be sure to complete them while they are still available!
Colony 6 Side Quests
| Quest | Location | Giver | Rewards |
|---|---|---|---|
| The Melody of Happiness | South of Front Entrance | Nic | +150 Reputation 28500 G 24000 EXP Rex Arms |
| Dream of a Poet | Near the farm in town | Yura | +150 Reputation 28500 G 24000 EXP Rex Greaves |
| Family Secrets | North of the pond | En Argentis | +100 Reputation 20000 G 23000 EXP Rondine Gloves, Rondine Shoes |
| Betrothal Test | North of the pond | Peppino | +100 Reputation 23500 G 26000 EXP Rafaga Gear, Rafaga Gauntlets |
| Stopping the Elopement | North of the pond | Don Argentis | +500 Reputation 28000 G 30000 EXP Satellite Shot, Hierax Bottoms, Sharla Skill Tree - Affection |
| A Butler's Concerns | Reconstruction HQ | Gowago | +100 Reputation 26500 G 25000 EXP Hierax Top, Hierax Bottoms |
| A Maid's Concerns | Reconstruction HQ | Minana | +100 Reputation 35000 G 36500 EXP Rafaga Armour, Rafaga Leggings |
| Nic's Training | Farm | Nopo'rikh | +200 Reputation 20000 G 30000 EXP Good Footing VI |
| Nic's Final Test | Farm | Nopo'rikh | +300 Reputation 28000 G 40000 EXP Attack Plus IV, Attack Stability IV |
Quests in Red Text indicate Timed Quests. As these quests will expire after progressing to a certain part of the game, be sure to complete them while they are still available!
Maps and Collectopaedia
Central Factory Maps
GF |
1F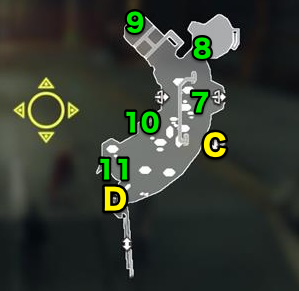 |
2F |
3F/4F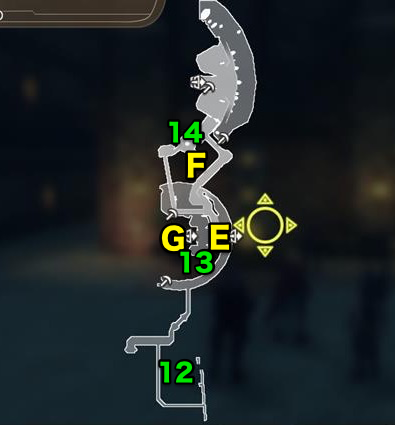 |
5F |
Central Factory Landmarks and Locations
Landmarks
| A | Port Terminal |
|---|---|
| B | Control Tower |
| C | Central Warehouse Lift |
| D | Factory Vent |
| E | Tower Boarding Gate |
| F | Regeneration Control |
| G | Agniratha Transporter |
| H | Ventilation Conduit |
| I | Bridge to Apocrypha |
Locations
| 1 | Central Gate |
|---|---|
| 2 | Landing Strip 1 |
| 3 | Landing Strip 2 |
| 4 | Maintenance Entrance 1 |
| 5 | Maintenance Wing |
| 6 | Storage Depot |
| 7 | Central Lift |
| 8 | Training Ground Roof |
| 9 | Central Tower Lift |
| 10 | Large Mechon Store |
| 11 | Main Factory Gate |
| 12 | Mechon Factory |
| 13 | Central Tower Roof |
| 14 | Face Maintenance Bay |
| 15 | Apocrypha Generator |
Central Factory Collectopaedia
| Veg | Meaty Potato | Blue Root | - | - | - |
|---|---|---|---|---|---|
| Animal | Prism Centipede | Cable Mouse | Oil Fox | - | - |
| Bug | Dew Beetle | Glider Cockroach | - | - | - |
| Nature | White Styrene | Black Styrene | Blood Oil | - | - |
| Parts | Angel Engine X | Leaf Coil | Warrior Screw | - | - |
| Strange | Smoke Cylinder | Sacred Panther | Parts Noble | - | - |
Collection Rewards
| Vegetables | Strength Up IV |
|---|---|
| Animals | Blaze Defence IV |
| Bugs | Ether Up IV |
| Nature | Lock-On Resist IV |
| Parts | Talent Boost III |
| Strange | Arts Heal IV |
| 100% Completion | Machina Driver III |
Heart-to-Hearts
There are no available Heart-to-Hearts in this area.
Agniratha Maps
GF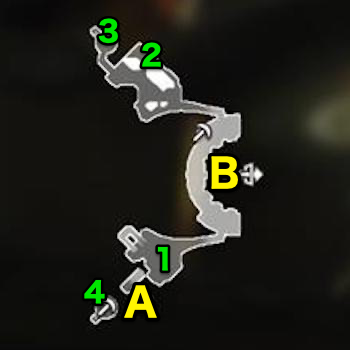 |
1F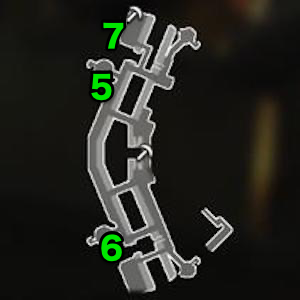 |
2F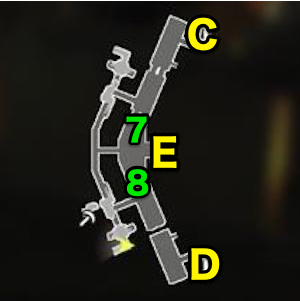 |
3F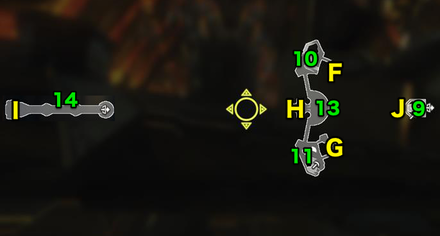 |
Agniratha Landmarks and Locations
Landmarks
| A | Factory Transporter |
|---|---|
| B | Central Tower |
| C | 1st Control Platform |
| D | 4th Control Platform |
| E | Meyneth Statue |
| F | 2nd Control Platform |
| G | 3rd Control Platform |
| H | Shrine Transporter |
| I | Meyneth Shrine |
| J | Seven Sage Cloister |
Locations
| 1 | Residential District 1 |
|---|---|
| 2 | Residential District 2 |
| 3 | Calcos Pillar |
| 4 | Cleas Pillar |
| 5 | Helas Pillar |
| 6 | Dios Pillar |
| 7 | Zedonia Plaza |
| 8 | Telethia Bridge |
| 9 | Data Centre |
| 10 | Legislative District |
| 11 | Judicial District |
| 12 | Worship Terrace |
| 13 | Meyneth Cloister |
Heart-to-Hearts
There are no available Heart-to-Hearts in this area.
Agniratha Collectopaedia
| Fruit | Juicy Blueberry | Sweet Lime | Spicy Banana | - | - |
|---|---|---|---|---|---|
| Flower | Lewisia Silver | Freesia Cyst | Bellflower Crystal | - | - |
| Bug | Electric Cricket | Scissor Bug | - | - | - |
| Nature | Missing Tree | Fortune Feather | - | - | - |
| Parts | Fancy Bolt | Blue Light Amp | Fairy Tale Diode | Grape Spring | - |
| Strange | Eryth Blue | Dramatic Night | - | - | - |
Collection Rewards
| Fruit | Auto-Heal Up III |
|---|---|
| Flowers | Topple Resist IV |
| Bugs | Ether Def Up IV |
| Nature | Ether Def Down IV |
| Parts | Daze Resist IV |
| Strange | Tension Swing III |
| 100% Completion | Debuff Resist IV |
Tips and Strategies
Doubting the Quest Guide
The Quest Guide works as a nearest path guide to your current destination. The quest guide however, ignores all enemies in the path. It is sometimes, better to steer your direction and look for an alternative route to arrive at your destination safer/faster.
Boss Strategy Guide
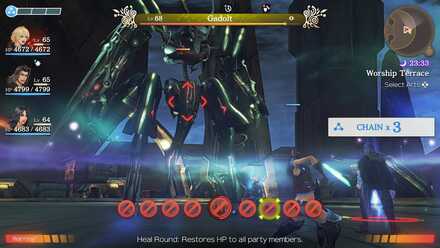
Gadolt

Gadolt fights you with several laser-based moves. These attacks are ether attacks, so build up your HP and Ether Defense to survive Gadolt's onslaught. Bringing him down to 25% HP will end the 1st fight. He isn't that difficult during the first fight, but things will greatly change during the 2nd one.
Gadolt Recommended Characters
|
|
|
|
Gadolt is immune to break, but Riki's Roly-Poly can force topple on him. Toppling him can greatly change the tide of the fight to your favor. Unleash Dunban and Shulk's arts when Gadolt is toppled (should you get the chance). Successfully doing so will end the fight rather quickly.
Gadolt (2nd Fight)

This time, Gadolt fights for real. He has several ether-based attacks, so Evasion and Defense stats play a minimal role in this fight. He summons two Mechon allies and uses the same moves he had during the first fight. Don't let this fool you, as a DPS-type boss with other units taking aggro for him is much more challenging.
Gadolt Moveset
- Linear Laser V - Deals massive damage to all units in front of Gadolt.
- Blow Jaggy - Inflicts Daze to all enemies in front of him.
- Quick Cannon - Inflicts Ether damage and paralyze. This is his most used move among his arsenal.
- Shield Cal - Allows him to summon two Mechons to fight together with him. He will always use this at the beginning of the fight.
- Ether Jammer - Inflicts Ether Defense Down. A seemingly innocent move.
- Laser Bullet - Deals massive amounts of Ether Damage to the whole party.
Gadolt Moveset Counters
- Linear Laser V - It's a fifth rank talent art. A monado art shield rank 5 is necessary to block this move.
- Blow Jaggy - A rather fast move. It is extremely hard to counter this move when it is used, so it's suggested to just position yourself away from your two other characters. This way, you'll be able to avoid all three characters getting Dazed (which will usually lead to Gadolt using another move, spelling a team elimination).
- Quick Cannon - Similar to Blow Jaggy, Quick Cannon targets a single character. Avoid grouping up to lessen the amount of casualty this move can cause. Make sure that the target is not suffering from Ether Defense Down. If the character does have the debuff, use Sharla's Cure Bullet to immediately remove the debuff.
- Shield Call - Nothing to do about this, just focus on removing the summoned Mechons when they arrive as soon as possible.
- Ether Jammer - This move is the reason why Sharla is a better support than Riki in this fight. The debuff this causes can greatly amplify the damage received by your party. Have Sharla remove the debuff with Cure Bullet to survive Gadolt's following attacks.
- Laser Bullet - The move that will most likely cause your defeat. Laser Bullet can eliminate a low leveled party in a single hit, even at full health. A detailed explanation to play against this move will be listed below.
How to Survive Gadolt's Laser Bullet
Make sure to save up your Party Gauge! A quick fact about Chain Attacks: Chain Attacks cannot be canceled by any other means once in use. Timing a good Chain Attack against Gadolt's Laser Bullet will still cause your party to take damage, but your character's health will never fall below 1.
Time your Chain Attack at the same time Gadolt uses Laser Bullet, and most of your character's HP will fall in the red zone. Then chain some healing arts to recover from the move. This will allow you to continue the fight and you will only lose a whole party gauge.
Gadolt Recommended Characters
|
|
|
|
Evasion isn't a good stat for this battle, but Dunban is still a better choice than Reyn in this fight. Dunban can dish out more damage than Reyn, which is great as prolonging the duration of this battle will prove hard. As listed above, Sharla's value in this fight is immeasurable. It's the doctor that you'll have to call when you're hurt, and Gadolt can hurt you a lot.
Egil
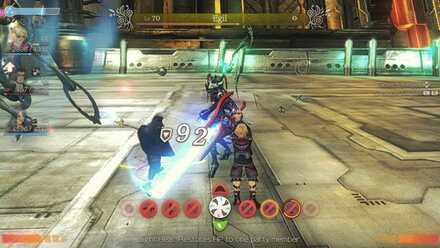
Similar to Gadolt, Egil will summon mechon allies to his side to fight for him. These Mechons aren't durable, but the flying mechon can use Sacrifice if damaged then left alone. A group of flying mechon using Sacrifice at the same time will prove fatal to your team.
Watch out for Egil's Homing Missile. It is capable of wiping out your whole party in a single-use, but it can be blocked by Shield. Just keep your Monado Arts ready and Egil will fall easily.
Egil Recommended Characters
|
|
|
|
Yaldabaoth
Yaldabaoth is a high-level enemy. It cannot be defeated. Just endure and survive the fight. Yaldabaoth will use Catastrophe soon, then the fight will end.
Yaldabaoth Recommended Characters
|
|
|
|
A sustain setup is recommended for this fight to survive Yaldabaoth's assault. You can also attempt to level Shulk up so you can hit Yaldabaoth and build up your talent arts. If you can always keep Monado Shield up, his Alchemy talent art will prove useless (which is also his only high damaging move).
Story Walkthrough Related Links
Xenoblade Chronicles Story Walkthrough
| Prologue | The Battle of Sword Valley |
|---|---|
| Chapter 1 | Colony 9 and Tephra Cave |
| Chapter 2 | Colony 9 (Mechon Invasion) |
| Chapter 3 | Tephra Cave (Revisited) |
| Chapter 4 | Bionis' Leg |
| Chapter 5 | Colony 6 and Ether Mine |
| Chapter 6 | Satori Marsh and Bionis' Interior (1st Time) |
| Chapter 7 | Makna Forest and Frontier Village |
| Chapter 8 | Eryth Sea, Alcamoth, and High Entia Tomb |
| Chapter 9 | Prison Island (1st Time) |
| Chapter 10 | Valak Mountain |
| Chapter 11 | Sword Valley and Galahad Fortress |
| Chapter 12 | Fallen Arm |
| Chapter 13 | Mechonis Field |
| Chapter 14 | Central Factory and Agniratha |
| Chapter 15 | Mechonis Core |
| Chapter 16 | Central Factory (Revisited) |
| Chapter 17 | Bionis' Interior and Prison Island (Revisited) |
| Final Boss | Memory Space |
Author

Xenoblade Chronicles: Definitive Edition Walkthrough & Guides Wiki
Chapter 14: Central Factory and Agniratha Walkthrough
Rankings
- We could not find the message board you were looking for.
Gaming News

![Monster Hunter Stories 3 Review [First Impressions] | Simply Rejuvenating](https://img.game8.co/4438641/2a31b7702bd70e78ec8efd24661dacda.jpeg/show)

![Monster Hunter Stories 3 Review [First Impressions] | Simply Rejuvenating](https://img.game8.co/4438641/2a31b7702bd70e78ec8efd24661dacda.jpeg/thumb)
![The Seven Deadly Sins: Origin Review [First Impressions] | A Promising Start](https://img.game8.co/4440581/584e0bfb87908f12c4eab6e846eb1afd.png/thumb)
Popular Games

Genshin Impact Walkthrough & Guides Wiki
Umamusume: Pretty Derby Walkthrough & Guides Wiki
Pokemon Pokopia Walkthrough & Guides Wiki
Honkai: Star Rail Walkthrough & Guides Wiki
Monster Hunter Stories 3: Twisted Reflection Walkthrough & Guides Wiki
Arknights: Endfield Walkthrough & Guides Wiki
Wuthering Waves Walkthrough & Guides Wiki
Zenless Zone Zero Walkthrough & Guides Wiki
Pokemon TCG Pocket (PTCGP) Strategies & Guides Wiki
Monster Hunter Wilds Walkthrough & Guides Wiki


Recommended Games
Fire Emblem Heroes (FEH) Walkthrough & Guides Wiki
Diablo 4: Vessel of Hatred Walkthrough & Guides Wiki
Cyberpunk 2077: Ultimate Edition Walkthrough & Guides Wiki
Yu-Gi-Oh! Master Duel Walkthrough & Guides Wiki
Super Smash Bros. Ultimate Walkthrough & Guides Wiki
Pokemon Brilliant Diamond and Shining Pearl (BDSP) Walkthrough & Guides Wiki
Elden Ring Shadow of the Erdtree Walkthrough & Guides Wiki
Monster Hunter World Walkthrough & Guides Wiki
The Legend of Zelda: Tears of the Kingdom Walkthrough & Guides Wiki
Persona 3 Reload Walkthrough & Guides Wiki


All rights reserved
© 2010 - 2020 Nintendo / MONOLITHSOFT. Xenoblade Chronicles and Nintendo Switch are trademarks of Nintendo. © 2020 Nintendo.
The copyrights of videos of games used in our content and other intellectual property rights belong to the provider of the game.
The contents we provide on this site were created personally by members of the Game8 editorial department.
We refuse the right to reuse or repost content taken without our permission such as data or images to other sites.