Chapter 10: Valak Mountain Walkthrough
This is a walkthrough for the Valak Mountain section of Xenoblade Chronicles Definitive Edition for Nintendo Switch. For a map of Valak Mountain Landmarks and Locations, as well as boss strategy and other tips and tricks, read on!
List of Contents
| Previous Section | Next Section |
|---|---|
| Prison Island | Sword Valley and Galahad Fortress |
Chapter 10: Valak Mountain Walkthrough
Alcamoth and Makna Forest
| Objectives | |
|---|---|
| 1 |  Head out and look for Dunban. After the fight with Metal Face and the cutscenes you'll return to Alcamoth. Leave Whitewind Palace to find Dunban, then return to the Audience Chamber for more cutscenes. |
| 2 | Exit Alcamoth. You'll have your full party available for the trip and a destination in mind: Sword Valley. To get there you'll need to pass through Makna Forest via a flight pod, and then through Valak Mountain. |
| Optional 1 | 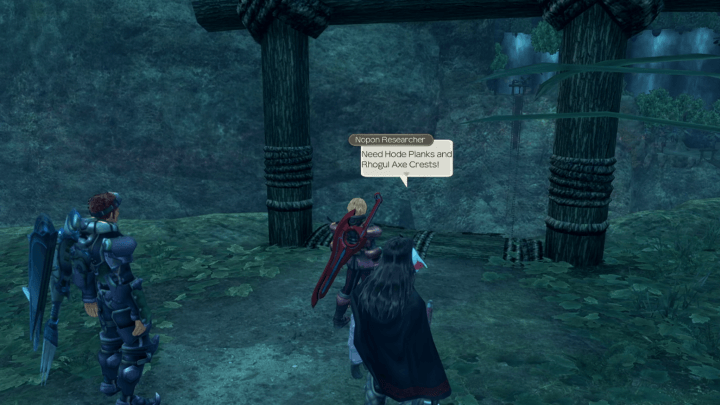 Repair the Bridge After landing in Makna Forest, you'll find two Nopons near a broken bridge. Talk to them to initiate the Bridge Repair Side Quest, which will work as a shortcut between Makna Forest proper and the path to Valak Mountain. |
| Optional 2 | Find Hode Planks and Rhogul Axe Crests You'll need to find Hode Planks from any Hode (not just the ones targeted by the quest), and Rhogul Axe Crests from Mist Rhoguls in Satorl Marsh |
| 4 | Head through Valak Pass to exit Makna Forest. When ready, walk through Valak Pass to ascend up the mountain wrapped around the Bionis' right arm. |
Valak Mountain
| Objectives | |
|---|---|
| 1 | Descend down the steep path Follow the quest guide through snowy Valak Mountain until you unlock the Hollow Bone landmark. |
| 2 | 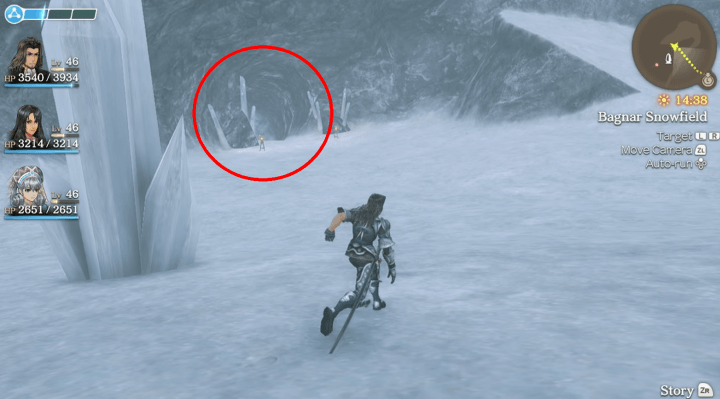 Enter the cavern and let yourself slip through the cave. Timing the jump properly or not will yield the same result, so do not worry if you mistime your jump. |
| 3 | 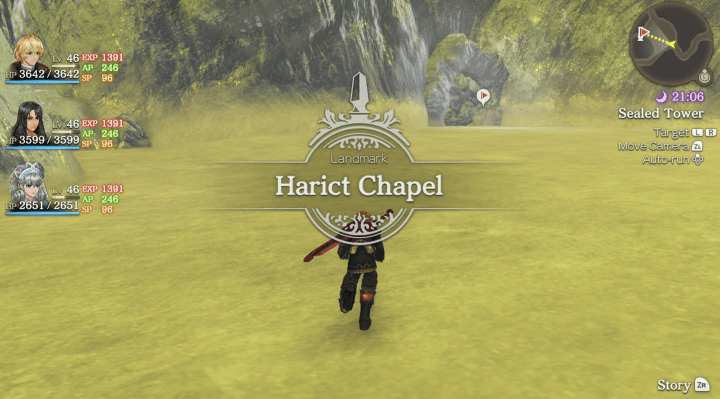 Head deeper until you reach the Sealed Tower. Arriving at the Sealed Tower's Harict Chapel area, you will find an ice boulder blocking your way. |
| 4 | Follow the Quest Guide to the Magma Rock. You'll need a special rock to melt the ice, and it's in the Lava Cave. |
| 5 |  Defeat Conflagrant Razeal. The boss is located inside an area with lava and harmful Nebula-type enemies called Moonlight Paimon. Defeat the Paimons before engaging the boss, as your companions may accidentally chase them into the lava and take damage or die. |
| 6 | Unseal the Door and Prepare for a boss fight. After unsealing the door, you'll watch some cutscenes, then proceed onto the Great Glacier. Prepare your party for a boss fight. |
| 7 | Defeat the Boss! It's time to defeat the Valak Mountain Boss! Despite having a smaller stature than typical Mechon, you can use use Monado Buster to deal extra damage and Monado Enchant so that your allies can damage him as well. Defeating the boss triggers another cutscene and ends the chapter. |
Chapter 11: Sword Valley and Galahad Fortress Walkthrough
Side Quests
The following side quests are available from this chapter:
Valak Mountain Side Quests
| Quest | Location | Giver | Rewards |
|---|---|---|---|
| Chilkins and Antols | Nopon Camp | Nopon Researcher | +100 Reputation 10000 G 3300 EXP Spike Defence IV, Chill Defence IV, Paralysis Resist IV |
| Valak Mountain Research | Nopon Camp | Nopon Researcher | +150 Reputation 11500 G 3800 EXP Chill Defence V |
| The Freezing Nopon | Hollow Bone | Nopon Researcher | +200 Reputation 12000 G 4500 EXP Heavy Leggings |
| Bad Timing | Bionis' Wrist | Nopon Researcher | +200 Reputation 13800 G 5000 EXP Heavy Gear, Heavy Armour |
| Chilkin Changes | Nopon Camp | Dakuku | +50 Reputation 15000 G 3200 EXP Blaze Defence V, Daze Resist II |
| The Balance of Power | Nopon Camp | Dakuku | +250 Reputation 21000 G 8500 EXP Snaer Striker, Stellar Gear, Stellar Gauntlets, Dunban Skill Tree - Obstinance |
| Monster Quest 1 | Zokhed Pass | Nopon Merchant | +50 Reputation 23000 G 23000 EXP |
| Monster Quest 2 | Zokhed Pass | Nopon Merchant | +50 Reputation 25500 G 25500 EXP |
| Monster Quest 3 | Zokhed Pass | Nopon Merchant | +50 Reputation 28000 G 28000 EXP |
| Monster Quest 4 | Zokhed Pass | Nopon Merchant | +50 Reputation 30000 G 30000 EXP |
Quests in Red Text indicate Timed Quests. As these quests will expire after progressing to a certain part of the game, be sure to complete them while they are still available!
Maps and Collectopaedia
Valak Mountain Maps
Upper Level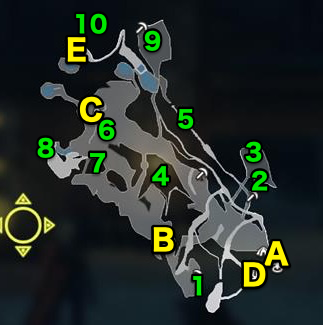 |
Lower Level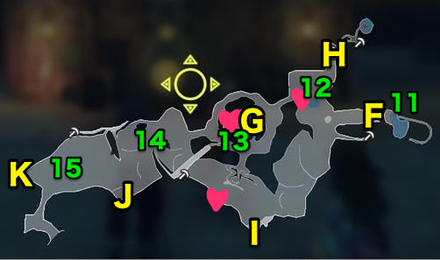 |
Valak Mountain Landmarks and Locations
Landmarks
| A | Zokhed Pass |
|---|---|
| B | Mechonis Wound |
| C | Hollow Bone |
| D | Befalgar Pedestal |
| E | Three Sage Summit |
| F | Nopon Camp |
| G | Harict Chapel |
| H | Lava Cave |
| I | La Luz Church |
| J | Nofol Tower |
| K | Bionis' Wrist |
Locations
| 1 | Nagul Waterfall |
|---|---|
| 2 | Serik Waterfall |
| 3 | Apis Lair |
| 4 | Kana Peak |
| 5 | Agul Mountain Range |
| 6 | Bagnar Snowfield |
| 7 | Chilkin Lair |
| 8 | Url Crevasse |
| 9 | Bionis' Right Elbow |
| 10 | Valak Peak |
| 11 | Antol Den |
| 12 | Jakt Geyser |
| 13 | Sealed Tower |
| 14 | Ignia Hill |
| 15 | Great Glacier |
Heart-to-Hearts
| Title | Location | Char. 1 | Char. 2 | Affinity |
|---|---|---|---|---|
| A Snowy Hot Spring | Jakt Geyser | Shulk | Riki | Purple |
| First Sight of Snow | La Luz Church | Reyn | Fiora | Purple |
| In Ose Tower | Sealed Tower | Dunban | Riki | Green |
Valak Mountain Collectopaedia
| Veg | Sour Radish | Ice Cabbage | Girl Courgette | Amethyst Vanilla | - |
|---|---|---|---|---|---|
| Fruit | Ether Plum | Fire Apple | Ruby Mangosteen | Sour Grape | - |
| Flower | Fortune Mallow | Black Peony | Fatal Belladonna | - | - |
| Animal | Wet Rat | Ice Monkey | Crystal Frog | Mud Squirrel | - |
| Nature | Gypsum Branch | Black Ash | Emerald Snow | Rabbit Stone | Broom Icicle |
| Strange | Frost Glass | Large Handcuffs | - | - | - |
Collection Rewards
| Vegetables | Heavy Boots |
|---|---|
| Fruit | Chill Defence III |
| Flowers | Confuse Resist III |
| Animals | Aura Heal II |
| Nature | Heavy Gear |
| Strange | Chill Plus III |
| 100% Completion | Cerasus Cutlass |
Tips and Strategies
Auto-Run

Auto-Run is active as long as there is a running icon near the mini-map.
When exploring massive places, it is recommended to use Auto-Run. This way, you can do other activities while your party leader automatically walks towards your chosen direction. Just make sure to steer his path now and then.
Using Auto-Run
The Auto-Run makes the party leader move in a straight line, which is useful for exploring wide and open areas. It can be canceled if you steer without pressing forward, target an enemy unit, or when your party leader takes aggro from an enemy unit.
Swapping Leaders
 |
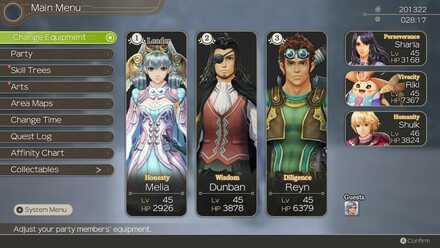 |
There may come a time when Shulk isn't the best leader to use. Such examples are areas infested with Nebula type enemies that are weak to Ether based attacks. Changing your party leader to a character that can dish out Ether damage (Melia) can often prove more beneficial for your party.
Boss Strategy Guide
Mumkhar
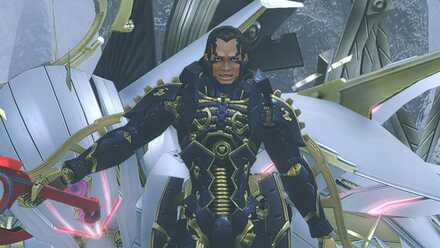
Mumkhar is a humanoid boss fight, but he is also a mechon. Using the Monado Art Enchant is necessary for your allies to be able to damage Mumkhar. He has a rank 4 talent called Fiery Pain, so having your shield to rank 4 during this battle can prove helpful. Another thing to watch out for is Mumkhar's Corner, which makes him invulnerable for a few seconds. Hold off on using arts during this time and wait for Corner to dissipate.
Topple and Daze!

Mumkhar is greatly vulnerable to topple and daze. With no allies to support him, focusing on toppling and dazing him with chain attacks and arts will work well.
Recommended Characters
| | | |
Mumkhar is vulnerable to topple and Daze which Shulk and Reyn are good at. If your party is capable of dealing huge damage, then replacing Sharla with Dunban can be considered if you can topple lock him, and the affinity between the three is high for more chain links.
Story Walkthrough Related Links
Xenoblade Chronicles Story Walkthrough
| Prologue | The Battle of Sword Valley |
|---|---|
| Chapter 1 | Colony 9 and Tephra Cave |
| Chapter 2 | Colony 9 (Mechon Invasion) |
| Chapter 3 | Tephra Cave (Revisited) |
| Chapter 4 | Bionis' Leg |
| Chapter 5 | Colony 6 and Ether Mine |
| Chapter 6 | Satori Marsh and Bionis' Interior (1st Time) |
| Chapter 7 | Makna Forest and Frontier Village |
| Chapter 8 | Eryth Sea, Alcamoth, and High Entia Tomb |
| Chapter 9 | Prison Island (1st Time) |
| Chapter 10 | Valak Mountain |
| Chapter 11 | Sword Valley and Galahad Fortress |
| Chapter 12 | Fallen Arm |
| Chapter 13 | Mechonis Field |
| Chapter 14 | Central Factory and Agniratha |
| Chapter 15 | Mechonis Core |
| Chapter 16 | Central Factory (Revisited) |
| Chapter 17 | Bionis' Interior and Prison Island (Revisited) |
| Final Boss | Memory Space |
Author

Xenoblade Chronicles: Definitive Edition Walkthrough & Guides Wiki
Chapter 10: Valak Mountain Walkthrough
Rankings
- We could not find the message board you were looking for.
Gaming News


![Monster Hunter Stories 3 Review [First Impressions] | Simply Rejuvenating](https://img.game8.co/4438641/2a31b7702bd70e78ec8efd24661dacda.jpeg/thumb)
Popular Games

Genshin Impact Walkthrough & Guides Wiki
Honkai: Star Rail Walkthrough & Guides Wiki
Umamusume: Pretty Derby Walkthrough & Guides Wiki
Pokemon Pokopia Walkthrough & Guides Wiki
Resident Evil Requiem (RE9) Walkthrough & Guides Wiki
Monster Hunter Wilds Walkthrough & Guides Wiki
Wuthering Waves Walkthrough & Guides Wiki
Arknights: Endfield Walkthrough & Guides Wiki
Pokemon FireRed and LeafGreen (FRLG) Walkthrough & Guides Wiki
Pokemon TCG Pocket (PTCGP) Strategies & Guides Wiki


Recommended Games
Diablo 4: Vessel of Hatred Walkthrough & Guides Wiki
Cyberpunk 2077: Ultimate Edition Walkthrough & Guides Wiki
Fire Emblem Heroes (FEH) Walkthrough & Guides Wiki
Yu-Gi-Oh! Master Duel Walkthrough & Guides Wiki
Super Smash Bros. Ultimate Walkthrough & Guides Wiki
Pokemon Brilliant Diamond and Shining Pearl (BDSP) Walkthrough & Guides Wiki
Elden Ring Shadow of the Erdtree Walkthrough & Guides Wiki
Monster Hunter World Walkthrough & Guides Wiki
The Legend of Zelda: Tears of the Kingdom Walkthrough & Guides Wiki
Persona 3 Reload Walkthrough & Guides Wiki


All rights reserved
© 2010 - 2020 Nintendo / MONOLITHSOFT. Xenoblade Chronicles and Nintendo Switch are trademarks of Nintendo. © 2020 Nintendo.
The copyrights of videos of games used in our content and other intellectual property rights belong to the provider of the game.
The contents we provide on this site were created personally by members of the Game8 editorial department.
We refuse the right to reuse or repost content taken without our permission such as data or images to other sites.