This survey will take about 1 minute.
Your answers will help us to improve our website.
Honkai: Star Rail
All Dream Ticker Puzzle Locations and Solutions
★ Exclusive: Check out the State of Meta in 4.0!
♦ Latest: 4.1 Livestream Redeem Codes
♦ Phase 2: Sparkxie, Sparkle, Cerydra, Rappa
♦ Upcoming: Ashveil, Silver Wolf Lv.999, Evanescia
♦ Events: Cosmicon, Roll On!, Ding! Arcadia Fun-Time Clock-In Essentials

There are 42 Dream Ticker puzzles found in Honkai: Star Rail's Penacony Dreamscape. Check out all Dream Ticker locations and how to solve each puzzle here!
List of Contents
All Dream Ticker Puzzles
Golden Hour Dream Tickers
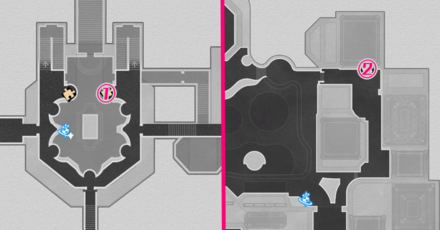
| 2nd Floor Locations | 3rd Floor Location |
|---|---|
 |
 |
| Golden Hour Puzzle Solutions | |
| Puzzle 1 | Puzzle 2 |
| Puzzle 3 | Puzzle 4 |
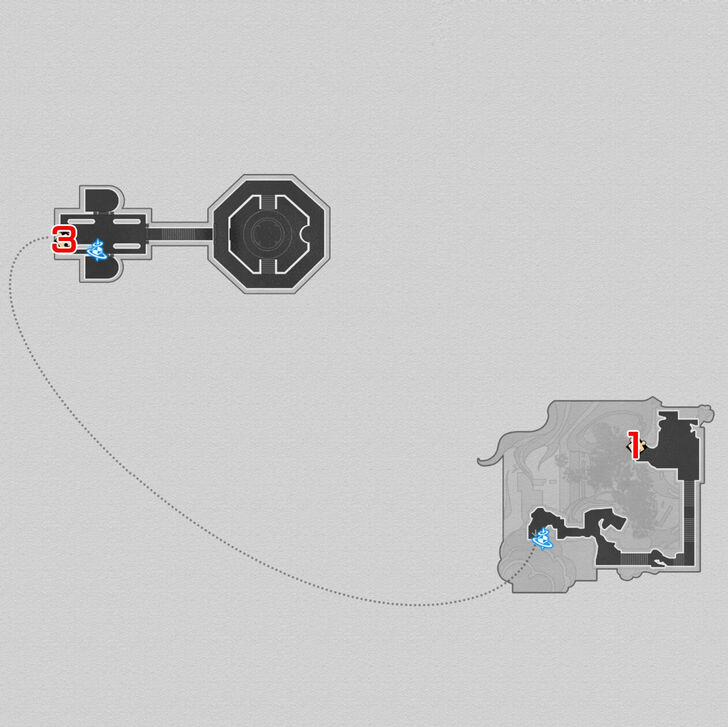
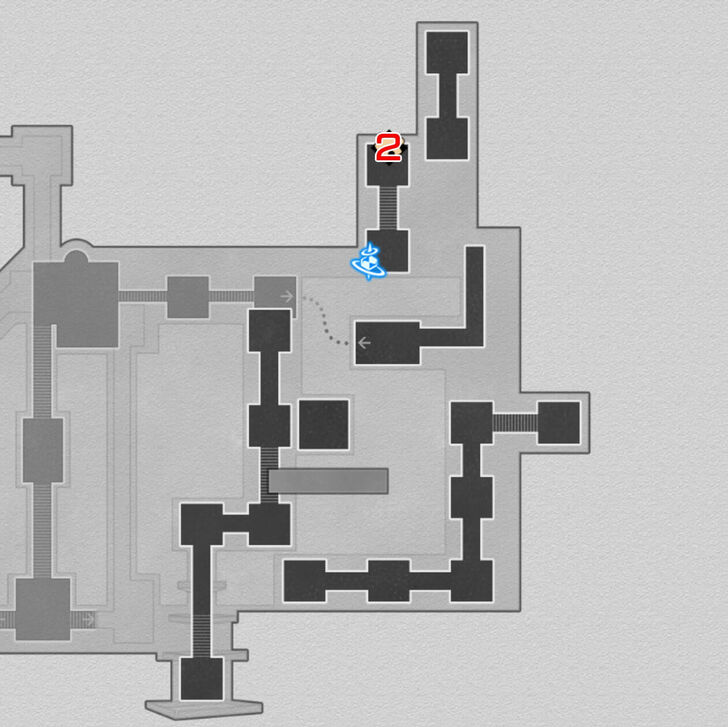
4 Dream Ticker puzzles can be found in the Golden Hour of Penacony. You can find three of them near the Aideen Park space anchor. The last one can be found by using the Pinball Machine south of the Clockie Food Truck to get to the 2nd floor.
Golden Hour Treasure Chest Locations
Golden Hour Puzzle 1
| Golden Hour 1 Solution | |
|---|---|
| 1 |  Pull the yellow building block toward Clockie to collect the silver gear. |
| 2 | 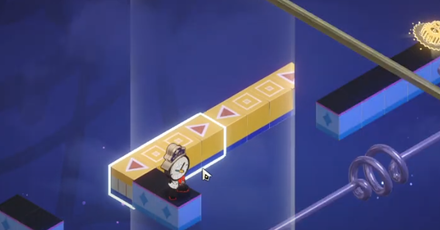 Pull the yellow building block toward the Dream Mirror. |
| 3 |  Adjust the Dream Mirror to the right to collect the gold gear. |
▲ Back to All Golden Hour Locations
Golden Hour Puzzle 2
| Golden Hour 2 Solution | |
|---|---|
| 1 |  Pull the yellow building block toward Clockie. |
| 2 |  Rotate the orange building block twice. |
| 3 |  Adjust the Dream Mirror to the right to collect the silver gear. |
| 4 | 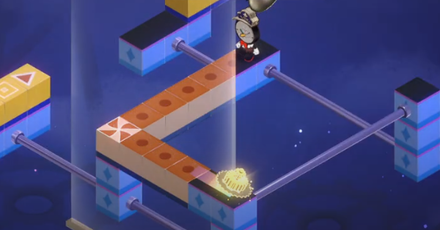 Rotate the orange building block once to collect the gold gear. |
▲ Back to All Golden Hour Locations
Golden Hour Puzzle 3
| Golden Hour 3 Solution | |
|---|---|
| 1 | 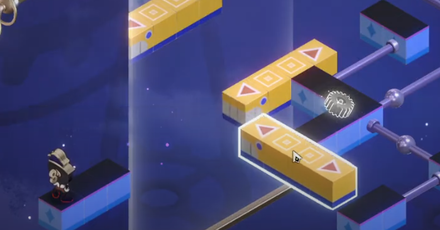 Pull the horizontal block to give space to the vertical block. |
| 2 | 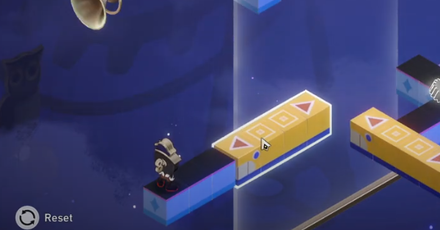 Pull the yellow building block in front of Clockie and have it go toward him. |
| 3 |  Pull the other horizontal building block and connect it with the vertical one to form a bridge and collect the silver gear. |
| 4 |  Pull back the horizontal yellow building block to give way to the left building block. |
| 5 |  Connect the left yellow building block to the north part of the platform where Clockie is currently standing on. |
| 6 |  Push the vertical yellow building block and have it connect to the Dream Mirror. |
| 7 |  Connect both blocks and then adjust the Dream Mirror to the left to collect the gold gear. |
▲ Back to All Golden Hour Locations
Golden Hour Puzzle 4
| Golden Hour 4 Solution | |
|---|---|
| 1 |  Pull the building block in front of Clockie to make a bridge. |
| 2 |  Adjust the Dream Mirror toward Clockie to connect the two building blocks and collect the silver gear. |
| 3 |  Pull the south building block toward the right. |
| 4 |  Adjust the Dream Mirror to the very left to collect the gold gear. |
▲ Back to All Golden Hour Locations
Dream's Edge Dream Tickers
| Dream's Edge Dream Ticker Locations | ||
|---|---|---|
 |
||
| Dream's Edge Puzzle Solutions | ||
| Puzzle 1 | Puzzle 2 | Puzzle 3 |
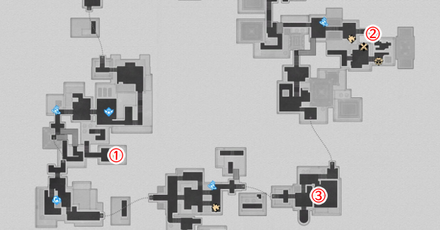
There are 3 Dream Ticker puzzles in the Dream's Edge. You can find one southeast of the Front Observation Deck space anchor. You can find the second puzzle east of the Dreamweaver Plaza space anchor. The last one can be found east of the Rooftop Garden space anchor, which can be accessed by solving the Dream's Eye puzzle.
Dream's Edge Treasure Chest Locations
Dream's Edge Puzzle 1
| Dream's Edge 1 Solution | |
|---|---|
| 1 | 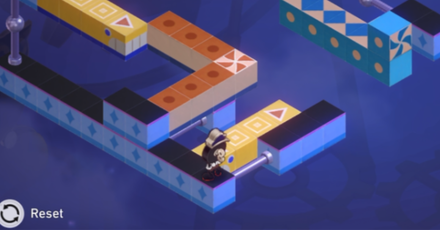 Pull the right yellow building block toward Clockie. |
| 2 | 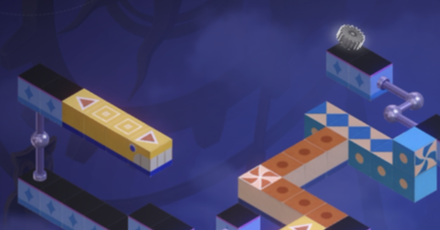 Push the left yellow building block away from the orange one. |
| 3 |  Rotate the orange building block twice and the blue building block once. |
| 4 |  Adjust the Dream Mirror to the left to collect the first silver gear. |
| 5 |  Rotate the orange building block once. |
| 6 | 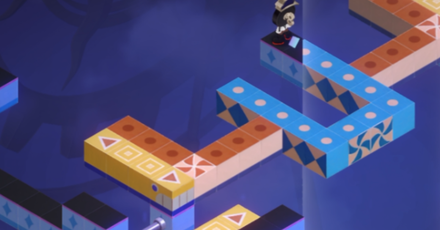 Move the leftmost yellow building block and have it fully aligned with the orange block to collect the second silver gear. |
| 7 | 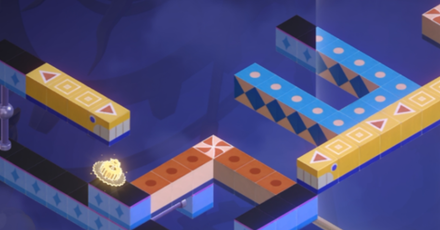 Move both yellow building blocks away from the orange block. The yellow building block on the right should connect to the blue building block. Afterwards, rotate the orange building block twice. |
| 8 |  Adjust the Dream Mirror to the right to collect the gold gear. |
▲ Back to All Dream's Edge Locations
Dream's Edge Puzzle 2
| Dream's Edge 2 Solution | |
|---|---|
| 1 |  Rotate the blue building block three times to collect the silver gear. |
| 2 |  Rotate the blue building block twice and adjust the Dream Mirror slightly to the right to collect the gold gear. |
▲ Back to All Dream's Edge Locations
Dream's Edge Puzzle 3
| Dream's Edge 3 Solution | |
|---|---|
| 1 | 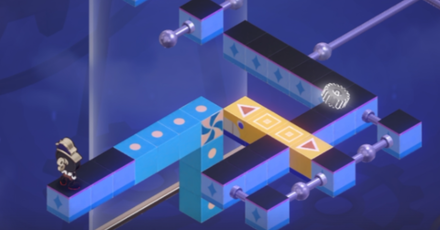 Rotate the blue building block twice. |
| 2 |  Connect the yellow building block to the blue building block to form a bridge and collect the silver gear. |
| 3 |  Connect the yellow building block to the Dream Mirror. |
| 4 |  Rotate the blue building block once. |
| 5 |  Adjust the Dream Mirror to the left to collect the gold gear. |
▲ Back to All Dream's Edge Locations
A Child's Dream Dream Tickers
| A Child's Dream Dream Ticker Locations | ||
|---|---|---|
 |
||
| A Child's Dream Puzzle Solutions | ||
| Puzzle 1 | Puzzle 2 | Puzzle 3 |
3 Dream Ticker puzzles can be found in the Child's Dream. You can find a Dream Ticker puzzle inside a room near the Corridor of Memories space anchor. The second Dream Ticker puzzle can also be accessed near the Corridor of Memories space anchor and solving the Dreamwalker puzzle.
The last Puzzle can be found near the Eddying Dreamscape space anchor, where you have to solve another Dreamwalker puzzle to access it.
A Child's Dream Treasure Chest Locations
A Child's Dream Puzzle 1
| A Child's Dream 1 Solution | |
|---|---|
| 1 |  Rotate both orange blocks once to collect the first silver gear. |
| 2 |  Rotate both orange blocks again and connect the yellow building block to both orange blocks. |
| 3 |  Adjust to the left to collect the gold gear. |
▲ Back to A Child's Dream Locations
A Child's Dream Puzzle 2
| A Child's Dream 2 Solution | |
|---|---|
| 1 |  Move the yellow building block downward. |
| 2 |  Rotate the blue building block twice to collect the silver gear. |
| 3 |  Rotate the blue building block once and adjust the Dream Mirror slightly to the left to collect the gold gear. |
▲ Back to A Child's Dream Locations
A Child's Dream Puzzle 3
| A Child's Dream 3 Solution | |
|---|---|
| 1 |  Move the north building block to the leftmost corner. |
| 2 |  Move the rightmost building block to the left to give way to the central building block. |
| 3 |  Connect the central building block to the Dream Mirror. |
| 4 |  Move the building block in the middle one space to the right. Then move the leftmost building block one space to the right to form a bridge. |
| 5 |  Adjust the Dream Mirror to the right to collect the Silver Gear. |
| 6 |  Move the building block in the middle to the rightmost area to collect the gold gear. |
▲ Back to A Child's Dream Locations
The Reverie (Dreamscape) Dream Tickers
| 3rd Floor Locations | 1st Floor Location |
|---|---|
 |
 |
| Golden Hour Puzzle Solutions | |
| Puzzle 1 | Puzzle 2 |
| Puzzle 3 | Puzzle 4 |
| Puzzle 5 | |
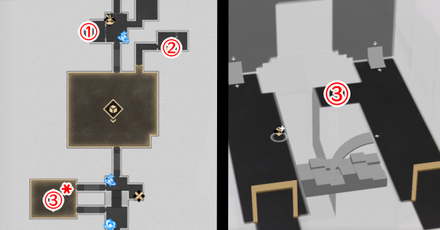
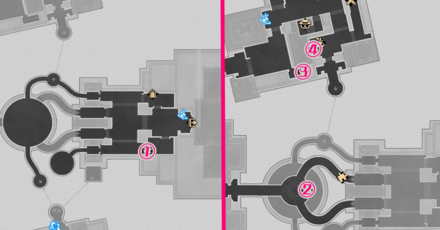
5 Dream Ticker puzzles can be found in the The Reverie - Dreamscape. Puzzle 1 can be found behind a locked door in the Dreamjolt Hostelry. You can get there by heading north from the Monitoring Room space anchor and taking the elevator up.
Puzzle 2 is just east of the VIP Lounge Corridor space anchor. Puzzle 3 can be found North of the Bud of Harmony Calyx (Crimson). Puzzle 4 south of the Platinum Guest Room space anchor. The last puzzle can be found in the Dreamscape Lobby.
The Reverie (Dreamscape) Locations
The Reverie (Dreamscape) Puzzle 1
| The Reverie (Dreamscape) 1 Solution | |
|---|---|
| 1 | 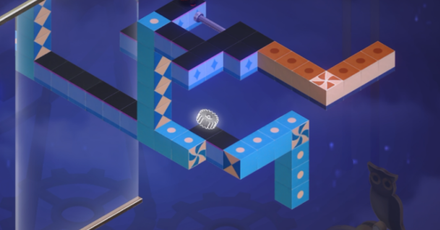 Rotate the two blue building blocks three times. |
| 2 |  Rotate the orange block once to collect the silver gear. |
| 3 |  Rotate the left blue building block once. |
| 4 |  Adjust the Dream Mirror slightly to the left to collect the gold gear. |
▲ Back to Reverie (Dreamscape) Locations
The Reverie (Dreamscape) Puzzle 2
| The Reverie (Dreamscape) 2 Solution | |
|---|---|
| 1 |  Move the vertical yellow building block one space upward. |
| 2 |  Connect the left tip of the horizontal yellow building block the the vertical block. |
| 3 | 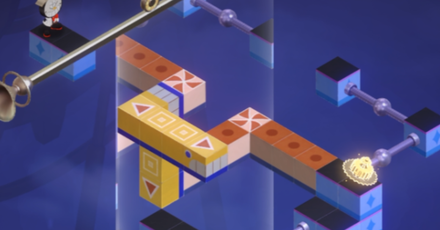 Rotate the orange building block once. |
| 4 |  Adjust the Dream Mirror slightly to the left to collect the gold gear. |
| 5 | 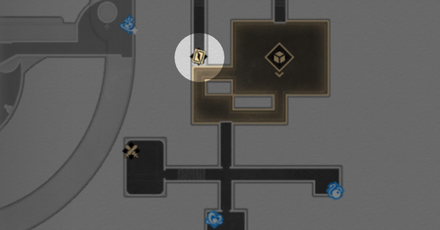 Look for the Dream Ticker in the Arcane Network. |
| 6 |  After catching up to the Dream Ticker, rotate the orange building block three times. |
| 7 |  Connect the yellow building block to the blue building block. |
| 8 |  Rotate the blue building block once to collect the first silver gear. |
| 9 |  Move the yellow building block two spaces from the left. |
| 10 |  Rotate the blue building block once. |
| 11 | 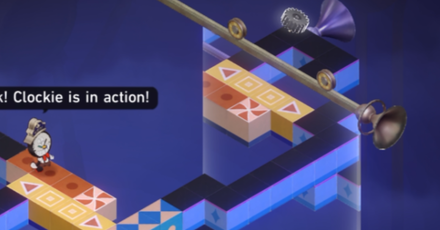 Adjust the Dream Mirror to the rightmost corner to collect the second silver gear. |
| 12 | 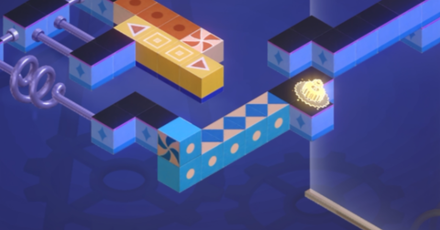 Rotate the blue building block twice. |
| 13 |  Connect the yellow building block to the blue building block. |
| 14 |  Rotate the orange building block once. |
| 15 |  Adjust the Dream Mirror to the left to collect the gold gear. |
▲ Back to Reverie (Dreamscape) Locations
The Reverie (Dreamscape) Puzzle 3
| The Reverie (Dreamscape) 3 Solution | |
|---|---|
| 1 |  Rotate the blue building block once.[/mid] |
| 2 |  Adjust the Dream Mirror to the left to collect the silver gear. |
| 3 |  Rotate the orange building block twice and then the blue building block twice to collect the gold gear. |
▲ Back to Reverie (Dreamscape) Locations
The Reverie (Dreamscape) Puzzle 4
| The Reverie (Dreamscape) 4 Solution | |
|---|---|
| 1 |  Move the yellow building block towards Clockie. |
| 2 |  Rotate the orange block once and then rotate the blue block once to collect the silver gear. |
| 3 |  Move the yellow building block to the leftmost area. |
| 4 |  Rotate the blue building block twice and then rotate the orange block once. |
| 5 |  Adjust the Dream Mirror to the rightmost area to collect the gold gear. |
▲ Back to Reverie (Dreamscape) Locations
The Reverie (Dreamscape) Puzzle 5
| The Reverie (Dreamscape) 5 Solution | |
|---|---|
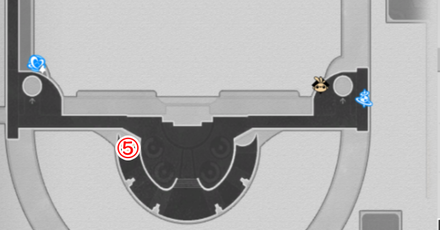
| 1 |  Rotate the left blue building block three times. |
| 2 | 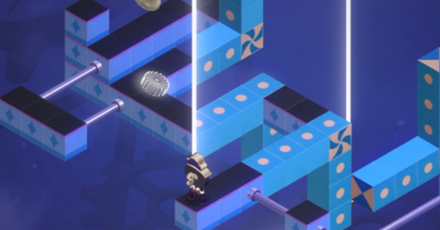 Adjust the Dream Mirror to the left to collect the silver gear. |
| 3 |  Rotate the right blue building block three times. |
| 4 |  Adjust the Dream Mirror to the leftmost corner to collect the gold gear. |
▲ Back to Reverie (Dreamscape) Locations
Dewlight Pavilion Dream Tickers
| Dewlight Pavilion Dream Ticker Locations | |
|---|---|
 |
|
| Dewlight Pavilion Puzzle Solutions | |
| Puzzle 1 (Floor 2) | Puzzle 2 (Sandpit) |
The map features both the 2nd Floor and the Sandpit.
Dewlight Pavilion Dream Ticker Puzzle 1
| Dewlight Pavilion 1 Solution | |
|---|---|
| 1 | 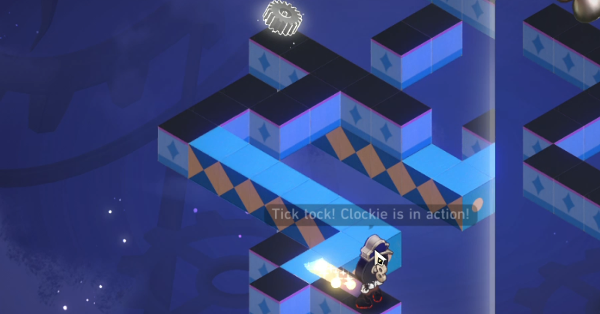 Rotate the blue building block twice to collect the silver gear. |
| 2 | 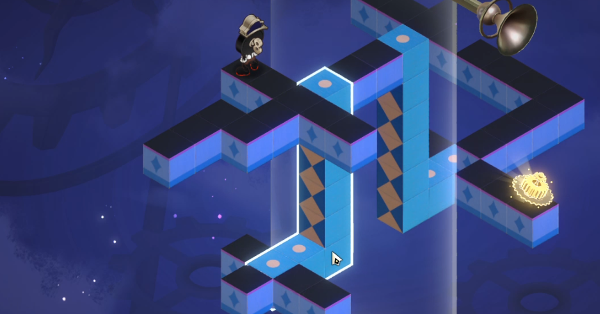 Rotate the blue building block three times to form a bridge. |
| 3 |  Adjust the Dream Mirror to the right to collect the gold gear. |
▲ Back to Dewlight Pavilion Locations
Dewlight Pavilion Dream Ticker Puzzle 2
| Dewlight Pavilion 2 Solution | |
|---|---|
| 1 |  Rotate both the orange and blue building blocks once to collect the silver gear. |
| 2 | 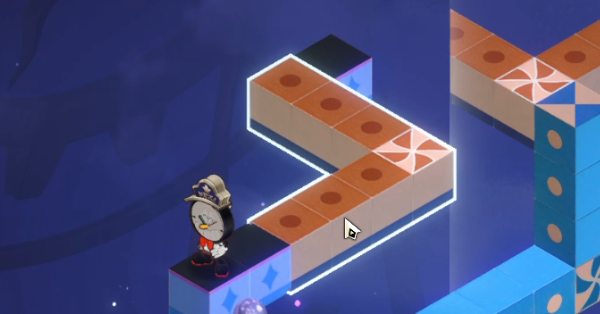 Rotate the orange building block once. |
| 3 |  Adjust the Dream Mirror to the left. |
| 4 |  Rotate the blue building block twice to collect the gold gear. |
▲ Back to Dewlight Pavilion Locations
Clock Studios Theme Park Dream Tickers
| Clock Studios Theme Park Dream Ticker Locations | |
|---|---|
 |
|
| Clock Studios Theme Park Puzzle Solutions | |
| Puzzle 1 (Floor 1) | Puzzle 2 (Floor 2) |
| Puzzle 3 (Floor 2) | Puzzle 4 (Floor 2) |
The map features both the 1st Floor and the 2nd Floor.
Clock Studios Theme Park Puzzle 1
| Clock Studios Theme Park 1 Solution | |
|---|---|
| 1 |  Connect both yellow building blocks. |
| 2 |  Rotate the blue block once to collect the silver gear. |
| 3 | 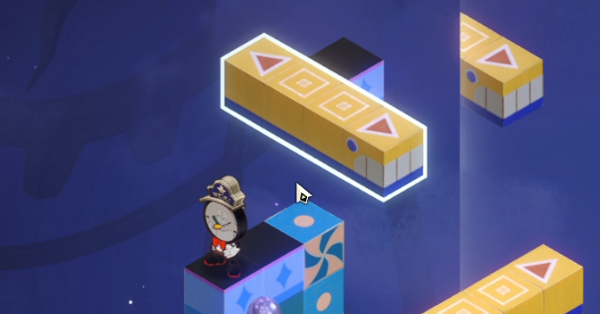 Rotate the blue block once to give way to the northern yellow block. Connect the yellow block to the small platform on the left. |
| 4 |  Rotate the blue block once to form a bridge. |
| 5 | 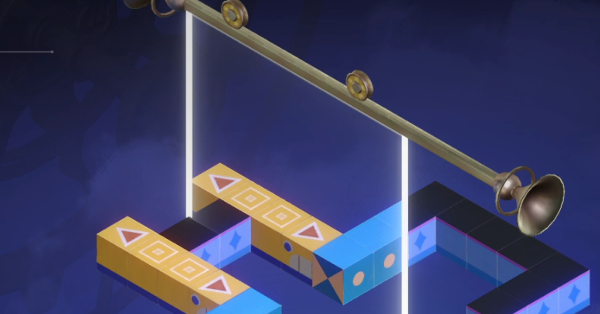 Adjust the Dream Mirror to the left. |
| 5 |  Connect the southern yellow block to the platform with the gold gear on it. |
▲ Back to Clock Studios Park Locations
Clock Studios Theme Park Puzzle 2
| Clock Studios Theme Park 2 Solution | |
|---|---|
| 1 |  Rotate the blue block three times to collect the silver gear. |
| 2 |  Adjust the Dream Mirror to the right. |
| 3 |  Rotate the blue block twice to collect the gold gear. |
▲ Back to Clock Studios Park Locations
Clock Studios Theme Park Puzzle 3
| Clock Studios Theme Park 3 Solution | |
|---|---|
| 1 | 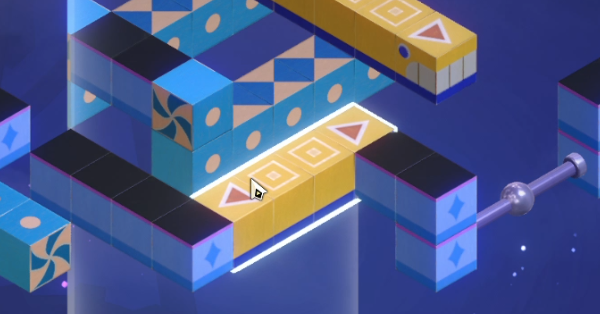 Pull the south yellow block toward the platform. |
| 2 |  Have the north yellow block connect to the platform Clockie is standing on. |
| 3 |  Rotate the right blue block once. |
| 4 |  Adjust the Dream Mirror slightly to the right to collect the first silver gear. |
| 5 | 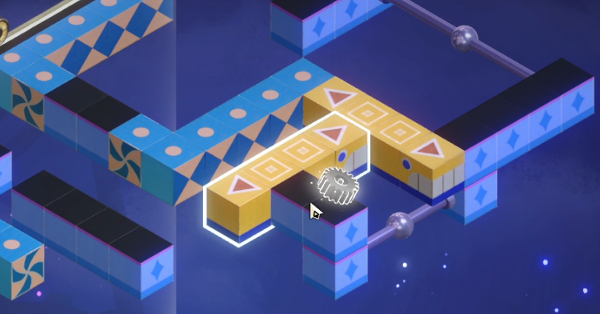 Connect both yellow blocks to collect the second silver gear. |
| 6 |  Rotate the north blue block three times to connect it to the platform with the gold gear. |
| 7 |  Rotate the left blue block three times to connect it to the other blue block. |
| 8 |  Move the south yellow block to the left to collect the gold gear. |
▲ Back to Clock Studios Park Locations
Clock Studios Theme Park Puzzle 4
| Clock Studios Theme Park 4 Solution | |
|---|---|
| 1 |  Rotate the right blue block three times. |
| 2 | 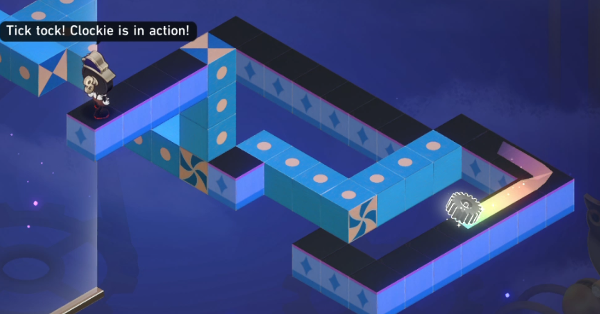 Rotate the left blue block once to collect the silver gear. |
| 3 |  Rotate the left blue block twice. |
| 4 |  Adjust the Dream Mirror to the right to collect the gold gear. |
▲ Back to Clock Studios Park Locations
Dreamflux Reef Dream Tickers
| Dreamflux Reef Dream Ticker Locations | ||
|---|---|---|
 |
||
| Dreamflux Reef Puzzle Solutions | ||
| Puzzle 1 | Puzzle 2 | Puzzle 3 |
There are a total of three Dream Ticker puzzles in the Dreamflux Reef. You can get to the puzzle on the southeastern side of the map by interacting with the Signpost near the train and coughing up 1 Aideen Token.
Dreamflux Reef Chest Locations
Dreamflux Reef Puzzle 1
| Dreamflux Reef 1 Solution | |
|---|---|
| 1 |  Pull the yellow block on the left toward the platform Clockie is standing on. |
| 2 |  Connect the right yellow block toward the left to collect the first silver gear. |
| 3 |  Rotate the left blue block three times to collect the second gear. |
| 4 |  Rotate the left blue block three times again. |
| 5 | 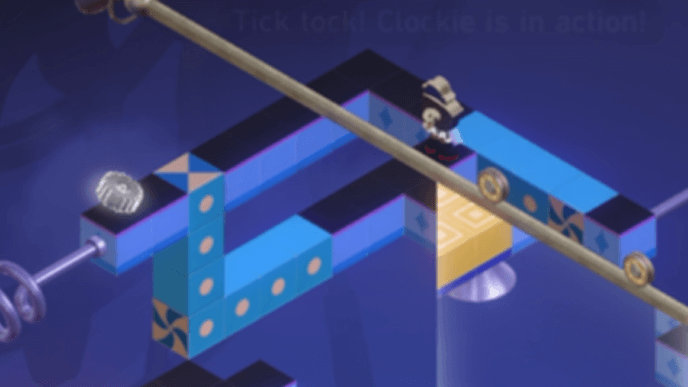 Rotate the right blue block once to collect the third gear. |
| 6 |  Rotate the orange block twice. |
| 7 |  Pull the right yellow block to the platforms on the right to collect the yellow gear. |
▲ Back to Dreamflux Reef Locations
Dreamflux Reef Puzzle 2
| Dreamflux Reef 2 Solution | |
|---|---|
| 1 |  Adjust the Dream Mirror to the left. |
| 2 | 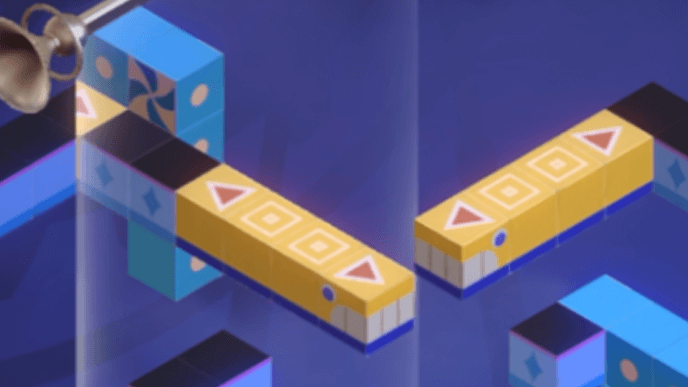 Push the left yellow block to the rightmost area to make way then push the right yellow block toward the mirror. |
| 3 |  Connect the two yellow blocks. |
| 4 |  Rotate the blue block once. |
| 5 |  Push the yellow zigzag block on the right near the platforms to collect the silver gear. |
| 6 |  Pull the left yellow block away from the middle one to give way. |
| 7 |  Rotate the blue block three times. |
| 8 |  Connect the yellow block on the middle and the yellow zigzag block to collect the gold gear. |
▲ Back to Dreamflux Reef Locations
Dreamflux Reef Puzzle 3
| Dreamflux Reef 3 Solution | |
|---|---|
| 1 |  Rotate the left blue block three times. |
| 2 |  Rotate the orange block once. |
| 3 |  Pull the yellow block on the right to collect the first silver gear. |
| 4 |  Rotate the left blue block twice to collect the second silver gear. |
| 5 |  Rotate the right blue block three times. |
| 6 |  Rotate the orange block twice. |
| 7 |  Adjust the Dream Mirror slightly to the left to collect the third gear. |
| 8 |  Adjust the Dream Mirror again to the left. |
| 9 |  Move the yellow block slightly to the right to collect the yellow gear. |
▲ Back to Dreamflux Reef Locations
SoulGlad Scorchsand Audition Venue Dream Tickers
| Overworld Map | Acting Challenge |
|---|---|
 |
 |
| Action Challenge | Time Trial |
 |
 |
| Audition Venue Puzzle Solutions | |
| Puzzle 1 | Puzzle 2 |
| Puzzle 3 | |
The SoulGlad Scorchsand Audition Venue has three Dream Ticker puzzles surrounding the map. You can unlock all of the areas by completing the Scorchsand Vacation Adventure Mission.
Audition Venue Chest Locations
SoulGlad Scorchsand Audition Venue Puzzle 1
| Scorchsand Audition Venue 1 Solution | |
|---|---|
| 1 |  Rotate the blue block twice. |
| 2 |  Pull the yellow block towards Clockie to collect the silver gear. |
| 3 |  Adjust the Dream Mirror to the left. |
| 4 |  Rotate the blue block once to collect the second gear. |
| 5 |  Adjust the Dream Mirror to the right. |
| 6 |  Push the yellow block toward the Dream Mirror. |
| 7 |  Rotate the orange block once. |
| 8 |  Rotate the blue block once to collect the yellow gear. |
▲ Back to Audition Venue Locations
SoulGlad Scorchsand Audition Venue Puzzle 2
| Scorchsand Audition Venue 2 Solution | |
|---|---|
| 1 |  Rotate the orange block three times. |
| 2 |  Rotate the blue block three times to collect the silver gear. |
| 3 |  Adjust the Dream Mirror to the right. |
| 4 | 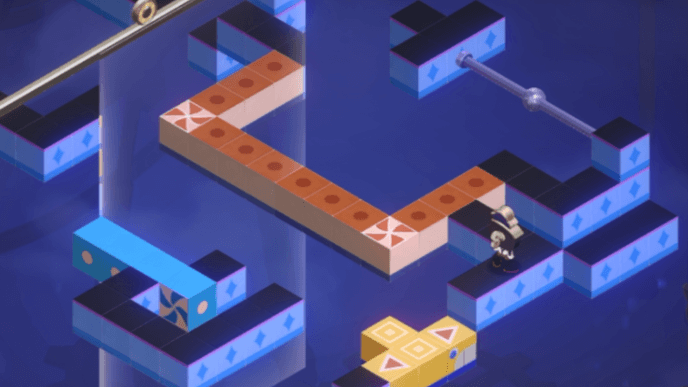 Rotate the orange block twice. |
| 5 | 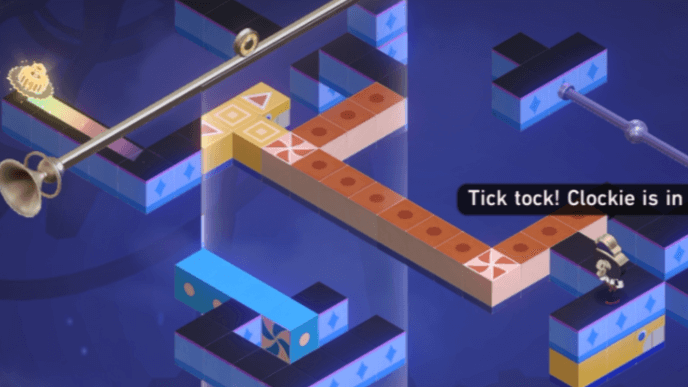 Put the yellow block underneath Clockie to collect the yellow gear. |
▲ Back to Audition Venue Locations
SoulGlad Scorchsand Audition Venue Puzzle 3
| Scorchsand Audition Venue 3 Solution | |
|---|---|
| 1 |  Rotate the blue block once and right orange block once. |
| 2 |  Rotate the left orange block once. |
| 3 |  Pull both yellow blocks toward the left. |
| 4 |  Adjust the Dream Mirror to the left to collect the silver gear. |
| 5 |  Push the central yellow block toward the right to give way to the left orange block. |
| 6 |  Rotate the left orange block three times. |
| 7 |  Push the left yellow block to the right to collect the second gear. |
| 8 |  Adjust the Dream Mirror to the right. |
| 9 |  Rotate the blue block twice. |
| 10 |  Connect the right yellow block to the blue block. |
| 11 |  Rotate the left orange block twice. |
| 12 |  Pull the central yellow block toward the platform with the yellow gear to complete the puzzle. |
▲ Back to Audition Venue Locations
Penacony Grand Theater Dream Tickers
| Grand Theater Locations | Puzzle 4 Location |
|---|---|
 |
 |
| Penacony Grand Theater Puzzle Solutions | |
| Puzzle 1 | Puzzle 2 |
| Puzzle 3 | Puzzle 4 |
You can find a total of 4 Dream Ticker puzzles in the Penacony Grand Theater. Most of these are located near the Space Anchors while one of them can be found inside a realm.
Penacony Grand Theater Chest Locations
Penacony Grand Theater Puzzle 1
| Penacony Grand Theater 1 Solution | |
|---|---|
| 1 |  Move the right yellow block one space to the left. |
| 2 |  Move the left yellow block one space to the right. |
| 3 |  Adjust the Dream Mirror to the left to collect the silver gear. |
| 4 |  Rotate the orange block once. |
| 5 |  Connect the right yellow block to the platform with the yellow gear. |
| 6 | 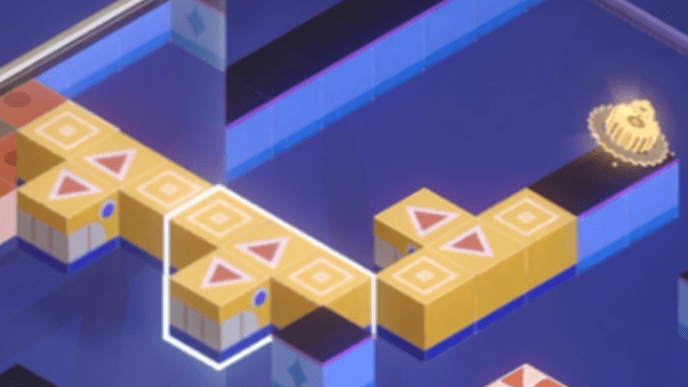 Move the left yellow block one space to the right. |
| 7 | 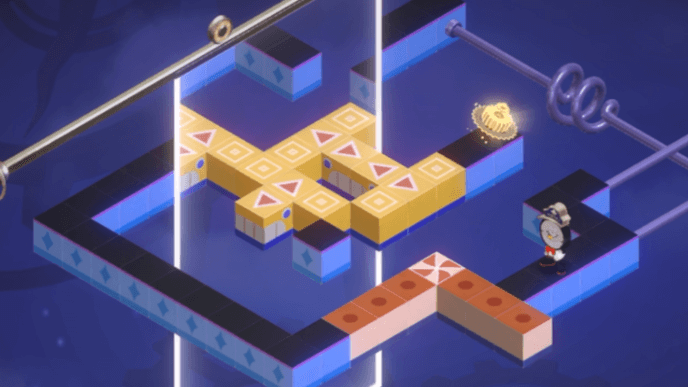 Adjust the Dream Mirror to the right to collect the yellow gear. |
▲ Back to Penacony Grand Theater Locations
Penacony Grand Theater Puzzle 2
| Penacony Grand Theater 2 Solution | |
|---|---|
| 1 | 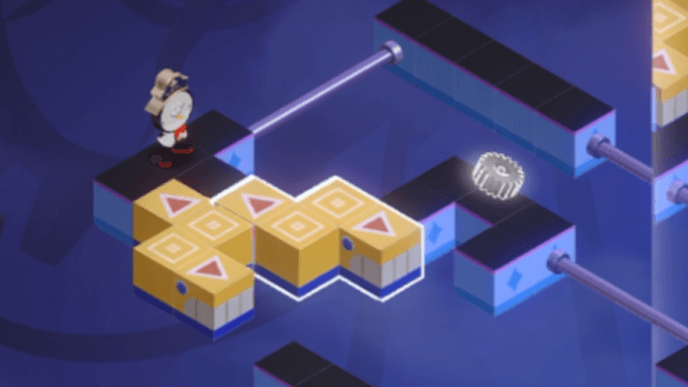 Move the right yellow block toward Clockie to collect the silver gear. |
| 2 |  Use the two yellow blocks to form a bridge and collect the second gear. |
| 3 | 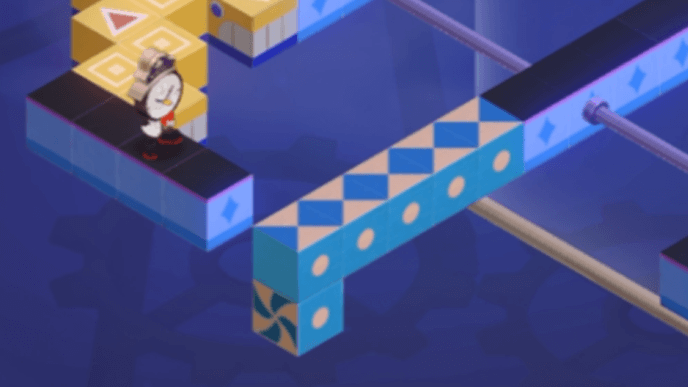 Rotate the blue block three times. |
| 4 |  Use the two yellow blocks to form another bridge. |
| 5 |  Adjust the Dream Mirror to the right to collect the second gear. |
| 6 | 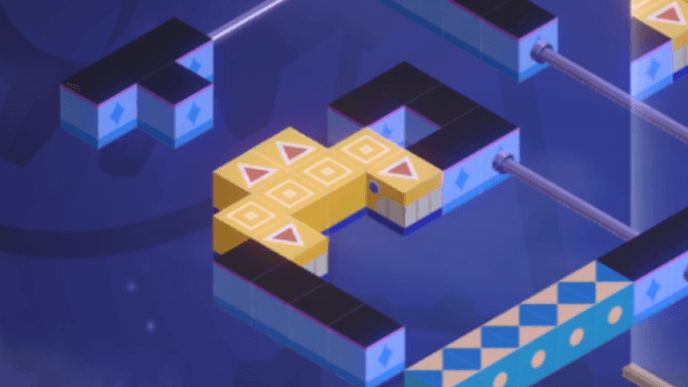 Move both yellow blocks to the left and form a bridge on the other side. |
| 7 |  Adjust the Dream Mirror to the left to collect the yellow gear. |
▲ Back to Penacony Grand Theater Locations
Penacony Grand Theater Puzzle 3
| Penacony Grand Theater 3 Solution | |
|---|---|
| 1 |  Rotate both the south orange block and blue block twice. |
| 2 |  Connect the right yellow block to the blue block. |
| 3 | 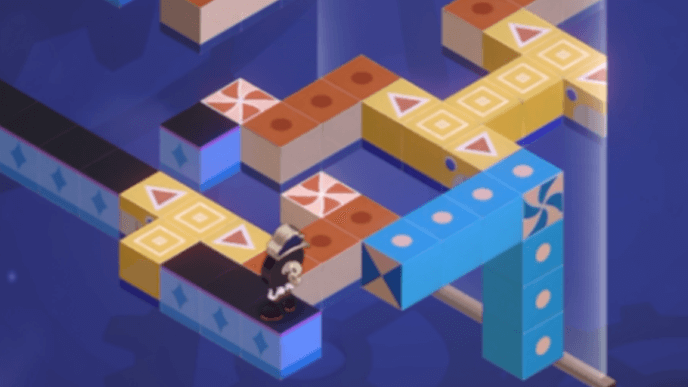 Rotate the central orange block twice. |
| 4 | 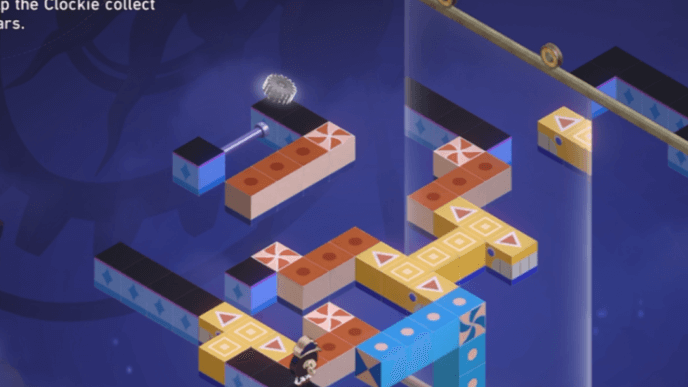 Adjust the Dream Mirror to the right. |
| 5 |  Rotate the north orange block twice to collect the first gear. |
| 6 |  Move the left yellow block to the left. |
| 7 | 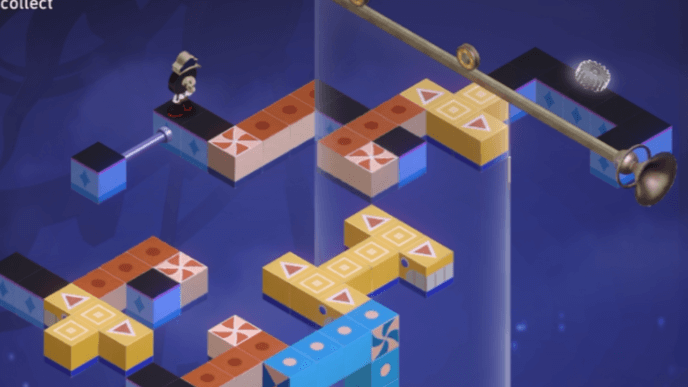 Rotate the central orange block twice to collect the second gear. |
| 8 | 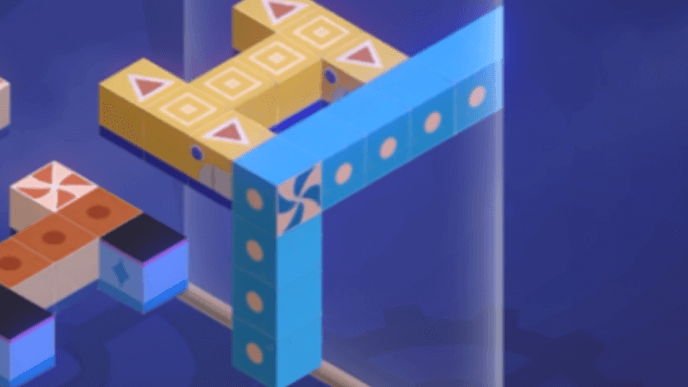 Rotate the blue block three times. |
| 9 |  Rotate the central orange until it connects with the right yellow block. |
| 10 |  Adjust the Dream Mirror to the rightmost part to collect the third gear. |
| 11 | 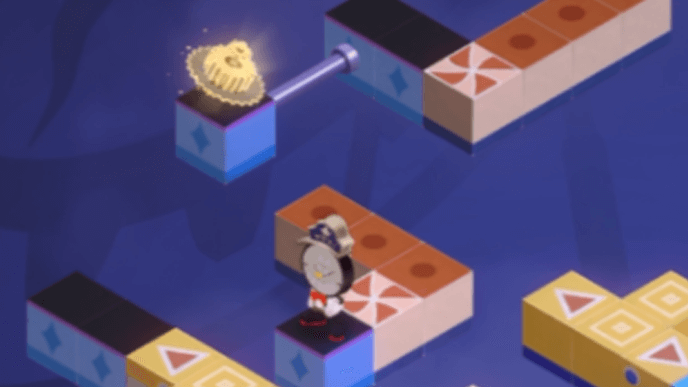 Rotate the central orange block once. |
| 12 | 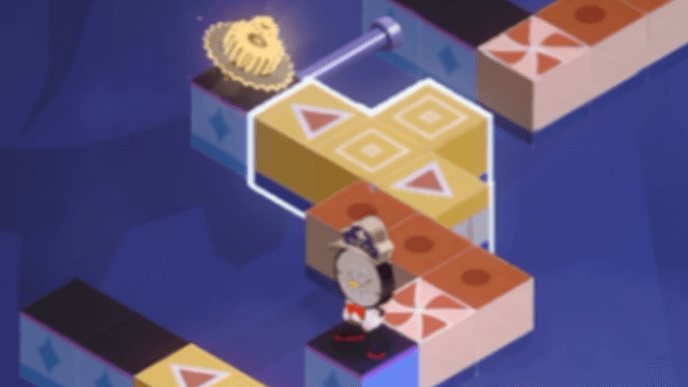 Move the right yellow block toward the yellow gear to complete the puzzle. |
▲ Back to Penacony Grand Theater Locations
Penacony Grand Theater Puzzle 4
| Penacony Grand Theater 4 Solution | |
|---|---|
| 1 |  Rotate the right orange block and then rotate the left orange block. |
| 2 |  Adjust the mirror to the left to collect the silver gear. |
| 3 |  Rotate both orange blocks once. |
| 4 |  Connect the yellow block to the orange blocks. |
| 5 |  Adjust the Dream Mirror to the right to collect the yellow gear. |
▲ Back to Penacony Grand Theater Locations
Radiant Feldspar Dream Tickers
| F2 Locations | B1 Locations |
|---|---|
 |
 |
| Radiant Feldspar Puzzle Solutions | |
| Puzzle 1 | Puzzle 2 |
| Puzzle 3 | Puzzle 4 |
| Puzzle 5 | |
You can find a total of 5 Dream Ticker puzzles in the Radiant Feldspar. Two are located in F2 while the rest are in B1. Puzzle 5 only spawns in B1 after you've solved the previous four puzzles.
Radiant Feldspar Chest Locations
Radiant Feldspar Puzzle 1
| Radiant Feldspar 1 Solution | |
|---|---|
| 1 |  Move the straight block one space to the left and bring the T-block to Clockie's starting platform. Then, connect the S-block to the gear. |
| 2 |  Connect the left end of the straight block to the right end of the S-block. Then, bring the T-block to the mirror. |
| 3 |  Adjust the Dream Mirror to the left to get the second gear. |
| 4 |  Connect the T-block to the platform with the gear and move the straight block one space to the left. |
| 5 |  Move the Dream Mirror to the right to get the third gear. |
| 6 |  Bring the S-block all the way north and connect the straight block to the mirror. |
| 7 |  Move the Dream Mirror all the way to the left to get the last gear. |
▲ Back to Radiant Feldspar Locations
Radiant Feldspar Puzzle 2
| Radiant Feldspar 2 Solution | |
|---|---|
| 1 |  Rotate the central L-block once and the straight block three times. |
| 2 |  Rotate both the southernmost block and the central block twice. Then, rotate the eastern block thrice. |
| 3 |  Move the Dream Mirror to the right to get the second gear. |
| 4 |  Rotate the smallest L-block once and move the Dream Mirror to the left to get the third gear. |
| 5 | 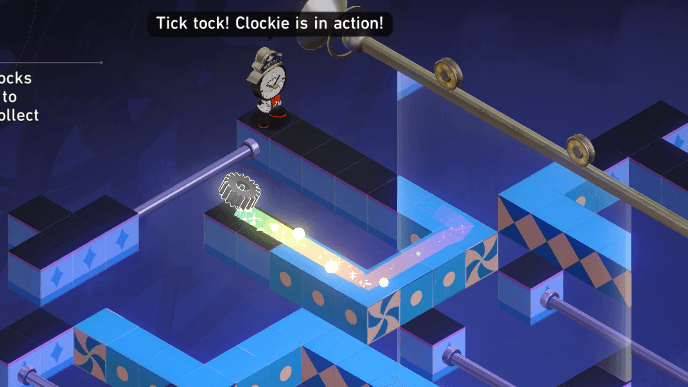 Rotate the smallest L-block twice to get the fourth gear. |
| 6 | 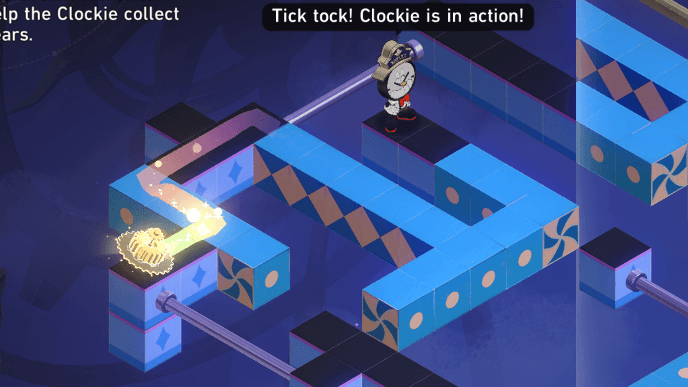 Rotate both the smallest and central L-blocks twice. Then, rotate the straight block twice as well to get the last gear. |
▲ Back to Radiant Feldspar Locations
Radiant Feldspar Puzzle 3
| Radiant Feldspar 3 Solution | |
|---|---|
| 1 |  Move the rightmost straight block all the way left and connect the leftmost T-block to it. Then, bridge the gap with the other T-block. |
| 2 |  Move the leftmost T-block all the way left and connect the rightmost straight block to it. Then, move the other T-block one space to the left. |
| 3 | 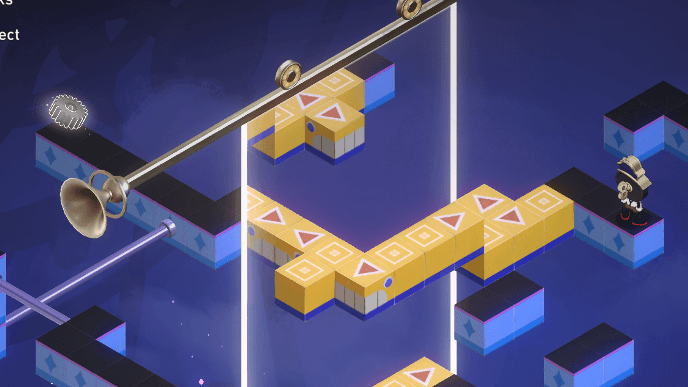 Adjust the Dream Mirror to the left to get the second gear. |
| 4 | 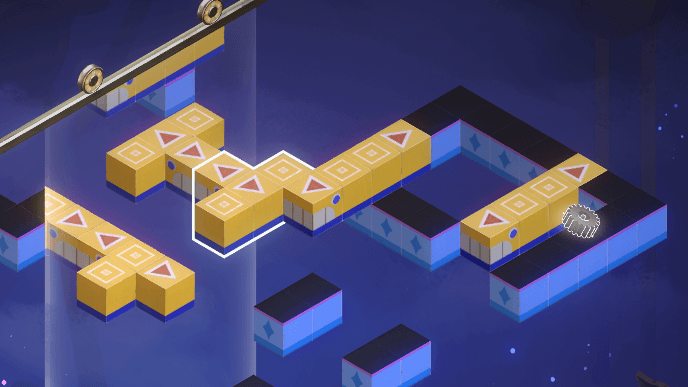 Move both straight blocks all the way to the right. Then, connect the rightmost T-block to the mirror. |
| 5 | 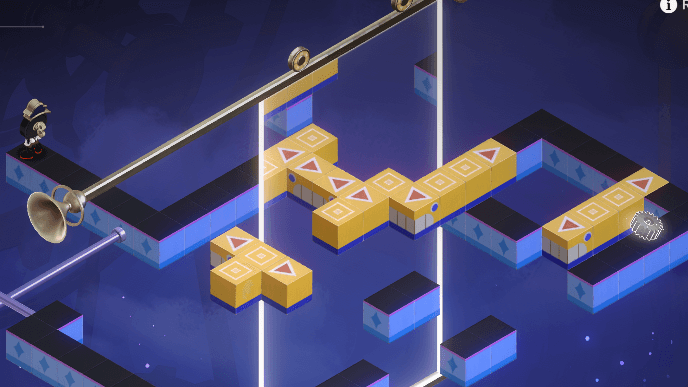 Adjust the Dream Mirror all the way to the right to get the third gear. |
| 6 | 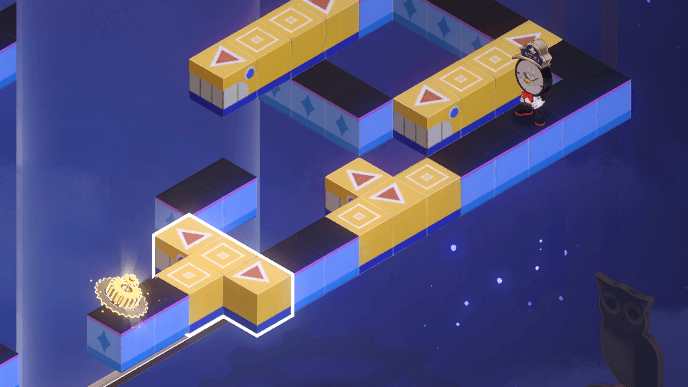 Move both T-blocks all the way right to get the last gear. |
▲ Back to Radiant Feldspar Locations
Radiant Feldspar Puzzle 4
| Radiant Feldspar 4 Solution | |
|---|---|
| 1 |  Rotate the west L-block once and south L-block thrice. |
| 2 |  Rotate the west L-block once and the north straight block twice. Then, move the Dream Mirror to the left. |
| 3 | 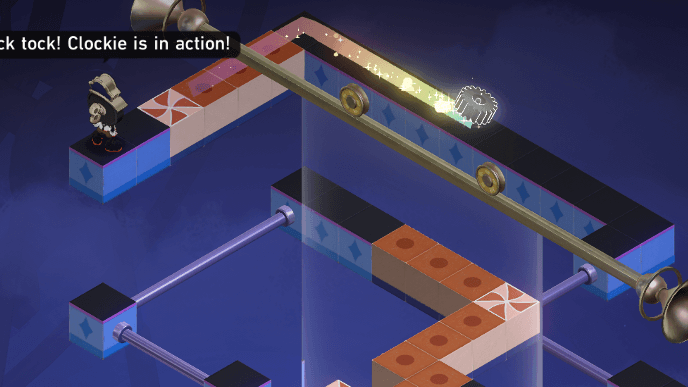 Rotate the north straight block once to get the third gear. |
| 4 |  Rotate the west L-block twice and the south L-block thrice. |
| 5 |  Rotate the south straight block once and move the mirror to the right to get the fourth gear. |
| 6 |  Rotate the south straight block twice and the south L-block thrice to get the last gear. |
▲ Back to Radiant Feldspar Locations
Radiant Feldspar Puzzle 5
| Radiant Feldspar 5 Solution | |
|---|---|
| 1 | 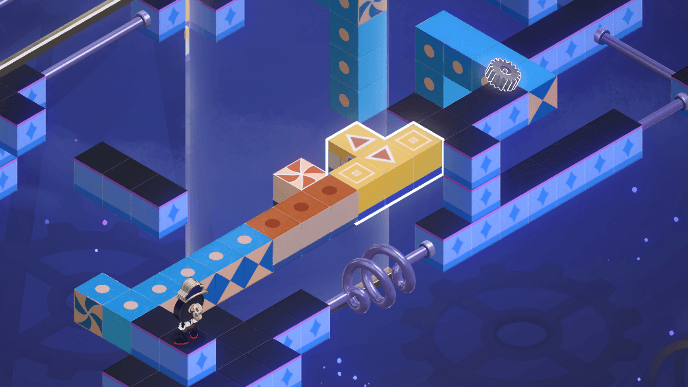 Rotate the west blue block thrice and the orange block twice. Then, bridge the gap with the yellow T-block. |
| 2 | 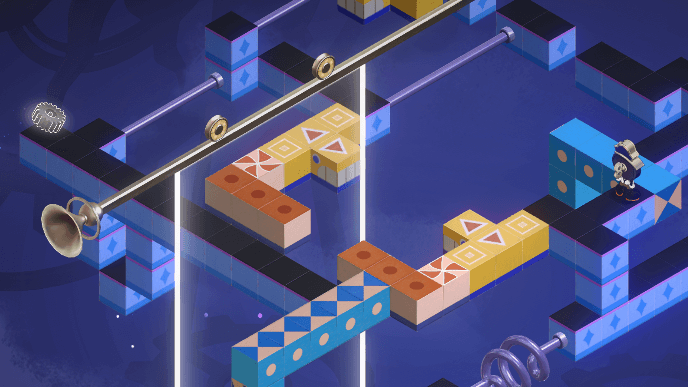 Rotate the west blue block thrice and the orange block once. Then, bridge the gap with the yellow T-block again and move the mirror to the left. |
| 3 |  Rotate the orange block once and bring the north yellow block towards the gear. |
| 4 |  Move the mirror to the right and rotate the east blue block thrice. Then, bring the yellow T-block to the mirror. |
| 5 |  Rotate the east blue block three times and move the north yellow block all the way right to get the last gear. |
▲ Back to Radiant Feldspar Locations
Paperfold University Dream Tickers
| Penacony Paperfold University Locations | |
|---|---|
 |
|
| Paperfold University Puzzle Solutions | |
| Puzzle 1 | Puzzle 2 |
| Puzzle 3 | |
There are 3 Dream Ticker puzzles in Paperfold University. Please note that there are different ways you can solve these Dream Tickers and some of them will still give you rewards even if you choose not to solve them.
Paperfold University Chest Locations
Paperfold University Puzzle 1
| Paperfold University 1 Solution | |
|---|---|
| 1 | 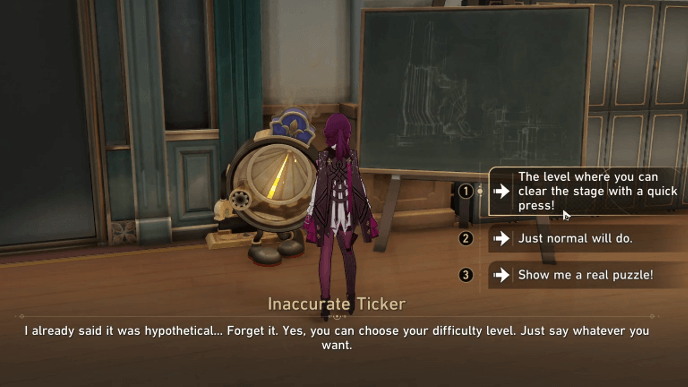 When the Dream Ticker asks you to pick a difficulty, choose "The level where you can clear the stage with a quick press!" If you chose any of the other options, you can simply exit the puzzle and talk to the Dream Ticker again to change the difficulty. The chosen difficulty won't affect the rewards. |
| 2 |  The puzzle will be set to the easiest difficulty. Start by moving the Dream Mirror all the way to the left. |
| 3 |  Move the bottom T-block left to connect it to the platform with Clockie. |
| 4 |  Rotate the orange L-block twice. |
| 5 |  Move the top T-block to the left so that you form a path that leads Clockie to the golden gear. |
▲ Back to Paperfold University Locations
Paperfold University Puzzle 2
| Paperfold University 2 Solution | |
|---|---|
| 1 |  While talking to the Dream Ticker, selecting Option 2 for all prompts will allow you to get its rewards without solving the puzzle. If you chose to repair the Ticker anyway, you can follow the steps below. |
| 2 |  Rotate the orange L-block twice. Then, move the Dream Mirror all the way to the left to get the first gear. |
| 3 |  Rotate the blue L-block three times to get the second gear. |
| 4 |  Rotate the orange L-block twice then move the yellow S-block a bit to the right so it forms a path leading to the third gear. |
| 5 |  Finally, rotate the blue L-block three times and move both the yellow S-block and Dream Mirror all the way to the right to get the last gear. |
▲ Back to Paperfold University Locations
Paperfold University Puzzle 3
| Paperfold University 3 Solution | |
|---|---|
| 1 |  Once you enter the Calmspace, you can just exit the puzzle screen and claim that you're done to get the rewards without solving anything. You can try getting any of the gears to have your fortune read, but this is purely flavor text and doesn't affect the rewards. |
| 2 |  This solution is for getting the gear at the bottom. Move the straight yellow block all the way down. |
| 3 |  Rotate the small L-block on the left side of Clockie once. Then, move the bottom T-block to the left so it forms a path to the gear. |
▲ Back to Paperfold University Locations
Dream of Gnawing Oak Dream Tickers
| F1 Locations | F3 Location |
|---|---|
 |
 |
| Dream of Gnawing Oak Puzzle Solutions | |
| Puzzle 1 | Puzzle 2 |
| Puzzle 3 | |
There are 3 Dream Ticker puzzles in Dream of Gnawing Oak. Two can be found in F1 outside of the Dreamscape while the other one can be found in F3 within the Dreamscape.
Dream of Gnawing Oak Chest Locations
Dream of Gnawing Oak Puzzle 1
| Dream of Gnawing Oak Puzzle 1 Solution | |
|---|---|
| 1 | 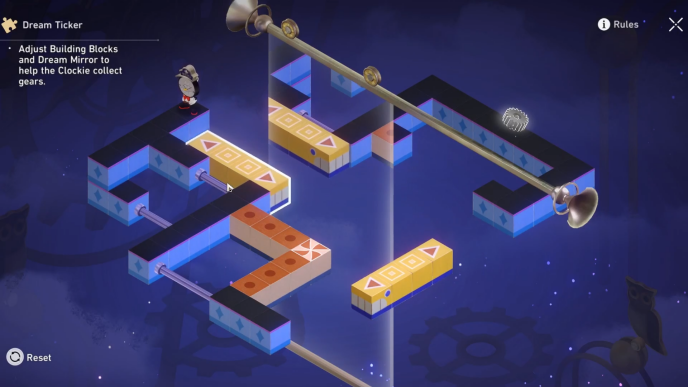 Move the vertical yellow block nearly all the way up to bridge the gap. |
| 2 | 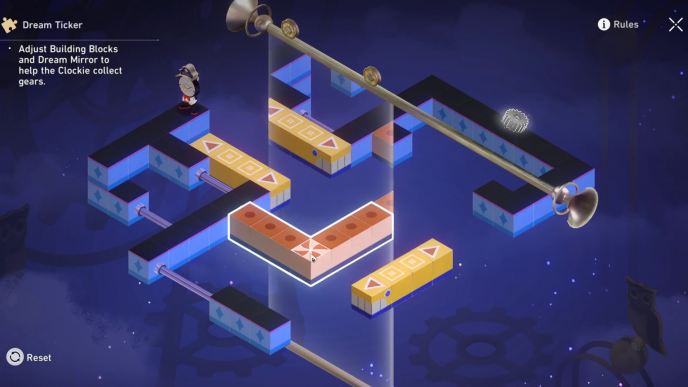 Rotate the orange L-block once. |
| 3 | 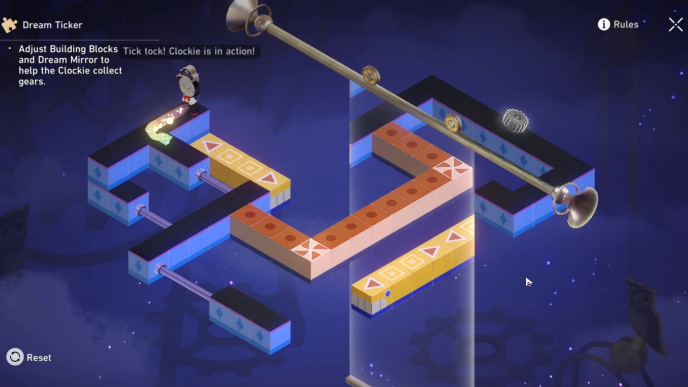 Move the Dream Mirror until the reflection of the orange L-block connects to the right side. This will get you the first gear. |
| 4 |  Move the horizontal yellow block all the way to the left. |
| 5 | 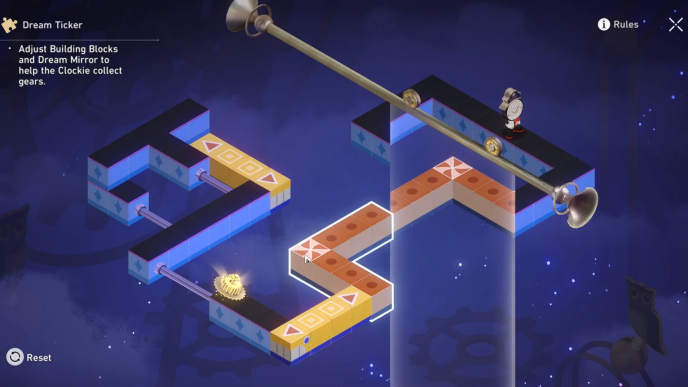 Rotate the orangeL-block once again. |
| 6 | 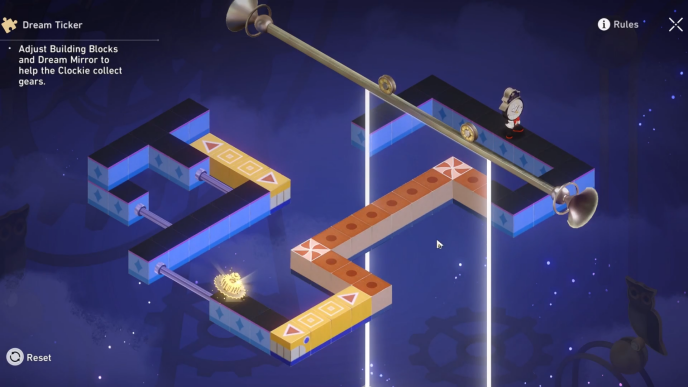 Move the Dream Mirror until the reflection of the orange L-block connects to the left path so you can get the second gear. |
▲ Back to Dream of Gnawing Oak Locations
Dream of Gnawing Oak Puzzle 2
| Dream of Gnawing Oak Puzzle 2 Solution | |
|---|---|
| 1 |  Rotate the right orange block twice. |
| 2 | 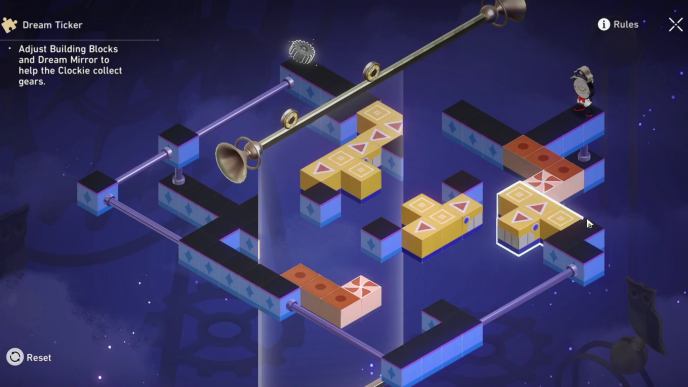 Move the leftmost yellow block all the way to the right. |
| 3 |  Move the Dream Mirror all the way to the right side so a path is formed to the first gear. |
| 4 | 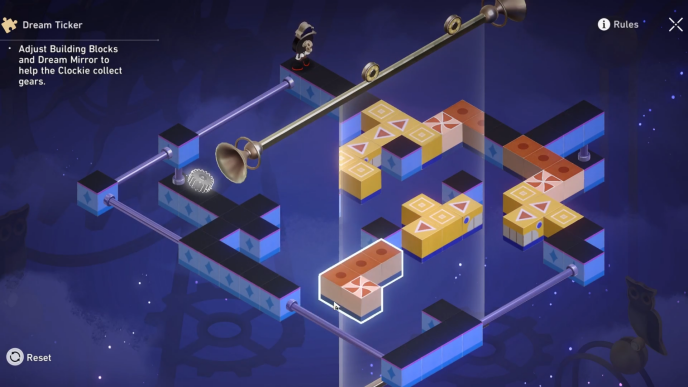 Rotate the left orange block once. |
| 5 | 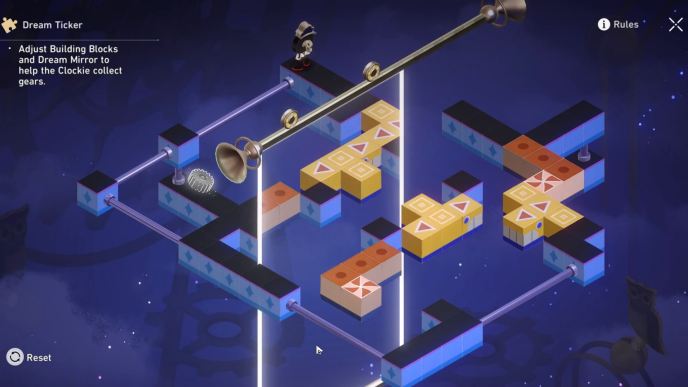 Move the Dream Mirror all the way to the left side. |
| 6 | 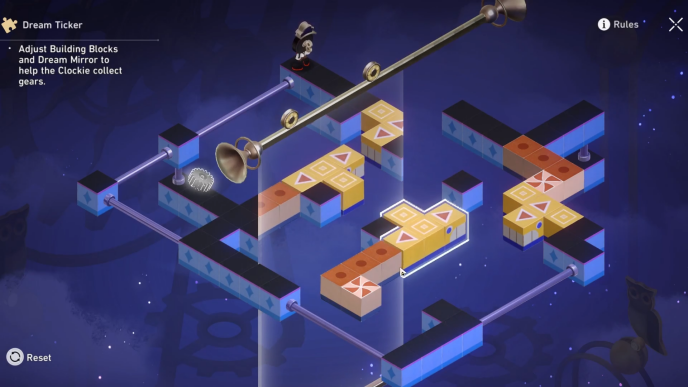 Move the top yellow block to the left. |
| 7 |  Move the right yellow block one block towards the left so its reflection in the Dream Mirror aligns with the rest. This will let you reach the second gear. |
| 8 | 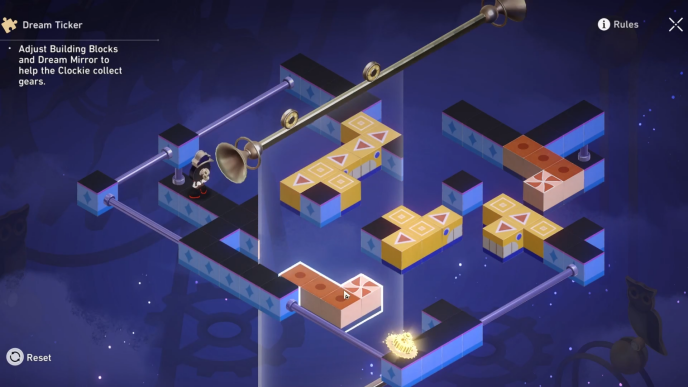 Rotate the left orange block once again. |
| 9 | 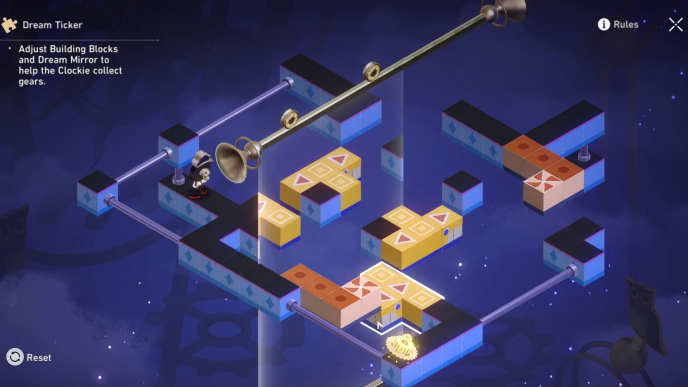 Move the right yellow block all the way to the left so you can reach the third and final gear. |
▲ Back to Dream of Gnawing Oak Locations
Dream of Gnawing Oak Puzzle 3
| Dream of Gnawing Oak Puzzle 3 Solution | |
|---|---|
| 1 |  Move the top most yellow block all the way to the left. |
| 2 | 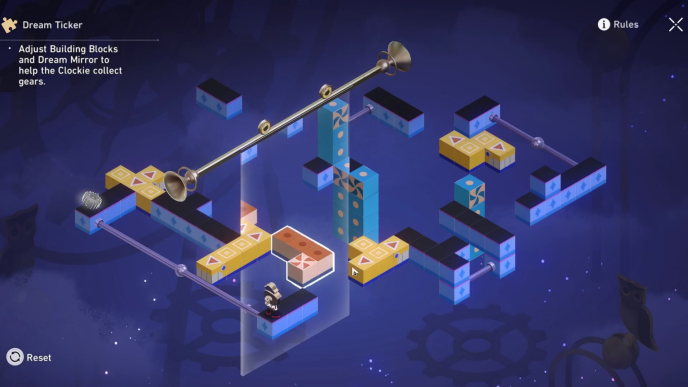 Rotate the orange block twice. |
| 3 | 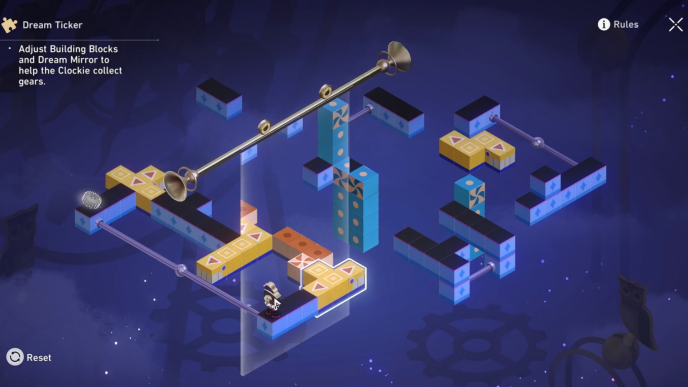 Move the bottom left yellow block all the way to the left. |
| 4 | 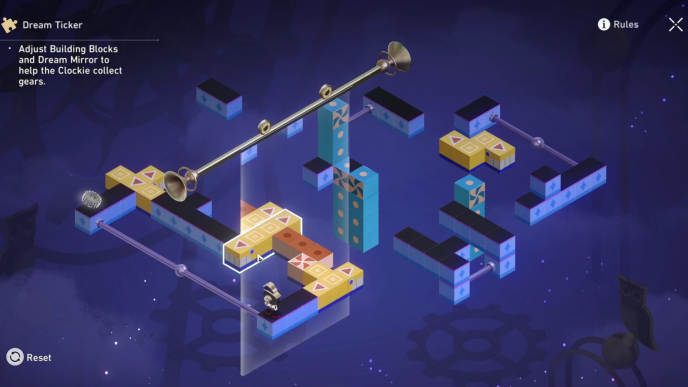 Move the middle yellow block slightly to the right. This will form a path to the first gear. |
| 5 | 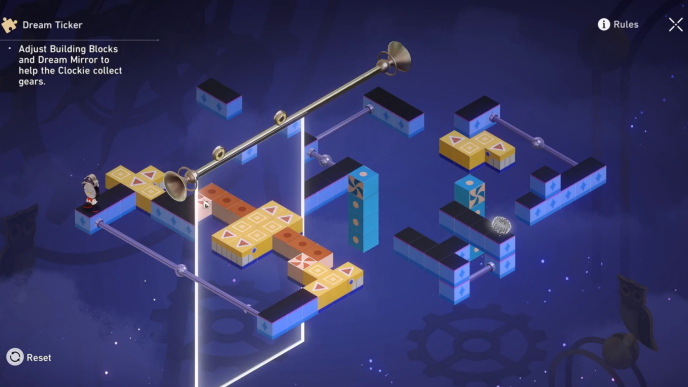 Move the Dream Mirror all the way to the left. |
| 6 | 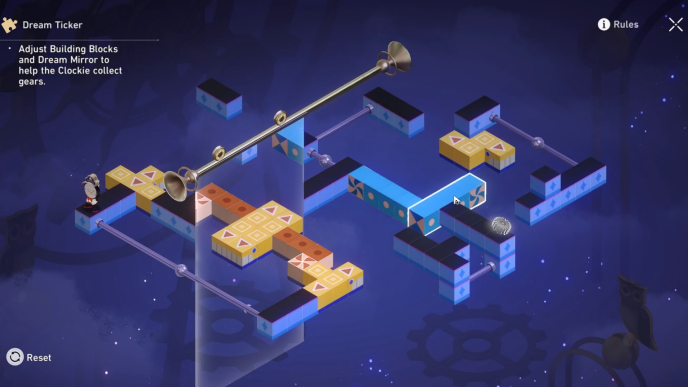 Rotate the left blue block once and the right blue block thrice. |
| 7 | 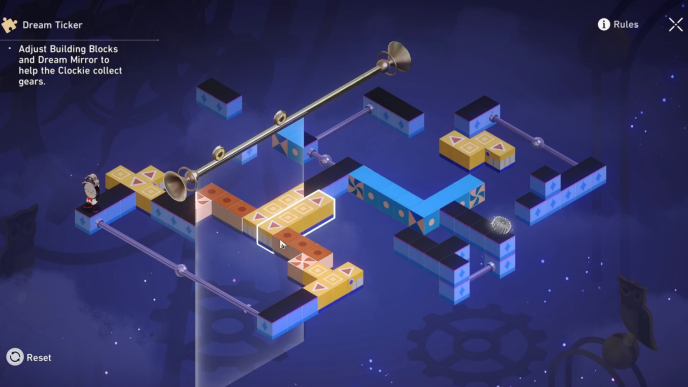 Move the middle yellow block slightly to the right until its reflection connects to both the orange block's reflection and the path to the right. This will form a path to the second gear. |
| 8 | 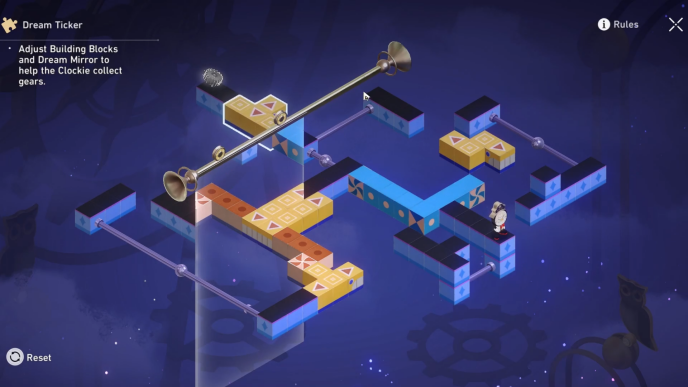 Move the top yellow block all the way to the right. |
| 9 | 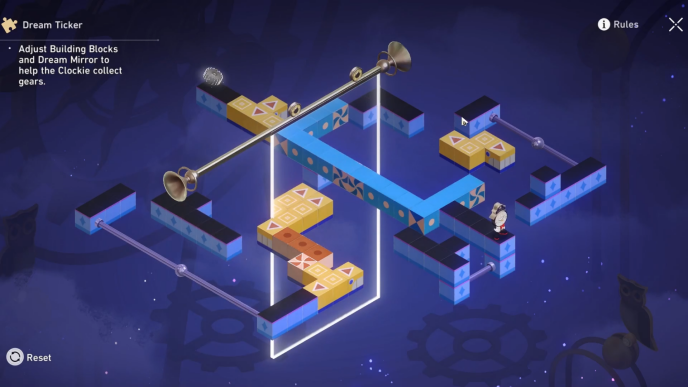 Move the Dream Mirror all the way to the right to form a path to the third gear. |
| 10 | 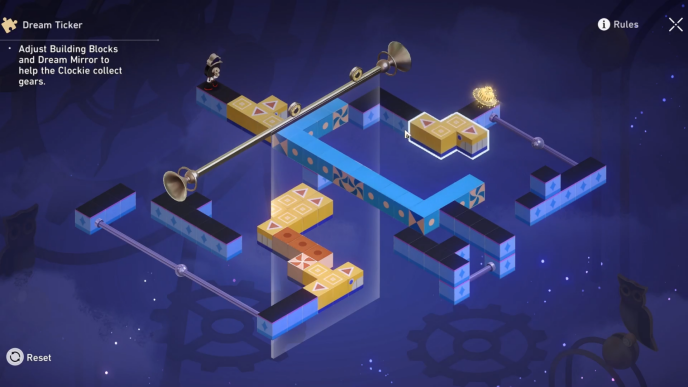 Move the right yellow block all the way up. |
| 11 |  Rotate the left blue block once to form a path to the fourth and final gear. |
▲ Back to Dream of Gnawing Oak Locations
Dream Ticker Information
Clockie Puzzles in the Dreamscape

Dream Tickers are Clockie puzzles scattered around the Penacony Dreamscape. Solve these puzzles to collect the Eerie Building Blocks which will be used to repair the Dream Ticker Supervisor.
Dream Ticker Supervisor Location

You can find the Dream Ticker Supervisor on the 1st Floor of The Reverie (Dreamscape). Simply teleport to the Monitoring Room and head straight to the door at the North to find the Supervisor.
Honkai: Star Rail Related Guides

All Tips and Tricks Guides
Comment
2  Anonymous about 2 years
Apologies, seems in my blind frustrations I misread the guide.
Author

All Dream Ticker Puzzle Locations and Solutions
Please participate in our site
improvement survey
03/2026
improvement survey
03/2026
Would you assist in
improving Game8's site?
improving Game8's site?

×
We are listening to our users' valuable opinions and discussing how to act on them.
The information collected through this survey will be used for the purpose of improving our services. In addition, the information will only be disclosed a part of a statistic in a format that will not allow identification of personal information.
Begin Survey
Not Now
×
Please rate each item regarding Game8.co's Advertisements.
Amount of Ads
Very Dissatisfied
Somewhat Dissatisfied
Fine
Somewhat Satisfied
Highly Satisfied
Placement of Ads
Timing of Ad Display
Ad Loading Speed
Safeness of Ads
Content of Ads
×
Please rate each item regarding Game8.co's Quality of Articles.
Amount of information
Very Dissatisfied
Somewhat Dissatisfied
Fine
Somewhat Satisfied
Highly Satisfied
Frequency of updates
Speed of new information
Accuracy of articles
Understandibility of articles
Readability of sentences
×
Please rate each item regarding Game8.co's Usability of the Site.
Ease of finding information
Very Dissatisfied
Somewhat Dissatisfied
Fine
Somewhat Satisfied
Highly Satisfied
Loading Speed
Use of Color
Font Size
Visibility of Images
Easy to Understand Layout
×
Please rate each item regarding Game8.co's Message Boards, Comments.
Ease of Writing
Very Dissatisfied
Somewhat Dissatisfied
Fine
Somewhat Satisfied
Highly Satisfied
Readability
Ease in Finding Information
Comment Quality
Comment Quantity
Admin Response
×
Please rate each item regarding Game8.co's Site's new design.
Please rate our site's new design
Very Dissatisfied
Somewhat Dissatisfied
Fine
Somewhat Satisfied
Highly Satisfied
Do you think that the website's design change makes the site easier to use?
Has the new design made it easier for you to find information on the site?
Has the new design improved the overall visual appeal of the site?
How would you rate your overall satisfaction with the new design of the site?
×
How likely are you to recommend Game8 to someone you know?
Very Unlikely
0
1
2
3
4
5
6
7
8
9
10
Very Likely
If you have other opinions regarding potential improvement to the website, please share them with us. We would appreciate your honest opinion.
Note: This is a free response section, so you can proceed without entering anything.
Note: Please be sure not to enter any kind of personal information into your response.
Note: Please be sure not to enter any kind of personal information into your response.
×
Thank You
×
Thank you for participating in our survey! Your answers will help us to improve the quality of our website and services.
We hope you continue to make use of Game8.
We hope you continue to make use of Game8.
Close
Premium Articles

Rankings
Gaming News


![Everwind Review [Early Access] | The Shaky First Step to A Very Long Journey](https://img.game8.co/4440226/ab079b1153298a042633dd1ef51e878e.png/thumb)

![Monster Hunter Stories 3 Review [First Impressions] | Simply Rejuvenating](https://img.game8.co/4438641/2a31b7702bd70e78ec8efd24661dacda.jpeg/thumb)
Popular Games

Genshin Impact Walkthrough & Guides Wiki
Honkai: Star Rail Walkthrough & Guides Wiki
Umamusume: Pretty Derby Walkthrough & Guides Wiki
Pokemon Pokopia Walkthrough & Guides Wiki
Resident Evil Requiem (RE9) Walkthrough & Guides Wiki
Monster Hunter Wilds Walkthrough & Guides Wiki
Wuthering Waves Walkthrough & Guides Wiki
Arknights: Endfield Walkthrough & Guides Wiki
Pokemon FireRed and LeafGreen (FRLG) Walkthrough & Guides Wiki
Pokemon TCG Pocket (PTCGP) Strategies & Guides Wiki


Recommended Games
Diablo 4: Vessel of Hatred Walkthrough & Guides Wiki
Fire Emblem Heroes (FEH) Walkthrough & Guides Wiki
Yu-Gi-Oh! Master Duel Walkthrough & Guides Wiki
Super Smash Bros. Ultimate Walkthrough & Guides Wiki
Pokemon Brilliant Diamond and Shining Pearl (BDSP) Walkthrough & Guides Wiki
Elden Ring Shadow of the Erdtree Walkthrough & Guides Wiki
Monster Hunter World Walkthrough & Guides Wiki
The Legend of Zelda: Tears of the Kingdom Walkthrough & Guides Wiki
Persona 3 Reload Walkthrough & Guides Wiki
Cyberpunk 2077: Ultimate Edition Walkthrough & Guides Wiki


All rights reserved
Copyright © 2024 HoYoverse, COGNOSPHERE. All Rights Reserved.
The copyrights of videos of games used in our content and other intellectual property rights belong to the provider of the game.
The contents we provide on this site were created personally by members of the Game8 editorial department.
We refuse the right to reuse or repost content taken without our permission such as data or images to other sites.
"Wow this was so easy" Late game Dream Ticker: