Penacony Grand Theater Treasure Chest Locations
★ Exclusive: Check out the State of Meta in 4.0!
♦ Latest: 4.0 Redeem Codes
♦ Phase 2: Sparkxie, Sparkle, Cerydra, Rappa
♦ Upcoming: Ashveil, Silver Wolf Lv.999, Evanescia
♦ Events: Cosmicon, Roll On!, Ding! Arcadia Fun-Time Clock-In Essentials
There are 53 Penacony Grand Theater Chests to collect in Honkai: Star Rail's Penacony. See all Penacony Grand Theater chests, Warp Trotter, and Lordly Trashcans here!
List of Contents
Penacony Grand Theater Chest Locations
Penacony Grand Theater Interactive Map
Select icons to toggle them on/off
| Space Anchor | Treasure Chest | ||
| Origami Bird | Warp Trotter | ||
| Lordly Trashcan | Great Tree | ||
| Hanu's Adventure | Echo of War |
Penacony Grand Theater Chests
| Penacony Grand Theater Maps | |||||||||||
|---|---|---|---|---|---|---|---|---|---|---|---|
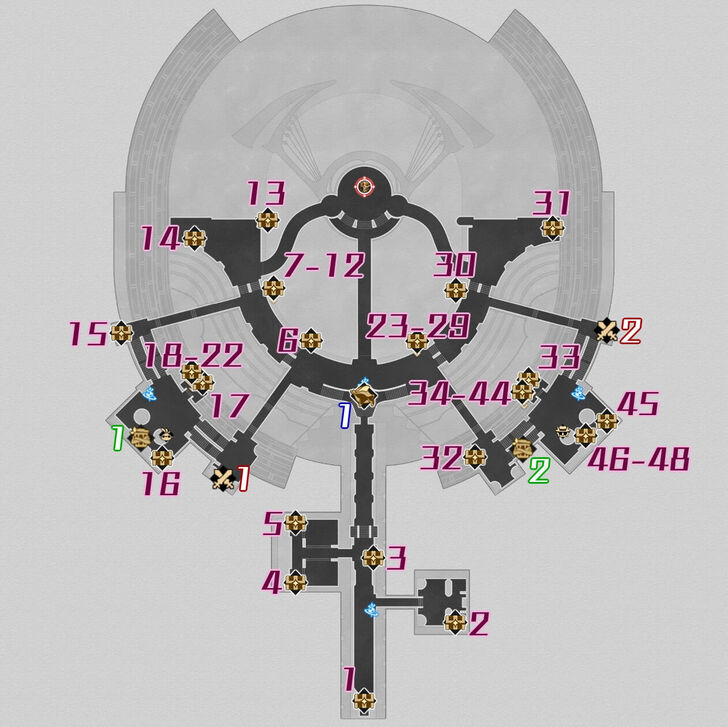 See Full Image |
|||||||||||
| Penacony Grand Theater Chests | |||||||||||
| Chest 1 | Chest 2 | Chest 3 | Chest 4 | ||||||||
| Chest 5 | Chest 6 | Chest 7 | Chest 8 | ||||||||
| Chest 9 | Chest 10 | Chest 11 | Chest 12 | ||||||||
| Chest 13 | Chest 14 | Chest 15 | Chest 16 | ||||||||
| Chest 17 | Chest 18 | Chest 19 | Chest 20 | ||||||||
| Chest 21 | Chest 22 | Chest 23 | Chest 24 | ||||||||
| Chest 25 | Chest 26 | Chest 27 | Chest 28 | ||||||||
| Chest 29 | Chest 30 | Chest 31 | Chest 32 | ||||||||
| Chest 33 | Chest 34 | Chest 35 | Chest 36 | ||||||||
| Chest 37 | Chest 38 | Chest 39 | Chest 40 | ||||||||
| Chest 41 | Chest 42 | Chest 43 | Chest 44 | ||||||||
| Chest 45 | Chest 46-48 | ||||||||||
| Penacony Grand Theater Lordly Trashcans | |||||||||||
| Trashcan 1 | Trashcan 2 | ||||||||||
| Penacony Grand Theater Trotter and Foes | |||||||||||
| Trotter | Foe 1 | Foe 2 | |||||||||
How to Get Penacony Grand Theater Chests
Penacony Grand Theater Chest 1
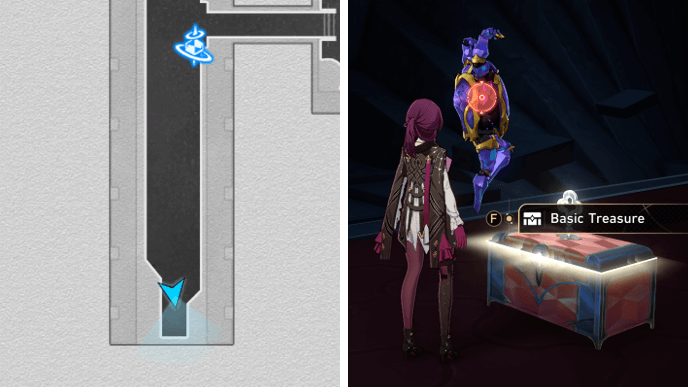
Chest 1 of Penacony Grand Theater is located at the southernmost area of the map. Be careful of the enemy guarding it.
Penacony Grand Theater Chest 2
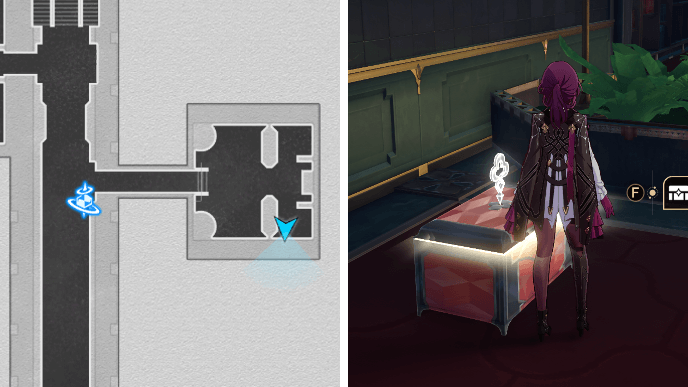
Chest 2 is in the room directly east of the Ascension Hallway Space Anchor. Head all the way to the far end while steering clear of enemies and you'll find it in the southeastern corner of the room.
Penacony Grand Theater Chest 3
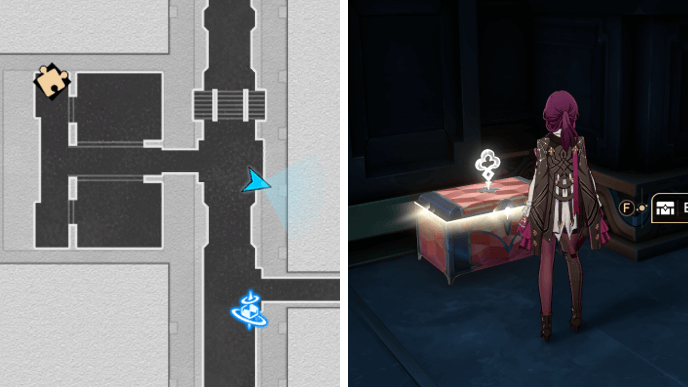
Head north from the Ascension Hallway Space Anchor and you'll find Chest 3 tucked into a corner space at your right side.
Penacony Grand Theater Chest 4

Go into the area directly west of Chest 3's location and head towards the left side of the front desk. Chest 4 is in the southwestern corner of the area.
Penacony Grand Theater Chest 5
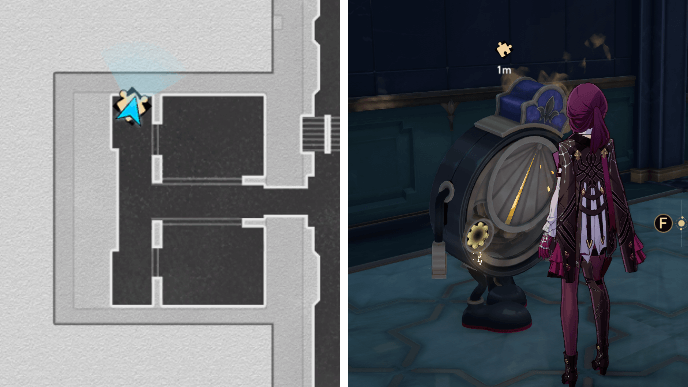
Chest 5 is at the northwestern corner of the area, directly across from Chest 4. You'll get the chest after solving a Dream Ticker puzzle.
Penacony Grand Theater Chest 5 Dream Ticker
You can repair the Dream Ticker that gives Chest 5 by following the steps shown above.
Penacony Grand Theater Chest 6

Chest is on a raised platform located northwest of the Hall of Chords Space Anchor.
Penacony Grand Theater Chest 7
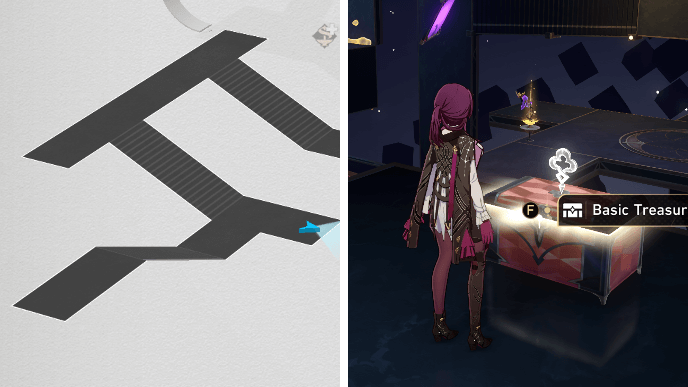
Head into the northwestern Dreamwalker puzzle room using the Arcane Artwork. Go down the first set of stairs and you'll find Chest 7 on your right side.
Penacony Grand Theater Chest 8
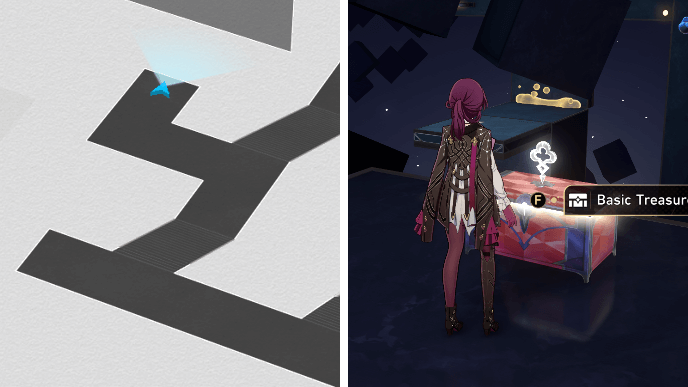
From Chest 7, continue onwards until you come across splitting paths. Take the path on your left to reach Chest 8. Be careful of the nearby enemy.
Penacony Grand Theater Chest 9
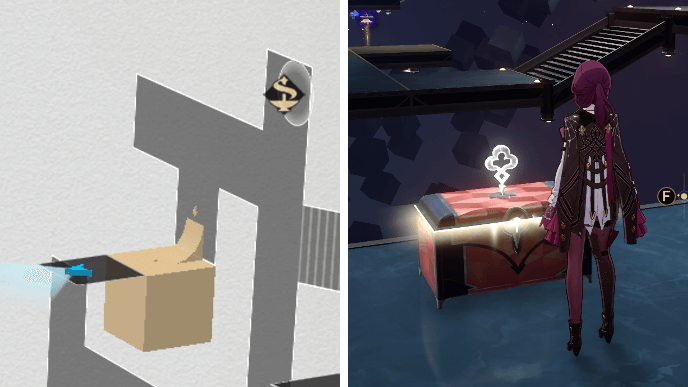
After getting Chest 8, take the path leading forward and get charges at the nearby Bubble Tower. Use the Dream Module to move the platform and form a Bubble Bridge.
Keep going straight and get charges from the next Bubble Tower you come across. Take the Bubble Bridge leading to the platform nearest to the Bubble Tower to reach Chest 9.
Penacony Grand Theater Chest 10
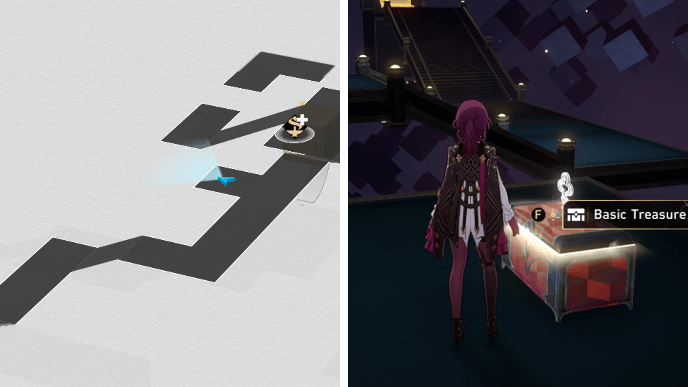
Retrieve your bubble charges again and use the Dream Module to form a Bubble Bridge leading to the path forward. Go straight until you come across Chest 10 on your left side. An enemy will be guarding it.
Penacony Grand Theater Chest 11
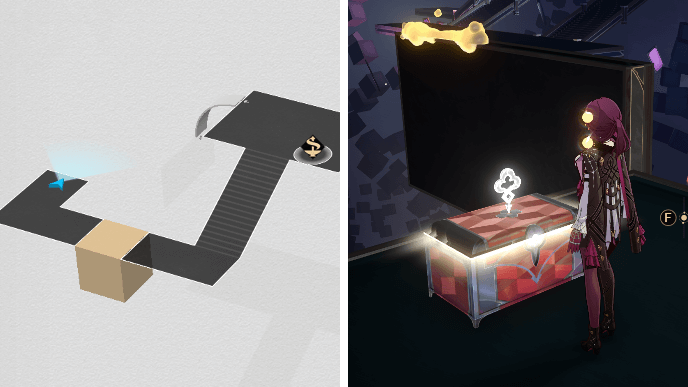
From Chest 10, go down the stairs and obtain more bubble charges. Take the path nearest to the Bubble Tower and use the Dream Module to move the platform. After bridging the gap, you can reach Chest 11.
Penacony Grand Theater Chest 12
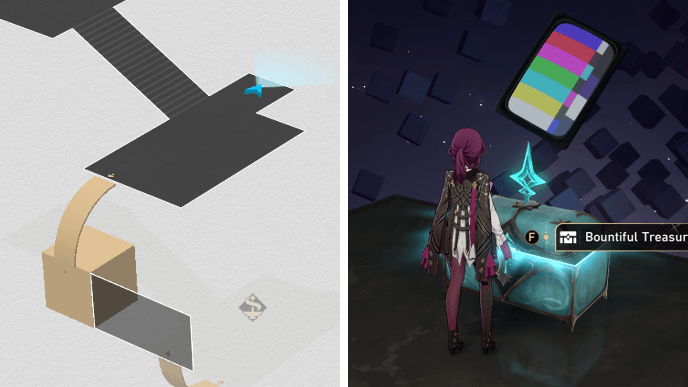
After getting Chest 11, move the platform again with the Dream Module then return to the path leading forward. Keep going straight and you'll eventually come across Chest 12 just before reaching the exit.
Penacony Grand Theater Chest 13
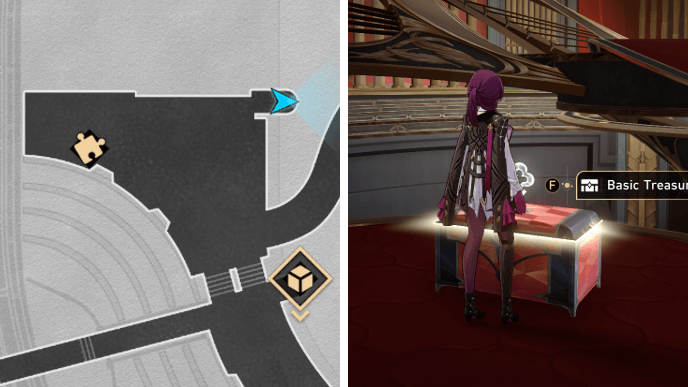
From the entrance of the northwestern puzzle room, go up the nearby stairs and continue north until you see Chest 13 on a raised platform.
Penacony Grand Theater Chest 14
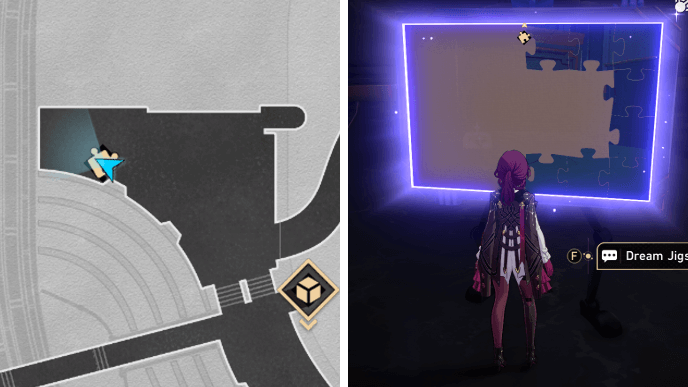
After getting Chest 13, head west and you'll find a Dream Jigsaw puzzle. Be careful of the nearby enemies and solve it to get Chest 14.
Penacony Grand Theater Chest 14 Dream Jigsaw
Solve the Dream Jigsaw puzzle and get Chest 14 by following the steps above.
Penacony Grand Theater Chest 15

Chest 15 is located northwest of the Saloon of Gospels Space Anchor. From the Space Anchor, go down the nearby stairs and you'll find the chest near some planter boxes.
Penacony Grand Theater Chest 16
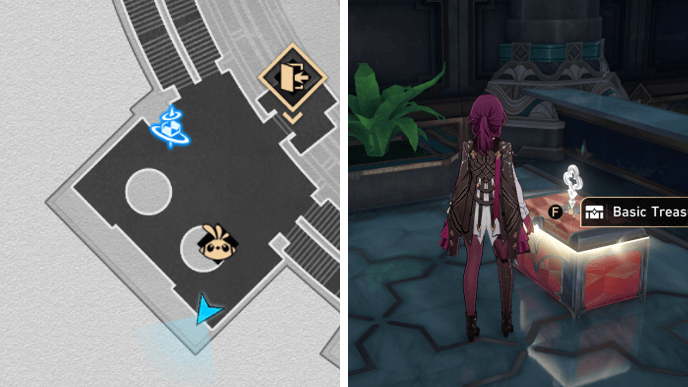
Chest 16 is located a few steps south of the Great Tree. The chest will be by the long counter and near a planter box.
Penacony Grand Theater Chest 17
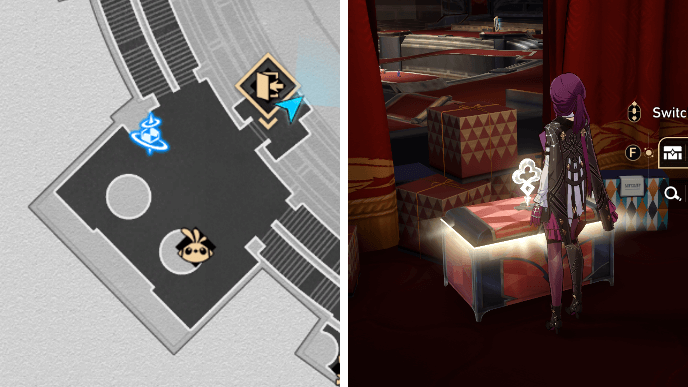
From the Saloon of Gospels Space Anchor, go east into the small room behind the curtains. Chest 17 will be in front of a pile of gift boxes.
Penacony Grand Theater Chest 18
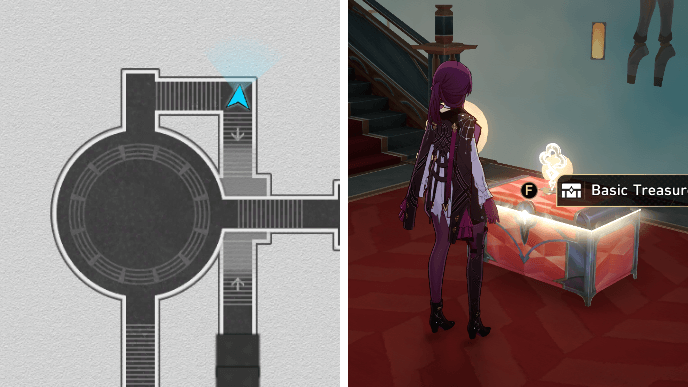
Go into the southwestern puzzle room using the Arcane Artwork. Go down the stairs to reach the main platform then take the path on your right while steering clear of the enemies. Chest 18 will be at the bottom of the stairs.
Penacony Grand Theater Chest 19
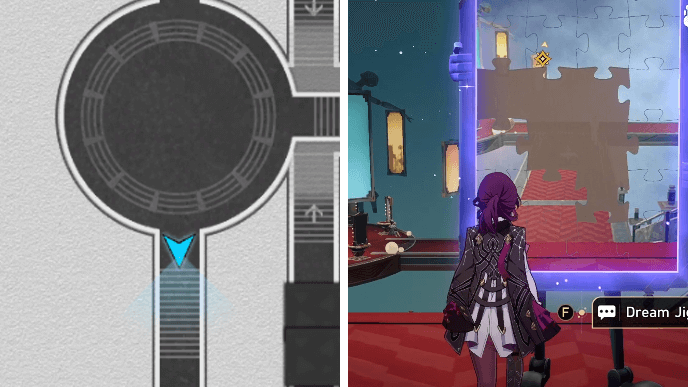
From Chest 18, return to the main platform and solve the nearby Dream Jigsaw puzzle. After doing so, Chest 19 as well as the path leading forward will appear.
Penacony Grand Theater Chest 19 Dream Jigsaw
Solve the Dream Jigsaw puzzle and get Chest 19 by following the steps above.
Penacony Grand Theater Chest 20
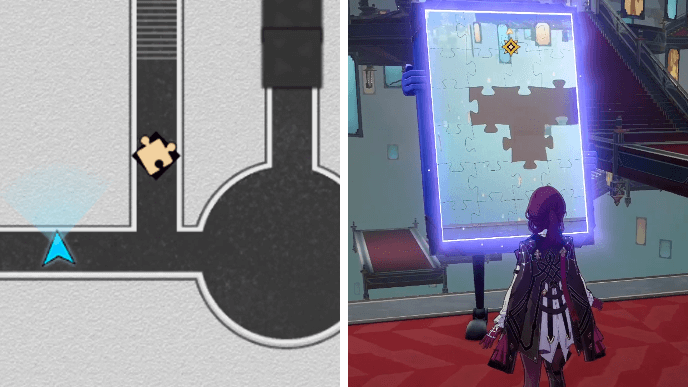
After getting Chest 19, go right and you'll find another Dream Jigsaw. Solve it to make Chest 20 spawn. You'll need to activate the control panel past the southeastern platform to form a bridge and get to it.
Penacony Grand Theater Chest 20 Dream Jigsaw
Solve the Dream Jigsaw puzzle and get Chest 20 by following the steps above.
Penacony Grand Theater Chest 21
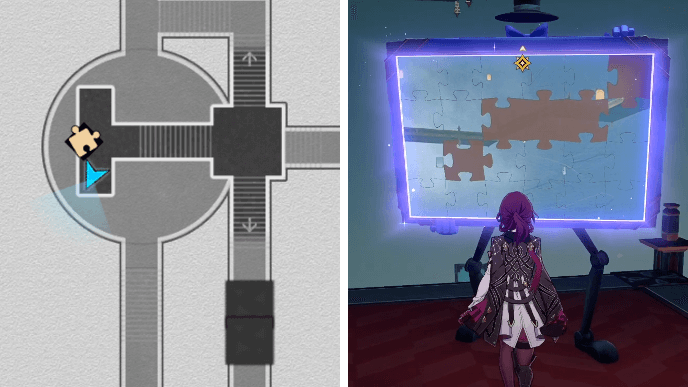
From Chest 20, solve the nearby Dream Jigsaw puzzle to make Chest 21 and the path leading forward appear.
Penacony Grand Theater Chest 21 Dream Jigsaw
Solve the Dream Jigsaw puzzle and get Chest 21 by following the steps above.
Penacony Grand Theater Chest 22
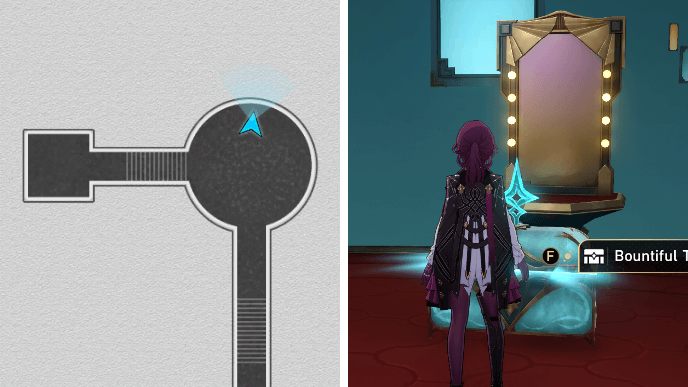
After getting Chest 21, keep going straight until you reach the next circular platform just before the exit. Chest 22 will be in front of a mirror.
Penacony Grand Theater Chest 23
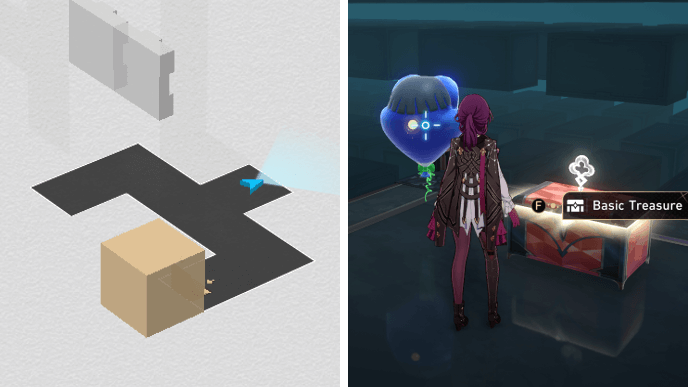
Enter the northeastern Dreamwalker puzzle room and get charges from the Bubble Tower. Take the path to the right of the Bubble Tower and use the Bubble Bridge to reach Chest 23.
Penacony Grand Theater Chest 24
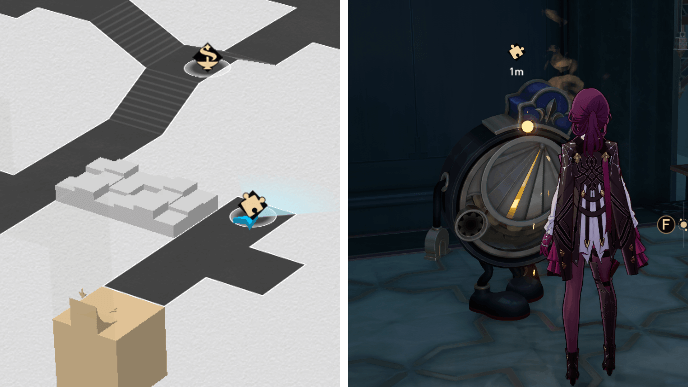
From Chest 23, use the nearby Dream Module to move the platform and form a Bubble Bridge leading to Chest 24. You'll get the chest after solving a Dream Ticker puzzle.
Penacony Grand Theater Chest 24 Dream Ticker
You can repair the Dream Ticker that gives Chest 24 by following the steps shown above.
Penacony Grand Theater Chest 25
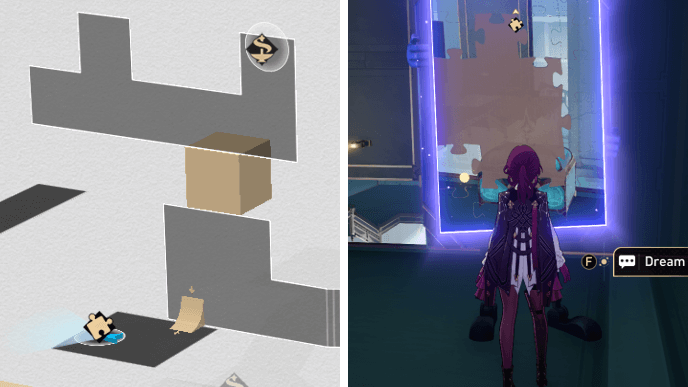
After getting Chest 24, use the nearby control panel to form a bridge leading back to path forward. Get more charges at the Bubble Tower and continue forward.
Retreive your bubble charges again at the next Bubble Tower and go up the Bubble Bridge furthest away from the Dream Module. You need to solve a Dream Jigsaw to get Chest 25.
Penacony Grand Theater Chest 25 Dream Jigsaw
Solve the Dream Jigsaw puzzle and get Chest 25 by following the steps above.
Penacony Grand Theater Chest 26
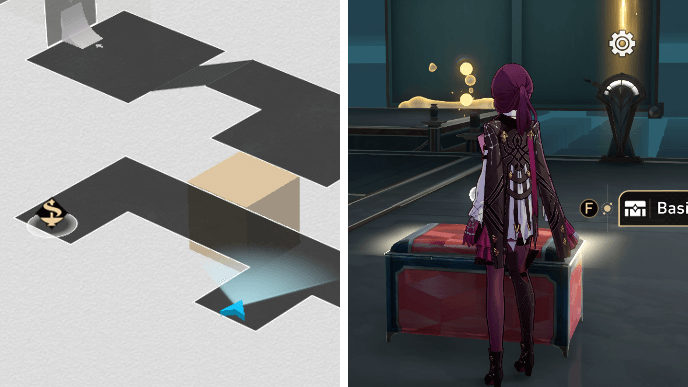
From Chest 25, return to the nearby Bubble Tower to get your charges back and you'll find Chest 26 across from the Dream Module.
Penacony Grand Theater Chest 27

Use the nearby Dream Module to form the next Bubble Bridge and keep going straight. You'll find Chest 27 near another Bubble Tower.
Penacony Grand Theater Chest 28
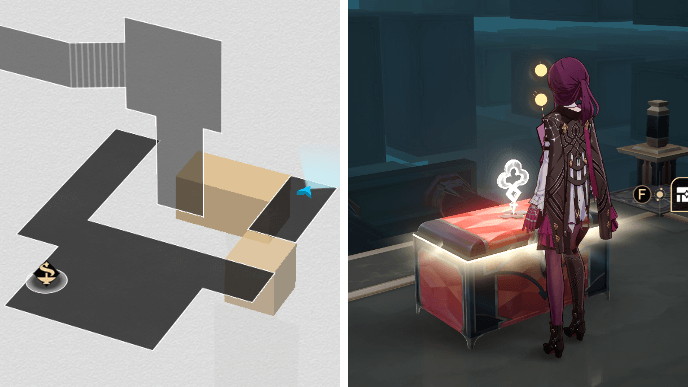
After getting Chest 27, use the Dream Module nearest to the Bubble Bridge you previously came from. Once you've moved the square platform, you can reach Chest 28 in the corner.
Penacony Grand Theater Chest 29
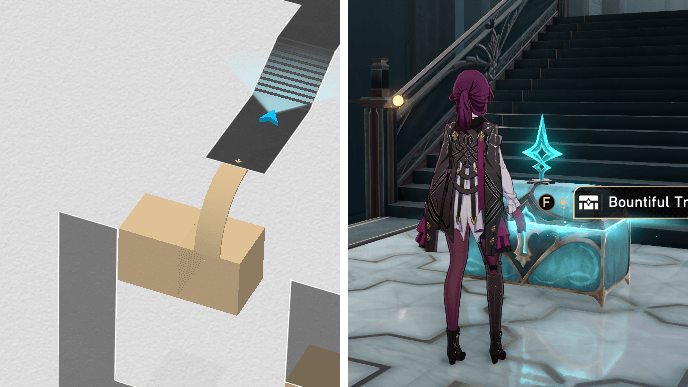
Use the other Dream Module to bring over the rectangular platform. Take the newly formed Bubble Bridge to reach Chest 29.
Penacony Grand Theater Chest 30
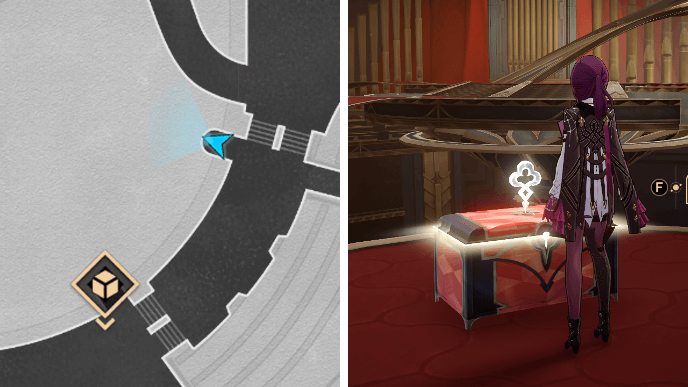
From the entrance of the northeastern puzzle room, go down the nearby stairs and go straight until you see Chest 30 on a raised platform.
Penacony Grand Theater Chest 31
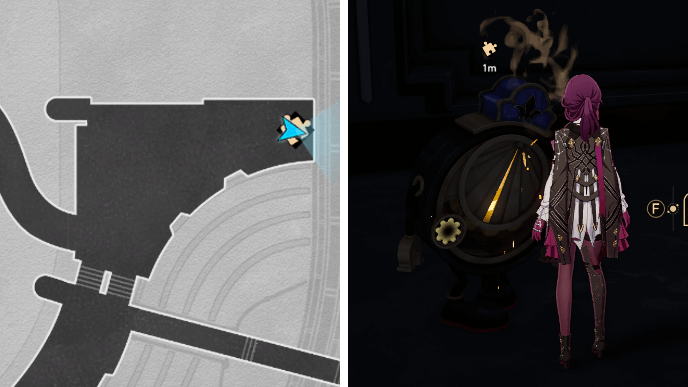
Chest 31 is located in the northeastern corner of the map. You need to repair a broken Dream Ticker to get the chest.
Penacony Grand Theater Chest 31 Dream Ticker
You can repair the Dream Ticker that gives Chest 31 by following the steps shown above.
Penacony Grand Theater Chest 32
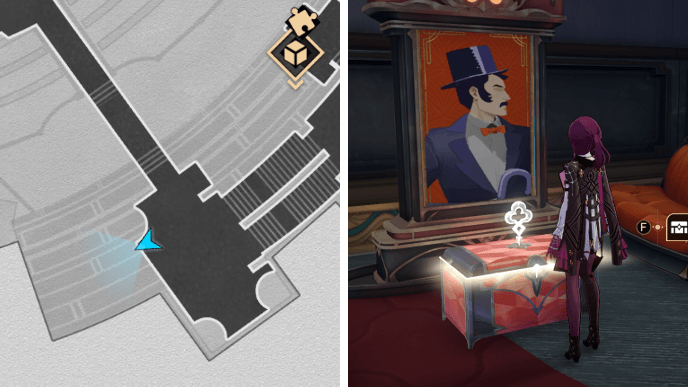
Take the long pathway directly across from the entrance of the northeastern puzzle room and you'll find Chest 32 to your right. The chest will be near a large poster and circular couches.
Penacony Grand Theater Chest 33
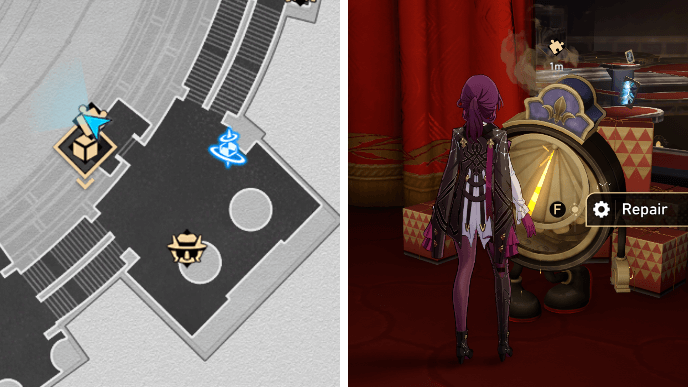
Go through the curtain to enter the small room west of the Communing Hall Space Anchor. Chest 33 will come from a Dream Ticker puzzle in front of a pile of boxes.
Penacony Grand Theater Chest 33 Dream Ticker
You can repair the Dream Ticker that gives Chest 33 by following the steps shown above.
Penacony Grand Theater Chest 34
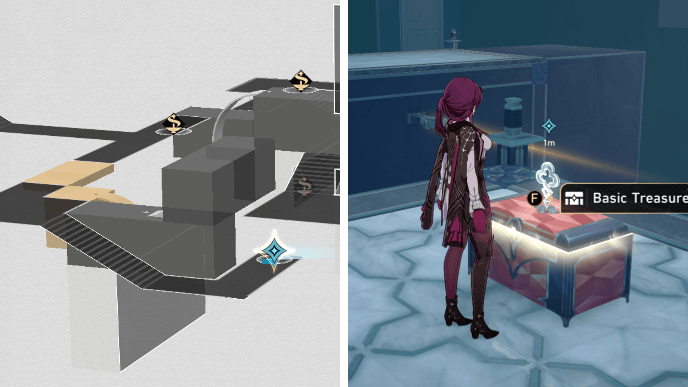
Chest 34 is located in the southeastern Dreamwalker puzzle room, which is locked behind the Loothunt in Mazeville Adventure Mission. In the puzzle room, get charges and take the bridge to the left of the Bubble Tower.
Obtain more bubble charges then return to the previous Bubble Tower and take the bridge on its right. Move the platform with the Dream Module and continue onwards. Go down the nearby stairs and you'll find Chest 34.
Penacony Grand Theater Chest 35
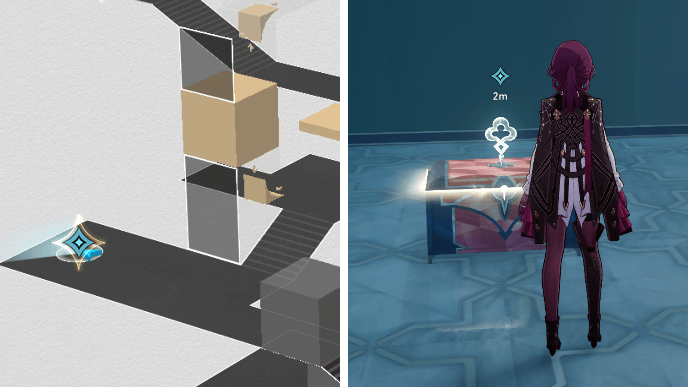
From Chest 24, head back upstairs and activate the nearby control panel to reach the Bubble Tower by the entrance again. Get more charges and take the Bubble Bridge leading upwards.
Keep going straight while consistently refilling your bubble charges. Once you spot a Dream Module, use it to move the platform and keep going. Before reaching the exit, go down the stairs opposite the control panel to get Chest 35.
Penacony Grand Theater Chest 36
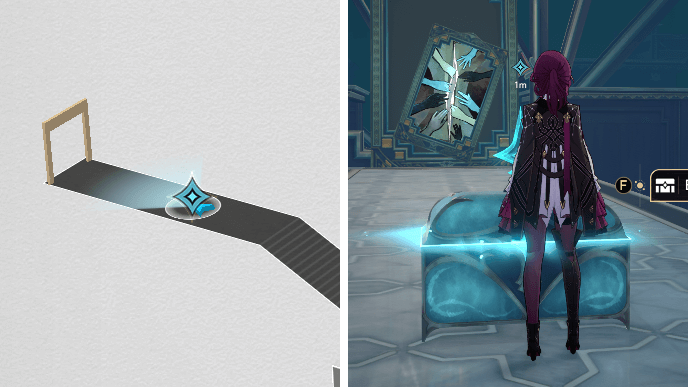
After getting Chest 35, go back upstairs and activate the control panel to continue onwards. You'll eventually come across Chest 36 just before reaching the exit.
Penacony Grand Theater Chest 37
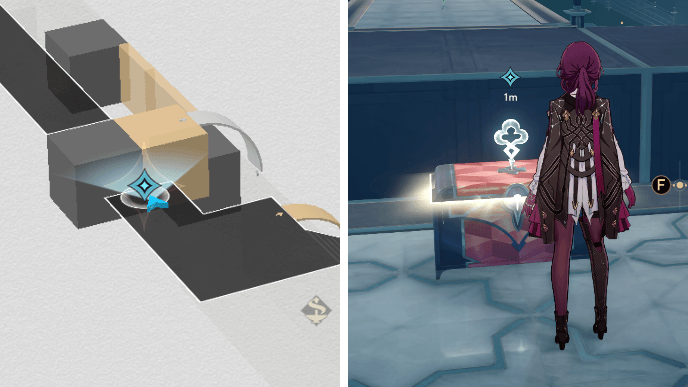
Talk to Aymille again after getting Chest 36, and the maze will transform. Get bubble charges and move the platform with the Dream Module.
Take the bridge to the right of the Dream Module. Go down the other bridge nearest to the next Bubble Tower and you'll find Chest 37.
Penacony Grand Theater Chest 38
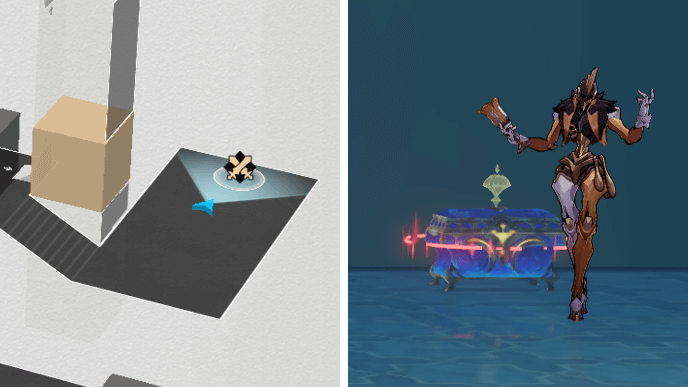
Return to the nearest Bubble Tower to get back your charges and activate the nearby control panel. Take the bridge at the end and continue onwards. Go down the stairs near the next Dream Module and you'll find an enemy guarding a chest. Defeat it to get Chest 38.
Penacony Grand Theater Chest 39
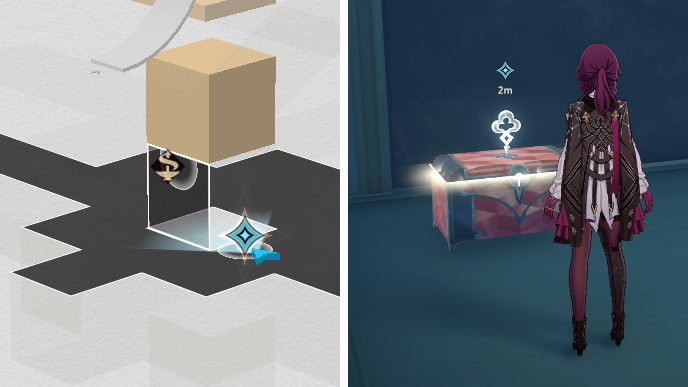
Go back upstairs to move the platform with the Dream Module. This will lead to a Bubble Tower that'll give more charges. After that, move the platform again and continue forward. You'll eventually come across Chest 39.
Penacony Grand Theater Chest 40
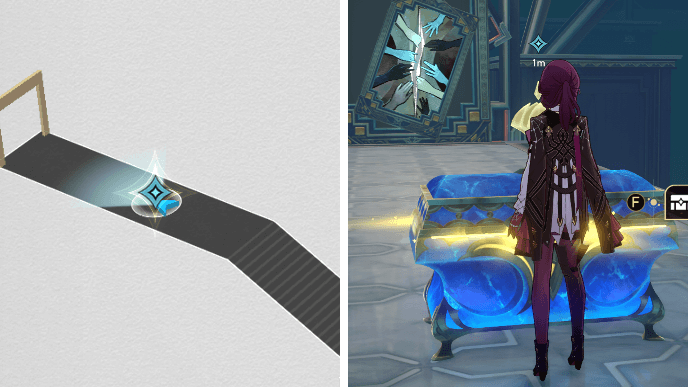
Use the Dream Module near Chest 39 and go back to the area with the previous Dream Module. The path leading to the exit will now be open and you'll find Chest 40 on the way there.
Penacony Grand Theater Chest 41
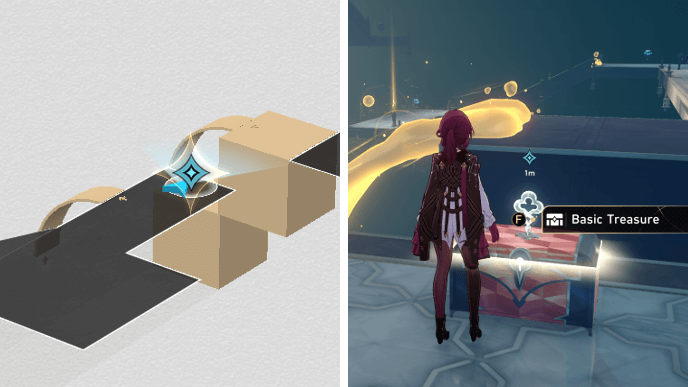
Talk to Aymille after getting Chest 40 and the maze will transform again. Get charges and use the Dream Module to continue onwards. Once you reach the area with the control panel, turn left to go down the stairs and use the next Dream Module.
Go back upstairs and activate the control panel to reach the first Dream Module and bring back the platform. Get more charges once more and follow the bridges forward to reach Chest 41.
Penacony Grand Theater Chest 42
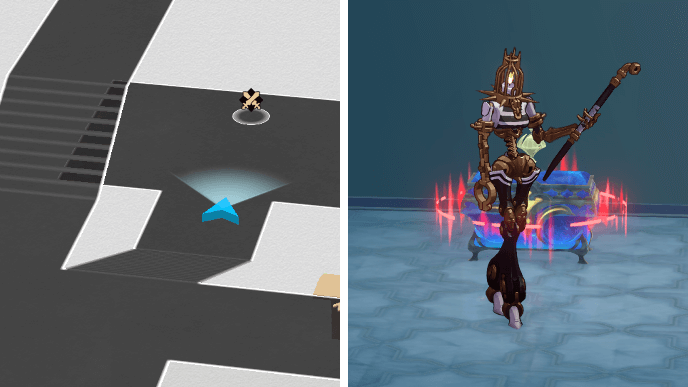
Go down the stairs near Chest 41 to find Chest 42 being guarded by an enemy. You'll need to defeat it to get the chest.
Penacony Grand Theater Chest 43
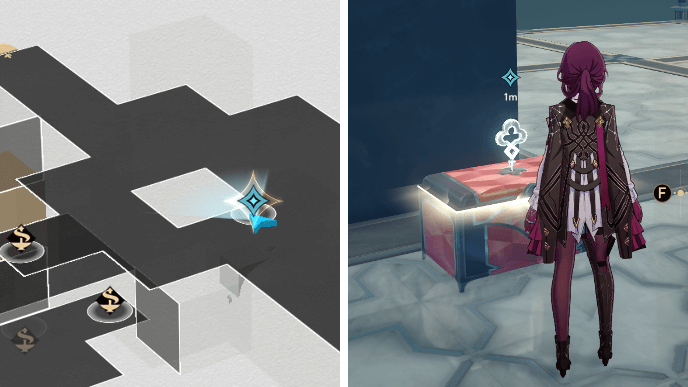
After getting Chest 42, keep going up the stairs until you find a Bubble Tower that can give you more charges. Take the nearest bridge and continue onwards until you reach an area with another Bubble Tower and Chest 43.
Penacony Grand Theater Chest 44
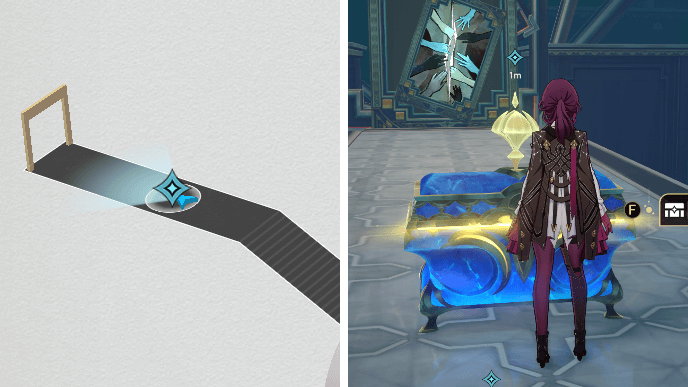
Take the Bubble Bridge opposite of Chest 43 and keep going straight until you find a control panel you can activate. You'll be able to reach the other Bubble Tower and get charges to go up the bridge near the control panel.
At the next area, use both Dream Modules to move the platforms and form a bridge. Get back your charges and go up the last few Bubble Bridges leading to the exit where Chest 44 is.
Penacony Grand Theater Chest 45
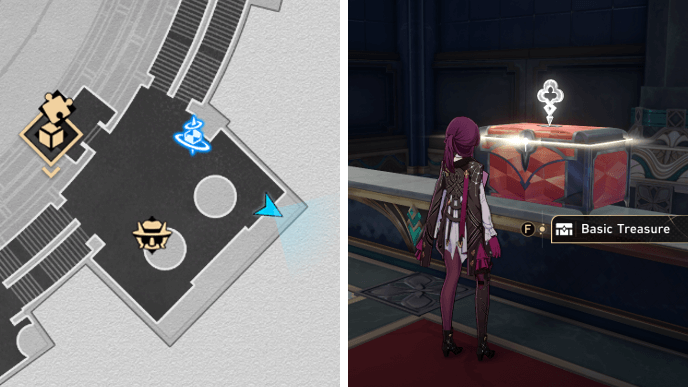
Chest 45 is located east of the Communing Hall Space Anchor. The chest will be on top of the long counter.
Penacony Grand Theater Chest 46-48

Chests 46-48 are locked behind the Hanu's End Adventure Mission that unlocks after you've collected all the Hanu's Adventure books in Penacony.
You must defeat Boss Stone's dinosaur robot by shooting at the fireworks whenever it comes near them. Detonating 3 fireworks on the robot will be enough to defeat it. After that, you'll get the chests!
Penacony Grand Theater Lordly Trashchans
Penacony Grand Theater Lordly Trashcan 1
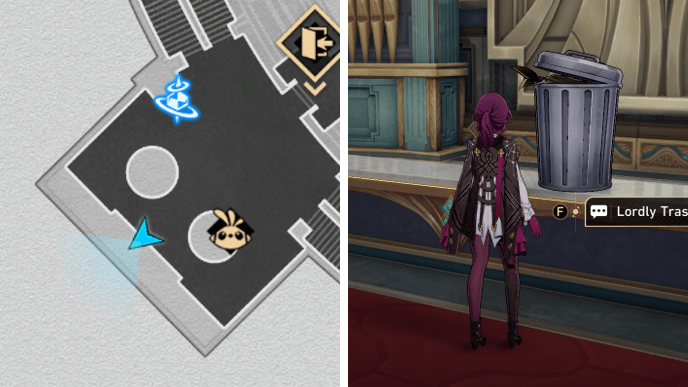
The first Lordly Trashcan in Penacony Grand Theater is located on top of the long bar counter south of the Saloon of Gospels Space Anchor. Choose Option 4 for both prompts to get its rewards without fighting!
Penacony Grand Theater Lordly Trashcan 2

The second Lordly Trashcan in Penacony Grand Theater is located on the staircases southwest of the Communing Hall Space Anchor. Choose Option 4 both times to peacefully get rewards!
Penacony Grand Theater Warp Trotter Location
Penacony Grand Theater Warp Trotter
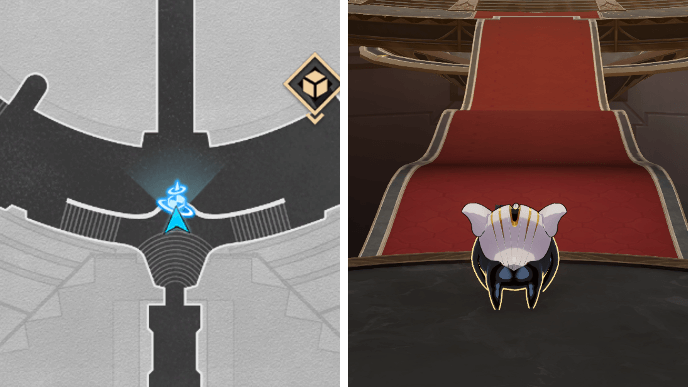
The Penacony Grand Theater Warp Trotter is located on the raised platform behind the Hall of Chords Space Anchor. It will only appear after you've finished the In Our Time mission series.
Formidable Foe Challenge Chests
Penacony Grand Theater Challenge 1
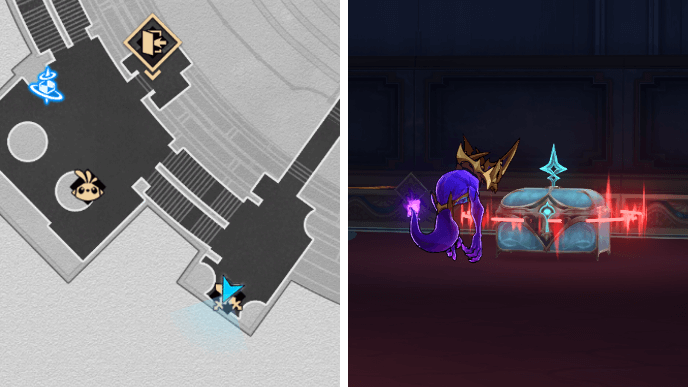
| Enemies | Weaknesses | |
|---|---|---|
| Wave 1 | ||
| Wave 2 | ||
The first Formidable Foe challenge of Penacony Grand Theater can be found southeast of the Saloon of Gospels Space Anchor.
All enemies in this challenge are weak to Fire and Physical, so characters of these elements are recommended for this fight!
Penacony Grand Theater Challenge 2
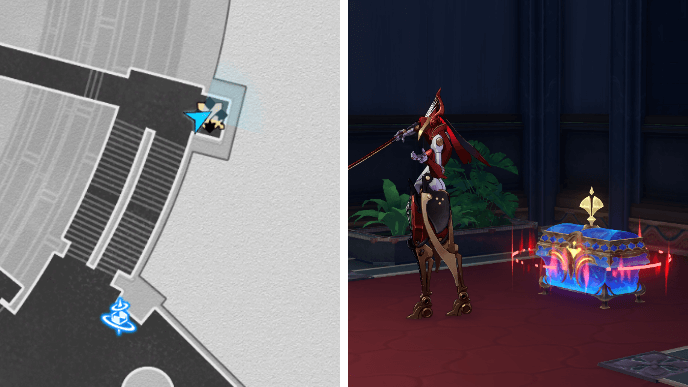
| Enemies | Weaknesses |
|---|---|
The second challenge of Penacony Grand Theater can be found at the top of the stairs northeast of the Communing Hall Space Anchor.
Enemies in this challenge are all weak to Lightning. Characters like Acheron, Kafka, or Serval will be helpful in this fight!
How to Unlock Penacony Grand Theater
Progress Everything that Rises Must Converge
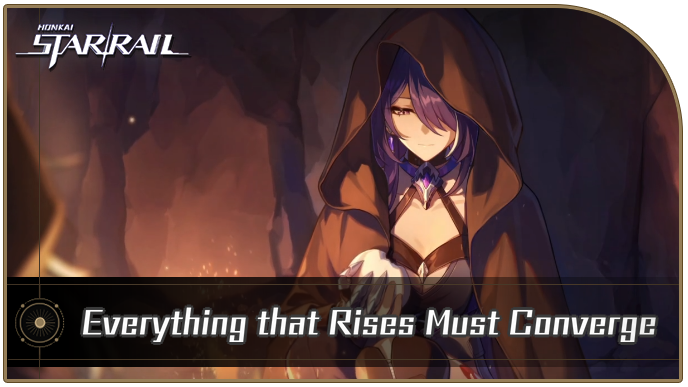
You can unlock Penacony Grand Theater by progressing through the Everything that Rises Must Converge Trailblaze Mission. This is part of the In Our Time mission series.
Everything that Rises Must Converge Mission
Start Loothunt in Mazeville
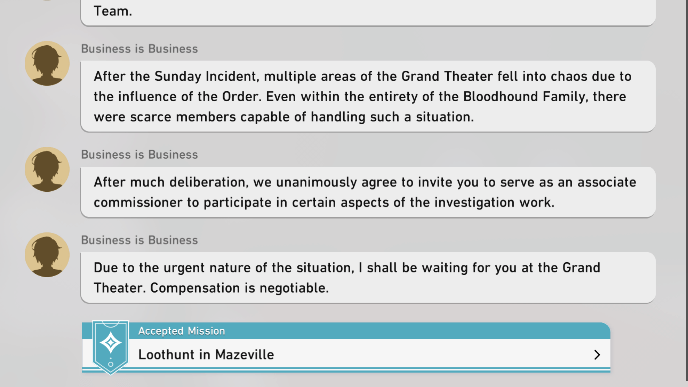
The Loothunt in Mazeville Adventure Mission unlocks the southeastern puzzle room where you can get extra chests!
Honkai: Star Rail Related Guides
List of All Maps
| List of Maps | |
|---|---|
| Herta Space Station | Jarilo-VI |
| The Xianzhou Luofu | Penacony |
| Amphoreus | Planarcadia |
Treasure Chest Locations
Comment
Author
Penacony Grand Theater Treasure Chest Locations
improvement survey
03/2026
improving Game8's site?

Your answers will help us to improve our website.
Note: Please be sure not to enter any kind of personal information into your response.

We hope you continue to make use of Game8.
Premium Articles
Rankings
- We could not find the message board you were looking for.
Gaming News
Popular Games

Genshin Impact Walkthrough & Guides Wiki

Honkai: Star Rail Walkthrough & Guides Wiki

Umamusume: Pretty Derby Walkthrough & Guides Wiki

Pokemon Pokopia Walkthrough & Guides Wiki

Resident Evil Requiem (RE9) Walkthrough & Guides Wiki

Monster Hunter Wilds Walkthrough & Guides Wiki

Wuthering Waves Walkthrough & Guides Wiki

Arknights: Endfield Walkthrough & Guides Wiki

Pokemon FireRed and LeafGreen (FRLG) Walkthrough & Guides Wiki

Pokemon TCG Pocket (PTCGP) Strategies & Guides Wiki
Recommended Games

Diablo 4: Vessel of Hatred Walkthrough & Guides Wiki

Fire Emblem Heroes (FEH) Walkthrough & Guides Wiki

Yu-Gi-Oh! Master Duel Walkthrough & Guides Wiki

Super Smash Bros. Ultimate Walkthrough & Guides Wiki

Pokemon Brilliant Diamond and Shining Pearl (BDSP) Walkthrough & Guides Wiki

Elden Ring Shadow of the Erdtree Walkthrough & Guides Wiki

Monster Hunter World Walkthrough & Guides Wiki

The Legend of Zelda: Tears of the Kingdom Walkthrough & Guides Wiki

Persona 3 Reload Walkthrough & Guides Wiki

Cyberpunk 2077: Ultimate Edition Walkthrough & Guides Wiki
All rights reserved
Copyright © 2024 HoYoverse, COGNOSPHERE. All Rights Reserved.
The copyrights of videos of games used in our content and other intellectual property rights belong to the provider of the game.
The contents we provide on this site were created personally by members of the Game8 editorial department.
We refuse the right to reuse or repost content taken without our permission such as data or images to other sites.


