SoulGlad Scorchsand Audition Venue Treasure Chest Locations
★ Exclusive: Check out the State of Meta in 4.0!
♦ Latest: 4.1 Livestream Redeem Codes
♦ Phase 2: Sparkxie, Sparkle, Cerydra, Rappa
♦ Upcoming: Ashveil, Silver Wolf Lv.999, Evanescia
♦ Events: Cosmicon, Roll On!, Ding! Arcadia Fun-Time Clock-In Essentials
There are 44 SoulGlad Scorchsand Audition Venue Chests to collect in Honkai: Star Rail's Penacony. See all SoulGlad Scorchsand chests, Warp Trotter, Lordly Trashcans, and how to open the locked door in the Gunfire Trial here!
List of Contents
SoulGlad Scorchsand Audition Venue Chest Locations
SoulGlad Scorchsand Audition Venue Interactive Map
Select icons to toggle them on/off
| Space Anchor | Treasure Chest | ||
| Origami Bird | Warp Trotter | ||
| Lordly Trashcan | Great Tree | ||
| Crimson Calyx | Hanu's Adventure |
Scorchsand Audition Venue Chests
| SoulGlad Scorchsand Audition Venue Full Map | |||||||||||
|---|---|---|---|---|---|---|---|---|---|---|---|
 See Full Image |
|||||||||||
| SoulGlad Scorchsand Audition Stage 1 Areas | |||||||||||
 See Full Image |
 See Full Image |
||||||||||
| SoulGlad Scorchsand Audition Stage 2 Areas | |||||||||||
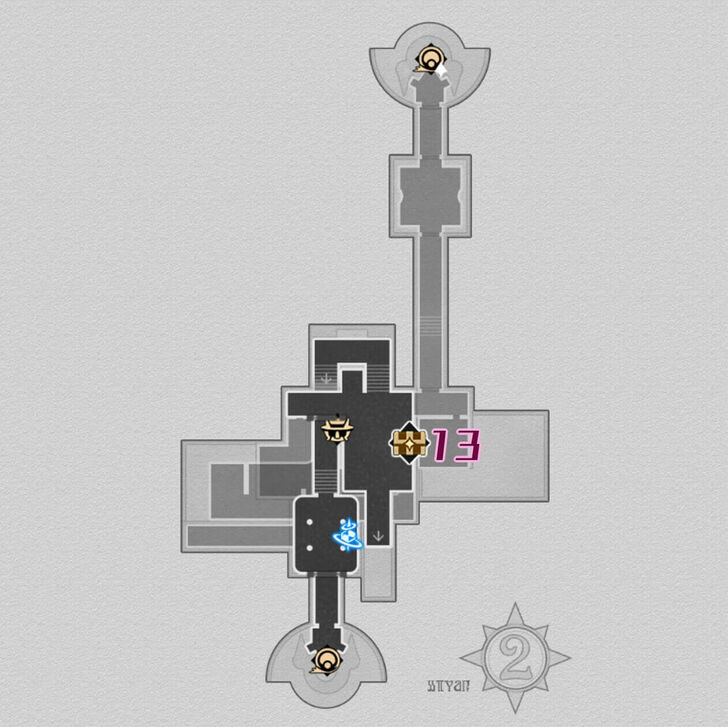 See Full Image |
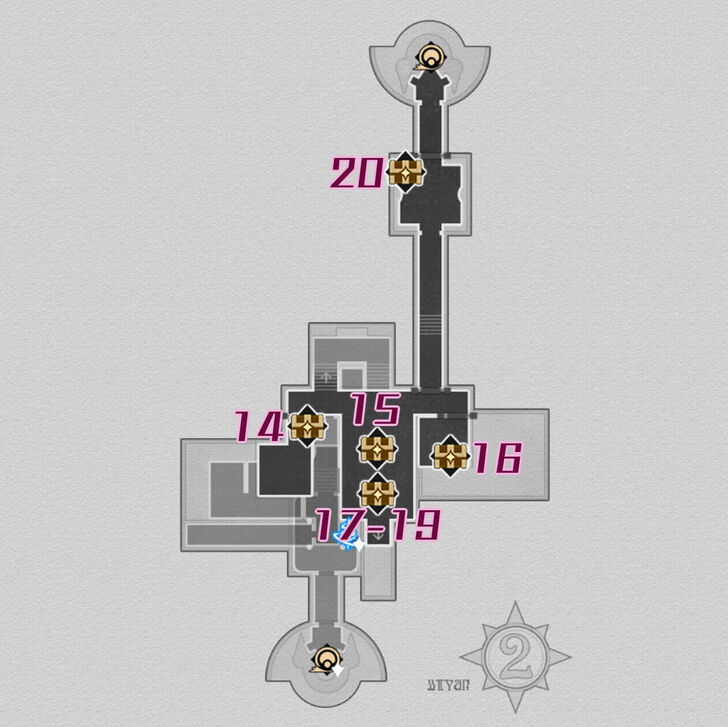 See Full Image |
||||||||||
 See Full Image |
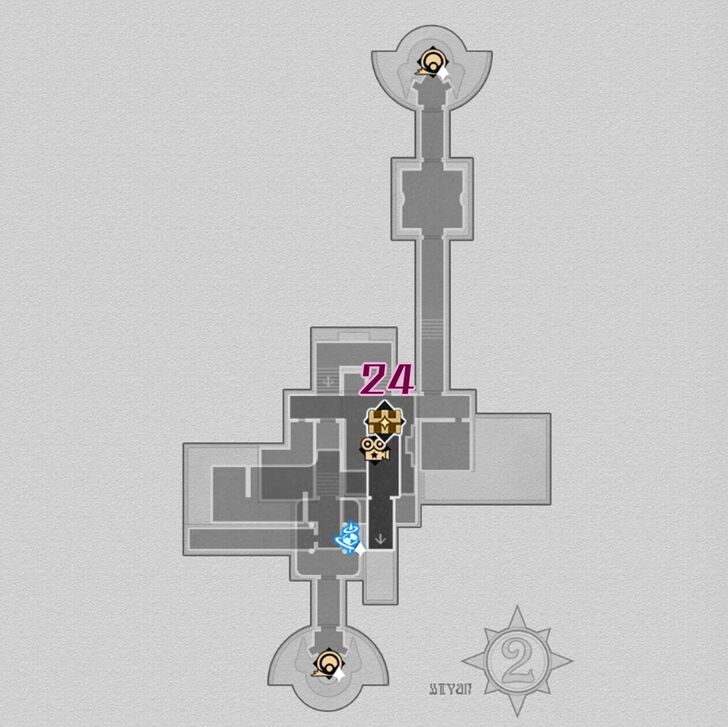 See Full Image |
||||||||||
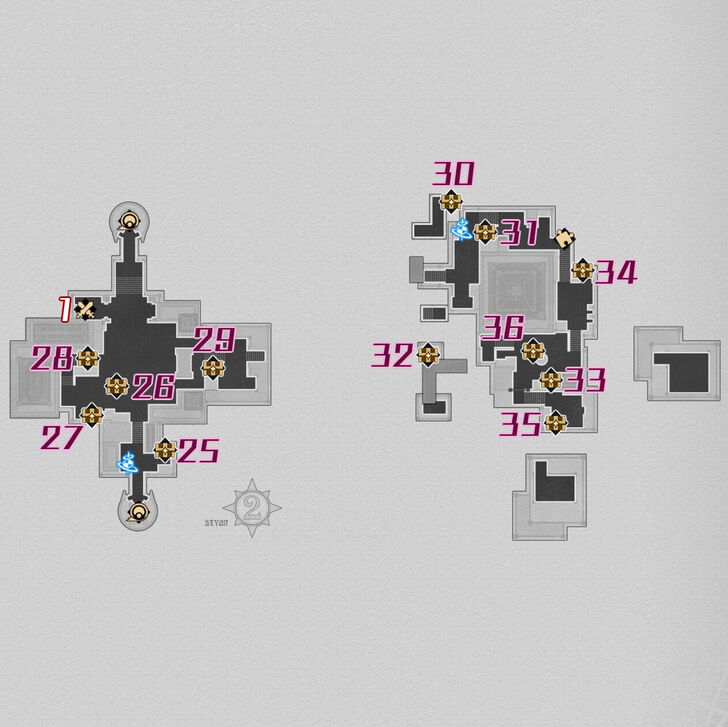 See Full Image |
|||||||||||
| SoulGlad Scorchsand Audition Stage 3 Areas | |||||||||||
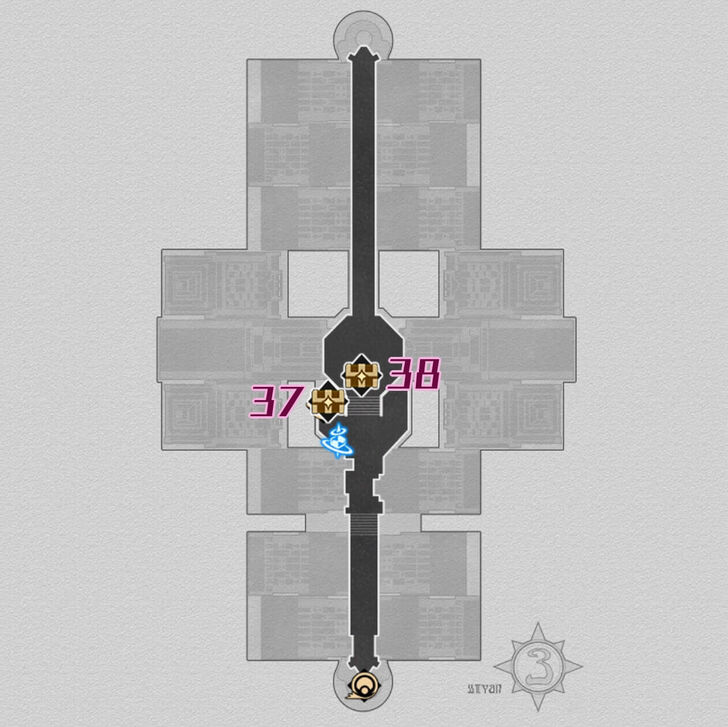 See Full Image |
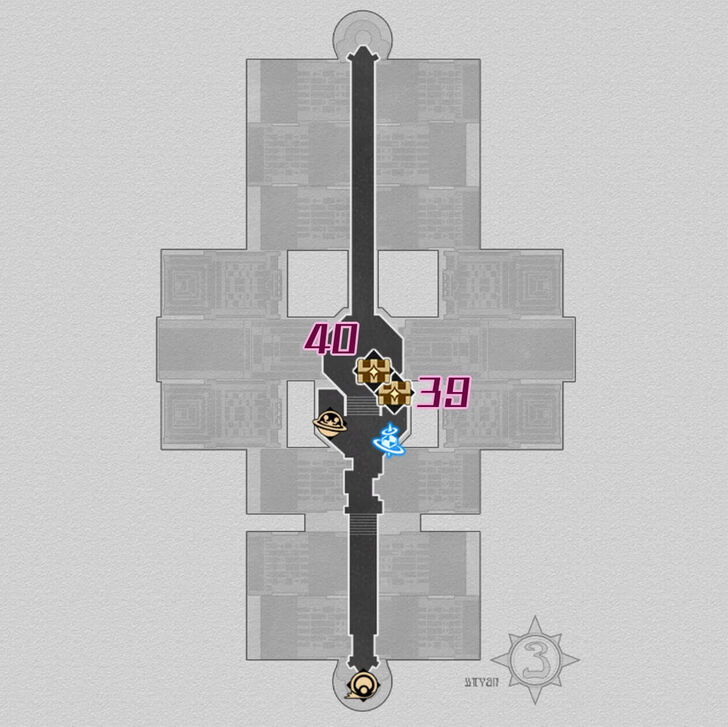 See Full Image |
||||||||||
| SoulGlad Scorchsand Audition Venue Chests | |||||||||||
| Chest 1 | Chest 2 | Chest 3 | Chest 4 | ||||||||
| Chest 5 | Chest 6 | Chest 7 | Chest 8 | ||||||||
| Chest 9 | Chest 10 | Chest 11 | Chest 12 | ||||||||
| Chest 13 | Chest 14 | Chest 15 | Chest 16 | ||||||||
| Chest 17-19 | Chest 20 | Chest 21 | Chest 22 | ||||||||
| Chest 23 | Chest 24 | Chest 25 | Chest 26 | ||||||||
| Chest 27 | Chest 28 | Chest 29 | Chest 30 | ||||||||
| Chest 31 | Chest 32 | Chest 33 | Chest 34 | ||||||||
| Chest 35 | Chest 36 | Chest 37 | Chest 38 | ||||||||
| Chest 39 | Chest 40 | ||||||||||
| Scorchsand Audition Venue Lordly Trashcans | |||||||||||
| Trashcans 1-2 | |||||||||||
| Scorchsand Audition Venue Trotter and Foe | |||||||||||
| Warp Trotter | Formidable Foe | ||||||||||
How to Get SoulGlad Scorchsand Audition Venue Chests
SoulGlad Scorchsand Chest 1

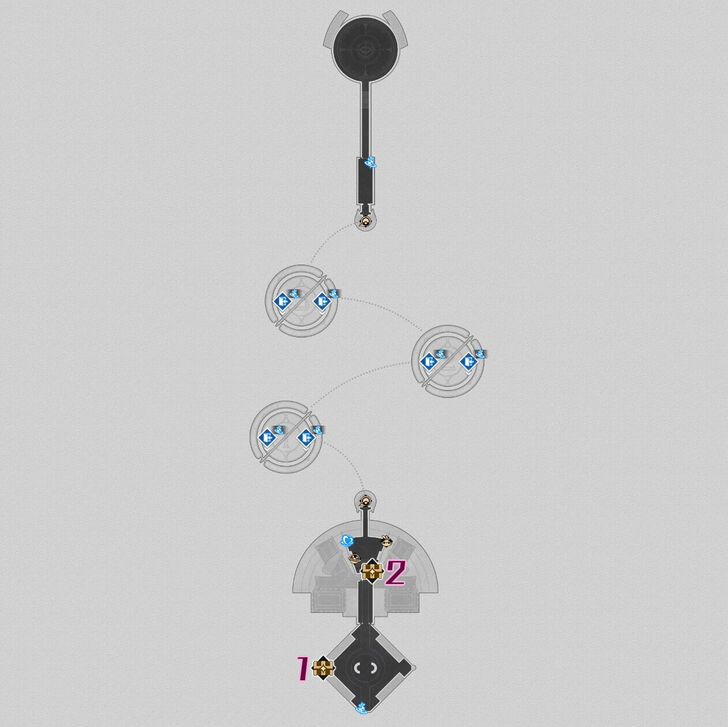
Chest 1 is located in the corner space northwest of the Audition Plaza Space Anchor. The chest will be behind a table and some chairs.
SoulGlad Scorchsand Chest 2
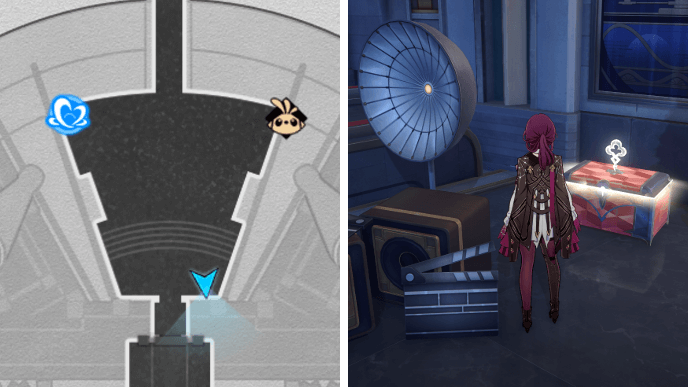
Chest 2 is a few steps southeast of the Bud of the Hunt Crimson Calyx. The chest is near a pile of filming equipment and a signboard.
SoulGlad Scorchsand Chest 3
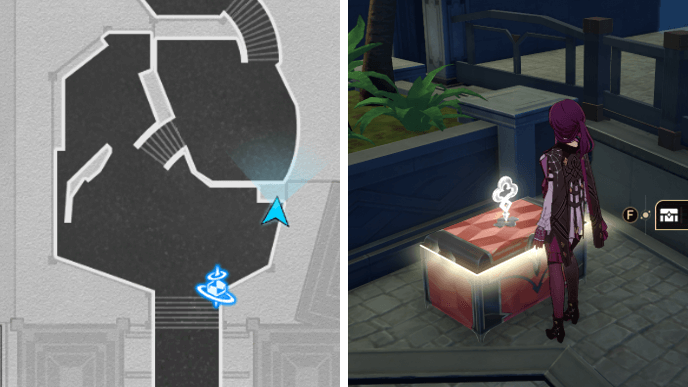
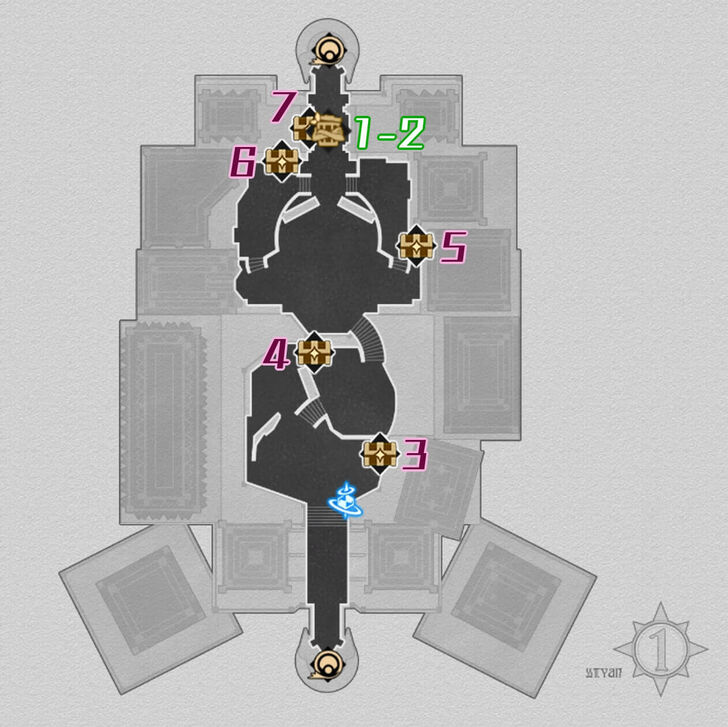
Chest 3 is in the Acting Challenge area of Stage 1. It will be in front of a large planter box a few steps northeast of the Dreamplay Fantasia: Acting Challenge Space Anchor.
SoulGlad Scorchsand Chest 4
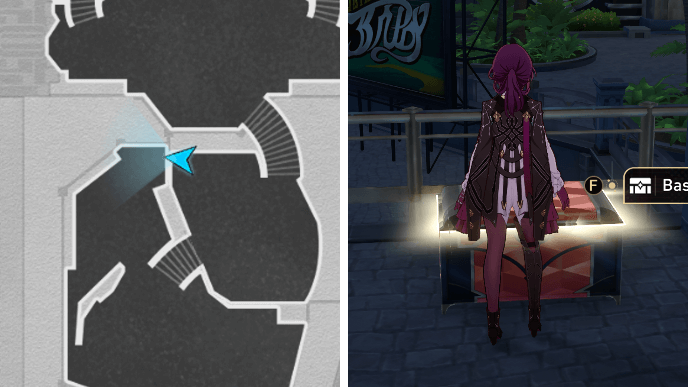
From Chest 3, head up the nearby stairs to reach the area with the stage's second challenge. Here, Chest 4 will be behind some benches.
SoulGlad Scorchsand Chest 5
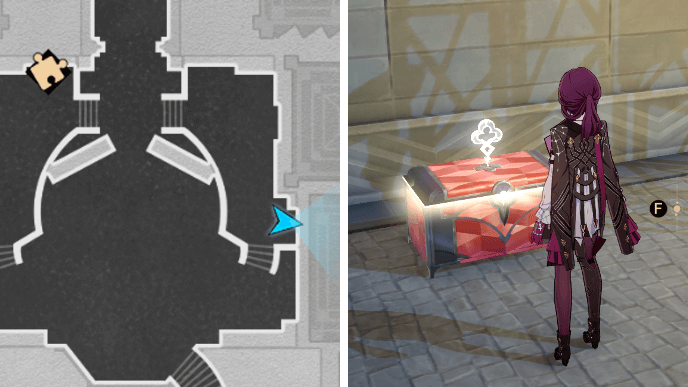
After completing the stage's third challenge, head a few steps north and take the stairs on your right. Chest 5 will be underneath a large billboard stand.
SoulGlad Scorchsand Chest 6
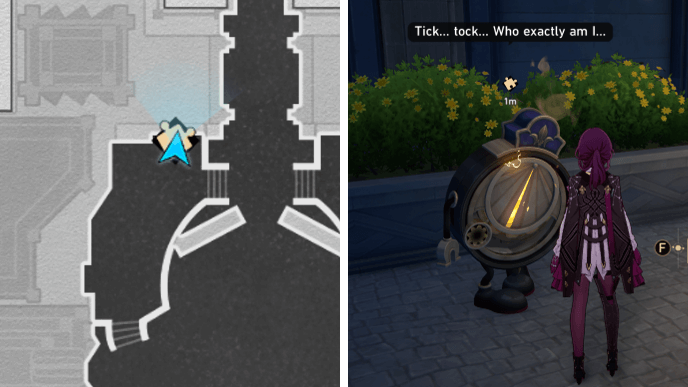
From Chest 5, return to the carpeted walkway and take the opposite set of stairs. Chest 6 will come from a broken Dream Ticker that needs to be repaired.
Scorchsand Audition Venue Chest 6 Dream Ticker Puzzle
You can solve Chest 6's Dream Ticker by following the steps shown above.
SoulGlad Scorchsand Chest 7
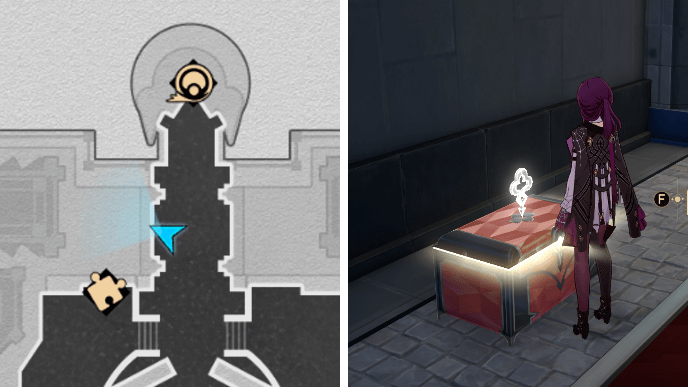
After getting Chest 6, head towards the shuttle leading to the next stage and you'll come across Chest 7 on your left side.
SoulGlad Scorchsand Chest 8
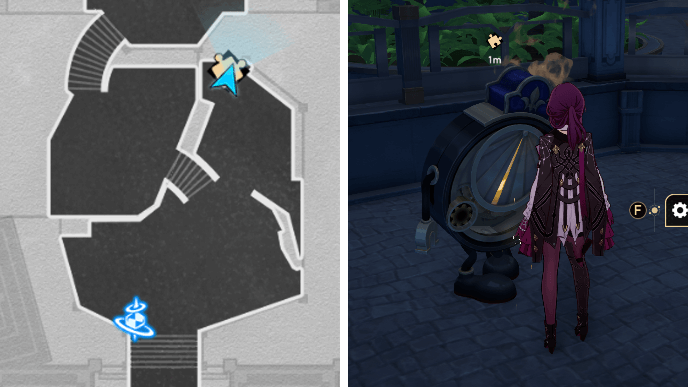
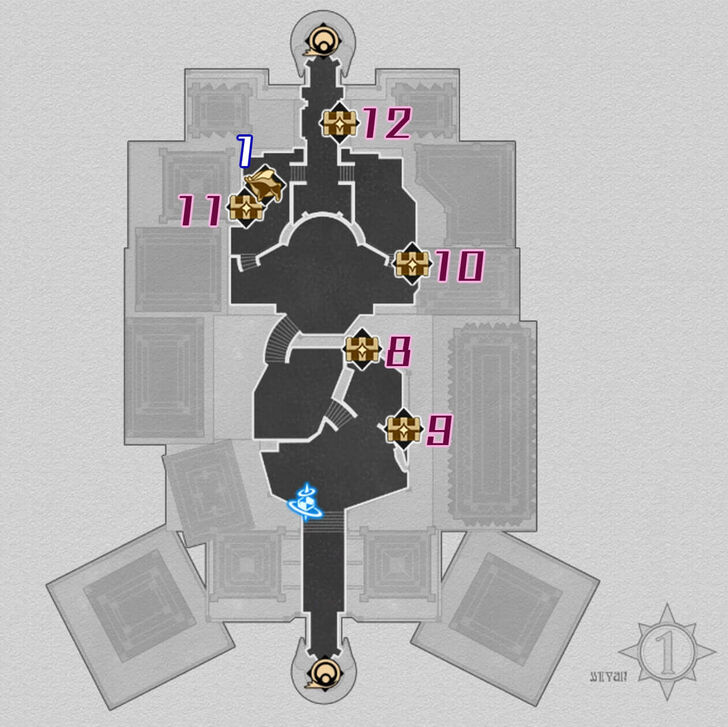
Chest 8 is in the Action Challenge area of Stage 1. From the Dreamplay Fantasia: Action Challenge Space Anchor, go northeast into the area before the stairs leading upwards. You'll get the chest from solving a Dream Ticker puzzle.
Scorchsand Audition Venue Chest 8 Dream Ticker Puzzle
You can solve Chest 8's Dream Ticker by following the steps shown above.
SoulGlad Scorchsand Chest 9
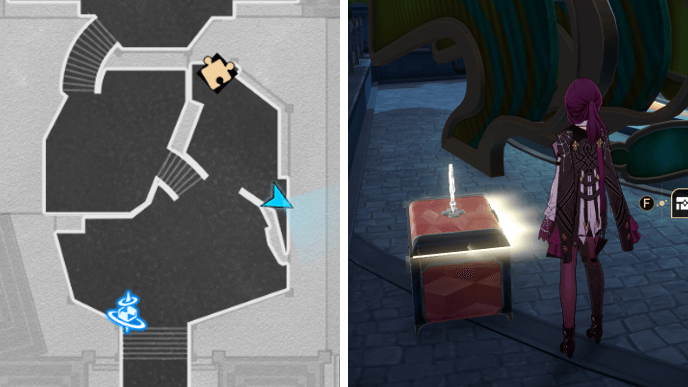
After picking up Chest 8, head southwest and you'll find Chest 9 behind the stage backdrop of the first challenge platform.
SoulGlad Scorchsand Chest 10
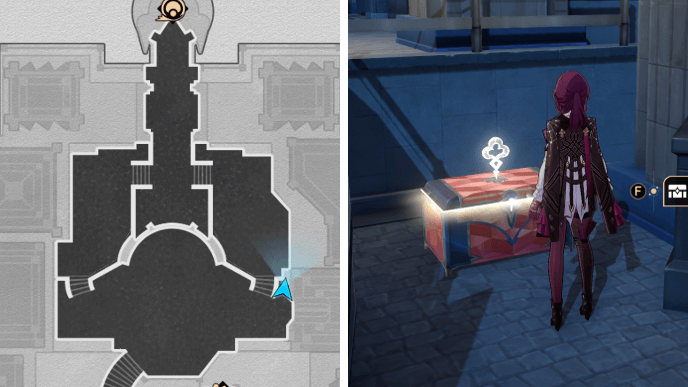
Chest 10 is located next to the stairs on the right side of the third challenge's stage.
SoulGlad Scorchsand Chest 11
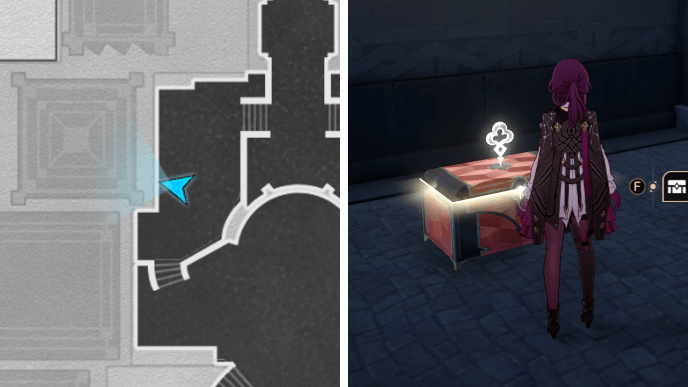
Once you complete the third challenge, go past the stage and take the stairs on the left. Chest 11 will be to the left side of a door.
SoulGlad Scorchsand Chest 12
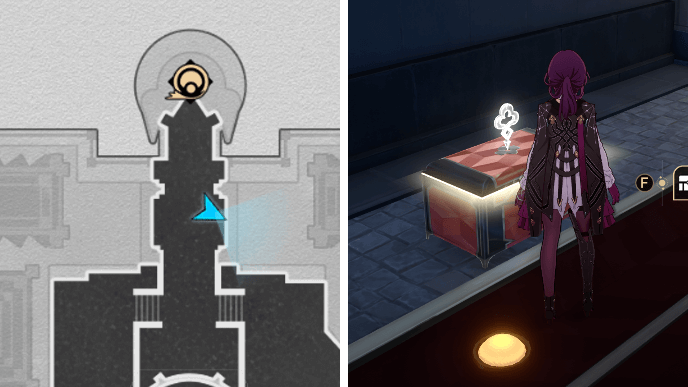
From Chest 11, return to the carpeted walkway and you'll find Chest 12 on the way to the shuttle leading to the next stage.
SoulGlad Scorchsand Chest 13

Chest 13 is in the Gunfire Trial area of Stage 2. In the central area of F1, transform with the Hanu's Adventure TV and use any of the teleport points to get onto the shelves. Chest 13 will be above the fireplace.
SoulGlad Scorchsand Chest 14
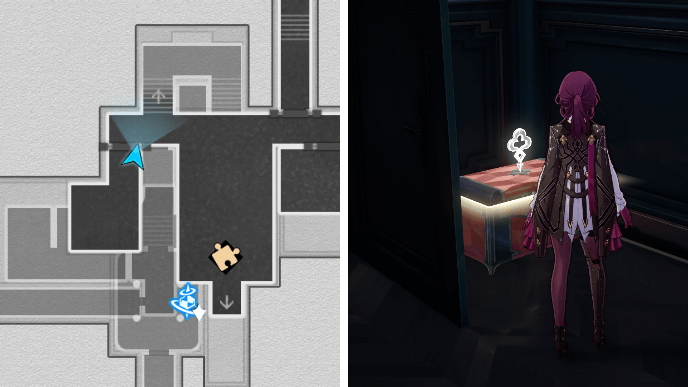
After getting Chest 13, take the stairs leading to F2 and go into the study room. Chest 14 will be hidden behind the door to the room.
SoulGlad Scorchsand Chest 15

From Chest 14, use the nearby Hanu's Adventure TV so you can go into the central area of F2. You'll need to complete the challenge by shooting down all enemies with the Rocket Launcher. After that, Chest 15 will appear.
SoulGlad Scorchsand Chest 16

Chest 16 is in a locked room on F2 that can be entered via the Arcane Artwork. Transform back with the Hanu's Adventure TV in the hallway leading to the shuttle and use the elevator to go to F1.
How to Reach the Arcane Artwork
You'll want to keep the elevator on F1, so return to F2 using the stairs like before. You can use the TV in the F2 study room to reach the central area as Hanu. Now, the painting will no longer be blocked. Transform back to use the painting and you'll find Chest 16 by a bookshelf.
SoulGlad Scorchsand Chest 17-19
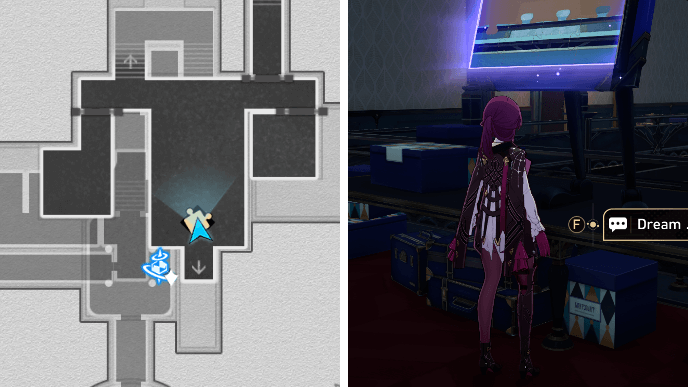
Use the nearby Hanu's Adventure TV and enter the Hanu Vent in the room where Chest 16 is. You'll be brought to a balcony area with a Dream Jigsaw. Solve the puzzle to get Chests 17-19.
Scorchsand Audition Venue Chest 17-19 Dream Jigsaw Puzzle
Follow the steps shown above to solve the Dream Jigsaw and get Chest 17, 18, and 19.
SoulGlad Scorchsand Chest 20

After getting Chest 19, transform back with the TV you used before and go through the walkway to reach a square area. Chest 20 will be in the northwestern corner near the door leading to the shuttle.
SoulGlad Scorchsand Chest 21

Take the elevator to B1 and go into the bar area. Chest 21 is in the corner by a soda display case.
SoulGlad Scorchsand Chest 22
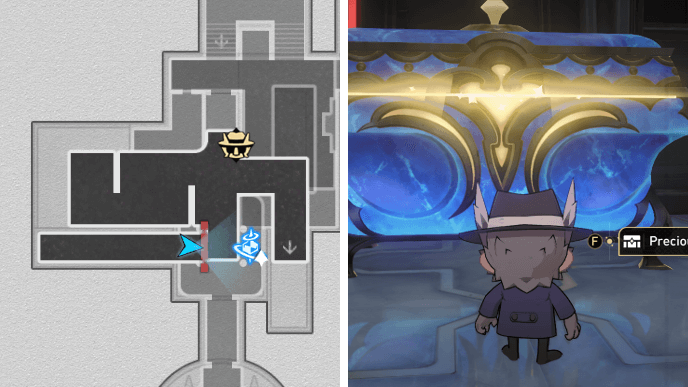
Transform with the nearby Hanu's Adventure TV and sneak around the enemies to get the Rocket Launcher by the seats near Chest 21's location. Shoot down enemies as well as the fireworks by the wall to open up the locked room.
Shoot at the other fireworks in the room when all enemies are gathered around it to get rid of them. Chest 22 will be by the door that's glowing red.
SoulGlad Scorchsand Chest 23
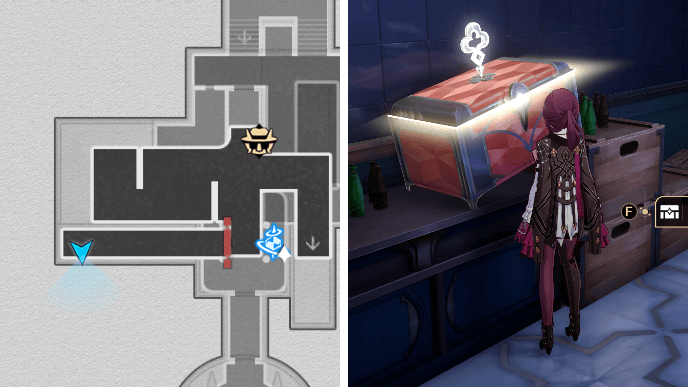
Chest 23 is on top of a counter and some crates in the same room as Chest 22. Transform back with the nearby TV so you can reach it.
SoulGlad Scorchsand Chest 24
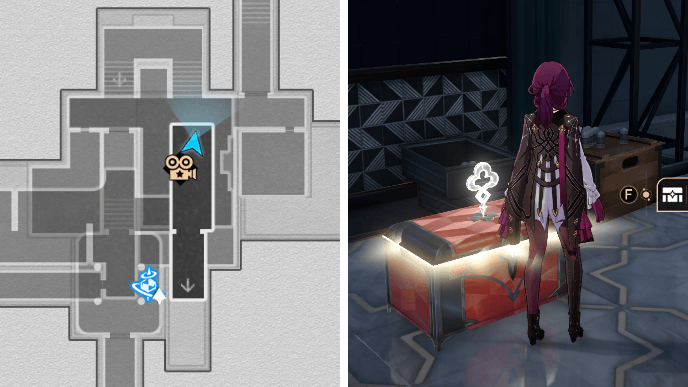
Chest 24 is in B2, which is locked behind a hidden challenge for the Gunfire Trial. After unlocking the hidden challenge, you'll be able to go to B2 via the elevator. Chest 24 will be at the end of the area by some containers and ammo.
Gunfire Trial Hidden Challenge Puzzle
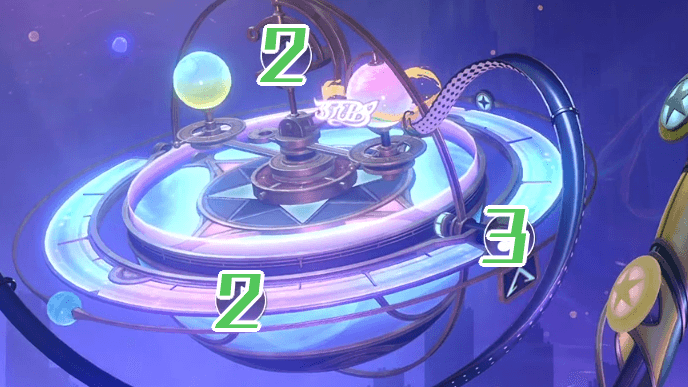
To unlock the Gunfire Trial area's hidden challenge, you'll need to adjust the mechanism as shown above. The numbers represent how many times you need to click on a certain part.
SoulGlad Scorchsand Chest 25
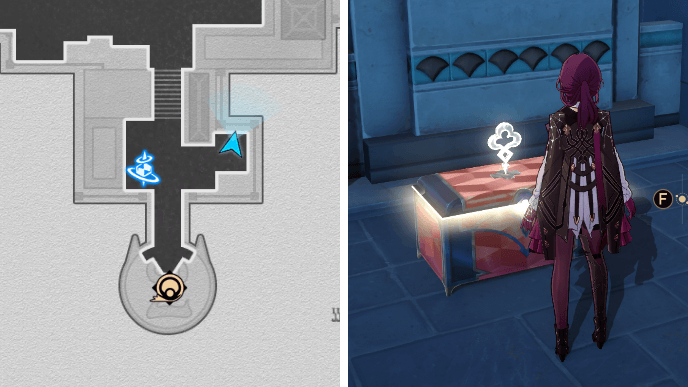
Chest 25 is in the Time Trial area of Stage 2. The chest is a few steps east of the Gunfire Time: Time Trial Space Anchor, but you'll need to get rid of the enemies guarding it first.
SoulGlad Scorchsand Chest 26
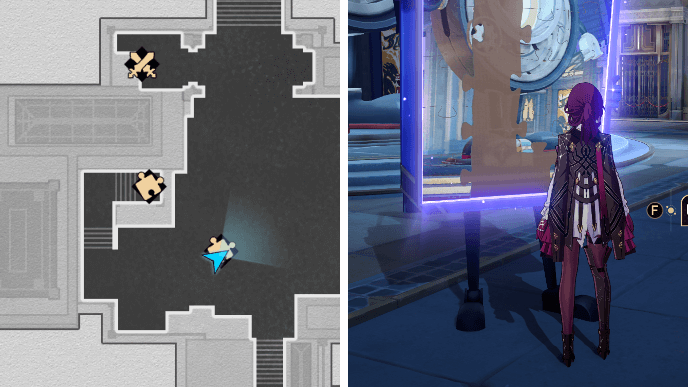
From Chest 25, head north into the area with the giant Clockie Statue and you'll find a Dream Jigsaw near it. Solve the puzzle to get Chest 26.
Scorchsand Audition Venue Chest 26 Dream Jigsaw Puzzle
Follow the steps shown above to solve the Dream Jigsaw and get Chest 26.
SoulGlad Scorchsand Chest 27
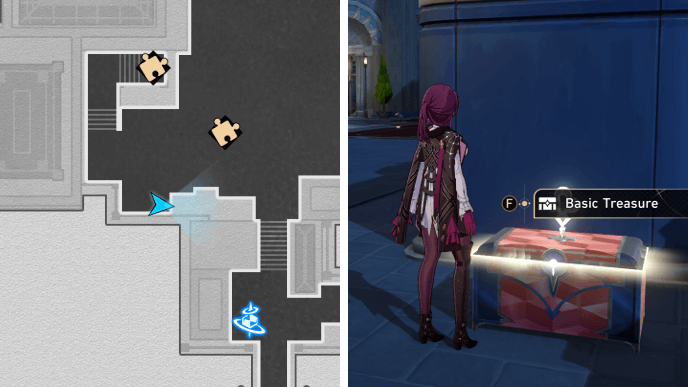
Chest 27 is located southwest of Chest 26's Dream Jigsaw. The chest will be in a corner space next to a large ventilation system.
SoulGlad Scorchsand Chest 28
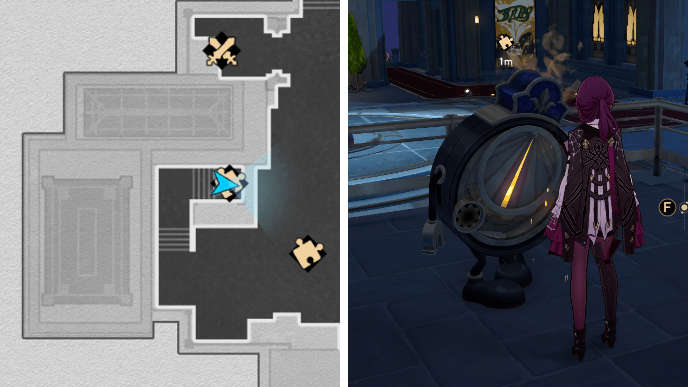
From Chest 27, head up the nearby stairs to find a broken Dream Ticker. Repair it to get Chest 28.
Scorchsand Audition Venue Chest 28 Dream Ticker Puzzle
You can solve Chest 28's Dream Ticker by following the steps shown above.
SoulGlad Scorchsand Chest 29
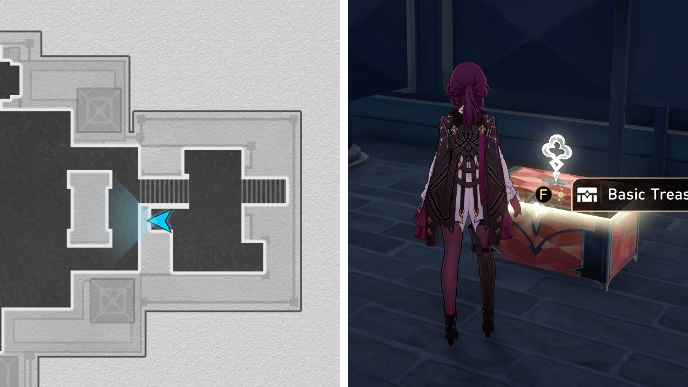
Head east from the Clockie Statue and you'll find Chest 29 a few steps northwest of the Dream's Eye mechanism. The chest will be next to some ventilation ducts.
SoulGlad Scorchsand Chest 30
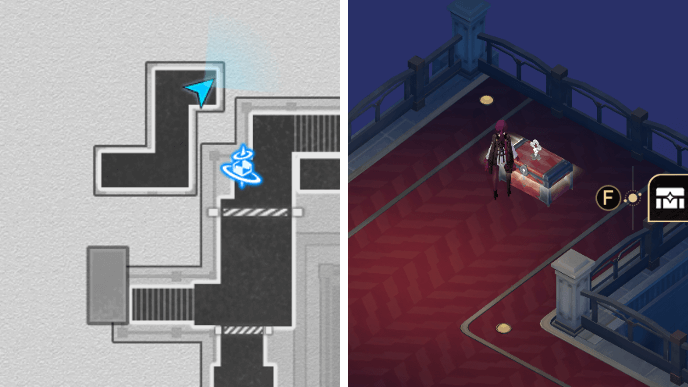
From Chest 29, activate the nearby Dream's Eye mechanism, then take the path to the left of the Dream Module to reach Chest 30.
SoulGlad Scorchsand Chest 31
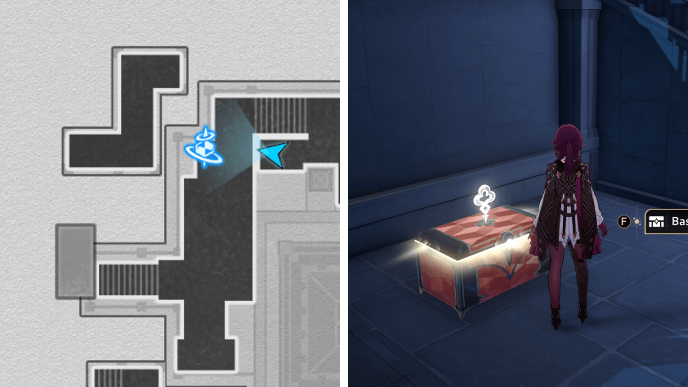
Use the Dream Module mentioned previously to bring over a platform that will connect you to the next area. Deactivate Dream's Eye and you'll find Chest 31 at the side of the stairs past the Gunfire Time: Time Trial (Posterior) Space Anchor.
SoulGlad Scorchsand Chest 32
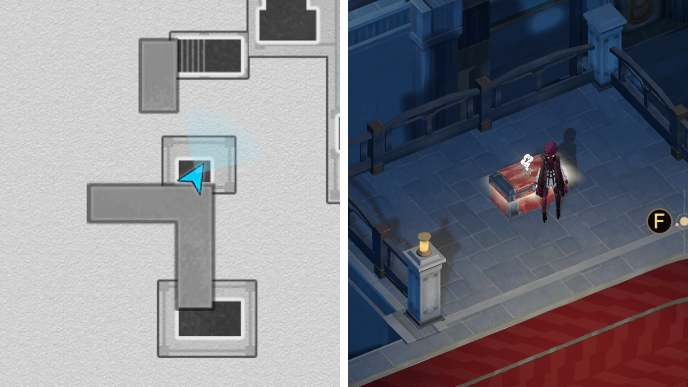
Activate Dream's Eye using the southernmost mechanism from the Gunfire Time: Time Trial (Posterior) Space Anchor and rotate the L-platform to the left with the nearby Dream Module.
Then, use the other Dream Module to bring over the straight platform and complete the path. Chest 32 can now be reached.
SoulGlad Scorchsand Chest 33
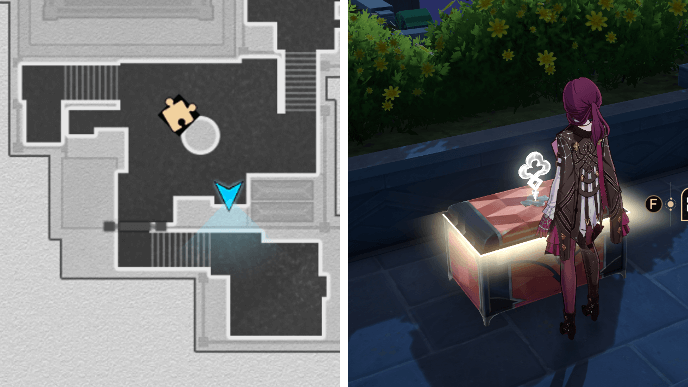
From Chest 32, continue forward until you reach the next Dream Module. Rotate the L-platform to the right and continue onwards. Chest 33 will be in front of a planter box to the right of the smaller Clockie Statue.
SoulGlad Scorchsand Chest 34
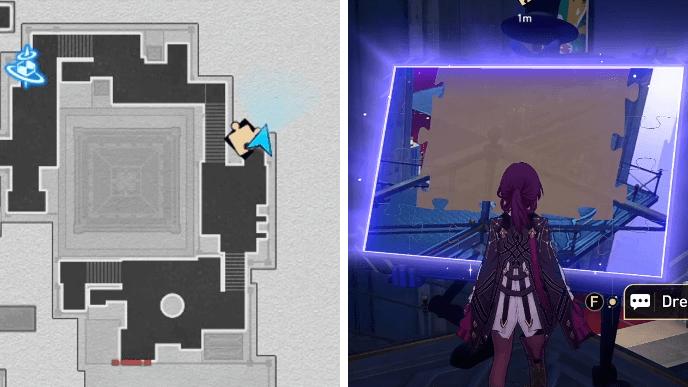
After getting Chest 33, head down the stairs past the Clockie Statue and you'll find a Dream Jigsaw puzzle. Solve it to get Chest 34.
Scorchsand Audition Venue Chest 34 Dream Jigsaw Puzzle
Follow the steps shown above to solve the Dream Jigsaw and get Chest 34.
SoulGlad Scorchsand Chest 35
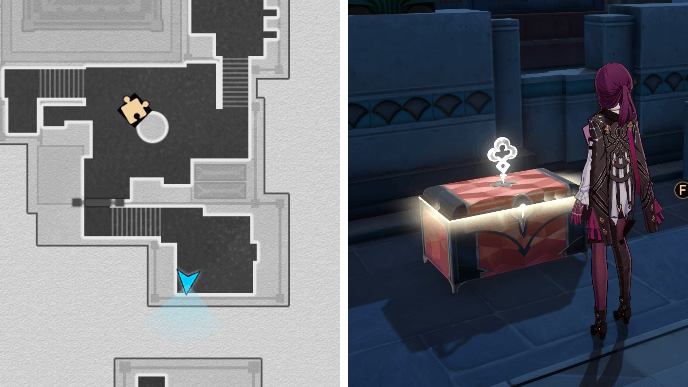
Chest 35 is locked behind a hidden challenge for the Time Trial. After unlocking the hidden challenge, the locked gate on the east side of the map will open. Go through it and you'll find Chest 35 near a Bubble Pinball machine.
Time Trial Hidden Challenge Puzzle
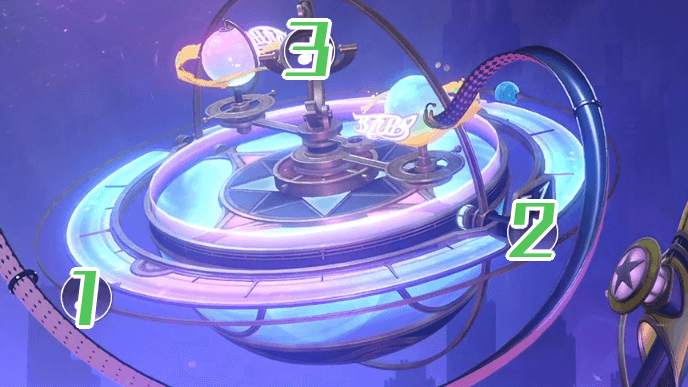
To unlock the Time Trial area's hidden challenge, you'll need to adjust the mechanism as shown above. The numbers represent how many times you need to click on a certain part.
SoulGlad Scorchsand Chest 36
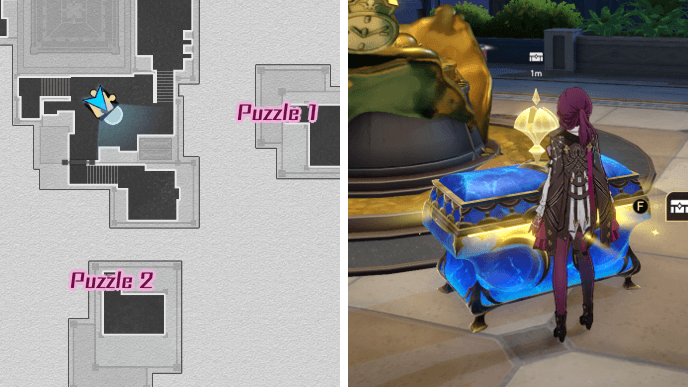
As part of the Time Trial's hidden challenge, you'll need to solve two Dream Jigsaw Puzzles to get Chest 36. They will be on separate platforms that you can reach via Bubble Pinball.
Scorchsand Audition Venue Chest 36 Dream Jigsaw and Bubble Pinball Puzzles
| 1 | 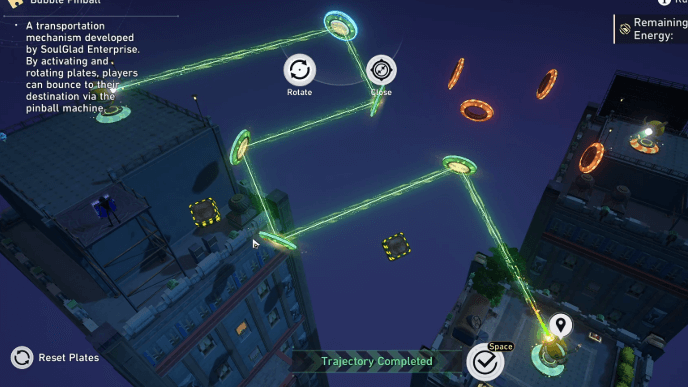 Follow the solution shown above to reach the eastern platform with the first Dream Jigsaw. |
|---|---|
| 2 | Above is the solution for the first Dream Jigsaw puzzle. Afterwards, you'll need to go to the other platform using the Bubble Pinball. |
| 3 | 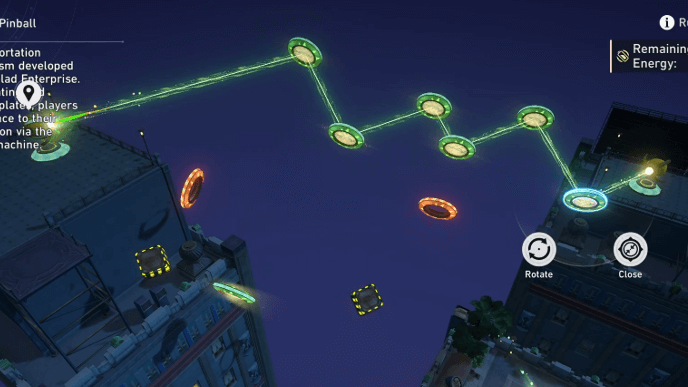 The solution above then leads to the southern platform with the second Dream Jigsaw. |
| 4 | This is the solution to the second Dream Jigsaw puzzle. The Clockie statue will turn completely gold and grant you Chest 36! |
SoulGlad Scorchsand Chest 37
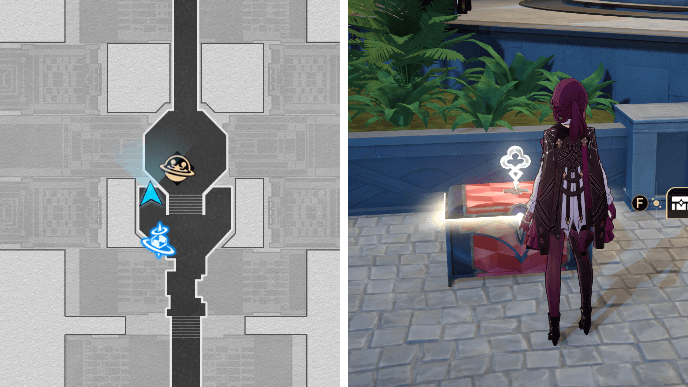
Chest 37 is in Arena I of Stage 3. The chest is directly north from the Superstar Showdown: Arena I Space Anchor.
SoulGlad Scorchsand Chest 38

Chest 38 is locked behind Arena I's hidden challenge. After unlocking the challenge, you need to hit all the signboards on the platform to get the chest.
Arena I Hidden Challenge Puzzle
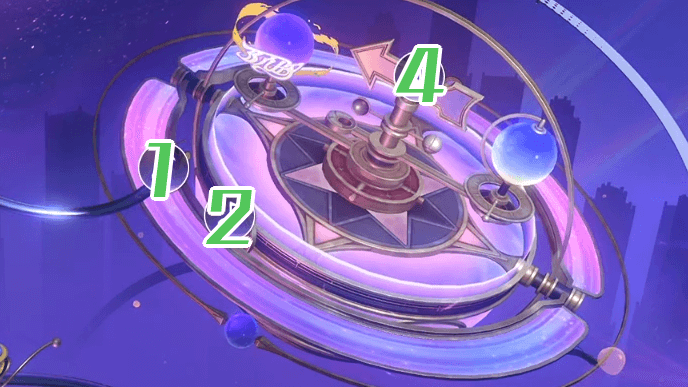
To unlock Arena I's hidden challenge, you'll need to adjust the mechanism as shown above. The numbers represent how many times you need to click on a certain part.
SoulGlad Scorchsand Chest 39

Chest 39 is in Arena II of Stage 3. The chest is directly north from the Superstar Showdown: Arena II Space Anchor.
SoulGlad Scorchsand Chest 40
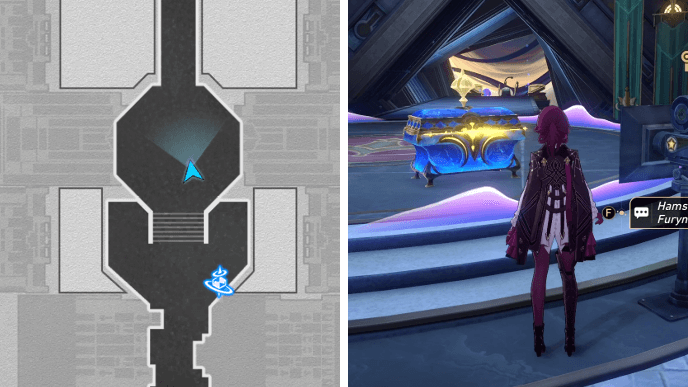
Chest 40 is locked behind Arena II's hidden challenge. After unlocking the challenge, you need to reach 3,000 points in Fast & Furynuts to get the chest.
Arena II Hidden Challenge Puzzle
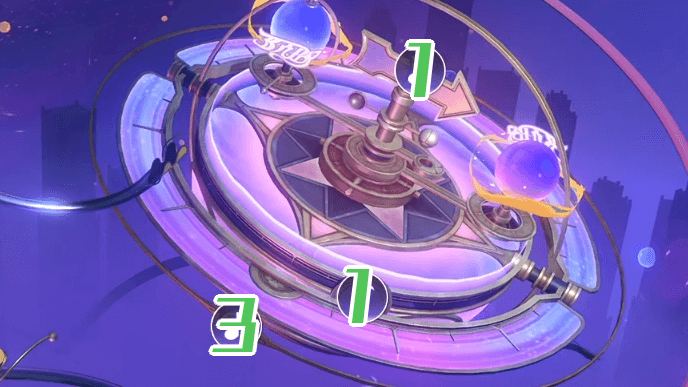
To unlock Arena II's hidden challenge, you'll need to adjust the mechanism as shown above. The numbers represent how many times you need to click on a certain part.
SoulGlad Scorchsand Audition Venue Lordly Trashchans
SoulGlad Scorchsand Lordly Trashcans
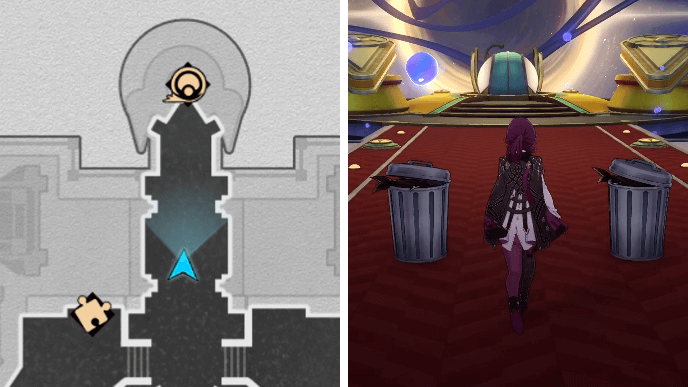
You can find two Lordly Trashcans in SoulGlad Scorchsand Audition Venue by unlocking the hidden challenge in Stage 1's Acting Challenge. They'll be at the northern part of the map before the shuttle leading to the next stage.
During your conversation, pick Option 3 then Option 1 to get their rewards without fighting. Take note, however, that this will require you to give up 1,000 Credits.
Acting Challenge Hidden Challenge Puzzle
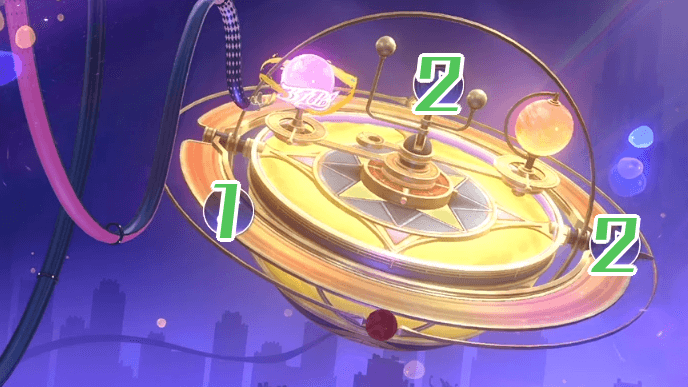
To unlock the Acting Challenge area's hidden challenge, you'll need to adjust the mechanism as shown above. The numbers represent how many times you need to click on a certain part.
SoulGlad Scorchsand Audition Venue Warp Trotter Location
SoulGlad Scorchsand Warp Trotter
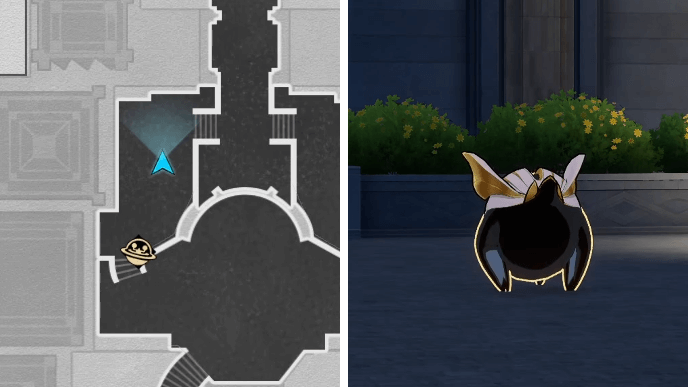
SoulGlad Scorchsand Audition Venue's Warp Trotter is locked behind the hidden challenge in Stage 1's Action Challenge. After unlocking the hidden challenge, the Trotter will be in the northwestern area of the map.
Action Challenge Hidden Challenge Puzzle
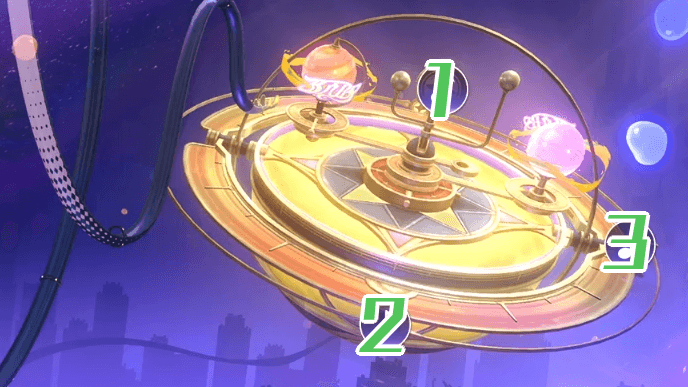
To unlock the Action Challenge area's hidden challenge, you'll need to adjust the mechanism as shown above. The numbers represent how many times you need to click on a certain part.
Formidable Foe Challenge Chests
SoulGlad Scorchsand Venue Challenge
| Enemies | Weaknesses | |
|---|---|---|
| Wave 1 | ||
| Wave 2 | ||
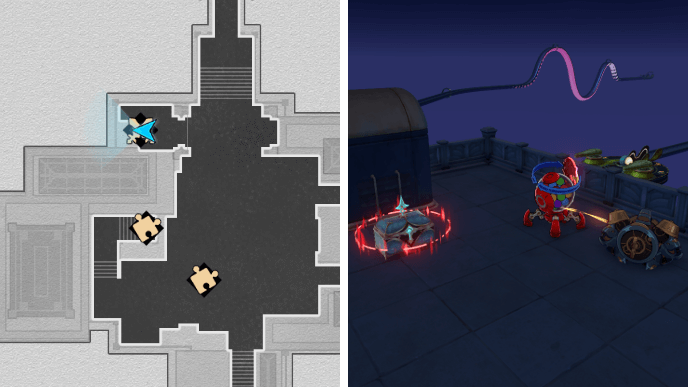
The Formidable Foe challenge of SoulGlad Scorchsand Audition Venue can be found in the Time Trial of Stage 2. It's located in a small area just before the shuttle leading to the next stage.
Enemies in this challenge are weak to Lightning, Fire, and Wind. Bringing characters of these elements will be helpful for this fight!
How to Open the SoulGlad Scorchsand Audition Venue Locked Room
Bring the Elevator Down to F1
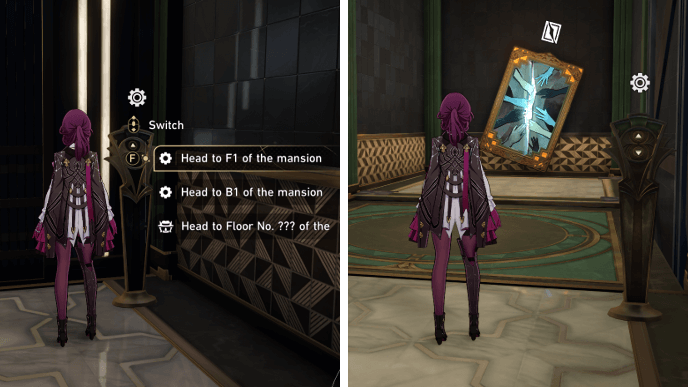
The Gunfire Trial locked room in SoulGlad Scorchsand Audition Venue can be accessed via the Arcane Artwork behind the elevator on F2.
To open up the path to it, just use the elevator to go to F1 and return to F2 using the stairs! Once you've used the artwork to teleport into the room, you can open the door from the inside.
How to Unlock SoulGlad Scorchsand Audition Venue
Progress Seabiscuit Mission
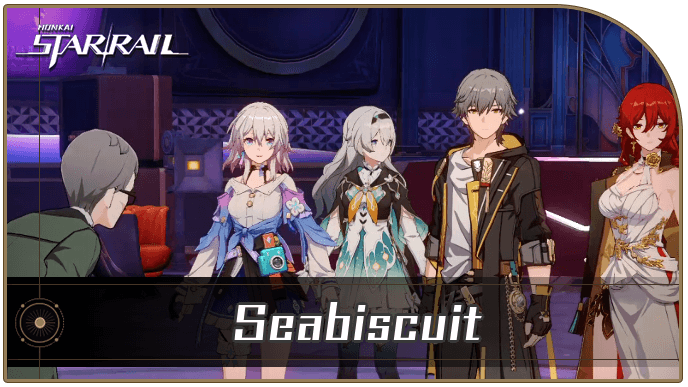
You can unlock SoulGlad Scorchsand Audition Venue by progressing through the Seabiscuit Trailblaze Mission. This is part of the In Our Time mission series.
Finish Scorchsand Vacation Mission

To explore the other parts of each stage that you didn't pick during the Seabiscuit mission, you'll need to complete the Scorchsand Vacation Adventure Mission.
This mission is unlocked after completeing the In Our Time mission series and reading the text from Mr. Aideen.
Unlock Extra Chests from Treasure Keepers
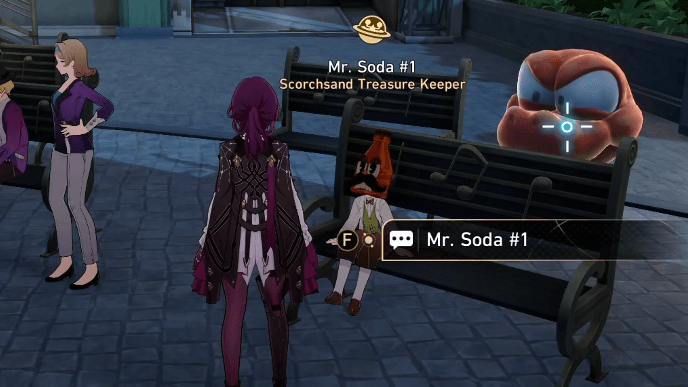
After the Scorchsand Vacation mission, you'll also unlock the ability to do hidden challenges for each stage! You can access them by adjusting the shuttle mechanism based on the clues received from Mr. Soda Treasure Keepers.
All Mr. Soda Hidden Challenges
Honkai: Star Rail Related Guides
List of All Maps
| List of Maps | |
|---|---|
| Herta Space Station | Jarilo-VI |
| The Xianzhou Luofu | Penacony |
| Amphoreus | Planarcadia |
Treasure Chest Locations
Comment
Oh thank youuuuuuuuu this was the one I was missing all this timeee aaahhh
Author
SoulGlad Scorchsand Audition Venue Treasure Chest Locations
improvement survey
03/2026
improving Game8's site?

Your answers will help us to improve our website.
Note: Please be sure not to enter any kind of personal information into your response.

We hope you continue to make use of Game8.
Premium Articles
Rankings
- We could not find the message board you were looking for.
Gaming News
Popular Games

Genshin Impact Walkthrough & Guides Wiki

Honkai: Star Rail Walkthrough & Guides Wiki

Umamusume: Pretty Derby Walkthrough & Guides Wiki

Pokemon Pokopia Walkthrough & Guides Wiki

Resident Evil Requiem (RE9) Walkthrough & Guides Wiki

Monster Hunter Wilds Walkthrough & Guides Wiki

Wuthering Waves Walkthrough & Guides Wiki

Arknights: Endfield Walkthrough & Guides Wiki

Pokemon FireRed and LeafGreen (FRLG) Walkthrough & Guides Wiki

Pokemon TCG Pocket (PTCGP) Strategies & Guides Wiki
Recommended Games

Diablo 4: Vessel of Hatred Walkthrough & Guides Wiki

Fire Emblem Heroes (FEH) Walkthrough & Guides Wiki

Yu-Gi-Oh! Master Duel Walkthrough & Guides Wiki

Super Smash Bros. Ultimate Walkthrough & Guides Wiki

Pokemon Brilliant Diamond and Shining Pearl (BDSP) Walkthrough & Guides Wiki

Elden Ring Shadow of the Erdtree Walkthrough & Guides Wiki

Monster Hunter World Walkthrough & Guides Wiki

The Legend of Zelda: Tears of the Kingdom Walkthrough & Guides Wiki

Persona 3 Reload Walkthrough & Guides Wiki

Cyberpunk 2077: Ultimate Edition Walkthrough & Guides Wiki
All rights reserved
Copyright © 2024 HoYoverse, COGNOSPHERE. All Rights Reserved.
The copyrights of videos of games used in our content and other intellectual property rights belong to the provider of the game.
The contents we provide on this site were created personally by members of the Game8 editorial department.
We refuse the right to reuse or repost content taken without our permission such as data or images to other sites.


![Everwind Review [Early Access] | The Shaky First Step to A Very Long Journey](https://img.game8.co/4440226/ab079b1153298a042633dd1ef51e878e.png/thumb)

![Monster Hunter Stories 3 Review [First Impressions] | Simply Rejuvenating](https://img.game8.co/4438641/2a31b7702bd70e78ec8efd24661dacda.jpeg/thumb)


chest 16 was so annoying. why put paintings in a different part of the map? defies the use for maps completely.