This survey will take about 1 minute.
Your answers will help us to improve our website.
Honkai: Star Rail
The Reverie (Dreamscape) Treasure Chest Locations
★ Exclusive: Check out the State of Meta in 4.0!
♦ Latest: 4.1 Livestream Redeem Codes
♦ Phase 2: Sparkxie, Sparkle, Cerydra, Rappa
♦ Upcoming: Ashveil, Silver Wolf Lv.999, Evanescia
♦ Events: Cosmicon, Roll On!, Ding! Arcadia Fun-Time Clock-In Essentials
There are 48 The Reverie Dreamscape Chests to collect in Honkai: Star Rail's Penacony. See all The Reverie Dreamscape chest locations and The Reverie Dreamscape Warp Trotters in this guide!
List of Contents
The Reverie Dreamscape Chest Locations
Reverie Dreamscape Interactive Map
Select icons to toggle them on/off
| Space Anchor | Treasure Chest | ||
| Origami Bird | Great Tree | ||
| Lordly Trashcan | Warp Trotter | ||
| Bookshelf Readable | Hanu's Adventure | ||
| Stagnant Shadow | Cavern of Corrosion | ||
| Crimson Calyx | Golden Calyx |
The Reverie Dreamscape Chests
| The Reverie (Dreamscape) Maps | |||
|---|---|---|---|
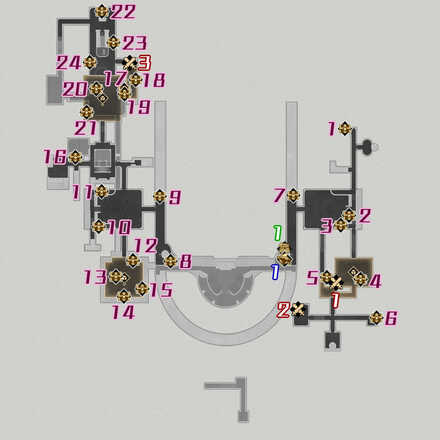 (Dreamscape) F3 See Full Image |
|||
 (Dreamscape) F2 See Full Image |
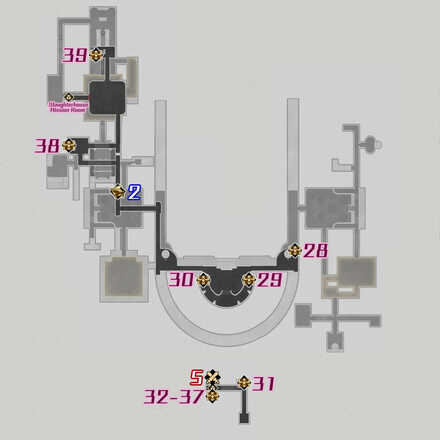 (Dreamscape) F1 See Full Image |
||
| The Reverie (Dreamscape) Chests | |||
| Chest 1 | Chest 2 | Chest 3 | Chest 4 |
| Chest 5 | Chest 6 | Chest 7 | Chest 8 |
| Chest 9 | Chest 10 | Chest 11 | Chest 12 |
| Chest 13 | Chest 14 | Chest 15 | Chest 16 |
| Chest 17 | Chest 18 | Chest 19 | Chest 20 |
| Chest 21 | Chest 22 | Chest 23 | Chest 24 |
| Chest 25 | Chest 26 | Chest 27 | Chest 28 |
| Chest 29 | Chest 30 | Chest 31 | Chest 32 |
| Chest 33 | Chest 34 | Chest 35 | Chest 36 |
| Chest 37 | Chest 38 | Chest 39 | |
| The Reverie (Dreamscape) Lordly Trashcans | |||
| Trashcan 1 | Trashcan 2 | ||
| The Reverie (Dreamscape) Trotters and Formidable Foes | |||
| Trotter 1 | Trotter 2 | Foe 1 | Foe 2 |
| Foe 3 | Foe 4 | Foe 5 | |
For collectibles in puzzle rooms, please refer to their individual sections for their precise locations!
How to Get The Reverie Dreamscape Chests
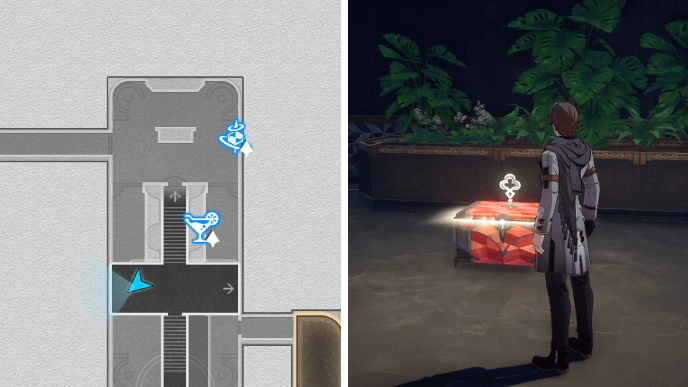
The Reverie Dreamscape Chest 1

Chest 1 is located northwest of the Platinum Guest Room Space Anchor. After getting out of the room, just turn right and you'll find the chest at the end of the short path.
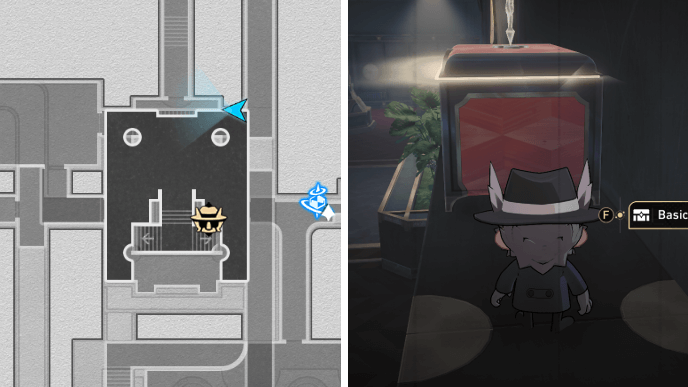
The Reverie Dreamscape Chest 2

After getting Chest 1, turn back and continue going down the hallway until you reach the lounge on the east side of the map. Go down the central stairs and Chest 2 will be on your left.
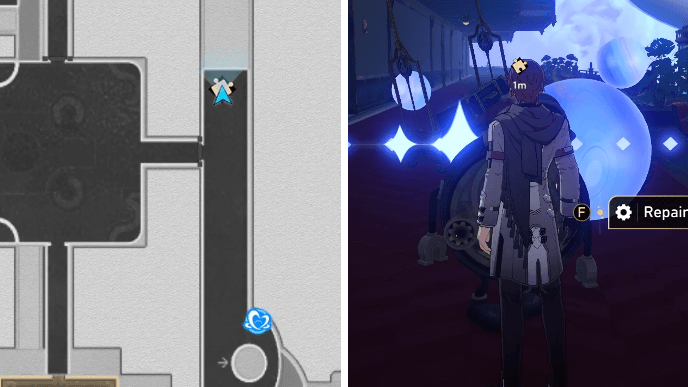
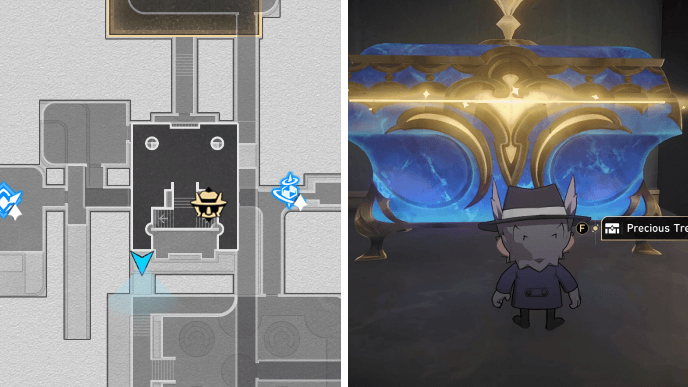
The Reverie Dreamscape Chest 3
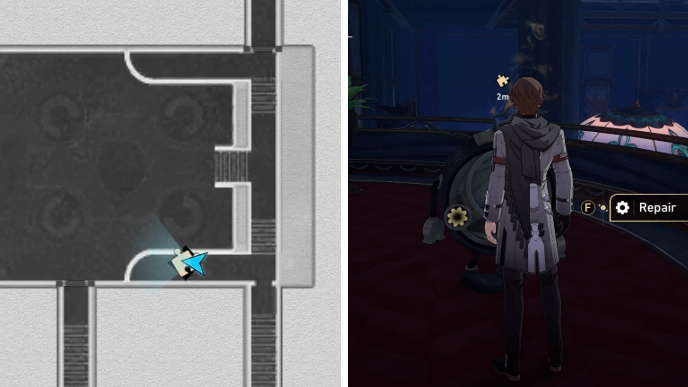
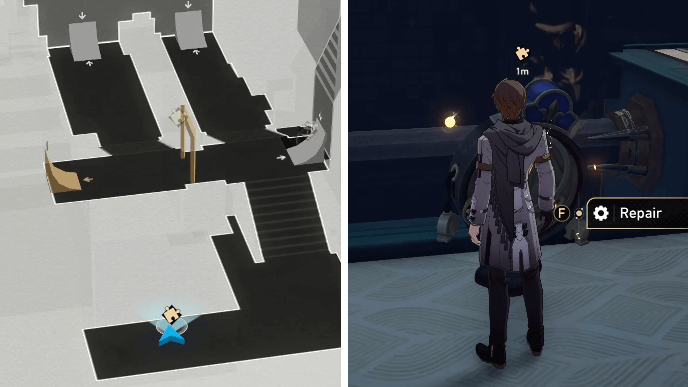
From Chest 2, head back up the stairs and turn right. Before leaving the area, you'll find a broken Dream Ticker on the balcony at the right side of the door. Solve the puzzle to get Chest 3.
How to Solve Chest 3 Dream Ticker
You can repair the Dream Ticker that gives Chest 3 by following the steps shown in the video above.
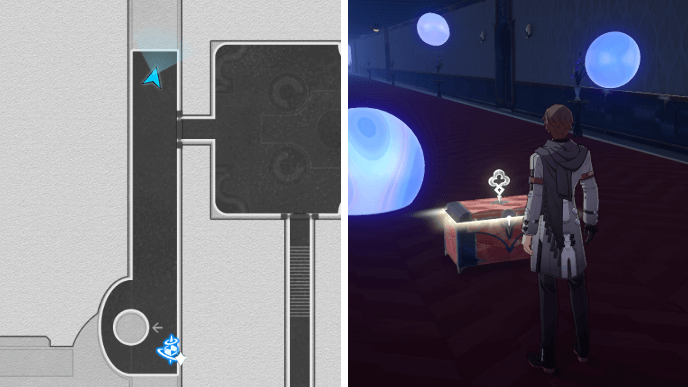
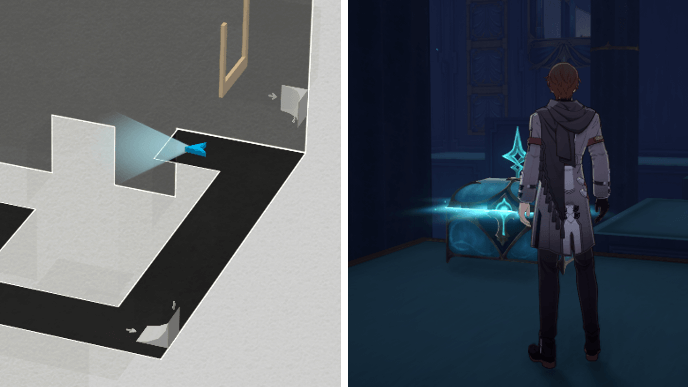
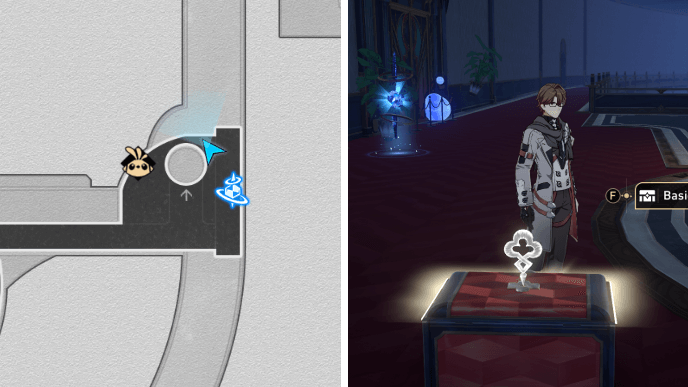
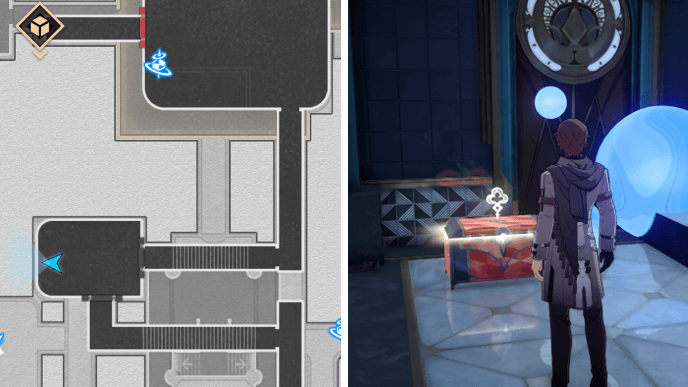
The Reverie Dreamscape Chest 4
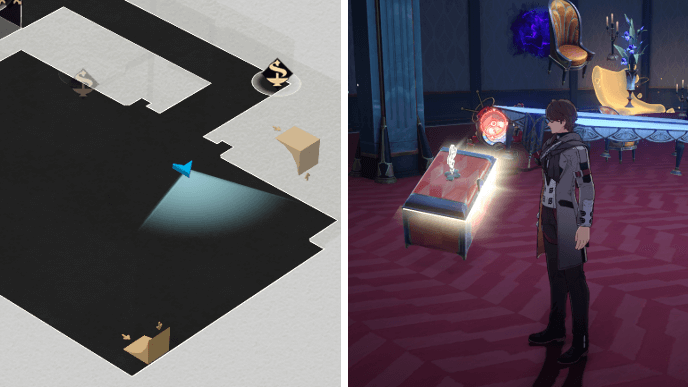
After getting Chest 3, turn back and take the nearest exit out of the lounge area. Continue onwards until you enter the easternmost Dreamwalker puzzle room on the map.
Get charges from the central Bubble Tower and use the Bubble Bridge on your left. Keep going forward until you reach the surface with the floating tables. Chest 4 will be near the exit of the room.
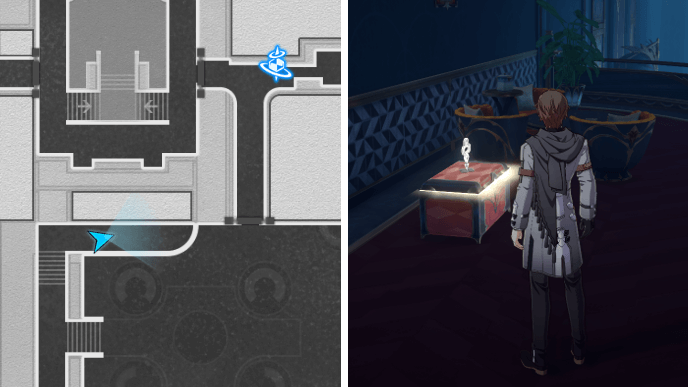
The Reverie Dreamscape Chest 5
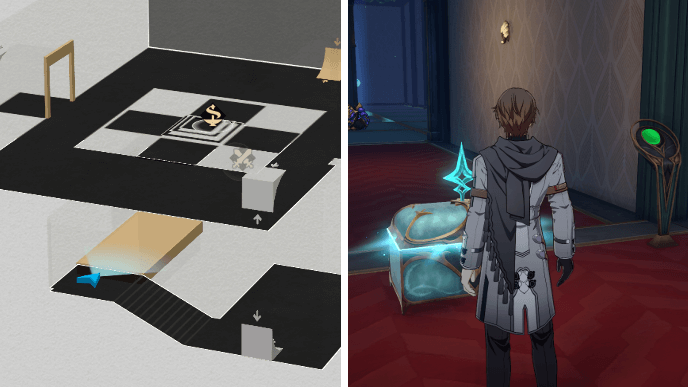
From Chest 4, exit the room and refresh your charges at the nearby Bubble Tower. Take the Bubble Bridge at the end of the corridor and continue onwards until you see a staircase to your left. Chest 5 will be at the top of those stairs and next to a control panel.
The Reverie Dreamscape Chest 6
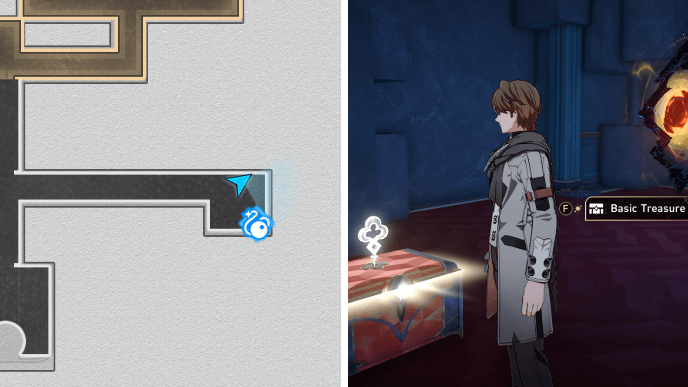
From Chest 5, go down the stairs and exit the puzzle room. You will eventually end up in a corridor splitting into 3 paths. Take the path on your left and go through the distorted hallway. Chest 6 will be at the end near the Path of Dreamdive Cavern of Corrosion.
The Reverie Dreamscape Chest 7
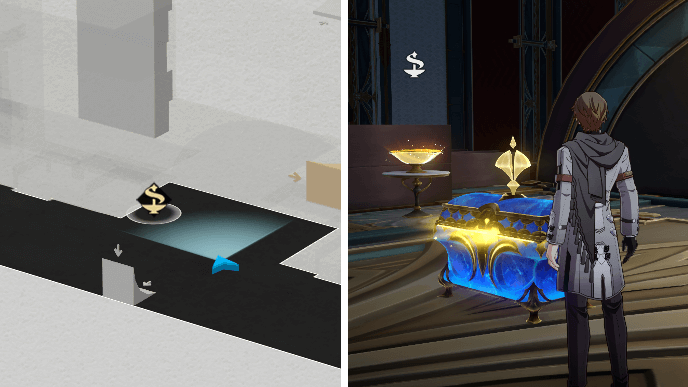
Chest 7 can be obtained once you have access to the elevator by the Dreamscape Lobby Space Anchor on F1. After taking the elevator, head north and Chest 7 will be at the far end of the area.
The Reverie Dreamscape Chest 8

To get Chest 8, you must use the western elevator on F1. Once you're on F3, the chest will be behind the elevator and near the Crimson Calyx.
The Reverie Dreamscape Chest 9
From Chest 8, go down the walkway past the Crimson Calyx and you will find Chest 9 at the far end. You must solve the Dream Ticker puzzle to get the chest.
How to Solve Chest 9 Dream Ticker
You can repair the Dream Ticker that gives Chest 9 by following the steps shown in the video above.
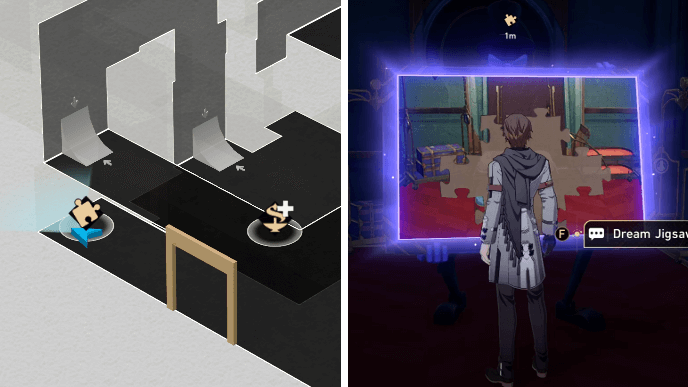
The Reverie Dreamscape Chest 10

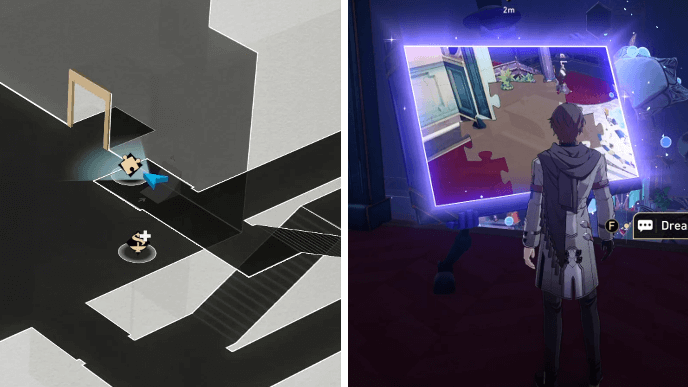
After getting Chest 9, enter the western lounge area and go up the central stairs. Turn left and head towards the Dream Jigsaw on the balcony. Solve the puzzle to open up the locked door nearby and get Chest 10.
How to Solve Chest 10 Dream Jigsaw
You can solve the Dream Jigsaw puzzle that gives Chest 10 by following the steps shown in the video above.
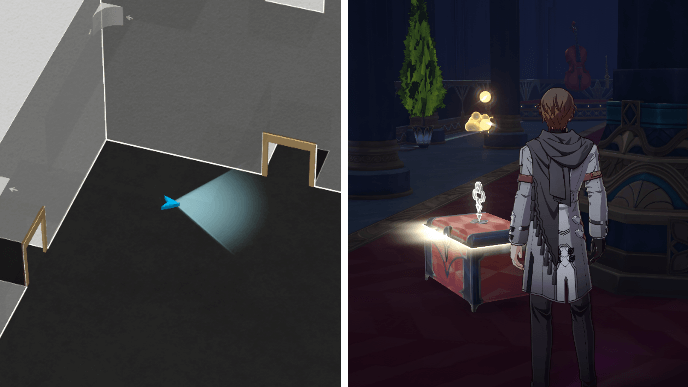
The Reverie Dreamscape Chest 11
From Chest 11, head straight towards the balcony on the other side. Chest 11 will be near a small table surrounded by 3 small chairs.
The Reverie Dreamscape Chest 12
Head back to the center of the lounge and go through door on your right. You will eventually end up in the southwestern Dreamwalker puzzle room. Turn left and you'll see a Dream Jigsaw that you'll need to solve to get Chest 12.
How to Solve Chest 12 Dream Jigsaw
You can solve the Dream Jigsaw puzzle that gives Chest 12 by following the steps shown in the video above.
The Reverie Dreamscape Chest 13

From Chest 12, get charges from the nearby Bubble Tower and go up the stairs to reach the Bubble Bridge on the right side of the room. Chest 13 will be in the small area you end up in.
The Reverie Dreamscape Chest 14
Head back to the Bubble Tower near Chest 12 and refresh your charges. Then, take the Bubble Bridge right in front of you. Continue following the Bubble Bridges leading forward until you find Chest 14 by a chandelier and another Bubble Tower.
The Reverie Dreamscape Chest 15

From Chest 14, refresh your bubble charges and take the bridge past the Bubble Tower. Chest 15 will be tucked away in the small corner space of the area you end up in.
The Reverie Dreamscape Chest 16

From the VIP Lounge Corridor Space Anchor, head into the next area and make your way to the door right across from the one you came from. Chest 16 will be in the small corridor space before the room of the Shape of Nectar Stagnant Shadow.
The Reverie Dreamscape Chest 17

After getting Chest 17 and exiting the small area, go through the door on your left side to reach the northwestern Dreamwalker puzzle room. Get bubble charges and use the bridge nearest to the central stairs. Chest 17 will be in the area left of the Bubble Tower.
The Reverie Dreamscape Chest 18
Head back to the starting surface and go into the hall before the small platform with floating instruments. Chest 18 will be next to the staircase leading upwards.
The Reverie Dreamscape Chest 19
After getting Chest 18, take the stairs all the way up and you'll find a Dream Jigsaw. Solve the puzzle to make Chest 19 appear in between the 2 large bird statues in the main area of the puzzle room.
How to Solve Chest 19 Dream Jigsaw
You can solve the Dream Jigsaw puzzle that gives Chest 19 by following the steps shown in the video above.
The Reverie Dreamscape Chest 20
After getting Chest 19, head towards the small platform with the floating drum set and trumpet. Chest 20 will be next to the pillar nearby.
The Reverie Dreamscape Chest 21
From Chest 20, refresh your bubble charges and take the bridge nearest to the Bubble Tower. Continue following the bridges leading forward until you reach the ceiling of the puzzle room. Before heading to the chandelier, turn right and Chest 21 will be at the end.
The Reverie Dreamscape Chest 22
You can access the area where Chest 22 is by using the F1 elevator near the Dream Ticker Supervisor. You can also return to the northwestern puzzle room and use the door on the side of the drum set to reach the area.
The chest is a few steps northwest from the Dreamjolt Hostelry Space Anchor. It will be also in front of a large planter box.
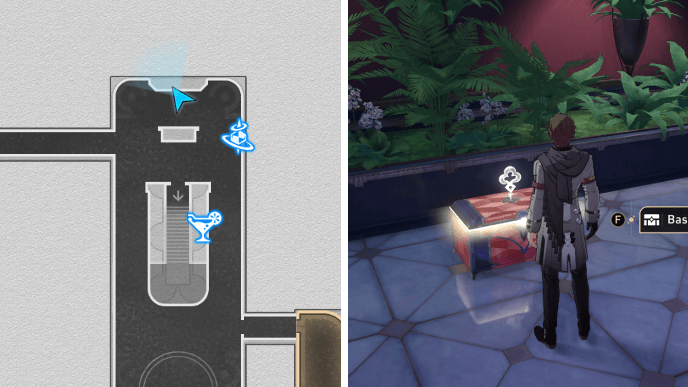
The Reverie Dreamscape Chest 23
Head a few south from the Dreamjolt Hostelry Space Anchor. Chest 23 will be in between a divider and a potted plant.
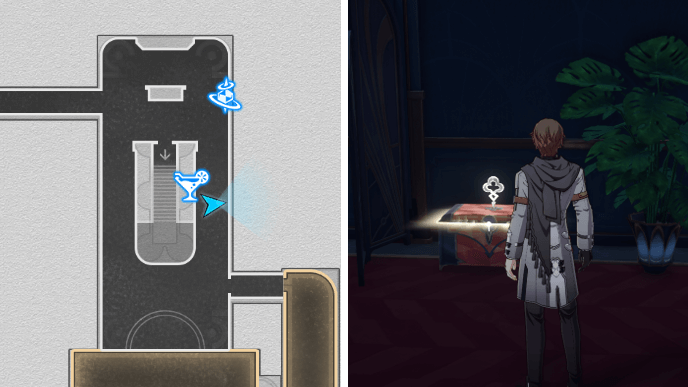
The Reverie Dreamscape Chest 24
After getting Chest 23, turn right once you reach the exit of the area and you'll see a broken Dream Ticker by a couple of plants. Repair it to get Chest 24.
How to Solve Chest 24 Dream Ticker
You can repair the Dream Ticker that gives Chest 24 by following the steps shown in the video above.
The Reverie Dreamscape Chest 25
From Chest 24, head towards the planter box with giant roses near the Dreamjolt Hostelry Space Anchor. Go down the stairs in front of the planter box and you'll find Chest 25 to your right.
The Reverie Dreamscape Chest 26
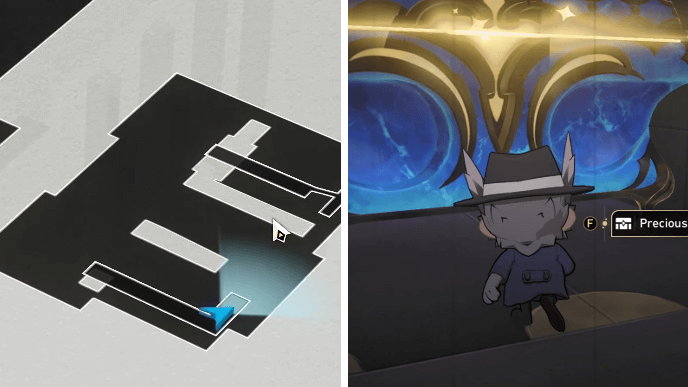
Teleport to the VIP Loung Corridor Space Anchor and go through the nearby door. Head down all the stairs and transform using the Hanu's Adventure TV.
Use the Teleport Point by the bookshelves to get on top of them. Stun the enemy keeping guard with the vase and get Chest 26 at the end of the bookshelf path.
The Reverie Dreamscape Chest 27
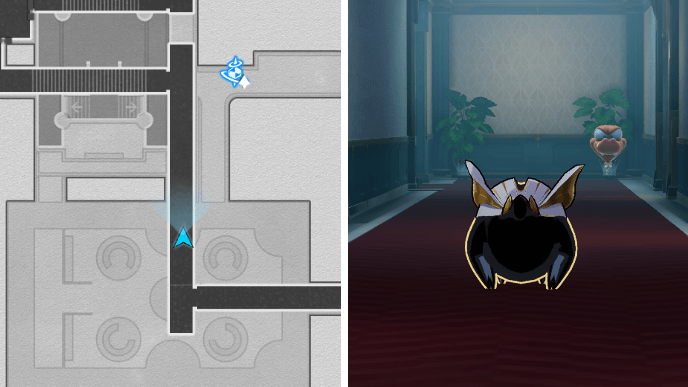
After getting Chest 26, get down from the bookshelves and head towards the southwestern corner of the room. There'll be a small entrance you can slip through as Hanu, allowing you to reach Chest 27. Be careful of the Birdskull keeping watch nearby.
The Reverie Dreamscape Chest 28
Teleport to the Dreamscape Lobby Space Anchor on F1. Chest 28 will be on the right side of the elevator.
The Reverie Dreamscape Chest 29
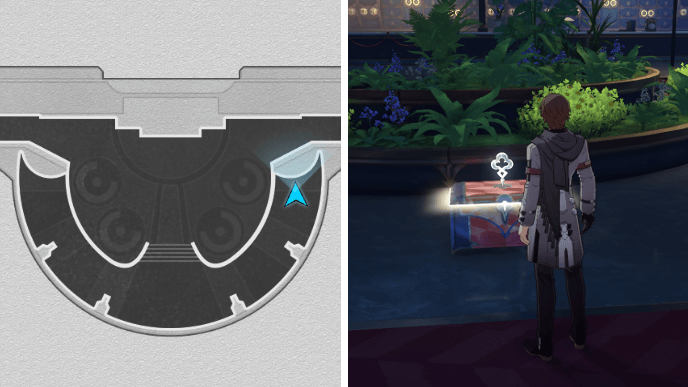
From the Dreamscape Lobby Space Anchor, head towards the main lobby. Chest 29 will be in the eastern side of the lobby in front of some tiered planter boxes.
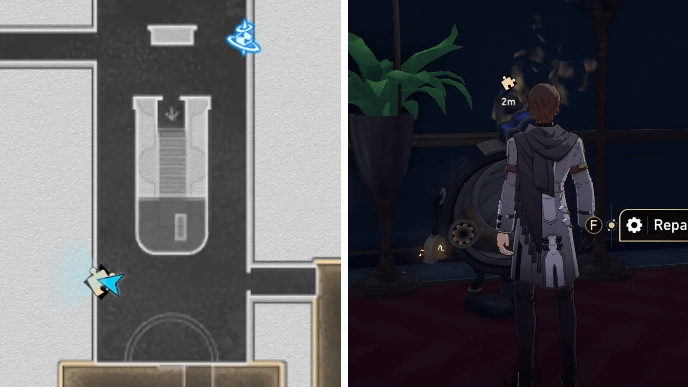
The Reverie Dreamscape Chest 30

After getting Chest 29, go to the spot directly opposite from where you came from and you'll find a broken Dream Ticker. Repair it to get Chest 30.
How to Solve Chest 30 Dream Ticker
You can repair the Dream Ticker that gives Chest 30 by following the steps shown in the video above.
The Reverie Dreamscape Chest 31
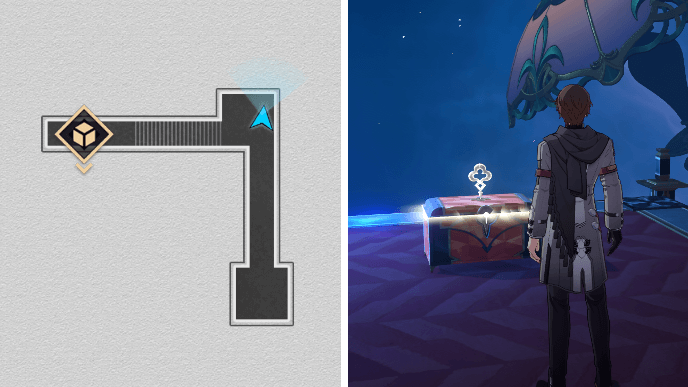
To get to the L-shaped area where Chest 31 is, you'll need to head back to the eastern lounge on F3 and teleport there using the Arcane Artwork. Once you're there, Chest 31 will be right in front of you.
The Reverie Dreamscape Chest 32

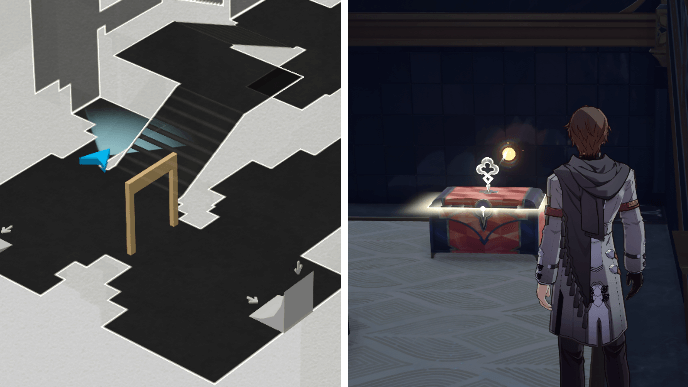
From Chest 31, go up the nearby stairs and use the Arcane Artwork to enter the southernmost Dreamwalker puzzle room. Head down into the central area and transform using the Hanu's Adventure TV tucked into the space on your left.
Use the Teleport Point directly north from the TV to reach a surface where you'll find a Dream Jigsaw. Solve the puzzle to make Chest 32 appear in the central area.
How to Solve Chest 32 Dream Jigsaw
You can solve the Dream Jigsaw puzzle that gives Chest 32 by following the steps shown in the video above.
The Reverie Dreamscape Chest 33
After getting Chest 32, transform back into Hanu and use the Teleport Point near the Bubble Tower this time. Use the vase to stun the nearby enemy first and use the next Teleport Point. Return to your normal form to get rid of the obstacles.
Transform back into Hanu and pass through the gap near the Teleport Point you just came from. You'll need to get to the next one without being caught by the Birdskull. Once you're on top of the bookshelves, you can get Chest 33 at the end.
The Reverie Dreamscape Chest 34
Head back to the central area and get bubble charges to use the bridge northeast of the Bubble Tower. Continue onwards and stop once you spot the next bridge. Turn around and you'll find Chest 34 tucked in a small space next to the set of stairs you came from.
The Reverie Dreamscape Chest 35

From Chest 34, take the nearby Bubble Bridge and you'll reach an area with another Bubble Tower. Be sure to refresh your charges first. Then, you'll find Chest 35 a little bit past the Bubble Tower.
The Reverie Dreamscape Chest 36
After getting Chest 35, return to the central area and refresh your bubble charges. Use the bridge northwest of the Bubble Tower this time.
Follow the other bridges leading forward until you reach a door with a control panel. Walk past the door and you'll find a Dream Ticker at the end of the path. Repair it to get Chest 36.
How to Solve Chest 36 Dream Ticker
You can repair the Dream Ticker that gives Chest 36 by following the steps shown in the video above.
The Reverie Dreamscape Chest 37

From Chest 36, activate the nearby control panel so you can head back to the central area and refresh your bubble charges. After that, head back to where you came from and use the Bubble Bridge behind the door you just unlocked.
With the door unlocked, you'll use fewer charges to get to the next area. Refresh your charges again at the nearby Bubble Tower and take the bridge leading downwards to reach Chest 37.
The Reverie Dreamscape Chest 38
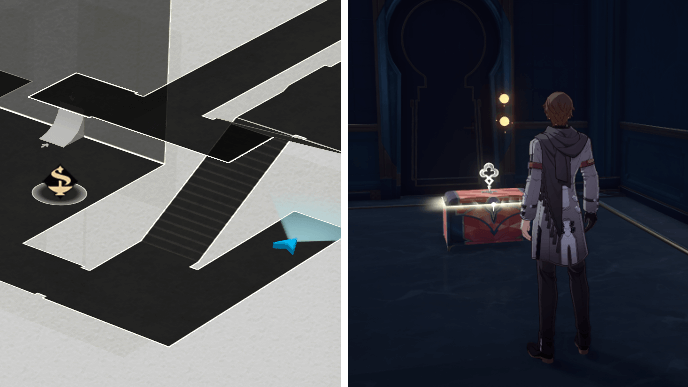
Teleport to the Monitoring Room Space Anchor and go through the corridor leading south until you reach the next room. Chest 38 will be right in front of you once you get there.
The Reverie Dreamscape Chest 39
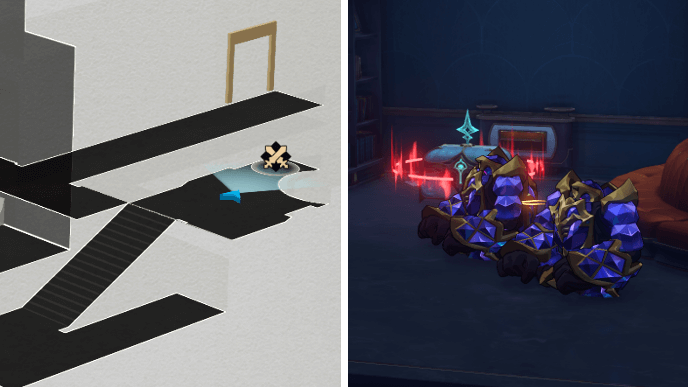
Teleport to the Monitoring Room Space Anchor and head towards the northern area of the F1 map. You'll be getting Chest 39 from the Dream Ticker Supervisor once you submit 15 Eerie Building Blocks to it.
The Reverie Dreamscape Lordly Trashcans
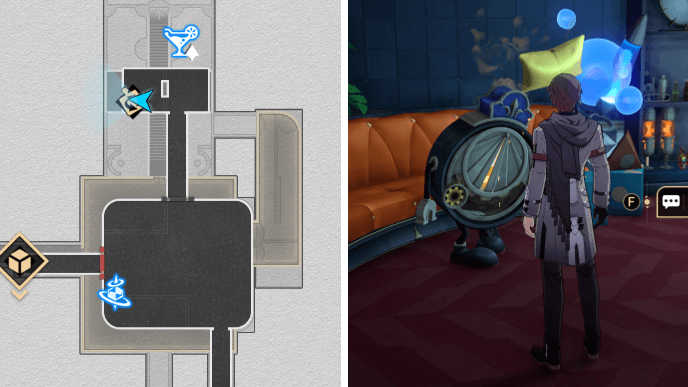
The Reverie Dreamscape Lordly Trashcan 1

The first Lordly Trashcan can be found on F3 of The Reverie (Dreamscape). Warp to the Dreamscape Lobby Space Anchor then take the elevator.
You can get the Trashcan's rewards without fighting it by choosing Option 3 then Option 1 during your conversation.
The Reverie (Dreamscape) Lordly Trashcan 2
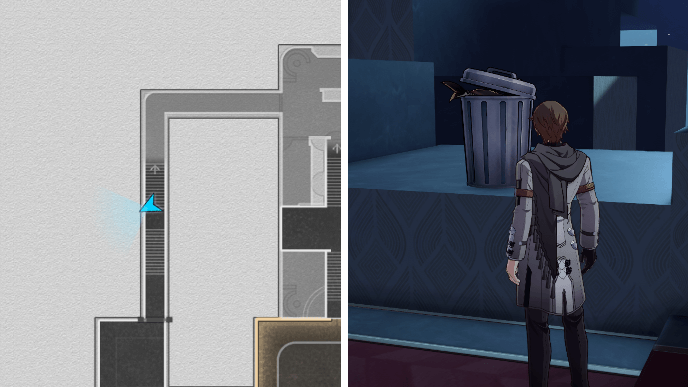
The second Lordly Trashcan can be found on F2 of The Reverie (Dreamscape). Warp to the Dreamjolt Hostelry Space Anchor and head into the long corridor past the planter box with giant roses.
As you go down the stairs, you'll find it atop a heightened platform on your right. This time, the Trashcan will not engage in a friendly conversation with you. You must simply defeat it to get its rewards.
The Reverie Dreamscape Warp Trotter Locations
The Reverie Dreamscape Warp Trotter 1

The first Warp Trotter can be found on F3 of The Reverie (Dreamscape). Warp to the Dreamscape Lobby Space Anchor then take the elevator. Go around the elevator to see the Warp Trotter and attack before it tries to run away.
The Reverie Dreamscape Warp Trotter 2
The second Warp Trotter of The Reverie (Dreamscape) can be found at the hallway on F1. Teleport and go downwards from the Monitoring Room Space Anchor to encounter the Warp Trotter.
Formidable Foe Challenge Chests
The Reverie Dreamscape Challenge Chest 1
| Enemies | Weaknesses |
|---|---|
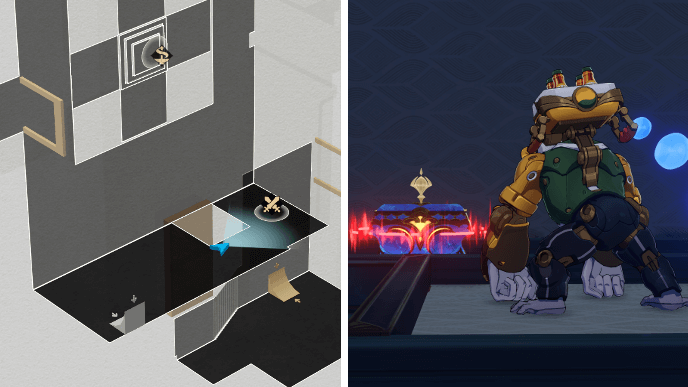
The first challenge of The Reverie (Dreamscape) can be found in F3's easternmost puzzle room. From the spot where Chest 4 is, get bubble charges and use the Bubble Bridge at the southwest corner of the room.
Physical, Wind, and Lightning characters are recommended for this fight. Bringing a shielder like the March 7th, Gepard, or the Fire Trailblazer will also help deal rebound damage to the Sweet Gorilla.
The Reverie Dreamscape Challenge Chest 2

| Enemies | Weaknesses |
|---|---|
The secomd challenge of The Reverie (Dreamscape) can be found in the room west of the Path of Dreamdive Cavern of Corrosion.
All enemies in this challenge are weak to Lightning. AoE characters like Serval, Kafka, or Jing Yuan are recommended for this fight.
The Reverie Dreamscape Challenge Chest 3
| Enemies | Weaknesses | |
|---|---|---|
| Wave 1 | ||
| Wave 2 | ||
The third challenge of The Reverie (Dreamscape) can be found in F3's northwestern puzzle room. The challenge chest will be at the top of the staircase near Chest 18.
The Formidable Foes guarding the chest are all weak to Lightning. AoE characters like Serval, Kafka, or Jing Yuan are recommended for this challenge.
The Reverie Dreamscape Challenge Chest 4

| Enemies | Weaknesses | |
|---|---|---|
| Wave 1 | ||
| Wave 2 | ||
The fourth challenge of The Reverie (Dreamscape) can be found in the northwestern area of F2. Teleport to the Dreamjolt Hostelry Space Anchor and go into the long corridor past the planter box with giant roses.
The Formidable Foes guarding the chest are all weak to Lightning. AoE characters like Serval, Kafka, or Jing Yuan are recommended for this challenge.
The Reverie Dreamscape Challenge Chest 5
| Enemies | Weaknesses |
|---|---|
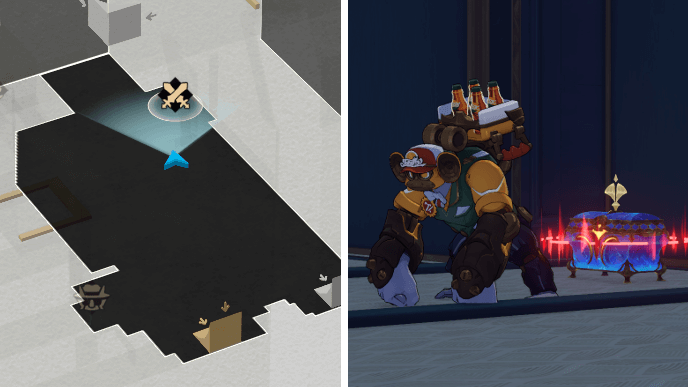
The fifth challenge of The Reverie (Dreamscape) can be found in F1's southernmost puzzle room. Pass through the Bubble Bridge on the left side of the room and continue onward until you spot the Formidable Foe.
The Formidable Foes guarding the chest are all weak to Fire. Characters like Fire Trailblazer, Topaz, and Himeko are recommended for this challenge.
Slaughterhouse Treasure Chests
Get Additional Chests from Slaughterhouse Mission
Extra chests are available in another puzzle room that only unlocks after starting the Slaughterhouse mission. See how to get them all in our guide!
How to Unlock The Reverie Dreamscape
Progress Should One Awaken at Midnight

You can unlock The Reverie (Dreamscape) by progressing through the Trailblaze Mission, Should One Awaken at Midnight.
Should One Awaken at Midnight Mission Guide
Honkai: Star Rail Related Guides
List of All Maps
| List of Maps | |
|---|---|
| Herta Space Station | Jarilo-VI |
| The Xianzhou Luofu | Penacony |
| Amphoreus | Planarcadia |
Treasure Chest Locations
Comment
3  ??? about 2 years
None of the numbers/images match?? I'm so confused wtf
Author

The Reverie (Dreamscape) Treasure Chest Locations
Please participate in our site
improvement survey
03/2026
improvement survey
03/2026
Would you assist in
improving Game8's site?
improving Game8's site?

×
We are listening to our users' valuable opinions and discussing how to act on them.
The information collected through this survey will be used for the purpose of improving our services. In addition, the information will only be disclosed a part of a statistic in a format that will not allow identification of personal information.
Begin Survey
Not Now
×
Please rate each item regarding Game8.co's Advertisements.
Amount of Ads
Very Dissatisfied
Somewhat Dissatisfied
Fine
Somewhat Satisfied
Highly Satisfied
Placement of Ads
Timing of Ad Display
Ad Loading Speed
Safeness of Ads
Content of Ads
×
Please rate each item regarding Game8.co's Quality of Articles.
Amount of information
Very Dissatisfied
Somewhat Dissatisfied
Fine
Somewhat Satisfied
Highly Satisfied
Frequency of updates
Speed of new information
Accuracy of articles
Understandibility of articles
Readability of sentences
×
Please rate each item regarding Game8.co's Usability of the Site.
Ease of finding information
Very Dissatisfied
Somewhat Dissatisfied
Fine
Somewhat Satisfied
Highly Satisfied
Loading Speed
Use of Color
Font Size
Visibility of Images
Easy to Understand Layout
×
Please rate each item regarding Game8.co's Message Boards, Comments.
Ease of Writing
Very Dissatisfied
Somewhat Dissatisfied
Fine
Somewhat Satisfied
Highly Satisfied
Readability
Ease in Finding Information
Comment Quality
Comment Quantity
Admin Response
×
Please rate each item regarding Game8.co's Site's new design.
Please rate our site's new design
Very Dissatisfied
Somewhat Dissatisfied
Fine
Somewhat Satisfied
Highly Satisfied
Do you think that the website's design change makes the site easier to use?
Has the new design made it easier for you to find information on the site?
Has the new design improved the overall visual appeal of the site?
How would you rate your overall satisfaction with the new design of the site?
×
How likely are you to recommend Game8 to someone you know?
Very Unlikely
0
1
2
3
4
5
6
7
8
9
10
Very Likely
If you have other opinions regarding potential improvement to the website, please share them with us. We would appreciate your honest opinion.
Note: This is a free response section, so you can proceed without entering anything.
Note: Please be sure not to enter any kind of personal information into your response.
Note: Please be sure not to enter any kind of personal information into your response.
×
Thank You
×
Thank you for participating in our survey! Your answers will help us to improve the quality of our website and services.
We hope you continue to make use of Game8.
We hope you continue to make use of Game8.
Close
Premium Articles

Rankings
- We could not find the message board you were looking for.
Gaming News


![Everwind Review [Early Access] | The Shaky First Step to A Very Long Journey](https://img.game8.co/4440226/ab079b1153298a042633dd1ef51e878e.png/thumb)

![Monster Hunter Stories 3 Review [First Impressions] | Simply Rejuvenating](https://img.game8.co/4438641/2a31b7702bd70e78ec8efd24661dacda.jpeg/thumb)
Popular Games

Genshin Impact Walkthrough & Guides Wiki
Honkai: Star Rail Walkthrough & Guides Wiki
Umamusume: Pretty Derby Walkthrough & Guides Wiki
Pokemon Pokopia Walkthrough & Guides Wiki
Resident Evil Requiem (RE9) Walkthrough & Guides Wiki
Monster Hunter Wilds Walkthrough & Guides Wiki
Wuthering Waves Walkthrough & Guides Wiki
Arknights: Endfield Walkthrough & Guides Wiki
Pokemon FireRed and LeafGreen (FRLG) Walkthrough & Guides Wiki
Pokemon TCG Pocket (PTCGP) Strategies & Guides Wiki


Recommended Games
Diablo 4: Vessel of Hatred Walkthrough & Guides Wiki
Fire Emblem Heroes (FEH) Walkthrough & Guides Wiki
Yu-Gi-Oh! Master Duel Walkthrough & Guides Wiki
Super Smash Bros. Ultimate Walkthrough & Guides Wiki
Pokemon Brilliant Diamond and Shining Pearl (BDSP) Walkthrough & Guides Wiki
Elden Ring Shadow of the Erdtree Walkthrough & Guides Wiki
Monster Hunter World Walkthrough & Guides Wiki
The Legend of Zelda: Tears of the Kingdom Walkthrough & Guides Wiki
Persona 3 Reload Walkthrough & Guides Wiki
Cyberpunk 2077: Ultimate Edition Walkthrough & Guides Wiki


All rights reserved
Copyright © 2024 HoYoverse, COGNOSPHERE. All Rights Reserved.
The copyrights of videos of games used in our content and other intellectual property rights belong to the provider of the game.
The contents we provide on this site were created personally by members of the Game8 editorial department.
We refuse the right to reuse or repost content taken without our permission such as data or images to other sites.
different puzzle room/ location i experienced that too