This survey will take about 1 minute.
Your answers will help us to improve our website.
New Pokemon Snap (Switch)
All Research Spot Locations
This is a guide to finding all Research Spots in New Pokemon Snap (Pokemon Snap 2) for the Nintendo Switch. Learn what Research Spots are, their locations, as well as what rewards you will get after finding all Research Spots!
List of Contents
What Are Research Spots?
Points of Interest
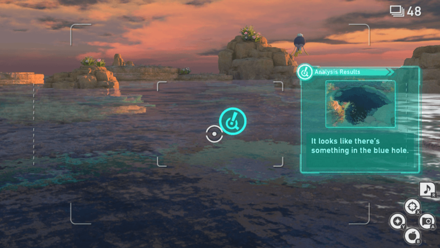
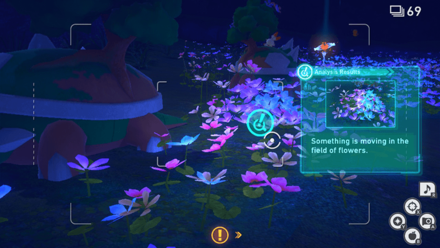
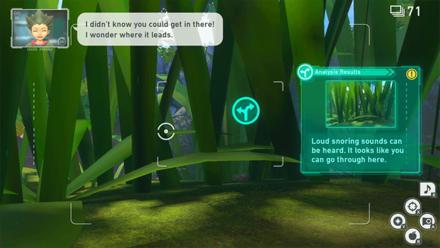
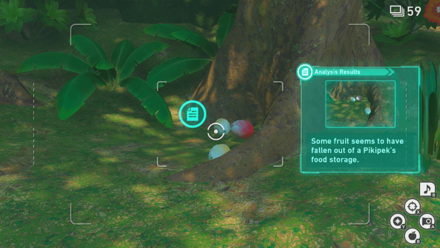
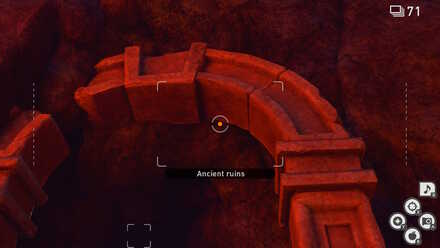
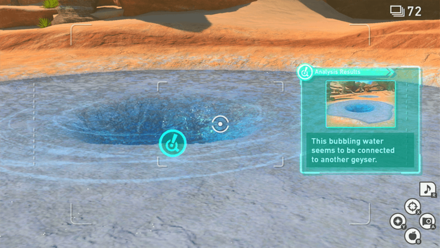
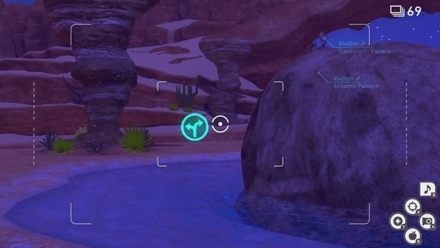
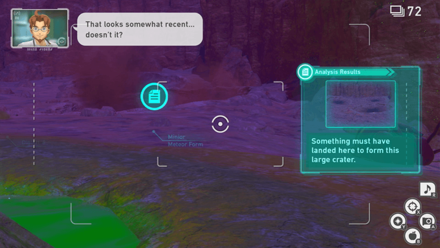
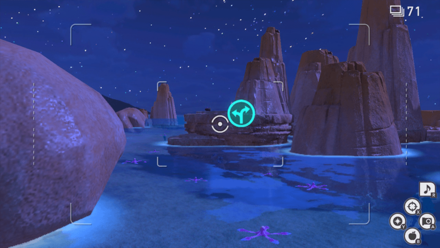
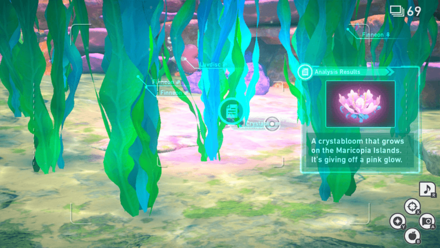
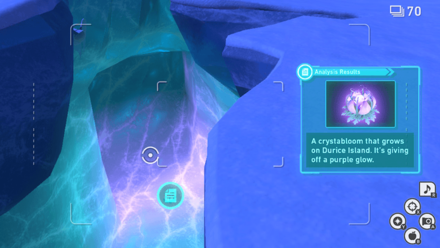
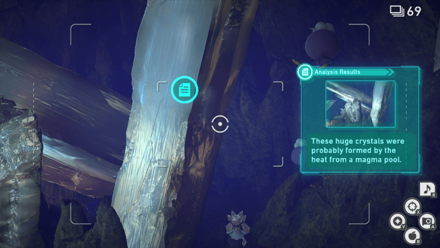
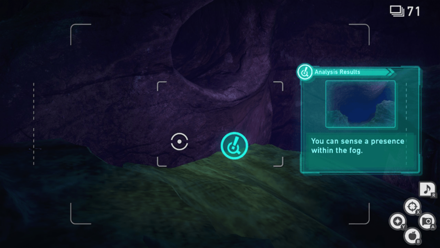
Scanning the blue hole at Reef (Evening) provides a clue to a hidden Pokemon.
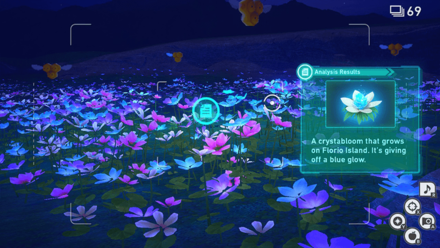
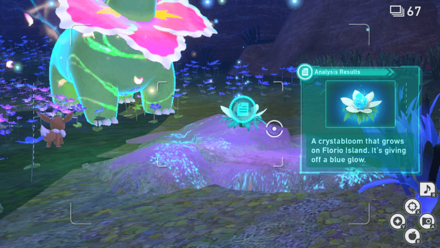
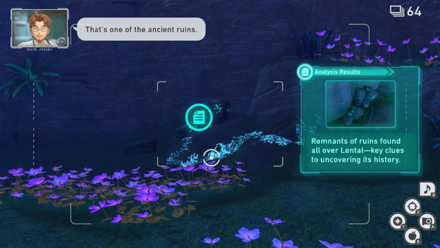
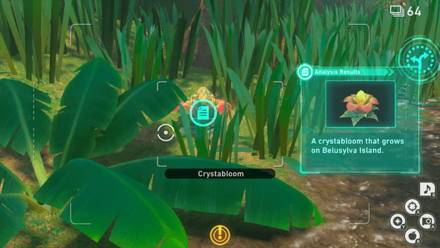
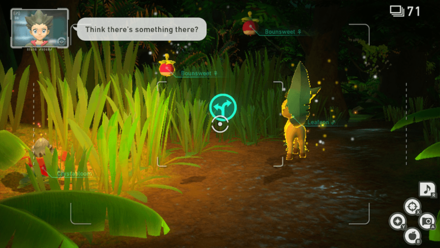
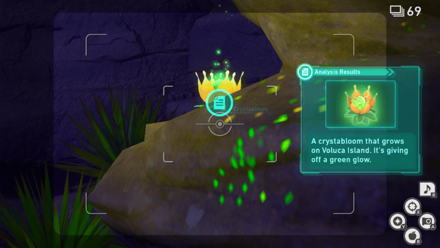
Research Spots are scannable points of interest found in the Lental Region. Scanning them provides clues to players which may help them complete Requests, take a 4 Star Photo of a certain Pokemon, discover alternate routes, or find glowing Crystablooms needed for story progression.
There are a total of 158 Research Spots that you can find at all the courses in the Lental Region. Finding and analyzing these spots rewards you with the Apprentice Detective, Assistant Detective, and Great Detective research titles.
Unlike Ancient Ruins and Crystablooms, Research Spots are not marked as Objects of Interests in the Photodex.
Research Spot Locations
Florio Research Spots
Park (Day) Research Spots
There are seven Research Spots that you can find at Park (Day). Two of these spots require you to start the course at Research Level 3.
| Research Spot | Where to Find |
|---|---|
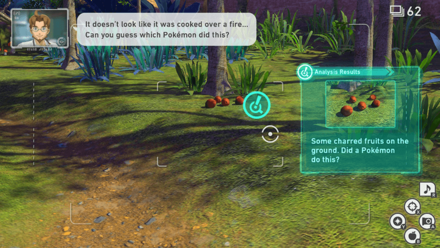 |
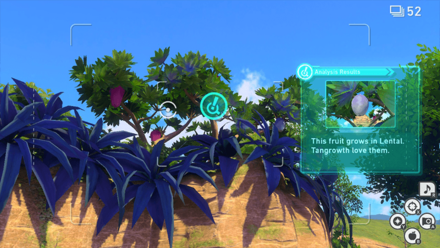
After crossing the first bridge, run a scan at the charred fruits to analyze the research spot. |
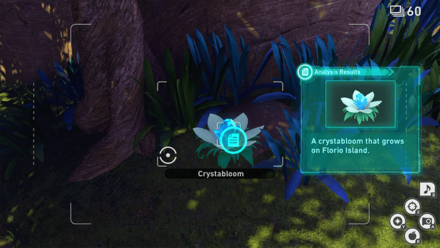 |
After passing the cooked fruits, run a scan and analyze the Crystalbloom on the left. |
 |
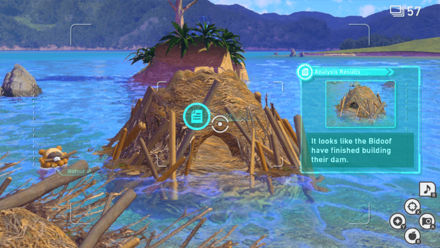
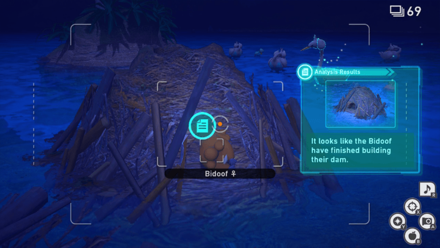
While crossing the dam, scan the area to reveal that Bidoof has finished building it. |
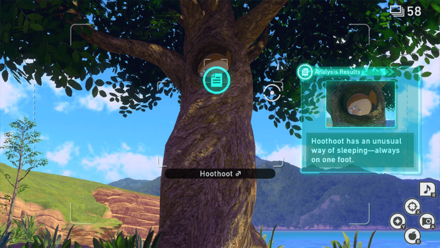 |
On the same area as the fruit tree, run a scan and analyze the sleeping Hoothoot on the tree. |
 |
At Research Level 3, head through the second area with the Swannas and Duckletts and run a scan to take the alternate route. |
 |
On the alternate route, run a scan and analyze Bidoof's den on the water |
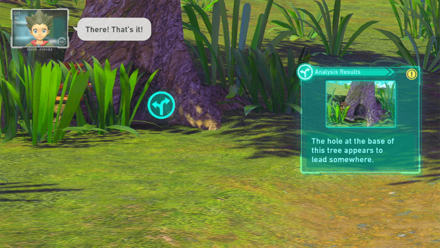 |
As part of the free content update, a new alternate route can be found after crossing the first bridge. Scan the tree on your left in the grassy area where the Grookey sleeps. A cutscene will play, showing the Neo-One shrinking down to enter the hole in the tree. |
Park (Night) Research Spots
There are five Research Spots that you can scan in Park (Night).
| Research Spot | Where to Find |
|---|---|
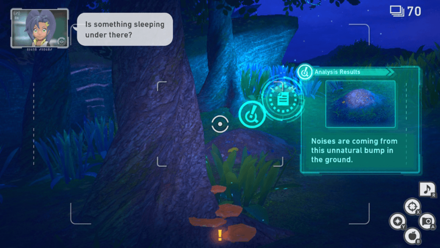 |
After crossing the first bridge, look to your left and run a scan to analyze the mound on the ground. Be sure not to scan while targeting the mound as the Pinsir will wake up. |
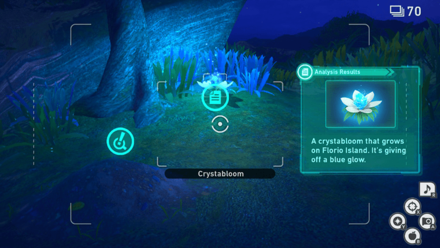 |
Next to the mound is the glowing Crystabloom that you can run and analyze. |
 |
While crossing the near dam, run a scan and analyze Bidoof's den. |
 |
To analyze this Research Spot, throw a Fluffruit at the Pichu at the starting point. Proceed through the course and throw an Illumina Orb at the sleeping Sylveon. As you head towards the flower bed area, run a scan and look to your left to find this Research Spot. |
 |
At the flower bed area, look to your right and run a scan to find the glowing Crystabloom. |
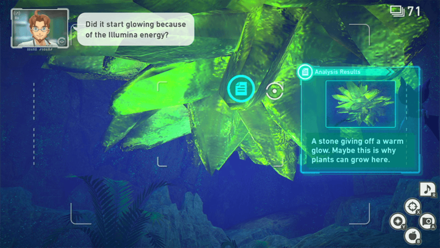
Illumina Spot (Florio Nature Park) Research Spots
There are two Research Spots in the Illumina Spot at Florio Nature Park. Both can be found just as you proceed through the course.
| Research Spot | Where to Find |
|---|---|
 |
At the start of the course, run a scan and analyze the first Crystabloom. |
 |
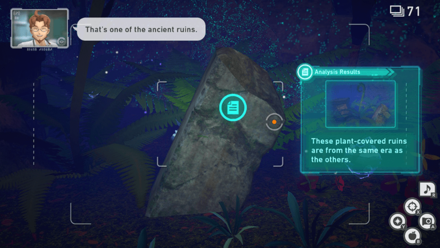
Near the end of the course, look to your right and run a scan to analyze the Ancient Ruins. |
Research Camp Research Spots
There are eight Research Spots that you can scan at the Research Camp.
Several of the spots can be found from the lab side and the camp side which require you to take multiple expeditions to scan all of them.
| Research Spot | Where to Find |
|---|---|
 |
From the camp starting point, run a scan near the campsite to analyze it. |
 |
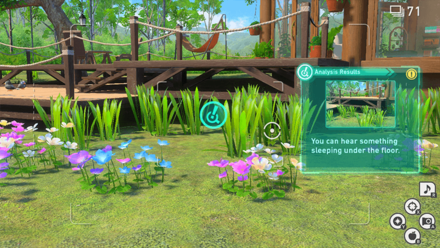
From the camp starting point, run a scan near the sleeping Dedenne to analyze the grassy area behind it. |
 |
Run a scan on one of the Neo-Ones to analyze it. |
 |
Proceed through the course and take the alternate route inside the lab. |
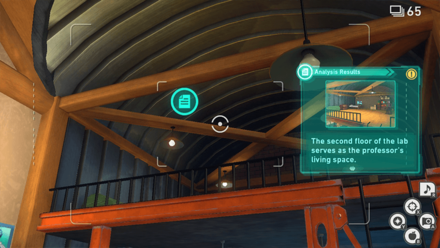 |
While inside the lab, run a scan and analyze the second floor. |
 |
From the lab starting point, run a scan near the deck to analyze it. |
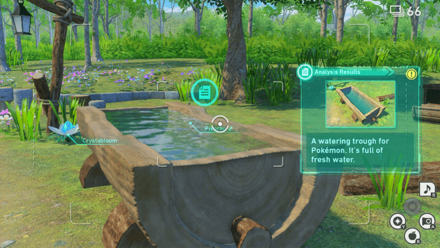 |
From the lab starting point, proceed through the course and scan the watering trough. |
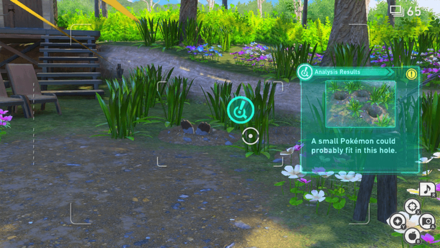 |
From the lab starting point, look to your right and scan the area where you can find Bunnelby's ears popping out. |
Side Path (Day) Research Spots
There are three Research Spots that can be found in Side Path (Day).
| Research Spot | Where to Find |
|---|---|
 |
At the beginning of the course, look to your left and run a scan to access the alternate route leading to the Snorlax Den. |
 |
At the regular route, look to your left and run a scan towards the sleeping Snorlax. |
 |
As you reach the garden near the end of the course, look up and run a scan on the nest. |
Side Path (Night) Research Spots
There are three Research Spots that can be found in Side Path (Night).
| Research Spot | Where to Find |
|---|---|
 |
At the beginning of the course, look to your left and run a scan to access the alternate route leading to the Snorlax Den. |
 |
At the regular route, look to your left and run a scan towards the sleeping Snorlax. |
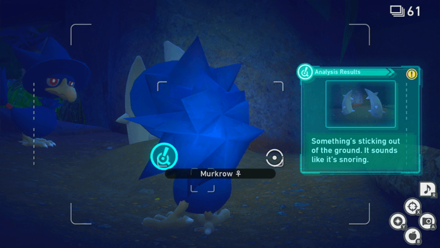 |
In the area with the two Murkrows, run a scan and analyze Pinsir's horns. |
Belusylva Research Spots
Jungle (Day) Research Spots
There are seven Research Spots that you can find at Jungle (Day). Two of these spots require you to start the course at Research Level 3.
| Research Spot | Where to Find |
|---|---|
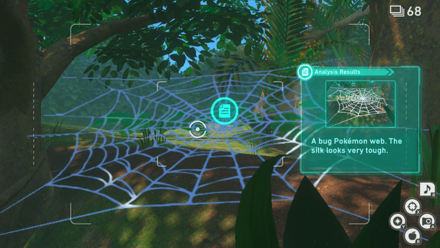 |
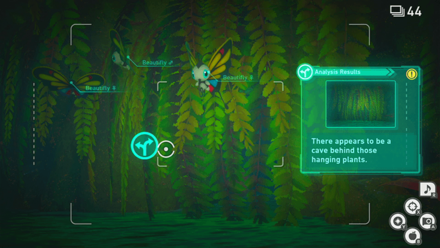
Near the starting point, look to your left to find and scan the spider web. |
 |
Look to your left and find a Crystabloom just before the first alternate route. |
 |
Throw an Illumina Orb at the Crystabloom near the first alternate route. Scan the alternate route to reveal a set of Pokemon tracks. |
 |
On the main path just before reaching the ruins area, look to your left and scan the fruits on the ground. |
 |
As you ascend to the ruins area, look down and scan a portion of the ruins below. |
 |
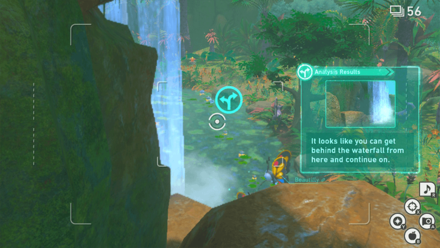
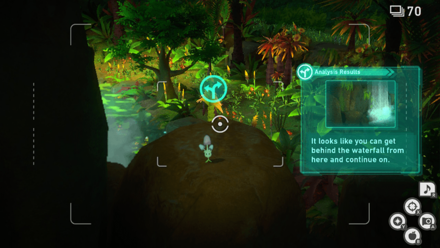
At Research Level 3, proceed through the course and scan the waterfalls on the left to analyze it. |
 |
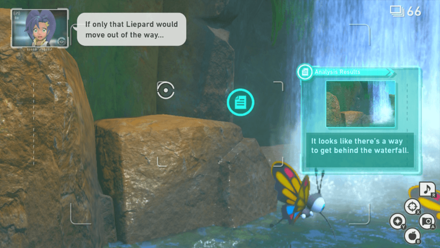
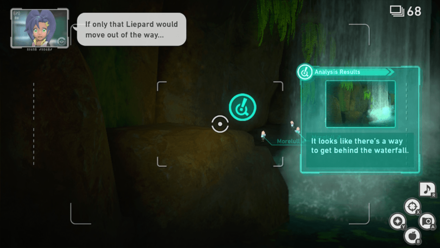
At Research Level 3, throw an Illumina Orb at the Liepard on the rock and scan the alternate route to head towards the waterfall. |
Jungle (Night) Research Spots
There are six Research Spots that you can find at Jungle (Night). Two of these spots require you to start the course at Research Level 2.
| Research Spot | Where to Find |
|---|---|
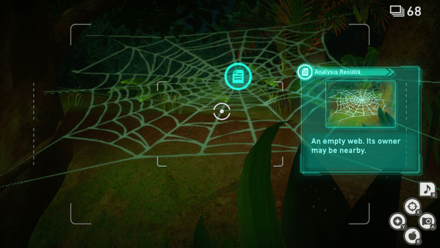 |
Near the starting point, look to your left to find and scan the spider web. |
 |
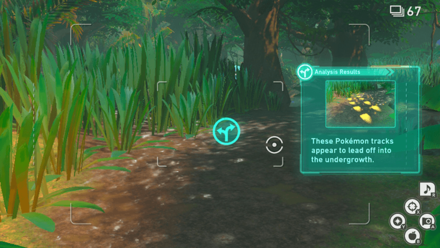
Look to your left to find a Crystabloom and throw an Illumina Orb at it to illuminate the set of Pokemon tracks near the first alternate route. If there are no tracks, restart the course and try again. |
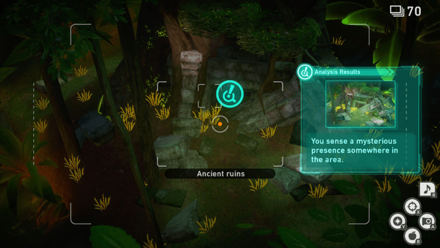 |
As you ascend to the ruins area, look down and scan a portion of the ruins below. This research spot can only be scanned at Research Level 1. |
 |
At Research Level 3, proceed through the course and scan the waterfalls on the left to analyze it. |
 |
At Research Level 3, play the Melody at the Liepard on the rock and scan the alternate route to head towards the waterfall. |
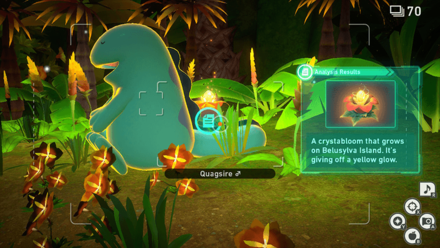 |
At Research Level 1, find the sitting Quagsire near the exit point and scan the glowing Crystabloom beside it. |
Forest Research Spots
There are nine Research Spots found in the Forest. We recommend setting this course at Research Level 3 to be able change the seasons and analyze the research spots there.
| Research Spot | Where to Find |
|---|---|
 |
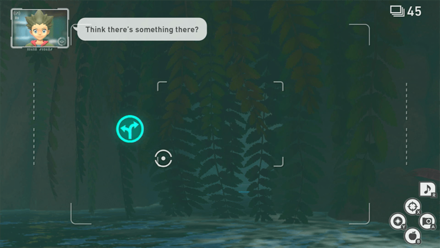
On the first foggy area, play the Melody to the Trevenant beside the floating stone for it to let you through the alternate route. |
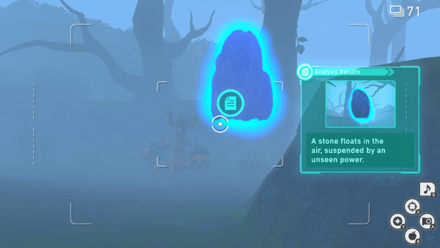 |
On the first alternate route, run a scan and analyze the floating stone. |
 |
On the second foggy area, light all the Crystablooms to your right to gain access to the second alternate route. |
 |
To scan this Research Spot, you need to follow the same steps to complete the Little Lost Deerling request. On the second foggy area, light the Crystablooms to reunite the Deerling and the Sawsbuck. Use Turbo to get ahead of the two Pokemon and scan the alternate route. If the analysis results do not appear, wait for the Sawsbuck and Deerling to pass by and run a scan again to analyze the research spot. |
 |
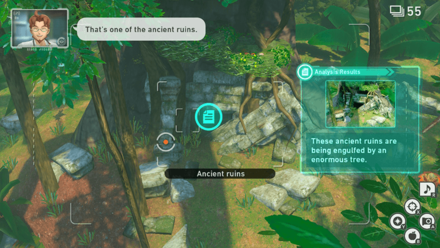
At the last area of the course, look to your left pass the giant root and scan the Ancient Ruins. |
 |
At the end of the second alternate route, look to your right where the Sawsbucks and Deerlings gather and run a scan in the area. |
 |
On the summer area, look to your left and scan Unfezant's next to analyze it. |
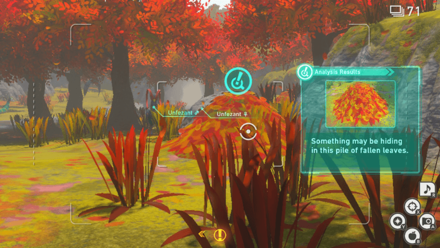 |
On the autumn area, run a scan to analyze all the leaf piles in the area. |
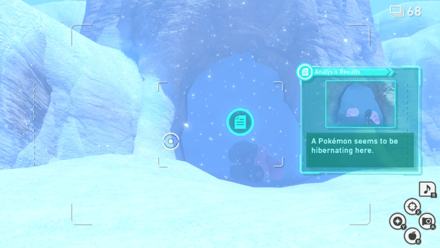 |
On the winter area, look to your left and run a scan on the cave where Bewear is hibernating. |
Illumina Spot (Elsewhere Forest) Research Spots
There is only one Research Spot in the Illumina Spot at Elsewhere Forest.
| Research Spot | Where to Find |
|---|---|
 |
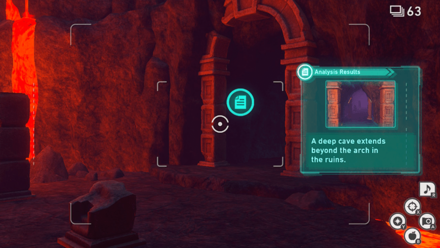
On the area past the giant root, look below and run a scan to analyze the Ancient Ruins underwater. |
River (Day) Research Spots
There are four Research Spots in River (Day). We recommend setting the Research Level to 3 to analyze all the research spots.
| Research Spot | Where to Find |
|---|---|
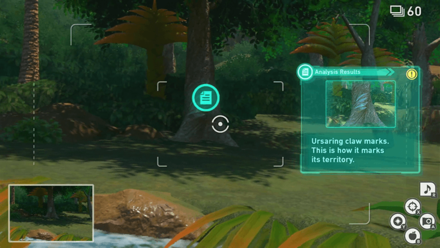 |
Look to your left in the area where Psyduck gets chased by a group of Aipoms. Run a scan to analyze the tree trunk that has Ursaring's claw marks. |
 |
After sliding down, run a scan on the waterfall to analyze it. |
 |
At Research Level 3, run a scan on the hanging plants on the right to access the alternate route. Note that you need to unlock the route at River (Night) first to scan this research spot. |
 |
Near the end of the course, look behind you and to the left on the hole on the wall. Run a scan to analyze it. |
River (Night) Research Spots
There are four Research Spots in River (Night). We recommend setting the Research Level to 2 to analyze all the research spots.
| Research Spot | Where to Find |
|---|---|
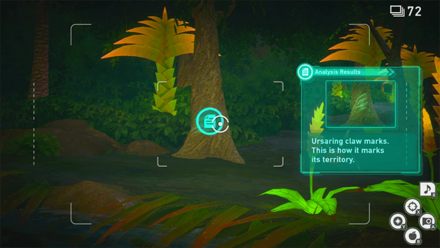 |
Look to your left in the area where Psyduck gets chased by a group of Aipoms. Run a scan to analyze the tree trunk that has Ursaring's claw marks. |
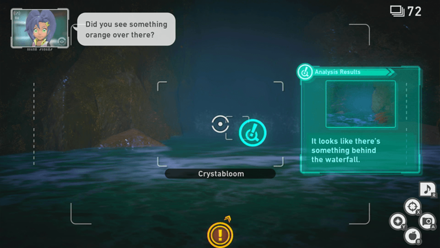 |
After sliding down, run a scan on the waterfall to analyze it. |
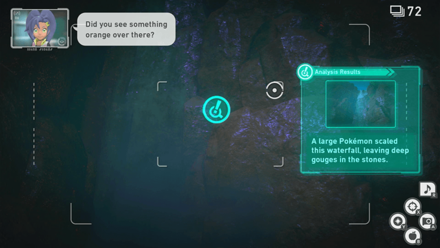 |
After analyzing the bottom of the waterfall, look up to find another research spot that you can scan. |
 |
At Research Level 2, run a scan on the hanging plants on the right to access the alternate route. |
Voluca Research Spots
Sands (Day) Research Spots
There are nine Research Spots found in Sands (Day). Two spots require you to start the course at Research Level 3.
| Research Spot | Where to Find |
|---|---|
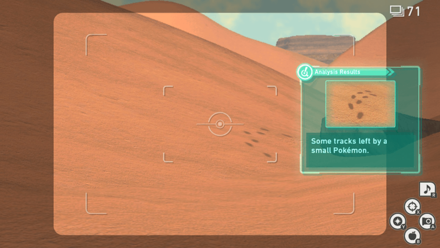 |
At the beginning of the course, look to you right and scan the tracks left by the Scorbunny. |
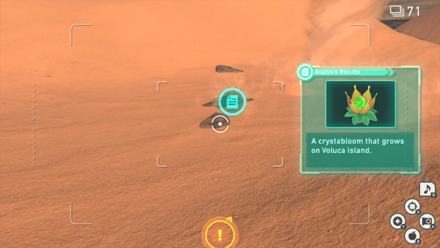 |
Near the sandstorm, run a scan and analyze the Crystabloom. |
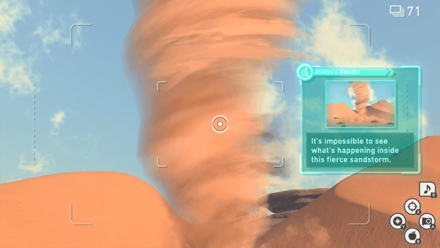 |
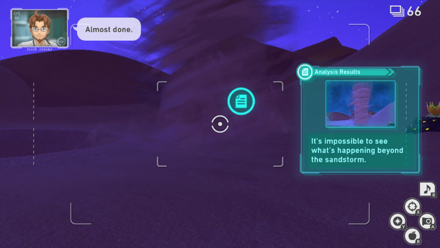
Look up and run a scan on the sandstorm itself. |
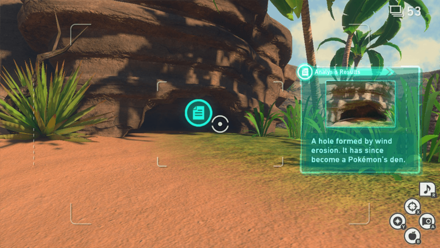 |
On the main path, look for the small cavern on the oasis and run a scan to analyze it. |
 |
At Research Levels 2 and 3, take the alternate route on the oasis area. |
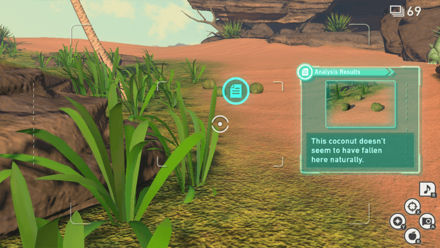 |
On the alternate route, scan the fallen cocounuts on the ground to analyze it. |
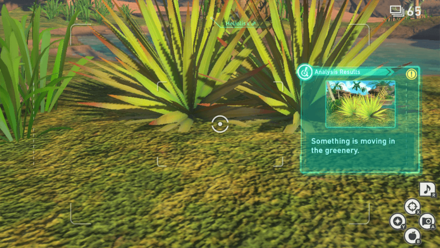 |
At Research Level 3, head to the main path and look to your right to find the moving greenery. |
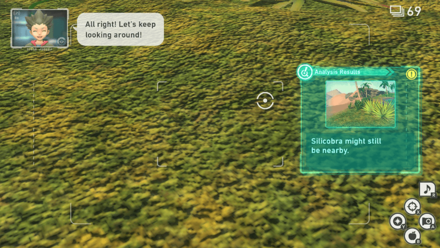 |
After scanning the moving greenery, throw a Fluffruit to reveal the Silicobra. Wait for the Pokemon to burrow in and scan the area. |
 |
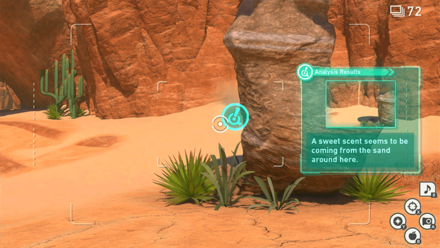
Near the exit point on the main path, look to your right and run a scan on the sand. |
Sands (Night) Research Spots
There are four Research Spots that you can find at Sands (Night).
| Research Spot | Where to Find |
|---|---|
 |
At Research Level 1, look to your right to find a Crystabloom on a cliff just before sliding down the sand slope. |
 |
At Research Level 2, run a scan and take the alternate route on the oasis area. |
 |
On the alternate route, run a scan on the cavern near the oasis. |
 |
On the alternate route, run a scan at the sandstorm to analyze it. Do not throw an Illumina Orb at it as this causes the sandstorm to disappear. |
Volcano Research Spots
There are six Research Spots that you can find at Volcano. Two spots require you to start this course at Research Level 2 and one at Research Level 3.
| Research Spot | Where to Find |
|---|---|
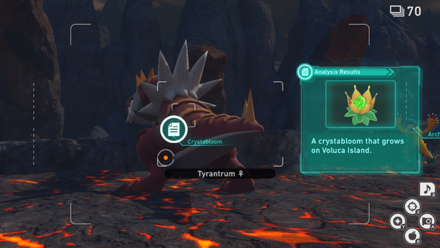 |
At Research Level 1, look to your left where the Tyrantrum is and run a scan to analyze the Crystabloom. |
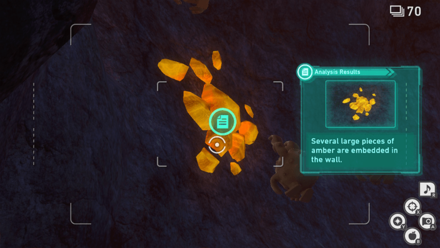 |
As you head towards the cave, look up the wall and run a scan to analyze the pieces of amber. |
 |
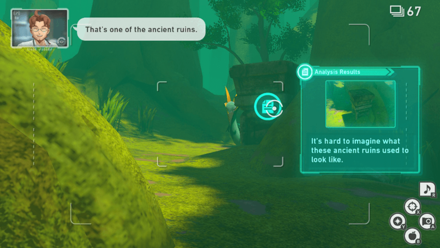
At the end of the course, run a scan at the Ancient Ruins to analyze it. |
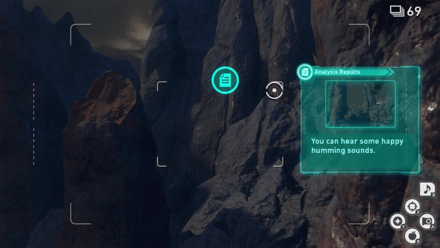 |
At Research Level 2, look to your right near the mountain to scan the area to find some "happy humming sounds." |
 |
At Research Level 2, scan the Ancient Ruins at the end of the course to analyze it. You can also scan this after taking the alternate route at Research Level 3. |
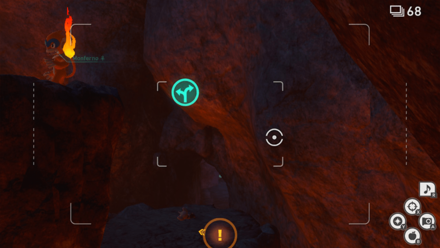 |
At Research Level 3, you can scan take an alternate route leading to the area with the blue lava. |
Illumina Spot (Fireflow Volcano) Research Spots
There is only one Research Spot in the Illumina Spot at Fireflow Volcano.
| Research Spot | Where to Find |
|---|---|
 |
Start the course at Research Level 2. Press the Down on the D-Pad to look behind and scan the Ancient Ruins. |
Badlands (Day) Research Spots
There are ten Research Spots that you can find in Badlands (Day).
| Research Spot | Where to Find |
|---|---|
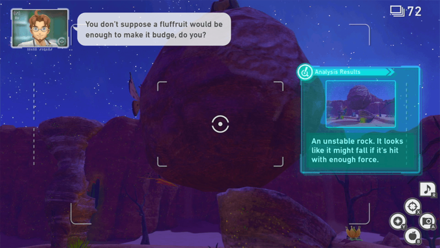
 |
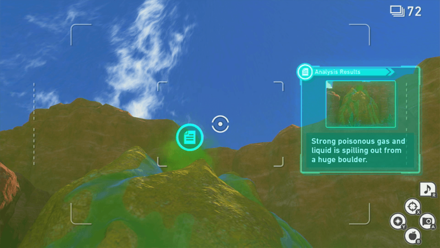
At the beginning of the course, run a scan on the large boulder to analyze it. |
 |
To scan this research spot, throw an Illumina Orb at the Crystabloom near the large boulder before passing through the first pool of water. Run a scan on the boulder to access the alternate route. |
 |
After passing through the large boulder, look to your right and run a scan on the sand to analyze it. |
 |
Look at the second pool of water on the left and run a scan to analyze it. |
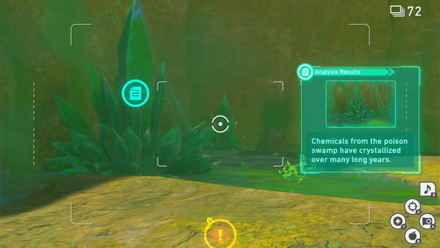 |
At the toxic swamp area, look to your left and scan the crystal. |
 |
Look above the crystal and scan the top part of the boulder. |
 |
As you pass through the toxic swamp area, look to your left to find a rock sticking out. Run a scan to analyze it. |
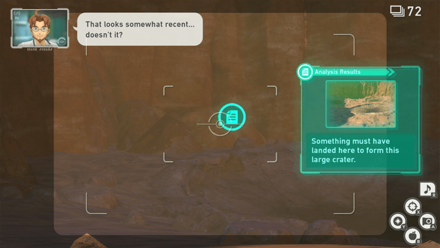 |
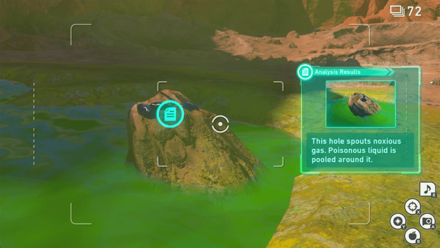
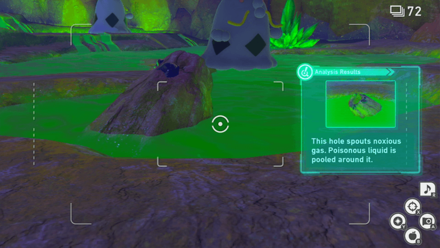
At the end of the toxic swamp area, look to your left and scan the crater area. |
 |
Near the end of the course, look to your left and run a scan on the first hole. |
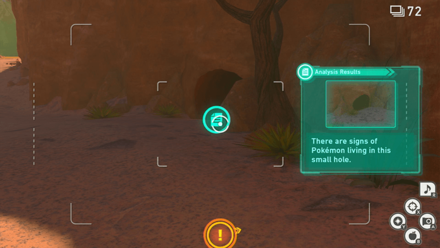
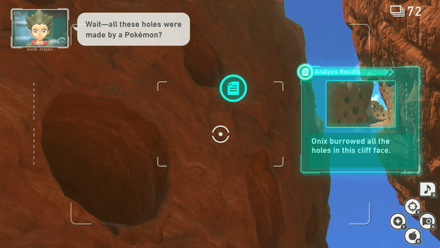 |
While passing through the cliff with holes, look up to your left and run a scan on the research spot. |
Badlands (Night) Research Spots
There are six Research Spots that you can find in Badlands (Night).
| Research Spot | Where to Find |
|---|---|
 |
At the beginning of the course, run a scan on the large boulder to analyze it. |
 |
To scan this research spot, throw an Illumina Orb and take a photo of at least three Digletts at the beginning of the course. After the Digletts move to the large boulder, throw an Illumina Orb at the Crystabloom next to it to access the alternate route. |
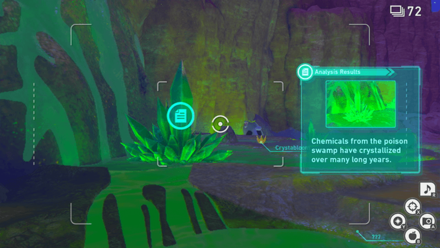 |
At the toxic swamp area, look to your left and scan the crystal. |
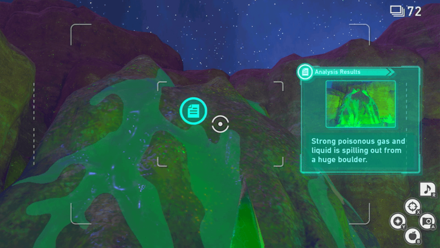 |
Look above the crystal and scan the top part of the boulder. |
 |
As you pass through the toxic swamp area, look to your left to find a rock sticking out. Run a scan to analyze it. |
 |
At the end of the toxic swamp area, look to your left and scan the crater area. |
Maricopia Research Spots
Beach (Day) Research Spots
There are six Research Spots that you can find in Beach (Day).
| Research Spot | Where to Find |
|---|---|
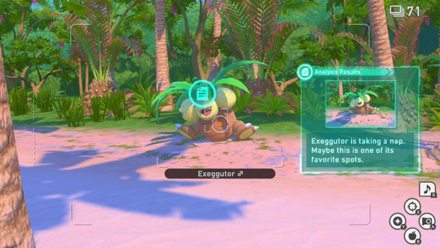 |
At Research Level 3, run a scan at the sleeping Exeggutor near the starting point. |
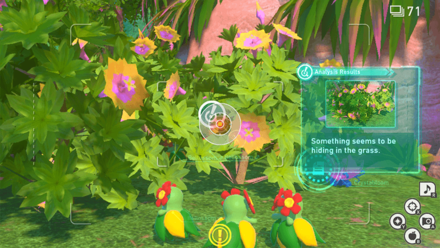 |
Look to your left and run a scan to analyze the bush. |
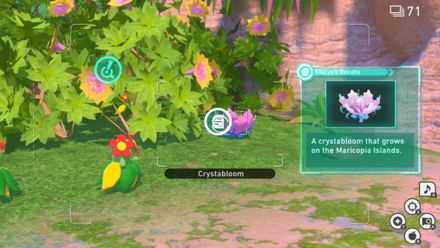 |
Beside the bush is a Crystabloom that you can analyze. |
 |
Run a scan to anaylze and take the alternate route in the middle of the course. |
 |
On the alternate route, look to your right and run a scan on the Octillery underwater. |
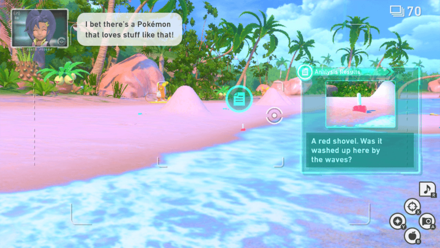 |
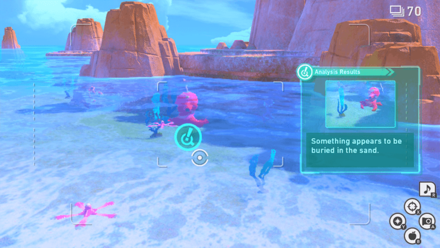
As you head towards the last area, run a scan and analyze the shovel buried in the sand. |
Beach (Night) Research Spots
There are two Research Spots in Beach (Night) and can be found near the starting point.
| Research Spot | Where to Find |
|---|---|
 |
Near the starting point, look to your left and run a scan on the bush to analyze it. |
 |
Run a scan to anaylze and take the alternate route in the middle of the course. |
Reef (Day) Research Spots
There are four research spots that you can find at Reef (Day). One spot requires you to scan it at a higher Research Level.
| Research Spot | Where to Find |
|---|---|
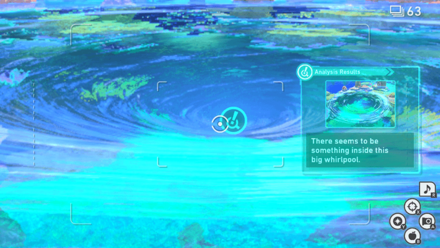 |
Near the starting point, look to your right and scan the whirlpool to analyze it. |
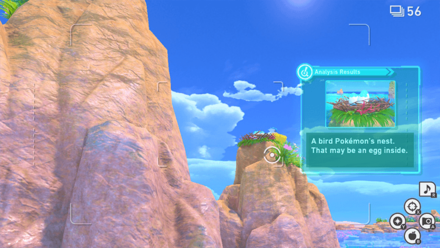 |
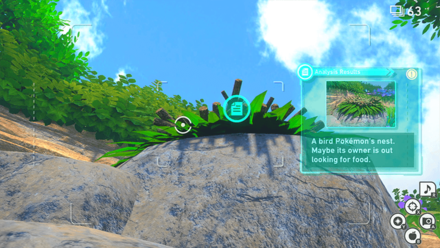
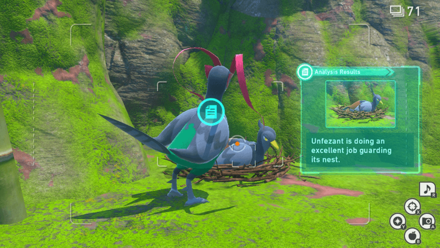
On the area where Wailord appears, look to your left to navigate on its backside. Look above the tall rocks and analyze the bird nest. |
 |
At Research Level 3, anaylze the bird nest again to find a different analysis result. |
 |
Near the end of the course, look to your right and run a scan to take the alternate route. |
Reef (Evening) Research Spots
There are three Research Spots that you can find at Reef (Evening).
| Research Spot | Where to Find |
|---|---|
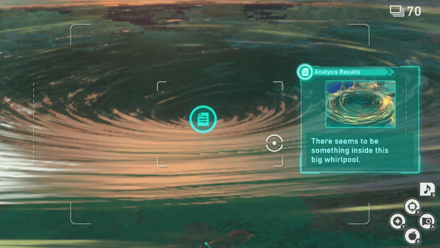 |
Near the starting point, look to your right and scan the whirlpool to analyze it. |
|
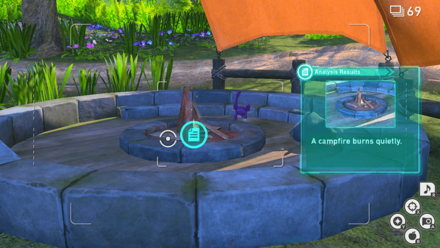
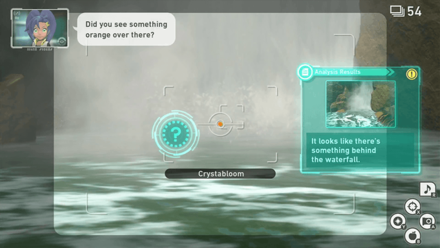
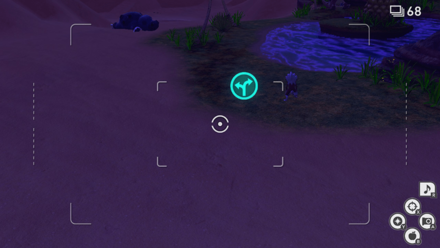
In the area after the swimming Primarina, look to your left and scan the blue hole underwater. |
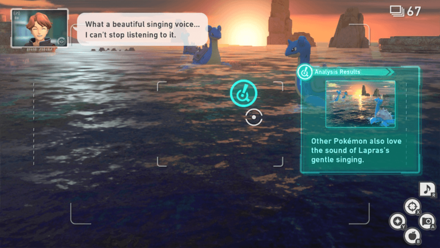 |
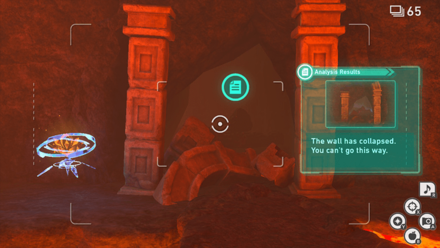
Take the alternate route and scan the area near the two Lapras. |
Undersea Research Spots
There are ten Research Spots that you can find in Undersea. Some of these spots can be found in the the two alternate routes, which require you to take multiple expeditions to scan all of them.
| Research Spot | Where to Find |
|---|---|
 |
At Research Level 1, look to your left to find a cave blocked by boulders. |
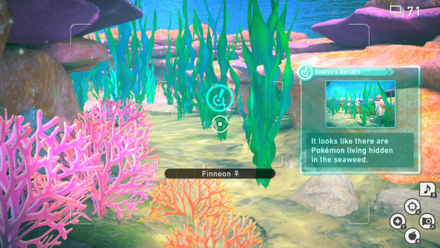 |
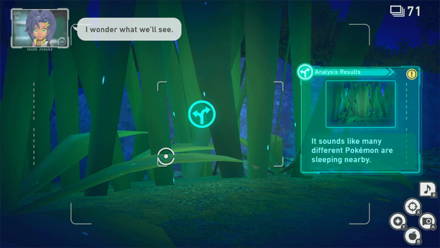
At Research Level 1, run a scan near the seaweed area to analyze it. |
 |
On the seaweed area, point your camera towards the sleeping Lumineon and run a scan to analyze the Crystabloom behind it. |
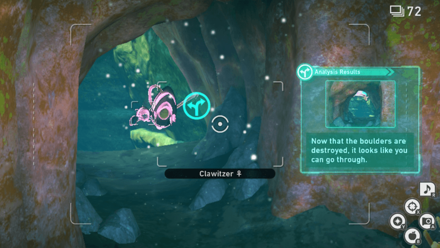 |
At Research Level 2 or 3, throw an Illumina Orb at the Clawitzer for it to destroy the boulders in the cave. Run a scan and take the alternate route. |
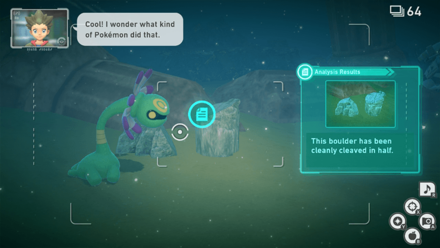 |
At Reasearch Level 3, take the first alternate route and head towards the ruins. Run a scan to analyze the boulder. |
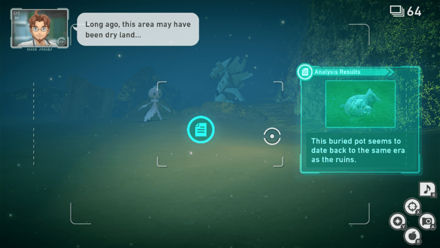 |
At the ruins area of the course, run a scan to analyze the buried pot. |
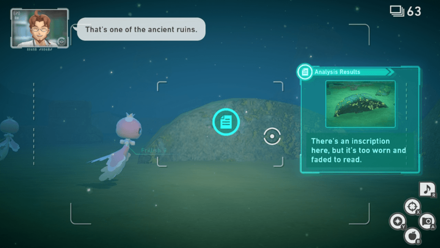 |
After scanning the buried pot, look to your right to find stone with an inscription. |
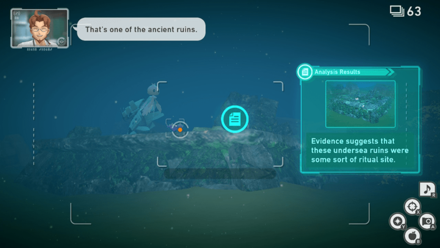 |
After scanning the stone with an inscription, look to your left to find the Ancient Ruins. |
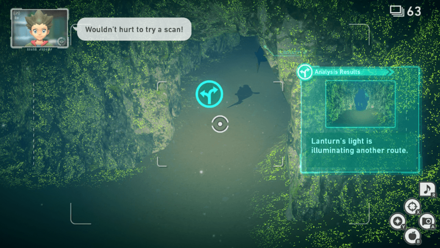 |
After rescuing the Lanturn, look to your right and scan it to take the alternate route inside the lair. |
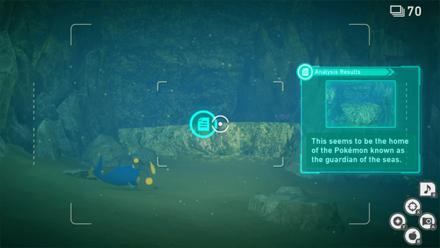 |
While inside the lair, throw Illumina Orbs at the two Crystablooms to wake up Lugia. Run a scan and analyze the elevated platform. |
Durice Research Spots
Snowfields (Day) Research Spots
There are seven Research Spots that you can find in Snowfields (Day). Some of these spots can be found in the the two alternate routes, which require you to take multiple expeditions to scan all of them.
| Research Spot | Where to Find |
|---|---|
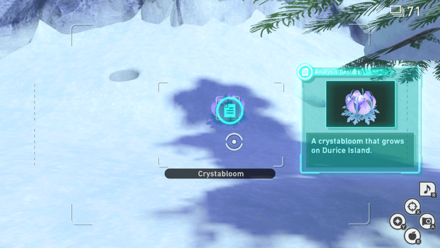 |
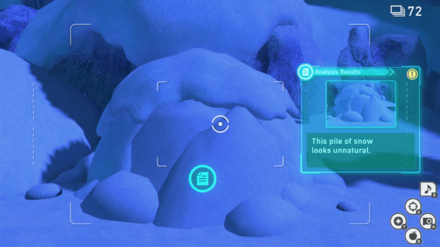
At Research Level 1, look to your right to find a Crystabloom next to the holes in the snow. |
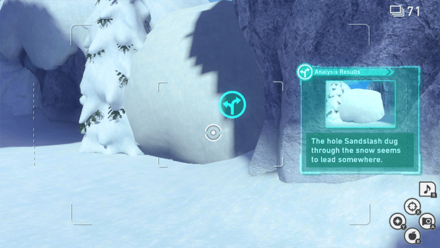 |
Near the Crystabloom, run a scan on the snow wall to access the alternate route and analyze. You need to take a photo of a Sandslash from the beginning of the course to gain access to this route. |
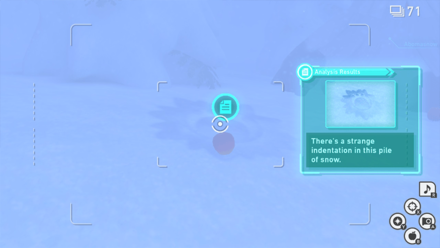 |
After entering the first alternate route, look your left and scan the tracks left by an Abomasnow. |
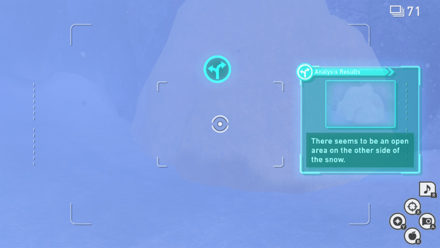 |
Run a scan near the second snow wall to take the second alternate route. You need to follow some steps on Snowfields (Night) to gain access to this route. |
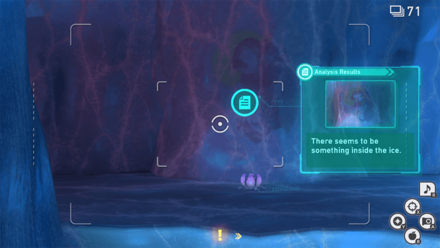 |
Inside the ice cave, look to your left and scan the Aurorus trapped inside the ice. |
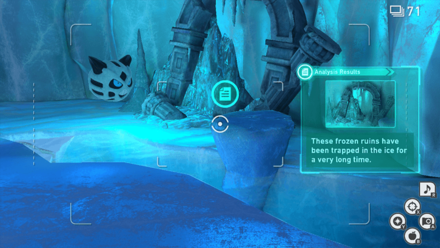 |
After scanning the trapped Aurorus, look to your right and scan the Ancient Ruins. |
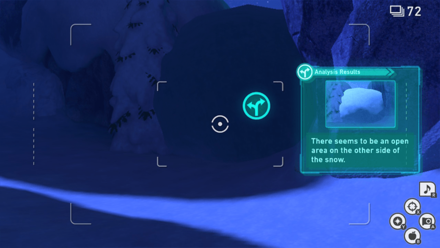
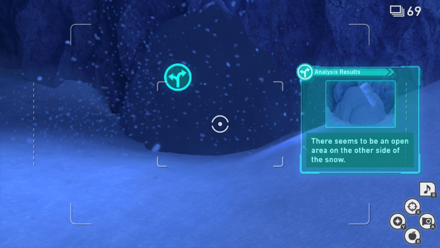
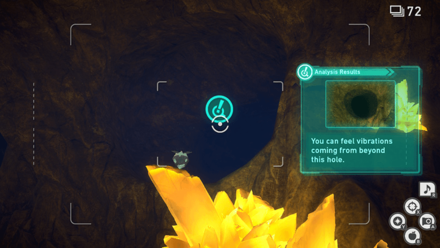
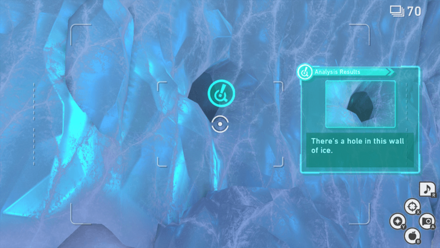 |
Near the exit point, look above and to your left to find a hole in the ice. Run a scan to analyze it. |
Snowfields (Night) Research Spots
There are six Research Spots that you can find in Snowfields (Night). Some of these spots can be found in the the two alternate routes, which require you to take multiple expeditions to scan all of them.
| Research Spot | Where to Find |
|---|---|
 |
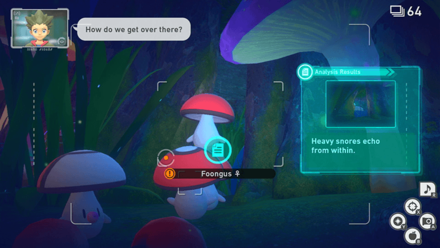
At the beginning of the course, look to your left to find the Mightyena near the igloo. Hit it with a Fluffruit and run a scan on the igloo. |
 |
At Research Level 1, take the main path and look in between the ice sheets on the ground to find the glowing Crystabloom. |
 |
If you have unlocked this alternate route from Snowfields (Day), run a scan to analyze it and take the route. |
 |
After taking the first alternate route, throw an Illumina Orb at the Crabonimable for it to punch the tree next to the sleeping Abomasnow. Look up to find the Froslass and take a photo of it. Run a scan to take the second alternate route and analyze it. |
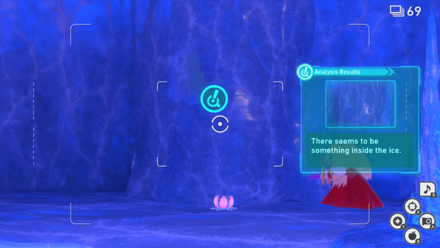 |
Inside the ice cave, look to your left and scan the Aurorus trapped inside the ice. |
 |
After scanning the trapped Aurorus, look to your right and scan the Ancient Ruins. |
Cave Research Spots
There are ten Research Spots that you can find at the Cave. We recommend scanning these Research Spots at Research Level 3 and after completing the story.
| Research Spot | Where to Find |
|---|---|
 |
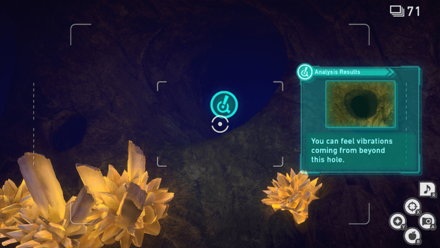
At the main route, look to your left and run a scan on the hole at the side of the cave to analyze it. |
 |
If you woke up the two sleeping Crobats at the main route, you can run a scan and take the route to the rimstone formation. |
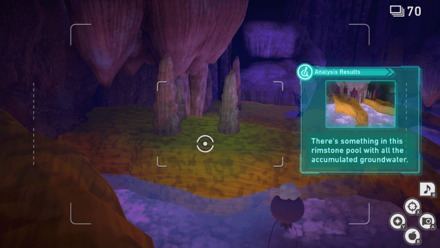 |
While on the rimstone formation alternate route, look to your left and run a scan to analyze the rimstone pool. Throwing an Fluffruit at the rimstone pool causes a Magikarp to jump out. |
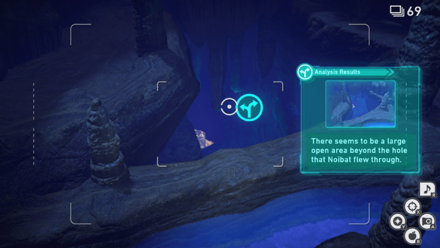 |
At Research Levels 2 and 3, you can follow the two Noibats which lead to an alternate route. |
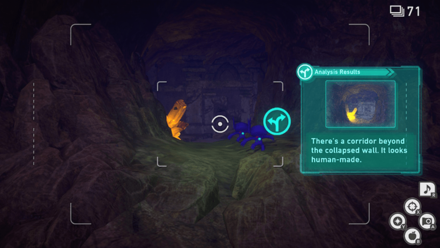
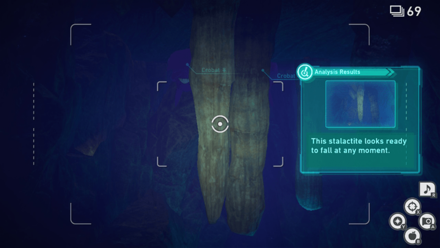 |
After taking the alternate route, run a scan and analyze the stalactite. |
 |
Once you appear in the room with the giant crystals, look to your right and run a scan to the giant crystal to analyze it. |
 |
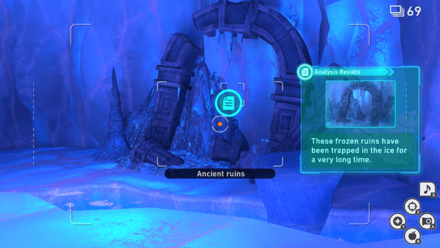
On the small jungle area, look to your right and run a scan on the Ancient Ruins to analyze it. |
 |
At the end of the alternate route on the small jungle area, run a scan at the large green crystal formation to analyze the research spot. |
 |
On the room with the giant crystals, throw Illumina Orbs at the two Carbinks and the Mawile. Look to your right and throw an Illumina Orb at Diancie. These steps allow you to head towards an alternate route through the jungle. Note that you need to complete the story and set the course at Research Level 3 to unlock this alternate route. |
 |
At the alternate route leading to the other side of the jungle area, look to your left and run a scan on the electrically charged Pokemon fur. |
Illumina Spot (Outaway Cave) Research Spots
There are seven Research Spots that you can find in the Illumina Spot at Outaway Cave. Two spots are in the alternate route which require you to take two expeditions to scan all the spots.
| Research Spot | Where to Find |
|---|---|
 |
On the first area, look to your right and run a scan at the hole to analyze it. |
 |
After the first hole, look to your left and run a scan at the second hole to analyze it. |
 |
On the second area, look to your left and scan the pit below. |
 |
After scanning the first pit, look to your right and scan the second pit below. |
 |
Near the exit point, look to your right and run a scan on the hole. |
 |
At Research Level 2, run a scan and take the alternate route. |
 |
On the alternate route, run a scan and to analyze the Ancient Ruins. |
Aurus Research Spots
Ruins Research Spots
There are seven Research Spots that you can find in the Ruins.
| Research Spot | Where to Find |
|---|---|
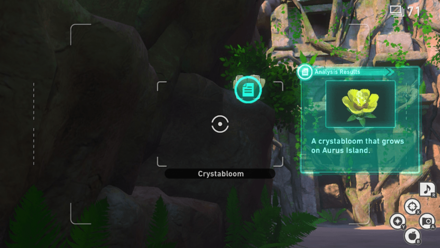 |
On the first area, find the Crystabloom on the left and scan it. |
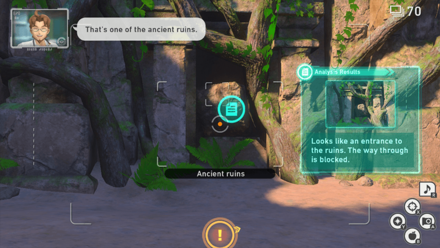 |
After scanning the first Crystabloom, scan the Ancient Ruins in the middle of the area to analyze it. |
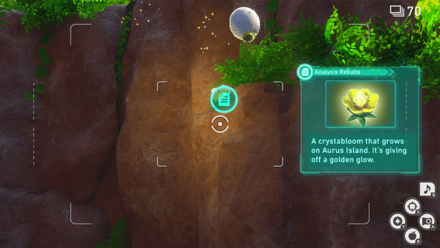 |
After the scanning the Ancient Ruins, look to your right to find a second Crystabloom on top of the cliff and scan it. |
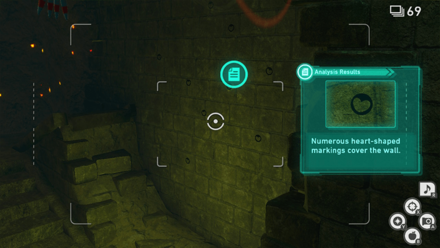 |
While descending down inside the ruins, look to your right and scan the wall with numerous heart markings. |
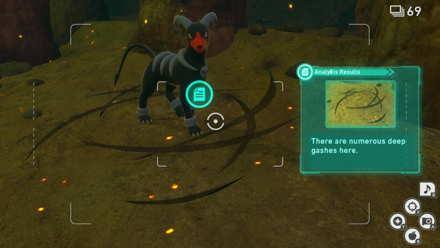 |
After passing the third statue, run a scan on the ground with the claw markings to analyze it. |
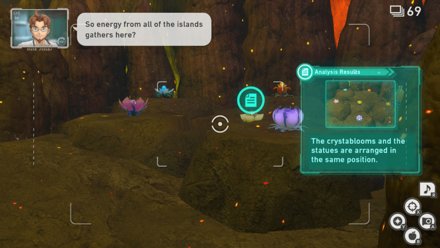 |
After passing the last statue, run a scan and analyze the group of Crystablooms. |
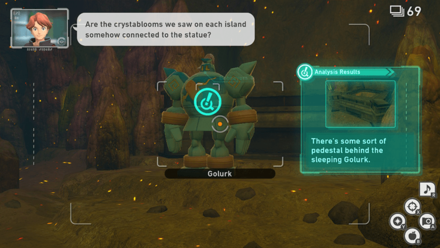 |
Near the group of Crystablooms, you can find a Golurk that you can scan. Note that you can only scan this research spot if you have not thrown an Illumina Orb at all the Crystablooms next to the statues inside the ruins. |
Illumina Spot (Ruins of Remembrance) Research Spots
There is only one Research Spot in the Illumina Spot at the Ruins of Remembrance.
| Research Spot | Where to Find |
|---|---|
 |
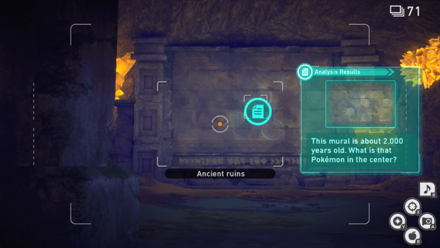
Find and scan the mural in the area to analyze it. |
Reward for Finding Research Spots
Apprentice Detective
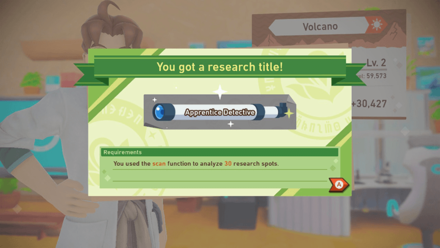
You will receive the Apprentice Detective Research Title for scanning and analyzing 30 research spots in the Lental Region.
Assistant Detective
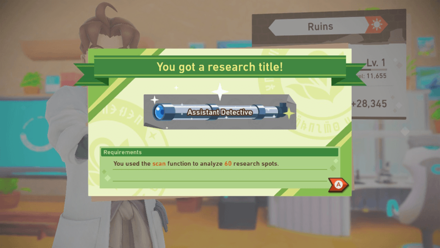
You will receive the Assistant Detective Research Title for scanning and analyzing 60 research spots in the Lental Region.
Great Detective
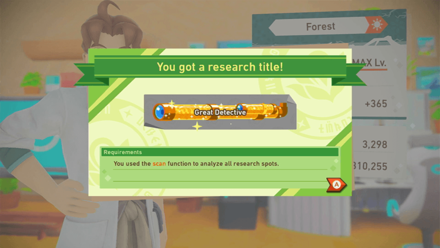
You will receive the Great Detective Research Title for scanning and analyzing all research spots in the Lental Region.
How to Unlock All Research Titles
New Pokemon Snap Related Guides

New Pokemon Snap Tips and Tricks
Author

All Research Spot Locations
Please participate in our site
improvement survey
03/2026
improvement survey
03/2026
Would you assist in
improving Game8's site?
improving Game8's site?

×
We are listening to our users' valuable opinions and discussing how to act on them.
The information collected through this survey will be used for the purpose of improving our services. In addition, the information will only be disclosed a part of a statistic in a format that will not allow identification of personal information.
Begin Survey
Not Now
×
Please rate each item regarding Game8.co's Advertisements.
Amount of Ads
Very Dissatisfied
Somewhat Dissatisfied
Fine
Somewhat Satisfied
Highly Satisfied
Placement of Ads
Timing of Ad Display
Ad Loading Speed
Safeness of Ads
Content of Ads
×
Please rate each item regarding Game8.co's Quality of Articles.
Amount of information
Very Dissatisfied
Somewhat Dissatisfied
Fine
Somewhat Satisfied
Highly Satisfied
Frequency of updates
Speed of new information
Accuracy of articles
Understandibility of articles
Readability of sentences
×
Please rate each item regarding Game8.co's Usability of the Site.
Ease of finding information
Very Dissatisfied
Somewhat Dissatisfied
Fine
Somewhat Satisfied
Highly Satisfied
Loading Speed
Use of Color
Font Size
Visibility of Images
Easy to Understand Layout
×
Please rate each item regarding Game8.co's Message Boards, Comments.
Ease of Writing
Very Dissatisfied
Somewhat Dissatisfied
Fine
Somewhat Satisfied
Highly Satisfied
Readability
Ease in Finding Information
Comment Quality
Comment Quantity
Admin Response
×
Please rate each item regarding Game8.co's Site's new design.
Please rate our site's new design
Very Dissatisfied
Somewhat Dissatisfied
Fine
Somewhat Satisfied
Highly Satisfied
Do you think that the website's design change makes the site easier to use?
Has the new design made it easier for you to find information on the site?
Has the new design improved the overall visual appeal of the site?
How would you rate your overall satisfaction with the new design of the site?
×
How likely are you to recommend Game8 to someone you know?
Very Unlikely
0
1
2
3
4
5
6
7
8
9
10
Very Likely
If you have other opinions regarding potential improvement to the website, please share them with us. We would appreciate your honest opinion.
Note: This is a free response section, so you can proceed without entering anything.
Note: Please be sure not to enter any kind of personal information into your response.
Note: Please be sure not to enter any kind of personal information into your response.
×
Thank You
×
Thank you for participating in our survey! Your answers will help us to improve the quality of our website and services.
We hope you continue to make use of Game8.
We hope you continue to make use of Game8.
Close
Rankings
- We could not find the message board you were looking for.
Gaming News


![Monster Hunter Stories 3 Review [First Impressions] | Simply Rejuvenating](https://img.game8.co/4438641/2a31b7702bd70e78ec8efd24661dacda.jpeg/thumb)
Popular Games

Genshin Impact Walkthrough & Guides Wiki
Honkai: Star Rail Walkthrough & Guides Wiki
Umamusume: Pretty Derby Walkthrough & Guides Wiki
Pokemon Pokopia Walkthrough & Guides Wiki
Resident Evil Requiem (RE9) Walkthrough & Guides Wiki
Monster Hunter Wilds Walkthrough & Guides Wiki
Wuthering Waves Walkthrough & Guides Wiki
Arknights: Endfield Walkthrough & Guides Wiki
Pokemon FireRed and LeafGreen (FRLG) Walkthrough & Guides Wiki
Pokemon TCG Pocket (PTCGP) Strategies & Guides Wiki


Recommended Games
Diablo 4: Vessel of Hatred Walkthrough & Guides Wiki
Cyberpunk 2077: Ultimate Edition Walkthrough & Guides Wiki
Fire Emblem Heroes (FEH) Walkthrough & Guides Wiki
Yu-Gi-Oh! Master Duel Walkthrough & Guides Wiki
Super Smash Bros. Ultimate Walkthrough & Guides Wiki
Pokemon Brilliant Diamond and Shining Pearl (BDSP) Walkthrough & Guides Wiki
Elden Ring Shadow of the Erdtree Walkthrough & Guides Wiki
Monster Hunter World Walkthrough & Guides Wiki
The Legend of Zelda: Tears of the Kingdom Walkthrough & Guides Wiki
Persona 3 Reload Walkthrough & Guides Wiki


All rights reserved
©2021 Pokémon. ©1995–2021 Nintendo / Creatures Inc. / GAME FREAK inc. ©1999 Nintendo / HAL Laboratory, Inc. Developed by BANDAI NAMCO Studios Inc.
Pokémon and Nintendo Switch are trademarks of Nintendo. © 2021 Nintendo.
The copyrights of videos of games used in our content and other intellectual property rights belong to the provider of the game.
The contents we provide on this site were created personally by members of the Game8 editorial department.
We refuse the right to reuse or repost content taken without our permission such as data or images to other sites.
Look away from Octillery when scanning