Dodogama Weakness and Strategy Guide
★ 2025/2/28: Monster Hunter Wilds is now available!
Join the hunt at our Monster Hunter Wilds Wiki!
Learn how to beat Dodogama in the game Monster Hunter World (MHW)! This guide explains everything about Dodogama's weakness, carves, rewards, and a complete strategy guide for beating and capturing it. Find out what parts are breakable and severable, and what drops and Monster materials are available.
| All Dodogama Articles | ||
|---|---|---|
|
|
⍺ | β | ⍺+ | β+ |
|
List of Contents
Dodogama Weakness, Body Parts, and Resistances
Dodogama Characteristics
 |
|||||
| Roar | Wind | Tremor | Blight | Status | |
|---|---|---|---|---|---|
| Small | None | None | Fire | Blastblight | |
| Breakable Parts | |||||
| Head, Torso, Hindlegs, Legs, Tail | |||||
Locations and Areas Visited
| Map | Starting Area | Visited Areas | Rest Spot |
|---|---|---|---|
 Elder's Recess Elder's Recess
|
9 | 2 / 3 / 7 / 8 / 9 | 8 |
*The starting location may change depending on the Quest.
Weakness, Body Parts, Extracts
Head
| Sever | Break | Bomb | Fire | Extract |
|---|---|---|---|---|
| 35 | 35 | 25 | 0 | Red |
| Water | Thunder | Ice | Dragon | |
| 20 | 30 | 20 | 10 |
Head Sac 1
| Sever | Break | Bomb | Fire | Extract |
|---|---|---|---|---|
| 60 | 60 | 52 | 0 | Red |
| Water | Thunder | Ice | Dragon | |
| 20 | 30 | 20 | 10 |
Head Sac 2
| Sever | Break | Bomb | Fire | Extract |
|---|---|---|---|---|
| 80 | 80 | 72 | 0 | Red |
| Water | Thunder | Ice | Dragon | |
| 20 | 30 | 20 | 10 |
Neck
| Sever | Break | Bomb | Fire | Extract |
|---|---|---|---|---|
| 30 | 30 | 20 | 0 | Red |
| Water | Thunder | Ice | Dragon | |
| 10 | 25 | 10 | 5 |
Neck Sac 1
| Sever | Break | Bomb | Fire | Extract |
|---|---|---|---|---|
| 52 | 52 | 45 | 0 | Red |
| Water | Thunder | Ice | Dragon | |
| 10 | 25 | 10 | 5 |
Neck Sac 2
| Sever | Break | Bomb | Fire | Extract |
|---|---|---|---|---|
| 72 | 72 | 64 | 0 | Red |
| Water | Thunder | Ice | Dragon | |
| 10 | 25 | 10 | 5 |
Torso
| Sever | Break | Bomb | Fire | Extract |
|---|---|---|---|---|
| 45 | 45 | 40 | 0 | Orange |
| Water | Thunder | Ice | Dragon | |
| 5 | 10 | 5 | 5 |
Back
| Sever | Break | Bomb | Fire | Extract |
|---|---|---|---|---|
| 45 | 45 | 40 | 0 | Orange |
| Water | Thunder | Ice | Dragon | |
| 5 | 10 | 5 | 5 |
Hindlegs
| Sever | Break | Bomb | Fire | Extract |
|---|---|---|---|---|
| 45 | 45 | 40 | 0 | White |
| Water | Thunder | Ice | Dragon | |
| 5 | 10 | 5 | 5 |
Legs
| Sever | Break | Bomb | Fire | Extract |
|---|---|---|---|---|
| 45 | 45 | 40 | 0 | White |
| Water | Thunder | Ice | Dragon | |
| 5 | 10 | 5 | 5 |
Tail
| Sever | Break | Bomb | Fire | Extract |
|---|---|---|---|---|
| 48 | 48 | 45 | 0 | Green |
| Water | Thunder | Ice | Dragon | |
| 10 | 15 | 10 | 5 |
Higher values indicate higher damage.
Vulnerability to Status Effects and Items
| Poison | ★★★ | Flash | ★★ |
|---|---|---|---|
| Paral | ★★ | Shock | ★★ |
| Sleep | ★★ | Pitfall | ★★ |
| Stun | ★★ | Ivy | ❌ |
| Blast | ★ | Dung | ★★ |
| Exhaust | ★ | Meat | ❌ |
| Mount | ★ | Screamer | ❌ |
Countermeasures against Dodogama
Recommended Weapon Element and Armor Skills
| Recommended Weapon Element | |
|---|---|
| Thunder Weapon | Dodogama is weakest against thunder. |
| Recommended Armor Skills | |
| Blast Resistance | Dodogama can inflict Blastblight, so having Blast Resistance will be helpful. |
| Earplugs | Since Dodogama has a small roar, getting Earplugs to Lvl 3 should be enough. |
How to Beat Dodogama
Lava Breath
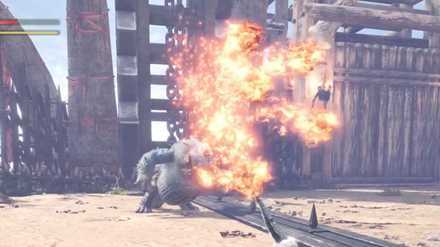
Dodogama will sometimes put rocks in its mouth and then perform a lava breath attack, this is a powerful attack that only hits in the front. Try to always position yourself to his sides at all times before attacking to completely avoid this attack.
Inflicting Blastblights
Some of Dodogama's attacks can inflict Blastblight which will explode after a few seconds if left unattended. You can counter this by using a Nullberry or just by rolling on the ground three times.
Focusing the Head
| Normal | Rocks Eaten |
|---|---|
 |
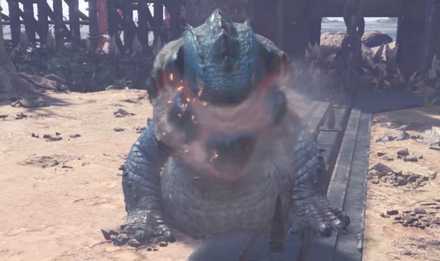 |
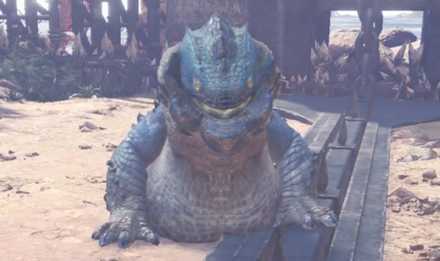
When Dodogama has already eaten rocks, there will be a light red glow and steam coming out of its mouth. During this situation, Dodogama's attacks will be strengthened and he can perform a powerful lava attack. However, if you manage to deal enough damage to his head, this will cause an explosion which can deal massive damage to Dodogama.
You should play aggressively during this situation and focus more on attacking rather than dodging to maximize your damage output and shorten the time of the hunt.
Dodogama Attack Patterns
| Attack | Attack Power | Guardable | Exhaustion |
|---|---|---|---|
| Rolling Attack | 55 | ◯ | 50 |
| Scratch | 30 | ◯ | 30 |
| Bite | 30 | ◯ | 30 |
| Rush | 55 | ◯ | 60 |
| Jump Attack | 30 | ◯ | 0 |
| Tail Attack | 30 | ◯ | 30 |
| Rock Blast | 60 | ◯ | 55 |
| Lava Breath | 30 | ◯ | 20 |
| Full Burst Rock Blast | 90 | ◯ | 60 |
Dodogama Carves and Rewards
Carvings and Hunt Rewards
| Obtain Rate (%) | |
|---|---|
| HR |
Dodogama Scale+
/ Body 31 Dodogama Hide+ / Body 24, Tail 20 Dodogama Jaw / Body 18 Dodogama Talon / Body 15 Dodogama Tail / Body 12, Tail 80 |
| MR |
Dodogama Shard
/ Body 31 Dodogama Thickhide / Body 24, Tail 20 Dodogama Mandible / Body 18 Dodogama Lash / Body 15, Tail 80 Dodogama Hardclaw / Body 15 |
Rewards for Each Body Part
| Obtain Rate (%) | |
|---|---|
| HR |
Dodogama Talon
/ Hindlegs 100 Dodogama Jaw / Head 100 |
| MR |
Dodogama Hardclaw
/ Hindlegs 100 Dodogama Mandible / Head 100 |
Shiny Drops
| Obtain Rate (%) | |
|---|---|
| HR Drops |
Dodogama Scale+
/ 50 Dodogama Talon / 28 Wyvern Tear / 22 |
| MR Drops |
Dodogama Shard
/ 50 Dodogama Hardclaw / 28 Large Wyvern Tear / 22 |
Quest Clear & Investigation Rewards
| Obtain Rate (%) | |
|---|---|
| LR Gold |
Dodogama Scale+
/ 8 Dodogama Talon / 36 Dodogama Jaw / 30 True Armor Sphere / 14 Dodogama Hide+ / 12 |
| HR Quest |
Dodogama Jaw
/ 9 Dodogama Hide+ / 26 Dodogama Scale+ / 20 Dodogama Talon / 16 True Armor Sphere / 16 Monster Keenbone / 13 |
| HR Silver |
Dodogama Talon
/ 30 Dodogama Jaw / 25 Dodogama Hide+ / 17 Nourishing Extract / 16 Dodogama Scale+ / 12 |
| HR Gold |
Dodogama Scale+
/ 8 Dodogama Talon / 36 Dodogama Jaw / 30 True Armor Sphere / 14 Dodogama Hide+ / 12 |
| MR Quest |
Dodogama Mandible
/ 9 Dodogama Thickhide / 26 Dodogama Shard / 20 Hard Armor Sphere / 16 Dodogama Hardclaw / 16 Nourishing Extract / 13 |
| MR Silver |
Dodogama Hardclaw
/ 30 Dodogama Mandible / 25 Dodogama Thickhide / 17 Hard Armor Sphere / 16 Dodogama Shard / 12 |
| MR Gold |
Dodogama Shard
/ 8 Dodogama Hardclaw / 34 Dodogama Mandible / 28 Hard Armor Sphere / 18 Dodogama Thickhide / 12 |
Plunderblade Rewards
Plunderblade
| Obtain Rate (%) | |
|---|---|
| HR |
Dodogama Scale+
/ 43 Dodogama Hide+ / 35 Dodogama Jaw / 22 |
| MR |
Dodogama Shard
/ 43 Dodogama Thickhide / 35 Dodogama Mandible / 22 |
Palarang
| Obtain Rate (%) | |
|---|---|
| MR |
Dodogama Shard
/ 50 Dodogama Hardclaw / 28 Large Wyvern Tear / 22 |
Quests Where Dodogama Appears
| Type | Quest Name |
|---|---|
| Optional | ★6 - Dodogama Drama |
| Event | ★6 - Triple Threat Throwdown |
| Event | ★7 - Rock N' Roll Recess |
| Event | ★7 - USJ: Blazing Azure Stars! |
| Optional | M★1 - Can't Bring Yourself To It |
| Optional | M★1 - This Here's Big Horn Country! |
| Optional | M★2 - Looking For That Glimmer |
| Optional | M★3 - Everyone's a Critic |
| Optional | M★3 - Begone Uragaan |
| Arena Quest | ★6 - Arena Quest 6 |
Related Links
All Monster Guides

List of All Base Game Monsters
MHW (Base Game) Monsters
Colored Variants
 Ancient Leshen Ancient Leshen
|
 Azure Rathalos Azure Rathalos
|
 Black Diablos Black Diablos
|
 Pink Rathian Pink Rathian
|
Arch-Tempered Elder Dragons
Monsters by Game
| All Monsters by Game | |
|---|---|
 Iceborne Iceborne |
 Monster Hunter World Monster Hunter World |
Comment
Author
Dodogama Weakness and Strategy Guide
improvement survey
03/2026
improving Game8's site?

Your answers will help us to improve our website.
Note: Please be sure not to enter any kind of personal information into your response.

We hope you continue to make use of Game8.
Rankings
- We could not find the message board you were looking for.
Gaming News
Popular Games

Genshin Impact Walkthrough & Guides Wiki

Honkai: Star Rail Walkthrough & Guides Wiki

Umamusume: Pretty Derby Walkthrough & Guides Wiki

Pokemon Pokopia Walkthrough & Guides Wiki

Resident Evil Requiem (RE9) Walkthrough & Guides Wiki

Monster Hunter Wilds Walkthrough & Guides Wiki

Wuthering Waves Walkthrough & Guides Wiki

Arknights: Endfield Walkthrough & Guides Wiki

Pokemon FireRed and LeafGreen (FRLG) Walkthrough & Guides Wiki

Pokemon TCG Pocket (PTCGP) Strategies & Guides Wiki
Recommended Games

Diablo 4: Vessel of Hatred Walkthrough & Guides Wiki

Cyberpunk 2077: Ultimate Edition Walkthrough & Guides Wiki

Fire Emblem Heroes (FEH) Walkthrough & Guides Wiki

Yu-Gi-Oh! Master Duel Walkthrough & Guides Wiki

Super Smash Bros. Ultimate Walkthrough & Guides Wiki

Pokemon Brilliant Diamond and Shining Pearl (BDSP) Walkthrough & Guides Wiki

Elden Ring Shadow of the Erdtree Walkthrough & Guides Wiki

Monster Hunter World Walkthrough & Guides Wiki

The Legend of Zelda: Tears of the Kingdom Walkthrough & Guides Wiki

Persona 3 Reload Walkthrough & Guides Wiki
All rights reserved
©CAPCOM CO., LTD. 2018, 2019 ALL RIGHTS RESERVED.
The copyrights of videos of games used in our content and other intellectual property rights belong to the provider of the game.
The contents we provide on this site were created personally by members of the Game8 editorial department.
We refuse the right to reuse or repost content taken without our permission such as data or images to other sites.
 Anjanath
 Barroth
 Bazelgeuse
 Behemoth
 Deviljho
 Diablos
 Dodogama
 Great Girros
 Great Jagras
 Jyuratodus
 Kirin
Kirin Kulu-Ya-Ku
 Kulve Taroth
 Kushala Daora
 Lavasioth
 Legiana
 Leshen
 Lunastra
 Nergigante
 Odogaron
 Paolumu
 Pukei-Pukei
 Radobaan
 Rathalos
 Rathian
 Teostra
 Tobi-Kadachi
 Tzitzi-Ya-Ku
 Uragaan
 Vaal Hazak
 Xeno'jiiva
 Zorah Magdaros
 Arch-Tempered Great Jagras
 Arch-Tempered Kirin
 Arch-Tempered Kulve Taroth
 Arch-Tempered Kushala Daora
 Arch-Tempered Lunastra
 Arch-Tempered Nergigante
 Arch-Tempered Teostra
 Arch-Tempered Vaal Hazak
 Arch-Tempered Xeno'jiiva
 Arch-Tempered Zorah Magdaros


![Monster Hunter Stories 3 Review [First Impressions] | Simply Rejuvenating](https://img.game8.co/4438641/2a31b7702bd70e78ec8efd24661dacda.jpeg/thumb)


