 Anjanath
 Barroth
 Bazelgeuse
 Behemoth
 Deviljho
 Diablos
 Dodogama
 Great Girros
 Great Jagras
 Jyuratodus
 Kirin
Kirin Kulu-Ya-Ku
 Kulve Taroth
 Kushala Daora
 Lavasioth
 Legiana
 Leshen
 Lunastra
 Nergigante
 Odogaron
 Paolumu
 Pukei-Pukei
 Radobaan
 Rathalos
 Rathian
 Teostra
 Tobi-Kadachi
 Tzitzi-Ya-Ku
 Uragaan
 Vaal Hazak
 Xeno'jiiva
 Zorah Magdaros
 Arch-Tempered Great Jagras
 Arch-Tempered Kirin
 Arch-Tempered Kulve Taroth
 Arch-Tempered Kushala Daora
 Arch-Tempered Lunastra
 Arch-Tempered Nergigante
 Arch-Tempered Teostra
 Arch-Tempered Vaal Hazak
 Arch-Tempered Xeno'jiiva
 Arch-Tempered Zorah Magdaros
This survey will take about 1 minute.
Your answers will help us to improve our website.
Monster Hunter World (MHW)
Arch-Tempered Zorah Magdaros Weakness and Strategy Guide
★ 2025/2/28: Monster Hunter Wilds is now available!
Join the hunt at our Monster Hunter Wilds Wiki!
Learn how to beat Arch-Tempered Zorah Magdaros in the game Monster Hunter World (MHW)! This guide explains everything about Arch-Tempered Zorah Magdaros's weakness, carves, rewards, and a complete strategy guide for beating and capturing it. Find out what parts are breakable and severable, and what drops and Monster materials are available.
| All Zorah Magdaros Articles | ||
|---|---|---|
|
|
⍺ | β | ⍺+ | β+ |
|
List of Contents
Arch-Tempered Zorah Magdaros Weakness, Body Parts, and Resistances
Arch-Tempered Zorah Magdaros Characteristics
 |
|||||
| Roar | Wind | Tremor | Blight | Status | |
|---|---|---|---|---|---|
| Big | None | Small | Fire | None | |
| Breakable Parts | |||||
| Head, Torso, Chest, Left Foreleg, Right Foreleg, Left Hindleg, Right Hindleg, Tail, Shell, Exhaust Organ (Large, Small), Weak Shell | |||||
Weakness, Body Parts, Extracts
No body part information is currently known for this Monster. Check back for more details as we continue to investigate!
Vulnerability to Status Effects and Items
| Poison | ❌ | Flash | ❌ |
|---|---|---|---|
| Paral | ❌ | Shock | ❌ |
| Sleep | ❌ | Pitfall | ❌ |
| Stun | ❌ | Ivy | ❌ |
| Blast | ❌ | Dung | ❌ |
| Exhaust | ❌ | Meat | ❌ |
| Mount | ❌ | Screamer | ❌ |
Best Loadout Against Zorah Magdaros
While Zorah Magdaros doesn't really require any specific loadout or skills to beat him. Below are all the things that will come in handy when attempting the Zorah Magdaros siege.
Best Items
| Max/Ancient Potion | Instant full heal. Highly recommended so you can last through the magma that the cores spew out. |
|---|---|
| Cool Drink | Reduces heat damage. |
Best Weapons
| Your Highest Damaging Weapon | The Magma cores are pretty durable, bring your highest damaging weapon to quickly break the cores. |
|---|---|
| Water Elemental Weapon | The cores are also weak to water, you can bring water elemental weapons to destroy the cores much easier. |
| Dragon Elemental Weapon | With the changes to the quest mechanics, it is now necessary to fight Nergigante. Bringing a dragon weapon will surely hasten the time for you to repel him. |
Best Armor Skills
| Heavy Artillery | Required for Zorah Magdaros' 2nd phase. |
|---|---|
| Tool Specialist | Reduces the cooldown of your tools. Allows you to don the Fireproof Mantle/ lay a health booster more often. |
Best Palico Skills, Weapons, and Felyne Skills
| Mewolotov Cocktail | More damage and damage is what you need to break the Magma Cores. |
|---|---|
| Water elemental weapon | A water elemental weapon is also great for your palico. Together with Meolotov Cocktail, this allows your Palico to deal a lot of damage. |
How to Beat Arch-Tempered Zorah Magdaros
Things to Know in Advance
· Cool Drink is required to prevent extreme heat
· Clearing is easier with the skill Heavy Artillery
- Use all the Necessary Buffs to increase your damage.
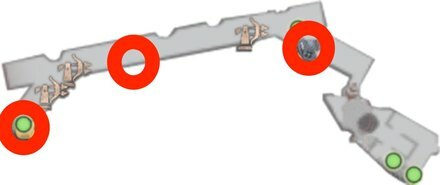
STEP 1: Destroying the Magma Cores
The Zora Magdoros fight is divided into two phases, destroying the Magma Cores and finish off using the turrets. In the first phase, you will fly into Arch-Tempered Zorah Magdaros' back and search for the magma cores scattered around his back.
Unlike the other Zorah Magdaros quest, there are 4 magma cores you need to destroy. They are pretty easy to locate on the map so just head there and start hammering.
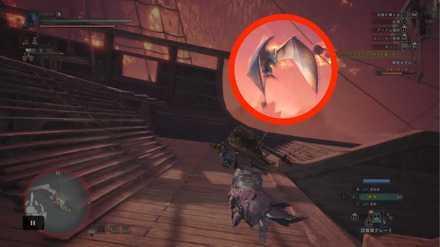
Fighting Nergigante
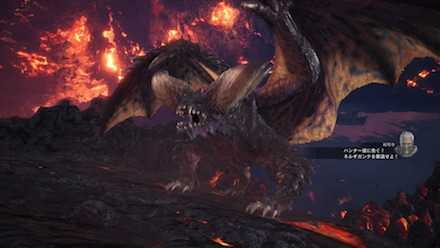
Unlike the normal Zorah Magdaros quests, it is required to repel Nergigante. When he appears, immediately head to its location and fight it until it leaves.
STEP 2: Barricade Siege
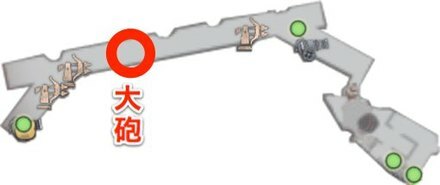
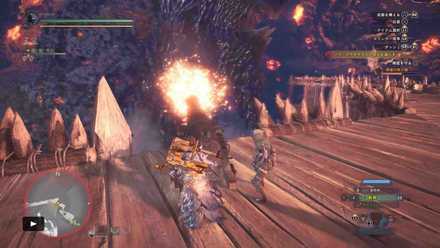
Attack From the Center
 |
 |
After moving to the barricade, immediately move to the cannon at the center of the map and fill it with shells while waiting for Arch-Tempered Zorah Magdaros to get a little closer for guaranteed shots.
Note: Be sure that you adjust the direction of the cannon before firing the shells.
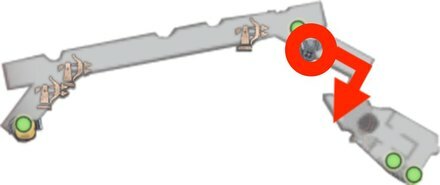
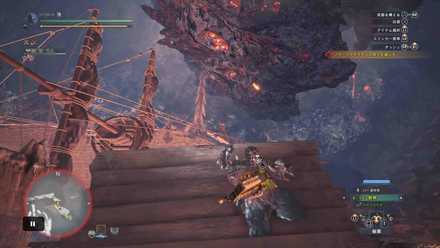
Using the Second Cannon
 |
 |
Next, you will have to move east and then use the second cannon after NPC hunters finished loading the shells. After firing the cannon, make sure that you drop down the ledge and take the shortcut leading to the west side of the barricade.
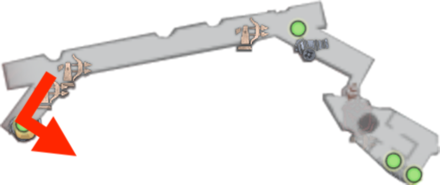
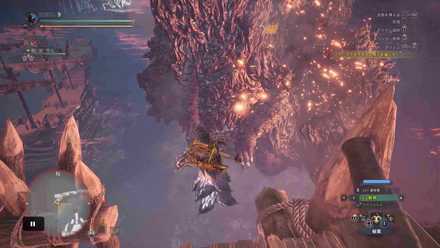
Before Jumping Off
 |
 |
Once you reach the western end of the barricade, use the nearby cannon before jumping on to the ship below you. Make sure that you do an aerial attack to avoid losing time from tripping after the jump.
Ship Cannons
 |
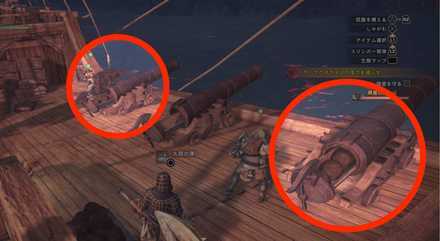 |
Inside the ship, there will be two cannons that are ready to fire because of the NPCs, be sure to adjust their direction and use them immediately.
From here, help the NPCs load up the cannon and continue your attacks against Arch-Tempered Zorah Magdaros until the Dragonator is ready.
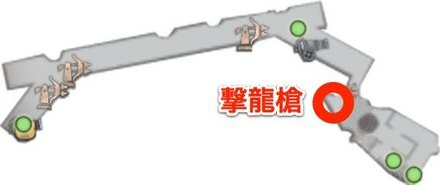
Using the Dragonator
The Dragonator is a powerful weapon that is attached at the rear end of the ship, you can use this as soon as it is ready but it can completely miss if Arch-Tempered Zorah Magdaros is not close enough. Make sure that Arch-Tempered Zorah Magdaros is within its range before using it to deal massive damage.
You can use the Dragonator by activating the bow at the center of the ship deck.
Flying Back to the Barricade
 |
 |
After exhausting all of the shells at the ship, it will not be efficient if you stay here longer. Immediately move back to the barricade using the Hitching Post on the ship deck.
Fire the Remaining Cannons
 |
 |
As soon as you get back to the barricade, fire all of the remaining cannons until you repel Arch-Tempered Zorah Magdaros.
Arch-Tempered Zorah Magdaros Tips
Glowing Magmacore
If the magma core is starting to glow bright red, this only means that the magma core will soon explode. Take note of this and keep an eye on the magma core to easily avoid any damage from the lava.
Using Cool Drink
When moving around Arch-Tempered Zorah Magdaros' back, you will constantly be affected by extreme heat. It is best that you use a Cool Drink to prevent taking any damage from this and focus on attacking the magma core instead of healing.
Abusing Heavy Artillery
You can make the run a lot easier by using the skill Heavy Artillery to maximize your damage output even when using the cannons at the barricade where you fend off Arch-Tempered Zorah Magdaros.
Arch-Tempered Zorah Magdaros Attack Patterns
| Attack | Attack Power | Guardable | Exhaustion |
|---|---|---|---|
| Front Slam | 80 | ◯ | 100 |
| Eruption | 60 | ◯ | 0 |
| Eruption (Standing) | 120 | X | 100 |
| Lava Eruption | 90 | ◯ | 30 |
| Lava Breath | 80 | ◯ | 30 |
| Falling Lava | 70 | ◯ | 30 |
| Lava Projectile | 50 | ◯ | 30 |
| Large Lava Projectile | 150 | ◯ | 100 |
Arch-Tempered Zorah Magdaros Carves and Rewards
Rewards for Each Body Part
| Obtain Rate (%) | |
|---|---|
| HR |
Zorah Magdaros Magma
/ Head 67 Zorah Magdaros Pleura / Chestplate 100 |
Shiny Drops
| Obtain Rate (%) | |
|---|---|
| HR Drops |
Zorah Magdaros Heat Scale
/ 27 Zorah Magdaros Magma / 15 Zorah Magdaros Carapace / 15 Zorah Magdaros Heat Scale / 27 Zorah Magdaros Magma / 15 Zorah Magdaros Carapace / 15 |
Quest Clear & Investigation Rewards
| Obtain Rate (%) | |
|---|---|
| HR Quest |
Zorah Magdaros Gem
/ 8 Zorah Magdaros Ridge / 23 Zorah Magdaros Heat Scale / 20 Zorah Magdaros Pleura / 18 Zorah Magdaros Magma / 16 Zorah Magdaros Carapace / 15 |
Plunderblade Rewards
Plunderblade
| Obtain Rate (%) | |
|---|---|
| HR |
Dragonite Ore
/ 55 Zorah Magdaros Carapace / 30 Zorah Magdaros Heat Scale / 15 |
Quests Where Arch-Tempered Zorah Magdaros Appears
| Type | Quest Name |
|---|---|
| Event | ★9 - Undying Alpenglow |
Related Links
All Monster Guides

List of All Base Game Monsters
MHW (Base Game) Monsters
Colored Variants
 Ancient Leshen Ancient Leshen
|
 Azure Rathalos Azure Rathalos
|
 Black Diablos Black Diablos
|
 Pink Rathian Pink Rathian
|
Arch-Tempered Elder Dragons
Monsters by Game
| All Monsters by Game | |
|---|---|
 Iceborne Iceborne |
 Monster Hunter World Monster Hunter World |
Comment
Author

Arch-Tempered Zorah Magdaros Weakness and Strategy Guide
Please participate in our site
improvement survey
03/2026
improvement survey
03/2026
Would you assist in
improving Game8's site?
improving Game8's site?

×
We are listening to our users' valuable opinions and discussing how to act on them.
The information collected through this survey will be used for the purpose of improving our services. In addition, the information will only be disclosed a part of a statistic in a format that will not allow identification of personal information.
Begin Survey
Not Now
×
Please rate each item regarding Game8.co's Advertisements.
Amount of Ads
Very Dissatisfied
Somewhat Dissatisfied
Fine
Somewhat Satisfied
Highly Satisfied
Placement of Ads
Timing of Ad Display
Ad Loading Speed
Safeness of Ads
Content of Ads
×
Please rate each item regarding Game8.co's Quality of Articles.
Amount of information
Very Dissatisfied
Somewhat Dissatisfied
Fine
Somewhat Satisfied
Highly Satisfied
Frequency of updates
Speed of new information
Accuracy of articles
Understandibility of articles
Readability of sentences
×
Please rate each item regarding Game8.co's Usability of the Site.
Ease of finding information
Very Dissatisfied
Somewhat Dissatisfied
Fine
Somewhat Satisfied
Highly Satisfied
Loading Speed
Use of Color
Font Size
Visibility of Images
Easy to Understand Layout
×
Please rate each item regarding Game8.co's Message Boards, Comments.
Ease of Writing
Very Dissatisfied
Somewhat Dissatisfied
Fine
Somewhat Satisfied
Highly Satisfied
Readability
Ease in Finding Information
Comment Quality
Comment Quantity
Admin Response
×
Please rate each item regarding Game8.co's Site's new design.
Please rate our site's new design
Very Dissatisfied
Somewhat Dissatisfied
Fine
Somewhat Satisfied
Highly Satisfied
Do you think that the website's design change makes the site easier to use?
Has the new design made it easier for you to find information on the site?
Has the new design improved the overall visual appeal of the site?
How would you rate your overall satisfaction with the new design of the site?
×
How likely are you to recommend Game8 to someone you know?
Very Unlikely
0
1
2
3
4
5
6
7
8
9
10
Very Likely
If you have other opinions regarding potential improvement to the website, please share them with us. We would appreciate your honest opinion.
Note: This is a free response section, so you can proceed without entering anything.
Note: Please be sure not to enter any kind of personal information into your response.
Note: Please be sure not to enter any kind of personal information into your response.
×
Thank You
×
Thank you for participating in our survey! Your answers will help us to improve the quality of our website and services.
We hope you continue to make use of Game8.
We hope you continue to make use of Game8.
Close
Rankings
- We could not find the message board you were looking for.
Gaming News


![Everwind Review [Early Access] | The Shaky First Step to A Very Long Journey](https://img.game8.co/4440226/ab079b1153298a042633dd1ef51e878e.png/thumb)

![Monster Hunter Stories 3 Review [First Impressions] | Simply Rejuvenating](https://img.game8.co/4438641/2a31b7702bd70e78ec8efd24661dacda.jpeg/thumb)
Popular Games

Genshin Impact Walkthrough & Guides Wiki
Honkai: Star Rail Walkthrough & Guides Wiki
Umamusume: Pretty Derby Walkthrough & Guides Wiki
Pokemon Pokopia Walkthrough & Guides Wiki
Resident Evil Requiem (RE9) Walkthrough & Guides Wiki
Monster Hunter Wilds Walkthrough & Guides Wiki
Wuthering Waves Walkthrough & Guides Wiki
Arknights: Endfield Walkthrough & Guides Wiki
Pokemon FireRed and LeafGreen (FRLG) Walkthrough & Guides Wiki
Pokemon TCG Pocket (PTCGP) Strategies & Guides Wiki


Recommended Games
Diablo 4: Vessel of Hatred Walkthrough & Guides Wiki
Fire Emblem Heroes (FEH) Walkthrough & Guides Wiki
Yu-Gi-Oh! Master Duel Walkthrough & Guides Wiki
Super Smash Bros. Ultimate Walkthrough & Guides Wiki
Pokemon Brilliant Diamond and Shining Pearl (BDSP) Walkthrough & Guides Wiki
Elden Ring Shadow of the Erdtree Walkthrough & Guides Wiki
Monster Hunter World Walkthrough & Guides Wiki
The Legend of Zelda: Tears of the Kingdom Walkthrough & Guides Wiki
Persona 3 Reload Walkthrough & Guides Wiki
Cyberpunk 2077: Ultimate Edition Walkthrough & Guides Wiki


All rights reserved
©CAPCOM CO., LTD. 2018, 2019 ALL RIGHTS RESERVED.
The copyrights of videos of games used in our content and other intellectual property rights belong to the provider of the game.
The contents we provide on this site were created personally by members of the Game8 editorial department.
We refuse the right to reuse or repost content taken without our permission such as data or images to other sites.