Jyuratodus Weakness and Strategy Guide
★ 2025/2/28: Monster Hunter Wilds is now available!
Join the hunt at our Monster Hunter Wilds Wiki!
Learn how to beat Jyuratodus in the game Monster Hunter World (MHW)! This guide explains everything about Jyuratodus's weakness, carves, rewards, and a complete strategy guide for beating and capturing it. Find out what parts are breakable and severable, and what drops and Monster materials are available.
| All Jyuratodus Articles | ||
|---|---|---|
|
|
1 | ⍺ | β | ⍺+ | β+ |
|
List of Contents
Jyuratodus Weakness, Body Parts, and Resistances
Jyuratodus Characteristics
 |
|||||
| Roar | Wind | Tremor | Blight | Status | |
|---|---|---|---|---|---|
| None | None | None | Water | Muddy | |
| Breakable Parts | |||||
| Head, Head [Mud], Torso, Torso [Mud], Left Leg, Left Leg [Mud], Right Leg, Right Leg [Mud], Tail, Tail [Mud] | |||||
Locations and Areas Visited
| Map | Starting Area | Visited Areas | Rest Spot |
|---|---|---|---|
 Wildspire Waste Wildspire Waste
|
10 | 4 / 9 / 10 | 10 |
*The starting location may change depending on the Quest.
Weakness, Body Parts, Extracts
Head
| Sever | Break | Bomb | Fire | Extract |
|---|---|---|---|---|
| 58 | 58 | 58 | 5 | Red |
| Water | Thunder | Ice | Dragon | |
| 0 | 10 | 5 | 5 |
Head [Mud]
| Sever | Break | Bomb | Fire | Extract |
|---|---|---|---|---|
| 23 | 23 | 23 | 0 | Red |
| Water | Thunder | Ice | Dragon | |
| 25 | 0 | 5 | 5 |
Neck
| Sever | Break | Bomb | Fire | Extract |
|---|---|---|---|---|
| 43 | 43 | 43 | 5 | Red |
| Water | Thunder | Ice | Dragon | |
| 0 | 10 | 5 | 5 |
Torso
| Sever | Break | Bomb | Fire | Extract |
|---|---|---|---|---|
| 35 | 35 | 35 | 10 | White |
| Water | Thunder | Ice | Dragon | |
| 0 | 25 | 5 | 5 |
Torso [Mud]
| Sever | Break | Bomb | Fire | Extract |
|---|---|---|---|---|
| 21 | 21 | 21 | 0 | White |
| Water | Thunder | Ice | Dragon | |
| 25 | 0 | 5 | 5 |
Back
| Sever | Break | Bomb | Fire | Extract |
|---|---|---|---|---|
| 24 | 24 | 24 | 5 | White |
| Water | Thunder | Ice | Dragon | |
| 0 | 15 | 5 | 5 |
Fins
| Sever | Break | Bomb | Fire | Extract |
|---|---|---|---|---|
| 25 | 25 | 25 | 10 | White |
| Water | Thunder | Ice | Dragon | |
| 0 | 20 | 5 | 5 |
Legs
| Sever | Break | Bomb | Fire | Extract |
|---|---|---|---|---|
| 30 | 30 | 25 | 15 | White |
| Water | Thunder | Ice | Dragon | |
| 0 | 30 | 5 | 5 |
Legs [Mud]
| Sever | Break | Bomb | Fire | Extract |
|---|---|---|---|---|
| 21 | 21 | 21 | 0 | White |
| Water | Thunder | Ice | Dragon | |
| 25 | 0 | 5 | 5 |
Tail
| Sever | Break | Bomb | Fire | Extract |
|---|---|---|---|---|
| 55 | 50 | 45 | 5 | Orange |
| Water | Thunder | Ice | Dragon | |
| 0 | 10 | 5 | 5 |
Tail [Mud]
| Sever | Break | Bomb | Fire | Extract |
|---|---|---|---|---|
| 23 | 23 | 23 | 0 | Orange |
| Water | Thunder | Ice | Dragon | |
| 25 | 0 | 5 | 5 |
Higher values indicate higher damage.
Vulnerability to Status Effects and Items
| Poison | ★★ | Flash | ★★ |
|---|---|---|---|
| Paral | ★★ | Shock | ★★ |
| Sleep | ★ | Pitfall | ★★ |
| Stun | ★★★ | Ivy | ❌ |
| Blast | ★ | Dung | ★★ |
| Exhaust | ★ | Meat | ❌ |
| Mount | ★★★ | Screamer | ★★ |
Countermeasures against Jyuratodus
Recommended Weapon Element and Armor Skills
| Recommended Weapon Element | |
|---|---|
| Thunder Weapon | Jyuratodus is weakest against thunder when not covered in mud. |
| Water Weapon | Jyuratodus is weakest against water when covered in mud. |
| Raw Weapon | If you don't want to think getting Jyuratodus's mud armor off, you can simply bring a weapon without any element. |
| Stun Weapon | Jyuratodus is also weak to stun, so any weapon with a stun ailment can be effective. |
| Recommended Armor Skills | |
| Flinch Free | Jyuratodus can put mud piles around the environment, and you can trip and get stuck in them, opening you up for an attack. Flinch Free at Lvl 3 prevents that. |
| Muck Resistance | If you can't afford to put Flinch Free at Lvl 3 or even 2, you can also get Muck Resistance, which allows you to get out of the mud pile faster after getting stunned. |
| Blight Resistance | Jyuratodus can inflict Waterblight. If you find yourself getting inflicted with Waterblight often, it might be good to get Blight Resistance. |
| Water/Polar Mobility | More often than not, you will be fighting Jyuratodus in its lair, where it is filled with water. Avoid getting slowed down by the water with the Water/Polar Mobility Skill. |
How to Beat Jyuratodus
Removing the Mud Armor
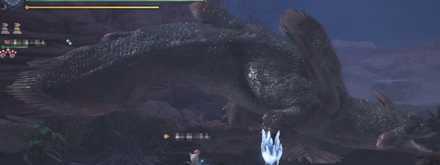
| Normal | Mud State |
|---|---|
 |
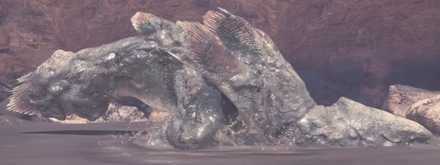 |
Jyuratodus will start off wearing his mud armor on every part of his body at the beginning of the hunt, to remove this armor you must concentrate on attacking a specific part to eventually break the armor. This will soften the part making it more vulnerable to your attacks.
Also, if you manage to break any part of Jyuratodus before he can start gathering mud again, this broken part will not get a mud armor. Because of this, it is recommended that you focus on one part of Jyuratodus to make him vulnerable throughout the hunt.
Attacking from the Sides
When fighting Jyuratodus, it is best that you position yourself and attack the head from the sides to avoid getting hit by his rush and hurl attacks. Focusing on this part throughout the hunt will allow you to maximize your damage output because of the mud armor removal.
Opportunity to Attack
While Jyuratodus is rolling and gathering mud to replenish his mud armor, he will be stationary for a few seconds. Use this opportunity to attack with your most powerful combos and deal as much damage as you can.
Jyuratodus Attack Patterns
| Attack | Attack Power | Guardable | Exhaustion |
|---|---|---|---|
| Tail Sweep (1st Step) | 20 | ◯ | 0 |
| Stail Sweep (2nd Step) | 40 | ◯ | 0 |
| Rush | 55 | ◯ | 30 |
| 2 Step Bite | 30 | ◯ | 20 |
| Bite | 20 | ◯ | 0 |
| Raid | 70 | ◯ | 50 |
| Quick Attack | 20 | ◯ | 0 |
| Jump | 20 | ◯ | 0 |
| Tail Swing | 30 | ◯ | 20 |
| Mud Coat | 10 | ◯ | 0 |
| Mud Hurl | 20 | ◯ | 0 |
Jyuratodus Carves and Rewards
Carvings and Hunt Rewards
| Obtain Rate (%) | |
|---|---|
| LR |
Jyuratodus Scale
/ Body 36 Jyuratodus Shell / Body 28 Jyuratodus Fin / Body 21 Jyuratodus Fang / Body 15 |
| HR |
Jyuratodus Scale+
/ Body 36 Jyuratodus Carapace / Body 27 Jyuratodus Fin+ / Body 20 Wyvern Gem / Body 2 Jyuratodus Fang+ / Body 15 |
| MR |
Wyvern Gem
/ 5 Jyuratodus Shard / 34 Jyuratodus Cortex / 25 Jyuratodus Grandfin / 20 Large Wyvern Gem / 2 Jyuratodus Hardfang / 14 |
Rewards for Each Body Part
| Obtain Rate (%) | |
|---|---|
| LR |
Jyuratodus Fin
/ Torso 100 Jyuratodus Fang / Head 100 |
| HR |
Jyuratodus Fin+
/ Torso 100 Jyuratodus Fang+ / Head 100 |
| MR |
Jyuratodus Grandfin
/ Torso 100 Jyuratodus Hardfang / Head 100 |
Breakable Body Parts
| Defense Value | How to Break | |
|---|---|---|
| Head | 100 | Set durability to 0, 4 times. |
| Head (Mud State) | 100 | Set durability to 0, once. |
| Torso | 300 | Set durability to 0, once. |
| Torso (Mud State) | 100 | Set durability to 0, 3 times. |
| Left Leg | 240 | Set durability to 0, twice. |
| Left Leg (Mud State) | 100 | Set durability to 0, twice. |
| Right Leg | 240 | Set durability to 0, twice. |
| Right Leg (Mud State) | 100 | Set durability to 0, twice. |
| Tail | 100 | Set durability to 0, 3 times. |
| Tail (Mud State) | 100 | Set durability to 0, once. |
Shiny Drops
| Obtain Rate (%) | |
|---|---|
| LR Drops |
Jyuratodus Scale
/ 50 Jyuratodus Fin / 28 Wyvern Tear / 22 |
| HR Drops |
Jyuratodus Scale+
/ 50 Jyuratodus Fin+ / 28 Wyvern Tear / 22 Jyuratodus Fin+ / 28 |
| MR Drops |
Flood Sac
/ 50 Jyuratodus Grandfin / 28 Large Wyvern Tear / 22 |
Quest Clear & Investigation Rewards
| Obtain Rate (%) | |
|---|---|
| LR Quest |
Jyuratodus Fin
/ 9 Jyuratodus Shell / 27 Jyuratodus Scale / 21 Aqua Sac / 18 Jyuratodus Fang / 15 Monster Bone M / 10 |
| LR Silver |
Jyuratodus Fang
/ 32 Jyuratodus Fin / 25 Jyuratodus Shell / 18 Aqua Sac / 14 Jyuratodus Scale / 11 |
| LR Gold |
Jyuratodus Scale
/ 8 Jyuratodus Fang / 36 Jyuratodus Fin / 30 Jyuratodus Shell / 14 Aqua Sac / 12 |
| HR Quest |
Jyuratodus Fin+
/ 9 Jyuratodus Carapace / 26 Jyuratodus Scale+ / 21 Torrent Sac / 18 Jyuratodus Fang+ / 15 Monster Keenbone / 10 Wyvern Tear / 1 |
| HR Silver |
Wyvern Gem
/ 8 Jyuratodus Fang+ / 32 Jyuratodus Fin+ / 23 Jyuratodus Carapace / 14 Torrent Sac / 12 Jyuratodus Scale+ / 11 |
| HR Gold |
Jyuratodus Scale+
/ 8 Jyuratodus Fang+ / 30 Jyuratodus Fin+ / 24 Wyvern Gem / 16 Jyuratodus Carapace / 12 Torrent Sac / 10 |
| MR Quest |
Jyuratodus Cortex
/ 28 Flood Sac / 22 Jyuratodus Shard / 22 Large Wyvern Gem / 2 Jyuratodus Hardfang / 16 Jyuratodus Grandfin / 10 |
Plunderblade Rewards
Plunderblade
| Obtain Rate (%) | |
|---|---|
| LR |
Jyuratodus Scale
/ 43 Jyuratodus Shell / 35 Jyuratodus Fang / 22 |
| HR |
Jyuratodus Scale+
/ 41 Jyuratodus Carapace / 35 Jyuratodus Fang+ / 22 Wyvern Gem / 2 |
| MR |
Jyuratodus Shard
/ 41 Jyuratodus Cortex / 35 Jyuratodus Hardfang / 22 Large Wyvern Gem / 2 |
Palarang
| Obtain Rate (%) | |
|---|---|
| MR |
Jyuratodus Shard
/ 50 Jyuratodus Grandfin / 28 Large Wyvern Tear / 22 |
Quests Where Jyuratodus Appears
| Type | Quest Name |
|---|---|
| Assigned | ★3 - Sinister Shadows In The Swamp |
| Optional | ★3 - Mired In The Spire |
| Optional | ★3 - The Piscine Problem |
| Optional | ★3 - Landing The Landslide Wyvern |
| Optional | ★4 - Royal Relocation |
| Optional | ★6 - A Crown Of Mud And Anger |
| Optional | ★6 - Up To Your Waist In The Waste |
| Event | ★7 - Wildspire Bolero |
| Optional | M★1 - Dragged Through the Mud |
| Optional | M★1 - Jyura in My Way |
| Optional | M★2 - A Queen At Heart |
| Event | M★6 - Heavy Metal in the Waste |
Related Links
All Monster Guides

List of All Base Game Monsters
MHW (Base Game) Monsters
Colored Variants
 Ancient Leshen Ancient Leshen
|
 Azure Rathalos Azure Rathalos
|
 Black Diablos Black Diablos
|
 Pink Rathian Pink Rathian
|
Arch-Tempered Elder Dragons
Monsters by Game
| All Monsters by Game | |
|---|---|
 Iceborne Iceborne |
 Monster Hunter World Monster Hunter World |
Comment
Author
Jyuratodus Weakness and Strategy Guide
improvement survey
03/2026
improving Game8's site?

Your answers will help us to improve our website.
Note: Please be sure not to enter any kind of personal information into your response.

We hope you continue to make use of Game8.
Rankings
- We could not find the message board you were looking for.
Gaming News
Popular Games

Genshin Impact Walkthrough & Guides Wiki

Honkai: Star Rail Walkthrough & Guides Wiki

Umamusume: Pretty Derby Walkthrough & Guides Wiki

Pokemon Pokopia Walkthrough & Guides Wiki

Resident Evil Requiem (RE9) Walkthrough & Guides Wiki

Monster Hunter Wilds Walkthrough & Guides Wiki

Wuthering Waves Walkthrough & Guides Wiki

Arknights: Endfield Walkthrough & Guides Wiki

Pokemon FireRed and LeafGreen (FRLG) Walkthrough & Guides Wiki

Pokemon TCG Pocket (PTCGP) Strategies & Guides Wiki
Recommended Games

Diablo 4: Vessel of Hatred Walkthrough & Guides Wiki

Fire Emblem Heroes (FEH) Walkthrough & Guides Wiki

Yu-Gi-Oh! Master Duel Walkthrough & Guides Wiki

Super Smash Bros. Ultimate Walkthrough & Guides Wiki

Pokemon Brilliant Diamond and Shining Pearl (BDSP) Walkthrough & Guides Wiki

Elden Ring Shadow of the Erdtree Walkthrough & Guides Wiki

Monster Hunter World Walkthrough & Guides Wiki

The Legend of Zelda: Tears of the Kingdom Walkthrough & Guides Wiki

Persona 3 Reload Walkthrough & Guides Wiki

Cyberpunk 2077: Ultimate Edition Walkthrough & Guides Wiki
All rights reserved
©CAPCOM CO., LTD. 2018, 2019 ALL RIGHTS RESERVED.
The copyrights of videos of games used in our content and other intellectual property rights belong to the provider of the game.
The contents we provide on this site were created personally by members of the Game8 editorial department.
We refuse the right to reuse or repost content taken without our permission such as data or images to other sites.
 Anjanath
 Barroth
 Bazelgeuse
 Behemoth
 Deviljho
 Diablos
 Dodogama
 Great Girros
 Great Jagras
 Jyuratodus
 Kirin
Kirin Kulu-Ya-Ku
 Kulve Taroth
 Kushala Daora
 Lavasioth
 Legiana
 Leshen
 Lunastra
 Nergigante
 Odogaron
 Paolumu
 Pukei-Pukei
 Radobaan
 Rathalos
 Rathian
 Teostra
 Tobi-Kadachi
 Tzitzi-Ya-Ku
 Uragaan
 Vaal Hazak
 Xeno'jiiva
 Zorah Magdaros
 Arch-Tempered Great Jagras
 Arch-Tempered Kirin
 Arch-Tempered Kulve Taroth
 Arch-Tempered Kushala Daora
 Arch-Tempered Lunastra
 Arch-Tempered Nergigante
 Arch-Tempered Teostra
 Arch-Tempered Vaal Hazak
 Arch-Tempered Xeno'jiiva
 Arch-Tempered Zorah Magdaros


![Everwind Review [Early Access] | The Shaky First Step to A Very Long Journey](https://img.game8.co/4440226/ab079b1153298a042633dd1ef51e878e.png/thumb)

![Monster Hunter Stories 3 Review [First Impressions] | Simply Rejuvenating](https://img.game8.co/4438641/2a31b7702bd70e78ec8efd24661dacda.jpeg/thumb)


