Tzitzi-ya-ku Weakness and Strategy Guide
★ 2025/2/28: Monster Hunter Wilds is now available!
Join the hunt at our Monster Hunter Wilds Wiki!
Learn how to beat Tzitzi-Ya-Ku in the game Monster Hunter World (MHW)! This guide explains everything about Tzitzi-Ya-Ku's weakness, carves, rewards, and a complete strategy guide for beating and capturing it. Find out what parts are breakable and severable, and what drops and Monster materials are available.
| All Tzitzi-Ya-Ku Articles | ||
|---|---|---|
|
|
1 | ⍺ | β | ⍺+ | β+ |
|
List of Contents
Tzitzi-Ya-Ku Weakness, Body Parts, and Resistances
Tzitzi-Ya-Ku Characteristics
 |
|||||
| Roar | Wind | Tremor | Blight | Status | |
|---|---|---|---|---|---|
| None | None | None | None | Stun | |
| Breakable Parts | |||||
| Antennae, Head, Torso, Hindlegs, Tail | |||||
Locations and Areas Visited
| Map | Starting Area | Visited Areas | Rest Spot |
|---|---|---|---|
 Coral Highlands Coral Highlands
|
2 | 1 / 2 / 3 / 4 / 5 / 8 | 7 |
*The starting location may change depending on the Quest.
Weakness, Body Parts, Extracts
Antennae
| Sever | Break | Bomb | Fire | Extract |
|---|---|---|---|---|
| 68 | 59 | 63 | 15 | Red |
| Water | Thunder | Ice | Dragon | |
| 15 | 20 | 20 | 15 |
Head
| Sever | Break | Bomb | Fire | Extract |
|---|---|---|---|---|
| 59 | 50 | 50 | 15 | Red |
| Water | Thunder | Ice | Dragon | |
| 15 | 20 | 20 | 15 |
Hindlegs
| Sever | Break | Bomb | Fire | Extract |
|---|---|---|---|---|
| 45 | 60 | 35 | 15 | Red |
| Water | Thunder | Ice | Dragon | |
| 15 | 20 | 20 | 15 |
Torso
| Sever | Break | Bomb | Fire | Extract |
|---|---|---|---|---|
| 45 | 60 | 35 | 15 | White |
| Water | Thunder | Ice | Dragon | |
| 15 | 20 | 20 | 15 |
Tail
| Sever | Break | Bomb | Fire | Extract |
|---|---|---|---|---|
| 40 | 40 | 35 | 15 | Orange |
| Water | Thunder | Ice | Dragon | |
| 15 | 20 | 20 | 15 |
Higher values indicate higher damage.
Vulnerability to Status Effects and Items
| Poison | ★★ | Flash | ❌ |
|---|---|---|---|
| Paral | ★★ | Shock | ★★ |
| Sleep | ★★ | Pitfall | ★★ |
| Stun | ★★ | Ivy | ❌ |
| Blast | ★★ | Dung | ★★ |
| Exhaust | ★ | Meat | ❌ |
| Mount | ★ | Screamer | ❌ |
Countermeasures against Tzitzi-Ya-Ku
Recommended Weapon Element and Armor Skills
| Recommended Weapon Element | |
|---|---|
| Thunder Weapon | Tzitzi-Ya-Ku is weakest against thunder... |
| Ice Weapon | ...and ice! Bring whichever weapon's stronger for you. |
| Recommended Armor Skills | |
| Stun Resistance | Stun Resistance at Lvl 3 will make Tzitzi-Ya-Ku a walk in the park, since his flash will be made completely useless. |
| Evade Window | You can also use the invincibility frames of your roll to completely negate the stun from his flash! Evade Window will make this easier. |
| Partbreaker | If you want to concentrate on breaking his head instead to make his flash weaker, investing in Partbreaker might be helpful. |
How to Beat Tzitzi-Ya-Ku
Sudden Flash
Tzitzi-Ya-Ku can emit a flash of light from his head to the direction he is facing. He will be defenseless during this attack but it can stun you if you are within its range and you are looking at him directly. Avoid this by facing away and moving to the sides to get an opening for your attacks.
Weakening the Flash
You can shorten the range of the flash by breaking his head, this way you will only have to take one step back to get out of its range instead of moving to the sides giving you more time to strike. Also, the head is the weakest part of Tzitzi-Ya-Ku, you should focus on attacking this part to maximize your damage output.
Tail Attack Follow-up
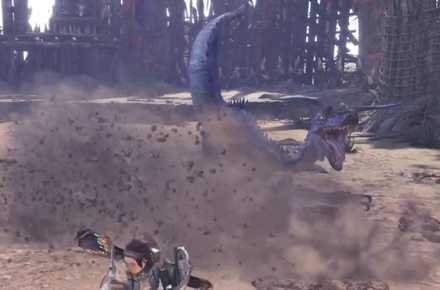
TziTzi-Ya-Ku will sometimes perform a jump attack at your position after using his tail attack. It is recommended that you keep moving after his tail attack to avoid any followups and only engage once you are sure that there is an opening.
Tzitzi-Ya-Ku Attack Patterns
| Attack | Attack Power | Guardable | Exhaustion |
|---|---|---|---|
| Scratch | 20 | ◯ | 5 |
| Continuous Scratch | 30 | ◯ | 5 |
| Hindleg Scratch | 35 | ◯ | 0 |
| Jump Attack | 30 | ◯ | 0 |
| Jump Kick | 50 | ◯ | 20 |
| Jump Kick with Tail | 60 | ◯ | 0 |
| Tail Attack | 35 | ◯ | 5 |
| Rush Attack | 40 | ◯ | 10 |
Tzitzi-Ya-Ku Carves and Rewards
Carvings and Hunt Rewards
| Obtain Rate (%) | |
|---|---|
| LR |
Tzitzi-Ya-Ku Scale
/ Body 36 Tzitzi-Ya-Ku Hide / Body 28 Tzitzi-Ya-Ku Photophore / Body 21 Tzitzi-Ya-Ku Claw / Body 15 |
| HR |
Bird Wyvern Gem
/ Body 4 Tzitzi-Ya-Ku Scale+ / Body 35 Tzitzi-Ya-Ku Hide+ / Body 27 Tzitzi-Ya-Ku Photophore+ / Body 20 Tzitzi-Ya-Ku Claw+ / Body 14 |
| MR |
Fey Wyvern Gem
/ 4 Tzitzi-Ya-Ku Shard / 35 Tzitzi-Ya-Ku Thickhide / 27 Tzitzi-Ya-Ku Photomembrane / 20 Tzitzi-Ya-Ku Hardclaw / 14 |
Rewards for Each Body Part
| Obtain Rate (%) | |
|---|---|
| LR |
Tzitzi-Ya-Ku Photophore
/ Antennae 100 |
| HR |
Tzitzi-Ya-Ku Photophore+
/ Antennae |
| MR |
Tzitzi-Ya-Ku Photomembrane
/ Antennae 100 |
Shiny Drops
| Obtain Rate (%) | |
|---|---|
| LR Drops |
Tzitzi-Ya-Ku Scale
/ 50 Tzitzi-Ya-Ku Claw / 28 Wyvern Tear / 22 |
| HR Drops |
Tzitzi-Ya-Ku Scale+
/ 50 Tzitzi-Ya-Ku Claw+ / 28 Wyvern Tear / 22 |
| MR Drops |
Tzitzi-Ya-Ku Shard
/ 50 Tzitzi-Ya-Ku Hardclaw / 28 Large Wyvern Tear / |
Quest Clear & Investigation Rewards
Plunderblade Rewards
Plunderblade
| Obtain Rate (%) | |
|---|---|
| LR |
Tzitzi-Ya-Ku Scale
/ 43 Tzitzi-Ya-Ku Hide / 35 Tzitzi-Ya-Ku Claw / 22 |
| HR |
Bird Wyvern Gem
/ Tzitzi-Ya-Ku Scale+ / Tzitzi-Ya-Ku Hide+ / Tzitzi-Ya-Ku Claw+ / |
| MR |
Tzitzi-Ya-Ku Shard
/ 43 Tzitzi-Ya-Ku Thickhide / 35 Tzitzi-Ya-Ku Hardclaw / 20 Fey Wyvern Gem / 2 |
Palarang
| Obtain Rate (%) | |
|---|---|
| MR |
Tzitzi-Ya-Ku Shard
/ 50 Tzitzi-Ya-Ku Hardclaw / 28 Large Wyvern Tear / |
Quests Where Tzitzi-Ya-Ku Appears
| Type | Quest Name |
|---|---|
| Assigned | ★4 - Ballooning Problems |
| Assigned | ★5 - The Embodiment of Legiana |
| Assigned | ★7 - Old World Monster In The New World |
| Optional | ★4 - A Tzitzi For Science |
| Optional | ★4 - Sorry You're Not Invited |
| Optional | ★4 - What A Bunch Of Abalone |
| Optional | ★4 - White Monster For A White Coat |
| Optional | ★4 - Troubled Troupers |
| Optional | ★5 - A Humid Headache |
| Optional | ★6 - Say Cheese! |
| Optional | ★6 - Loop the Paolumu |
| Event | ★7 - Coral Waltz |
| Event | ★6 - A Flash in the Pan |
| Event | ★4 - Ya-Ku With That? |
| Event | ★5 - Lessons of the Wild |
| Challenge | ★7 - Challenge Quest 1: Intermediate |
| Assigned | M★2 - Play Both Ends |
| Optional | M★1 - All the Wrong Signals |
| Optional | M★2 - The Plight of Paolumu |
| Optional | M★2 - Pink Power Grab |
| Optional | M★2 - Protip: Stay Hydrated |
| Optional | M★2 - Put That Red Cup Away |
| Optional | M★3 - Legiana Left Behind |
| Optional | M★3 - A Nasty Flesh Wound |
| Event | M★2 - Colorful Carnival |
| Arena Quest | ★6 - Arena Quest 4 |
Related Links
All Monster Guides

List of All Base Game Monsters
MHW (Base Game) Monsters
Colored Variants
 Ancient Leshen Ancient Leshen
|
 Azure Rathalos Azure Rathalos
|
 Black Diablos Black Diablos
|
 Pink Rathian Pink Rathian
|
Arch-Tempered Elder Dragons
Monsters by Game
| All Monsters by Game | |
|---|---|
 Iceborne Iceborne |
 Monster Hunter World Monster Hunter World |
Comment
Author
Tzitzi-ya-ku Weakness and Strategy Guide
improvement survey
03/2026
improving Game8's site?

Your answers will help us to improve our website.
Note: Please be sure not to enter any kind of personal information into your response.

We hope you continue to make use of Game8.
Rankings
- We could not find the message board you were looking for.
Gaming News
Popular Games

Genshin Impact Walkthrough & Guides Wiki

Honkai: Star Rail Walkthrough & Guides Wiki

Umamusume: Pretty Derby Walkthrough & Guides Wiki

Pokemon Pokopia Walkthrough & Guides Wiki

Resident Evil Requiem (RE9) Walkthrough & Guides Wiki

Monster Hunter Wilds Walkthrough & Guides Wiki

Wuthering Waves Walkthrough & Guides Wiki

Arknights: Endfield Walkthrough & Guides Wiki

Pokemon FireRed and LeafGreen (FRLG) Walkthrough & Guides Wiki

Pokemon TCG Pocket (PTCGP) Strategies & Guides Wiki
Recommended Games

Diablo 4: Vessel of Hatred Walkthrough & Guides Wiki

Cyberpunk 2077: Ultimate Edition Walkthrough & Guides Wiki

Fire Emblem Heroes (FEH) Walkthrough & Guides Wiki

Yu-Gi-Oh! Master Duel Walkthrough & Guides Wiki

Super Smash Bros. Ultimate Walkthrough & Guides Wiki

Pokemon Brilliant Diamond and Shining Pearl (BDSP) Walkthrough & Guides Wiki

Elden Ring Shadow of the Erdtree Walkthrough & Guides Wiki

Monster Hunter World Walkthrough & Guides Wiki

The Legend of Zelda: Tears of the Kingdom Walkthrough & Guides Wiki

Persona 3 Reload Walkthrough & Guides Wiki
All rights reserved
©CAPCOM CO., LTD. 2018, 2019 ALL RIGHTS RESERVED.
The copyrights of videos of games used in our content and other intellectual property rights belong to the provider of the game.
The contents we provide on this site were created personally by members of the Game8 editorial department.
We refuse the right to reuse or repost content taken without our permission such as data or images to other sites.
 Anjanath
 Barroth
 Bazelgeuse
 Behemoth
 Deviljho
 Diablos
 Dodogama
 Great Girros
 Great Jagras
 Jyuratodus
 Kirin
Kirin Kulu-Ya-Ku
 Kulve Taroth
 Kushala Daora
 Lavasioth
 Legiana
 Leshen
 Lunastra
 Nergigante
 Odogaron
 Paolumu
 Pukei-Pukei
 Radobaan
 Rathalos
 Rathian
 Teostra
 Tobi-Kadachi
 Tzitzi-Ya-Ku
 Uragaan
 Vaal Hazak
 Xeno'jiiva
 Zorah Magdaros
 Arch-Tempered Great Jagras
 Arch-Tempered Kirin
 Arch-Tempered Kulve Taroth
 Arch-Tempered Kushala Daora
 Arch-Tempered Lunastra
 Arch-Tempered Nergigante
 Arch-Tempered Teostra
 Arch-Tempered Vaal Hazak
 Arch-Tempered Xeno'jiiva
 Arch-Tempered Zorah Magdaros


![Monster Hunter Stories 3 Review [First Impressions] | Simply Rejuvenating](https://img.game8.co/4438641/2a31b7702bd70e78ec8efd24661dacda.jpeg/thumb)


