Uragaan Weakness and Strategy Guide
★ 2025/2/28: Monster Hunter Wilds is now available!
Join the hunt at our Monster Hunter Wilds Wiki!
Learn how to beat Uragaan in the game Monster Hunter World (MHW)! This guide explains everything about Uragaan's weakness, carves, rewards, and a complete strategy guide for beating and capturing it. Find out what parts are breakable and severable, and what drops and Monster materials are available.
| All Uragaan Articles | ||
|---|---|---|
|
|
⍺ | β | ⍺+ | β+ |
|
List of Contents
Uragaan Weakness, Body Parts, and Resistances
Uragaan Characteristics
 |
|||||
| Roar | Wind | Tremor | Blight | Status | |
|---|---|---|---|---|---|
| Small | None | Big | Fire | Sleep | |
| Breakable Parts | |||||
| Head, Torso, Tail | |||||
Locations and Areas Visited
| Map | Starting Area | Visited Areas | Rest Spot |
|---|---|---|---|
 Elder's Recess Elder's Recess
|
2 | 2 / 3 / 5 / 7 / 8 / 9 / 11 / 12 | 6 |
*The starting location may change depending on the Quest.
Weakness, Body Parts, Extracts
Head
| Sever | Break | Bomb | Fire | Extract |
|---|---|---|---|---|
| 60 | 65 | 45 | 0 | Red |
| Water | Thunder | Ice | Dragon | |
| 20 | 15 | 15 | 20 |
Jaw
| Sever | Break | Bomb | Fire | Extract |
|---|---|---|---|---|
| 18 | 19 | 10 | 0 | Red |
| Water | Thunder | Ice | Dragon | |
| 40 | 5 | 20 | 30 |
Jaw [Broken]
| Sever | Break | Bomb | Fire | Extract |
|---|---|---|---|---|
| 55 | 60 | 40 | 0 | Red |
| Water | Thunder | Ice | Dragon | |
| 20 | 5 | 15 | 20 |
Upper Neck
| Sever | Break | Bomb | Fire | Extract |
|---|---|---|---|---|
| 22 | 24 | 10 | 0 | Red |
| Water | Thunder | Ice | Dragon | |
| 15 | 0 | 10 | 15 |
Lower Neck
| Sever | Break | Bomb | Fire | Extract |
|---|---|---|---|---|
| 25 | 30 | 15 | 0 | Red |
| Water | Thunder | Ice | Dragon | |
| 20 | 0 | 10 | 15 |
Stomach
| Sever | Break | Bomb | Fire | Extract |
|---|---|---|---|---|
| 50 | 45 | 45 | 0 | Orange |
| Water | Thunder | Ice | Dragon | |
| 30 | 5 | 15 | 30 |
Back
| Sever | Break | Bomb | Fire | Extract |
|---|---|---|---|---|
| 20 | 24 | 15 | 0 | Orange |
| Water | Thunder | Ice | Dragon | |
| 15 | 0 | 10 | 15 |
Hindlegs
| Sever | Break | Bomb | Fire | Extract |
|---|---|---|---|---|
| 25 | 30 | 20 | 0 | Orange |
| Water | Thunder | Ice | Dragon | |
| 15 | 0 | 10 | 15 |
Forelegs
| Sever | Break | Bomb | Fire | Extract |
|---|---|---|---|---|
| 43 | 37 | 20 | 0 | White |
| Water | Thunder | Ice | Dragon | |
| 15 | 0 | 10 | 15 |
Upper Tail
| Sever | Break | Bomb | Fire | Extract |
|---|---|---|---|---|
| 25 | 25 | 15 | 0 | Green |
| Water | Thunder | Ice | Dragon | |
| 15 | 0 | 10 | 15 |
Lower Tail
| Sever | Break | Bomb | Fire | Extract |
|---|---|---|---|---|
| 35 | 30 | 35 | 0 | Green |
| Water | Thunder | Ice | Dragon | |
| 35 | 5 | 10 | 20 |
Tail Tip
| Sever | Break | Bomb | Fire | Extract |
|---|---|---|---|---|
| 25 | 25 | 15 | 0 | Green |
| Water | Thunder | Ice | Dragon | |
| 35 | 0 | 15 | 25 |
Higher values indicate higher damage.
Vulnerability to Status Effects and Items
| Poison | ★★★ | Flash | ★★ |
|---|---|---|---|
| Paral | ★★ | Shock | ★★ |
| Sleep | ★ | Pitfall | ★★ |
| Stun | ★★★ | Ivy | ★★ |
| Blast | ★★ | Dung | ★★ |
| Exhaust | ★ | Meat | ❌ |
| Mount | ★ | Screamer | ❌ |
Countermeasures against Uragaan
Recommended Weapon Element and Armor Skills
| Recommended Weapon Element | |
|---|---|
| Water Weapon | Uragaan is weakest against water. |
| Recommended Armor Skills | |
| Tremor Resistance | Uragaan can cause tremor quite often with his chin slam. If you find yourself getting caught by this, try getting Tremor Resistance Lvl 3. |
| Sleep Resistance | If you find Uragaan's sleep gas annoying, you can just get your Sleep Resistance skill to Lvl 3. |
| Fire Resistance | Same goes for his flame gas when he's enraged. Keep in mind that fire resistance only mitigates some fire damage, but does not negate Fireblight. |
| Partbreaker | Since breaking Uragaan's chin will make it much weaker, you might want to invest in the Partbreaker skill. |
| Clutch Claw Boost | You can also just keep the chin tender before you lay damage into it. |
How to Beat Uragaan
Chin Slam and Ground Tremors
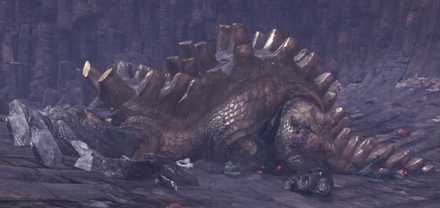
Uragaan has a slow attack where he raises his head and then slams it into the ground. This attack is very powerful and it can cause ground tremors which will stop you from moving. Be sure to keep your distance as soon as he raises his head to avoid this attack or getting caught by the ground tremors.
Aim for the Head
One of the toughest parts of Uragaan is his chin. However, if you manage to break this part, he will be significantly weaker than usual. It is best that you focus on this part and use Large Barrel Bombs for some damage.
Play as safely as possible when you are focusing the head since most of Uragaan's most powerful attack is his chin slam, he will often use this if you focus on this part of his head.
Different Types of Gas
| Normal | Enraged |
|---|---|
 |
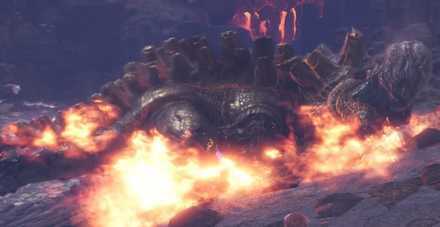 |
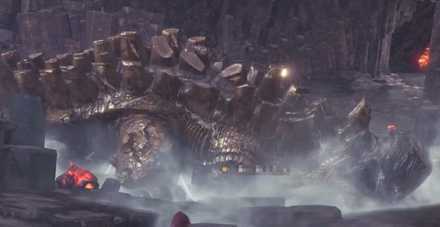
Uragaan can release two different types of gas when he crouches. One is a sleeping gas that he occasionally uses during his normal state and the other is a flame gas that is only used when he is enraged. Try to keep your distance when he is enraged since the flame gas can deal massive damage if you get caught within its range.
Explosive Rocks
Beware of the explosive red glowing rocks that Uragaan scatters during the hunt. These rocks will explode after a few seconds or if they are hit by the tremors caused by Uragaan. Be wary of your positioning and keep on checking the ground for any rocks that can explode near you.
Tired Uragaan
Uragaan will always fall after he performs a rolling attack. When he is tired, these rolling attacks will slow down and becomes easier to avoid. Use this an opportunity to attack with your party and deal as much damage as you can.
Uragaan Attack Patterns
| Attack | Attack Power | Guardable | Exhaustion |
|---|---|---|---|
| Chin Slam | 40 | ◯ | 10 |
| Continuous Chin Slam | 70 | ◯ | 50 |
| Bite | 100 | ◯ | 80 |
| Rolling Attack | 80 | ◯ | 60 |
| Tail Attack | 60 | ◯ | 30 |
| Rock Projectiles | 70 | ◯ | 40 |
| Body Slam | 50 | ◯ | 30 |
| Flame Gas | 80 | Guard Up | 0 |
Uragaan Carves and Rewards
Carvings and Hunt Rewards
| Obtain Rate (%) | |
|---|---|
| HR |
Uragaan Scale+
/ Body 37 Uragaan Carapace / Body 25 Uragaan Scute / Body 21, Tail 72 Uragaan Ruby / Body 2, Tail 3 Uragaan Marrow / Body 15, Tail 25 |
| MR |
Lava Nugget
/ Mining, While downed 60 Eltalite Ore / Mining, While downed 27 Purecrystal / Mining, While downed 13 Uragaan Ruby / Body 5, Tail 7 Uragaan Shard / Body 36 Uragaan Cortex / Body 24, Tail 30 Uragaan Scute+ / Body 20, Tail 60 Uragaan Pallium / Body 2, Tail 3 Uragaan Marrow / Body 13 |
Rewards for Each Body Part
| Obtain Rate (%) | |
|---|---|
| HR |
Uragaan Scale+
/ Tail 70 Uragaan Jaw / Head 72 Firecell Stone / Head 27 Uragaan Ruby / Head 1 Uragaan Scute / Back 70, Tail 30 Uragaan Marrow / Back 30 |
| MR |
Uragaan Scute+
/ Torso 70, Tail 30 Uragaan Marrow / Torso 30 Uragaan Shard / Tail 70 Uragaan Jaw+ / Head 72 Uragaan Cortex / Head 27 Uragaan Pallium / Head 1 |
Shiny Drops
| Obtain Rate (%) | |
|---|---|
| HR Drops |
Uragaan Scale+
/ 42 Uragaan Carapace / 34 Lava Nugget / 23 Uragaan Ruby / 1 |
| MR Drops |
Lava Nugget
/ 50 Uragaan Shard / 28 Large Wyvern Tear / 22 |
Quest Clear & Investigation Rewards
| Obtain Rate (%) | |
|---|---|
| HR Quest |
Coming soon! |
| HR Silver |
Uragaan Ruby
/ 6 Uragaan Scute / 26 Uragaan Marrow / 19 Lava Nugget / 14 Firecell Stone / 13 Uragaan Carapace / 12 Uragaan Scale+ / 10 |
| HR Gold |
Uragaan Scale+
/ 8 Lava Nugget / 8 Uragaan Scute / 24 Uragaan Marrow / 21 Firecell Stone / 16 Uragaan Ruby / 13 Uragaan Carapace / 10 |
| MR Quest |
Uragaan Marrow
/ 8 Uragaan Cortex / 30 Uragaan Ruby / 3 Uragaan Shard / 23 Conflagrant Sac / 21 Uragaan Scute+ / 15 |
| MR Silver |
Uragaan Scute+
/ 24 Uragaan Cortex / 15 Lava Nugget / 14 Conflagrant Sac / 13 Uragaan Shard / 12 Uragaan Ruby / 10 Uragaan Pallium / 10 |
| MR Gold |
Lava Nugget
/ 8 Uragaan Scute+ / 24 Uragaan Pallium / 18 Conflagrant Sac / 16 Uragaan Cortex / 13 Uragaan Shard / 11 Uragaan Ruby / 10 |
Plunderblade Rewards
Plunderblade
| Obtain Rate (%) | |
|---|---|
| HR |
Uragaan Scale+
/ 42 Uragaan Carapace / 34 Lava Nugget / 23 Uragaan Ruby / 1 |
| MR |
Uragaan Shard
/ 42 Uragaan Cortex / 34 Lava Nugget / 23 Uragaan Pallium / 1 |
Quests Where Uragaan Appears
| Type | Quest Name |
|---|---|
| Optional | ★7 - A Fiery Convergence |
| Optional | ★7 - Ore-eating Occupier |
| Optional | ★7 - Special Arena: HR Uragaan |
| Challenge | ★9 - Challenge Quest 1: Expert |
| Event | ★7 - Rollin' With The Uragaan |
| Event | ★7 - Rock N' Roll Recess |
| Assigned | M★3 - A Smashing Cross Counter |
| Optional | M★1 - Can't Bring Yourself To It |
| Optional | M★1 - This Here's Big Horn Country! |
| Optional | M★2 - Looking For That Glimmer |
| Optional | M★3 - Everyone's a Critic |
| Optional | M★3 - Begone Uragaan |
| Optional | M★3 - Secret of the Ooze |
| Optional | M★3 - Festival of Explosions! |
| Optional | M★3 - Special Arena: MR Uragaan |
| Optional | M★4 - Trap the Thunder Jaw |
| Event | M★3 - Fired-Up Bruisers |
| Event | M★6 - Alt Rock Recess |
| Arena Quest | ★8 - Arena Quest 8 |
Related Links
All Monster Guides

List of All Base Game Monsters
MHW (Base Game) Monsters
Colored Variants
 Ancient Leshen Ancient Leshen
|
 Azure Rathalos Azure Rathalos
|
 Black Diablos Black Diablos
|
 Pink Rathian Pink Rathian
|
Arch-Tempered Elder Dragons
Monsters by Game
| All Monsters by Game | |
|---|---|
 Iceborne Iceborne |
 Monster Hunter World Monster Hunter World |
Comment
Author
Uragaan Weakness and Strategy Guide
improvement survey
03/2026
improving Game8's site?

Your answers will help us to improve our website.
Note: Please be sure not to enter any kind of personal information into your response.

We hope you continue to make use of Game8.
Rankings
- We could not find the message board you were looking for.
Gaming News
Popular Games

Genshin Impact Walkthrough & Guides Wiki

Honkai: Star Rail Walkthrough & Guides Wiki

Umamusume: Pretty Derby Walkthrough & Guides Wiki

Pokemon Pokopia Walkthrough & Guides Wiki

Resident Evil Requiem (RE9) Walkthrough & Guides Wiki

Monster Hunter Wilds Walkthrough & Guides Wiki

Wuthering Waves Walkthrough & Guides Wiki

Arknights: Endfield Walkthrough & Guides Wiki

Pokemon FireRed and LeafGreen (FRLG) Walkthrough & Guides Wiki

Pokemon TCG Pocket (PTCGP) Strategies & Guides Wiki
Recommended Games

Diablo 4: Vessel of Hatred Walkthrough & Guides Wiki

Cyberpunk 2077: Ultimate Edition Walkthrough & Guides Wiki

Fire Emblem Heroes (FEH) Walkthrough & Guides Wiki

Yu-Gi-Oh! Master Duel Walkthrough & Guides Wiki

Super Smash Bros. Ultimate Walkthrough & Guides Wiki

Pokemon Brilliant Diamond and Shining Pearl (BDSP) Walkthrough & Guides Wiki

Elden Ring Shadow of the Erdtree Walkthrough & Guides Wiki

Monster Hunter World Walkthrough & Guides Wiki

The Legend of Zelda: Tears of the Kingdom Walkthrough & Guides Wiki

Persona 3 Reload Walkthrough & Guides Wiki
All rights reserved
©CAPCOM CO., LTD. 2018, 2019 ALL RIGHTS RESERVED.
The copyrights of videos of games used in our content and other intellectual property rights belong to the provider of the game.
The contents we provide on this site were created personally by members of the Game8 editorial department.
We refuse the right to reuse or repost content taken without our permission such as data or images to other sites.
 Anjanath
 Barroth
 Bazelgeuse
 Behemoth
 Deviljho
 Diablos
 Dodogama
 Great Girros
 Great Jagras
 Jyuratodus
 Kirin
Kirin Kulu-Ya-Ku
 Kulve Taroth
 Kushala Daora
 Lavasioth
 Legiana
 Leshen
 Lunastra
 Nergigante
 Odogaron
 Paolumu
 Pukei-Pukei
 Radobaan
 Rathalos
 Rathian
 Teostra
 Tobi-Kadachi
 Tzitzi-Ya-Ku
 Uragaan
 Vaal Hazak
 Xeno'jiiva
 Zorah Magdaros
 Arch-Tempered Great Jagras
 Arch-Tempered Kirin
 Arch-Tempered Kulve Taroth
 Arch-Tempered Kushala Daora
 Arch-Tempered Lunastra
 Arch-Tempered Nergigante
 Arch-Tempered Teostra
 Arch-Tempered Vaal Hazak
 Arch-Tempered Xeno'jiiva
 Arch-Tempered Zorah Magdaros


![Monster Hunter Stories 3 Review [First Impressions] | Simply Rejuvenating](https://img.game8.co/4438641/2a31b7702bd70e78ec8efd24661dacda.jpeg/thumb)


