Radobaan Weakness and Strategy Guide
★ 2025/2/28: Monster Hunter Wilds is now available!
Join the hunt at our Monster Hunter Wilds Wiki!
Learn how to beat Radobaan in the game Monster Hunter World (MHW)! This guide explains everything about Radobaan's weakness, carves, rewards, and a complete strategy guide for beating and capturing it. Find out what parts are breakable and severable, and what drops and Monster materials are available.
| All Radobaan Articles | ||
|---|---|---|
|
|
1 | ⍺ | β | ⍺+ | β+ |
|
List of Contents
Radobaan Weakness, Body Parts, and Resistances
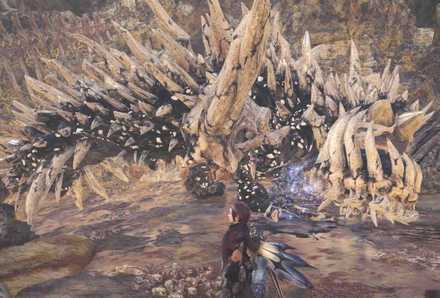
Radobaan Characteristics
 |
|||||
| Roar | Wind | Tremor | Blight | Status | |
|---|---|---|---|---|---|
| Small | None | Small | None | None | |
| Breakable Parts | |||||
| Head, Head Bone, Back, Backbone, Left Leg, Left Legbone, Right Leg, Right Legbone, Tail | |||||
Locations and Areas Visited
| Map | Starting Area | Visited Areas | Rest Spot |
|---|---|---|---|
 Rotten Vale Rotten Vale
|
1 | 1 / 2 / 3 / 4 | 2 |
*The starting location may change depending on the Quest.
Weakness, Body Parts, Extracts
Head
| Sever | Break | Bomb | Fire | Extract |
|---|---|---|---|---|
| 60 | 65 | 45 | 20 | Red |
| Water | Thunder | Ice | Dragon | |
| 20 | 20 | 20 | 30 |
Head Bone
| Sever | Break | Bomb | Fire | Extract |
|---|---|---|---|---|
| 21 | 23 | 15 | 0 | Red |
| Water | Thunder | Ice | Dragon | |
| 0 | 0 | 0 | 0 |
Torso
| Sever | Break | Bomb | Fire | Extract |
|---|---|---|---|---|
| 45 | 50 | 30 | 10 | Orange |
| Water | Thunder | Ice | Dragon | |
| 10 | 10 | 15 | 20 |
Stomach Bone
| Sever | Break | Bomb | Fire | Extract |
|---|---|---|---|---|
| 20 | 25 | 15 | 0 | White |
| Water | Thunder | Ice | Dragon | |
| 0 | 0 | 0 | 0 |
Legs
| Sever | Break | Bomb | Fire | Extract |
|---|---|---|---|---|
| 55 | 45 | 40 | 10 | White |
| Water | Thunder | Ice | Dragon | |
| 10 | 10 | 10 | 15 |
Leg Bone
| Sever | Break | Bomb | Fire | Extract |
|---|---|---|---|---|
| 20 | 25 | 15 | 0 | White |
| Water | Thunder | Ice | Dragon | |
| 0 | 0 | 0 | 0 |
Higher values indicate higher damage.
Vulnerability to Status Effects and Items
| Poison | ★★ | Flash | ★★ |
|---|---|---|---|
| Paral | ★★ | Shock | ★★ |
| Sleep | ★ | Pitfall | ★★ |
| Stun | ★★ | Ivy | ★★ |
| Blast | ★★★ | Dung | ★★ |
| Exhaust | ★ | Meat | ❌ |
| Mount | ★ | Screamer | ❌ |
Countermeasures against Radobaan
Recommended Weapon Element and Armor Skills
| Recommended Weapon Element | |
|---|---|
| Dragon Weapon | Radobaan is weakest against dragon. |
| Blast Weapon | Radobaan is also weak against blast, so if you have a stronger weapon that can inflict Blastblight, it is okay to use that as well. |
| Recommended Armor Skills | |
| Mind's Eye/Ballistics | Rabobaan's bone armor will sometimes make your weapons bounce off; get Mind's Eye/Ballistics to solve this problem. |
| Tremor Resistance | Radobaan can incapacitate you through tremors with his huge jaw attack! Repel the tremors altogether with Tremor Resistance Lvl 3. |
| Sleep Resistance | Radobaan can make you sleep! Prevent sleeping by getting Sleep Resistance to Lvl 3. |
| Earplugs | Radobaan has a small roar, so Earplugs Lvl 3 should suffice. |
| Clutch Claw Boost | It might be useful to tenderize the tougher parts of Radobaan to get rid of his bone armor faster. |
How to Beat Radobaan
Destroy the Bones
| Normal | Destroyed |
|---|---|
 |
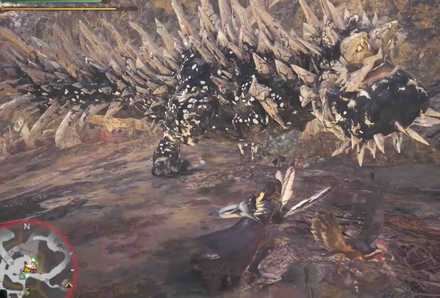 |
Radobaan is a unique monster that covers himself with a bone armor to make his body harder. You can destroy these bones by constantly attacking them with your main weapon. Once the bones are broken, that specific body part will be more vulnerable to your attacks.
Tripping Radobaan
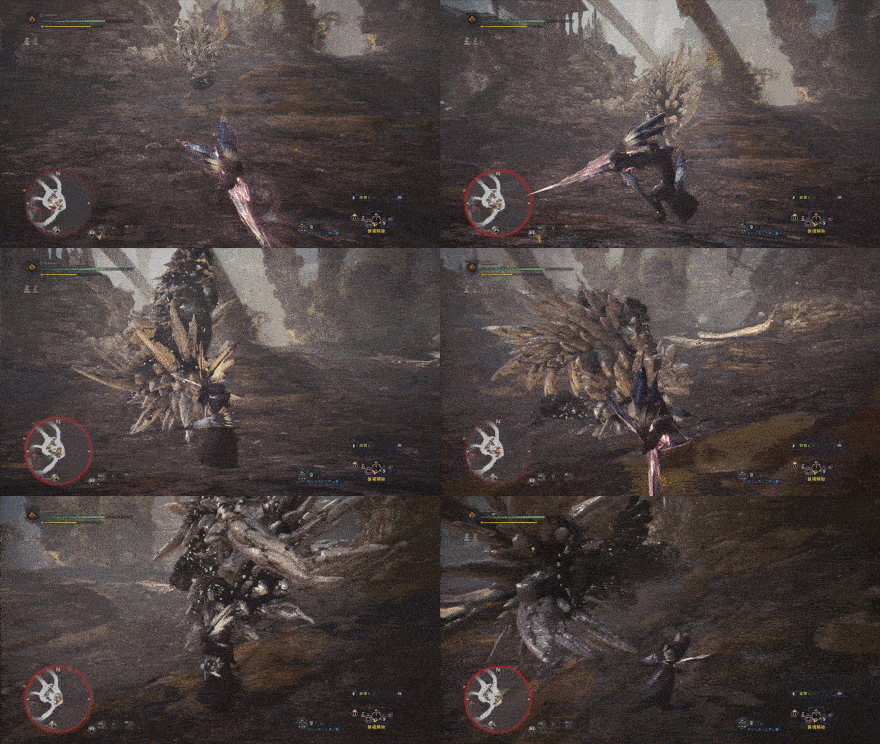
You can trip Radobaan if you manage to deal some damage while he is performing his rolling attack. This will down him for a few seconds allowing you and your party to attack with your best combos.
Radobaan Tremors
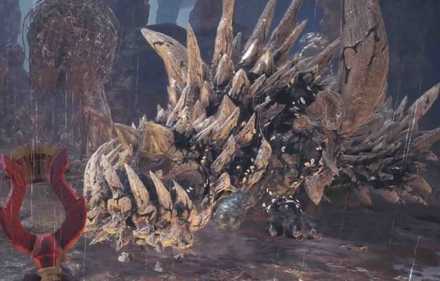
Radobaan has a slow attack where he raises his head before slamming his jaws on to the ground. This attack is extremely powerful and it can stop your movements due to tremors if you are nearby. Be sure to keep your distance when you see Radobaan prepare for this attack to avoid any damage.
Radobaan Attack Patterns
| Attack | Attack Power | Guardable | Exhaustion |
|---|---|---|---|
| Forward Bite | 30 | ◯ | 20 |
| Jaw Swing Attack | 50 | ◯ | 40 |
| Bite | 80 | ◯ | 50 |
| Jump Attack | 65 | ◯ | 60 |
| Rolling Attack | 60 | ◯ | 50 |
| Bodyslam | 50 | ◯ | 40 |
| Curl | 20 | ◯ | 20 |
| Tail Attack | 50 | ◯ | 50 |
Radobaan Carves and Rewards
Carvings and Hunt Rewards
| Obtain Rate (%) | |
|---|---|
| LR |
Radobaan Scale
/ Body 38 Radobaan Shell / Body 28 Radobaan Oilshell / Body 20, Tail 72 Radobaan Marrow / Body 14, Tail 28 |
| HR |
Radobaan Scale+
/ Body 36 Radobaan Carapace / Body 28 Radobaan Oilshell / Body 20, Tail 72 Wyvern Gem / Body 2, Tail 3 Radobaan Medulla / Body 14, Tail 25 |
| MR |
Wyvern Gem
/ Body 5 Radobaan Shard / Body 34 Radobaan Cortex / Body 26 Large Wyvern Gem / Body 2, Tail 3 Radobaan Oilshell+ / Body 19, Tail 72 Radobaan Medulla / Body 14, Tail 25 |
Rewards for Each Body Part
| Obtain Rate (%) | |
|---|---|
| LR |
Wyvern Bonemass
/ Hindlegs 70, Back 50 Radobaan Scale / Hindlegs 30 Radobaan Oilshell / Head 70, Back 35 Radobaan Marrow / Head 30, Back 15 |
| HR |
Radobaan Oilshell
/ Head 68, Back 35 Radobaan Medulla / Head 30, Back 15 Wyvern Gem / Head 2 Wyvern Bonemass / Both Legs 64, Back 50 Radobaan Scale+ / Both Legs 36 Wyvern Gem / Head 2 |
| MR |
Large Wyvern Bonemass
/ Torso 70, Legs 50 Radobaan Shard / Torso 30 Radobaan Oilshell+ / Head 68, Legs 35 Radobaan Medulla / Head 30, Legs 15 Large Wyvern Gem / Head 2 |
Shiny Drops
| Obtain Rate (%) | |
|---|---|
| LR Drops |
Radobaan Scale
/ 50 Wyvern Bonemass / 28 Wyvern Tear / 22 |
| HR Drops |
Radobaan Scale+
/ 50 Wyvern Bonemass / 28 Wyvern Tear / 22 |
| MR Drops |
Large Wyvern Bonemass
/ 50 Radobaan Shard / 28 Large Wyvern Tear / 22 |
Quest Clear & Investigation Rewards
Plunderblade Rewards
Plunderblade
| Obtain Rate (%) | |
|---|---|
| LR |
Radobaan Scale
/ 42 Radobaan Shell / 31 Wyvern Bonemass / 27 |
| HR |
Radobaan Scale+
/ 42 Radobaan Carapace / 31 Wyvern Bonemass / 25 Wyvern Gem / 2 |
| MR |
Radobaan Shard
/ 42 Radobaan Cortex / 31 Large Wyvern Bonemass / 25 Large Wyvern Gem / 2 |
Palarang
| Obtain Rate (%) | |
|---|---|
| MR |
Large Wyvern Bonemass
/ 50 Radobaan Shard / 28 Large Wyvern Tear / 22 |
Quests Where Radobaan Appears
| Type | Quest Name |
|---|---|
| Assigned | ★4 - Radobaan Roadblock |
| Assigned | ★5 - Into The Bowels of The Vale |
| Optional | ★4 - A Rotten Thing To Do |
| Optional | ★4 - A Bone To Pick |
| Optional | ★4 - Special Arena: Radobaan |
| Optional | ★5 - Scratching The Itch |
| Optional | ★5 - Man's Best Friend |
| Optional | ★6 - A Tingling Taste |
| Optional | ★6 - Stuck in a Rut |
| Optional | ★6 - Chef Quest! Pumped to Deliver |
| Optional | ★6 - Special Arena: HR Radobaan |
| Optional | ★9 - Showdown: the Muck and the Maul |
| Event | ★5 - Flesh Cleaved to Bone |
| Event | ★7 - Effluvial Opera |
| Assigned | M★3 - Absolute Power |
| Optional | M★1 - Grinding My Girros |
| Optional | M★2 - No Laughing Matter |
| Optional | M★2 - Bugger Off Bugs! |
| Optional | M★2 - Special Arena: MR Radobaan |
| Optional | M★3 - Don't be a Jerk with the Jerky |
| Optional | M★3 - Runnin', Rollin', and Weepin' |
| Optional | M★4 - The Purr-fect Room: Dark Iron |
| Event | M★2 - Hunter-Blunderer |
| Arena Quest | ★8 - Arena Quest 8 |
Related Links
All Monster Guides

List of All Base Game Monsters
MHW (Base Game) Monsters
Colored Variants
 Ancient Leshen Ancient Leshen
|
 Azure Rathalos Azure Rathalos
|
 Black Diablos Black Diablos
|
 Pink Rathian Pink Rathian
|
Arch-Tempered Elder Dragons
Monsters by Game
| All Monsters by Game | |
|---|---|
 Iceborne Iceborne |
 Monster Hunter World Monster Hunter World |
Comment
Author
Radobaan Weakness and Strategy Guide
improvement survey
03/2026
improving Game8's site?

Your answers will help us to improve our website.
Note: Please be sure not to enter any kind of personal information into your response.

We hope you continue to make use of Game8.
Rankings
- We could not find the message board you were looking for.
Gaming News
Popular Games

Genshin Impact Walkthrough & Guides Wiki

Honkai: Star Rail Walkthrough & Guides Wiki

Umamusume: Pretty Derby Walkthrough & Guides Wiki

Pokemon Pokopia Walkthrough & Guides Wiki

Resident Evil Requiem (RE9) Walkthrough & Guides Wiki

Monster Hunter Wilds Walkthrough & Guides Wiki

Wuthering Waves Walkthrough & Guides Wiki

Arknights: Endfield Walkthrough & Guides Wiki

Pokemon FireRed and LeafGreen (FRLG) Walkthrough & Guides Wiki

Pokemon TCG Pocket (PTCGP) Strategies & Guides Wiki
Recommended Games

Diablo 4: Vessel of Hatred Walkthrough & Guides Wiki

Fire Emblem Heroes (FEH) Walkthrough & Guides Wiki

Yu-Gi-Oh! Master Duel Walkthrough & Guides Wiki

Super Smash Bros. Ultimate Walkthrough & Guides Wiki

Pokemon Brilliant Diamond and Shining Pearl (BDSP) Walkthrough & Guides Wiki

Elden Ring Shadow of the Erdtree Walkthrough & Guides Wiki

Monster Hunter World Walkthrough & Guides Wiki

The Legend of Zelda: Tears of the Kingdom Walkthrough & Guides Wiki

Persona 3 Reload Walkthrough & Guides Wiki

Cyberpunk 2077: Ultimate Edition Walkthrough & Guides Wiki
All rights reserved
©CAPCOM CO., LTD. 2018, 2019 ALL RIGHTS RESERVED.
The copyrights of videos of games used in our content and other intellectual property rights belong to the provider of the game.
The contents we provide on this site were created personally by members of the Game8 editorial department.
We refuse the right to reuse or repost content taken without our permission such as data or images to other sites.
 Anjanath
 Barroth
 Bazelgeuse
 Behemoth
 Deviljho
 Diablos
 Dodogama
 Great Girros
 Great Jagras
 Jyuratodus
 Kirin
Kirin Kulu-Ya-Ku
 Kulve Taroth
 Kushala Daora
 Lavasioth
 Legiana
 Leshen
 Lunastra
 Nergigante
 Odogaron
 Paolumu
 Pukei-Pukei
 Radobaan
 Rathalos
 Rathian
 Teostra
 Tobi-Kadachi
 Tzitzi-Ya-Ku
 Uragaan
 Vaal Hazak
 Xeno'jiiva
 Zorah Magdaros
 Arch-Tempered Great Jagras
 Arch-Tempered Kirin
 Arch-Tempered Kulve Taroth
 Arch-Tempered Kushala Daora
 Arch-Tempered Lunastra
 Arch-Tempered Nergigante
 Arch-Tempered Teostra
 Arch-Tempered Vaal Hazak
 Arch-Tempered Xeno'jiiva
 Arch-Tempered Zorah Magdaros


![Everwind Review [Early Access] | The Shaky First Step to A Very Long Journey](https://img.game8.co/4440226/ab079b1153298a042633dd1ef51e878e.png/thumb)

![Monster Hunter Stories 3 Review [First Impressions] | Simply Rejuvenating](https://img.game8.co/4438641/2a31b7702bd70e78ec8efd24661dacda.jpeg/thumb)


