Arch-Tempered Vaal Hazak Weakness and Strategy Guide
★ 2025/2/28: Monster Hunter Wilds is now available!
Join the hunt at our Monster Hunter Wilds Wiki!
Learn how to beat Arch-Tempered Vaal Hazak in the game Monster Hunter World (MHW)! This guide explains everything about Arch-Tempered Vaal Hazak's weakness, carves, rewards, and a complete strategy guide for beating and capturing it. Find out what parts are breakable and severable, and what drops and Monster materials are available.
| All Vaal Hazak Articles | ||
|---|---|---|
|
|
⍺ | β |
|
List of Contents
Arch-Tempered Vaal Hazak Weakness, Body Parts, and Resistances
Arch-Tempered Vaal Hazak Characteristics
 |
|||||
| Roar | Wind | Tremor | Blight | Status | |
|---|---|---|---|---|---|
| Big | Low | None | None | Effluvial Buildup | |
| Breakable Parts | |||||
| Head, Torso, Left Foreleg, Right Foreleg, Tail | |||||
Locations and Areas Visited
| Map | Starting Area | Visited Areas | Rest Spot |
|---|---|---|---|
 Rotten Vale Rotten Vale
|
8 | 9 / 10 / 12 / 14 | 16 |
*The starting location may change depending on the Quest.
Weakness, Body Parts, Extracts
Head
| Sever | Break | Bomb | Fire | Extract |
|---|---|---|---|---|
| 50 | 40 | 50 | 25 | Red |
| Water | Thunder | Ice | Dragon | |
| 5 | 10 | 15 | 0 |
Head [Broken]
| Sever | Break | Bomb | Fire | Extract |
|---|---|---|---|---|
| 70 | 80 | 60 | 25 | Red |
| Water | Thunder | Ice | Dragon | |
| 5 | 10 | 15 | 25 |
Neck
| Sever | Break | Bomb | Fire | Extract |
|---|---|---|---|---|
| 45 | 40 | 30 | 15 | Red |
| Water | Thunder | Ice | Dragon | |
| 5 | 10 | 10 | 15 |
Chest
| Sever | Break | Bomb | Fire | Extract |
|---|---|---|---|---|
| 50 | 45 | 45 | 15 | Orange |
| Water | Thunder | Ice | Dragon | |
| 5 | 10 | 15 | 15 |
Stomach
| Sever | Break | Bomb | Fire | Extract |
|---|---|---|---|---|
| 50 | 40 | 45 | 20 | Orange |
| Water | Thunder | Ice | Dragon | |
| 5 | 10 | 15 | 0 |
Stomach [Broken]
| Sever | Break | Bomb | Fire | Extract |
|---|---|---|---|---|
| 60 | 70 | 40 | 20 | Orange |
| Water | Thunder | Ice | Dragon | |
| 5 | 10 | 15 | 25 |
Back
| Sever | Break | Bomb | Fire | Extract |
|---|---|---|---|---|
| 45 | 35 | 35 | 20 | Orange |
| Water | Thunder | Ice | Dragon | |
| 5 | 10 | 15 | 0 |
Back [Broken]
| Sever | Break | Bomb | Fire | Extract |
|---|---|---|---|---|
| 55 | 65 | 40 | 25 | Orange |
| Water | Thunder | Ice | Dragon | |
| 5 | 10 | 15 | 5 |
Forelegs
| Sever | Break | Bomb | Fire | Extract |
|---|---|---|---|---|
| 25 | 25 | 20 | 5 | Orange |
| Water | Thunder | Ice | Dragon | |
| 5 | 0 | 0 | 25 |
Hindlegs
| Sever | Break | Bomb | Fire | Extract |
|---|---|---|---|---|
| 45 | 40 | 35 | 20 | White |
| Water | Thunder | Ice | Dragon | |
| 5 | 5 | 10 | 5 |
Wings
| Sever | Break | Bomb | Fire | Extract |
|---|---|---|---|---|
| 24 | 23 | 30 | 15 | White |
| Water | Thunder | Ice | Dragon | |
| 5 | 10 | 10 | 5 |
Tail
| Sever | Break | Bomb | Fire | Extract |
|---|---|---|---|---|
| 35 | 30 | 30 | 20 | Green |
| Water | Thunder | Ice | Dragon | |
| 5 | 10 | 15 | 15 |
Tail Tip
| Sever | Break | Bomb | Fire | Extract |
|---|---|---|---|---|
| 60 | 30 | 50 | 20 | Green |
| Water | Thunder | Ice | Dragon | |
| 5 | 10 | 15 | 0 |
Higher values indicate higher damage.
Vulnerability to Status Effects and Items
| Poison | ★ | Flash | ★★ |
|---|---|---|---|
| Paral | ★ | Shock | ❌ |
| Sleep | ★ | Pitfall | ❌ |
| Stun | ★★ | Ivy | ❌ |
| Blast | ★★ | Dung | ❌ |
| Exhaust | ❌ | Meat | ❌ |
| Mount | ★ | Screamer | ❌ |
Best Equipment and Items for Arch-Tempered Vaal Hazak
Arch-Tempered Vaal Hazak is no longer a threat in MHW Iceborne. But to be able to fell the Elderdragon in an easier manner, we listed all the necessary tips items, skills, and even sample armor builds to help you out against the Arch-Tempered Elder Dragon.
Best Skills
| Effluvia Resistance | Without this skill, it is possible for you to get carted even with a good MR gear setup. This skill prevents AT Vaal Hazak from halving your max HP. |
|---|---|
| Tool Specialist | This is a great skill to have (much better if the secret is unlocked) to be able to spam those Health Boosters and Temporal Mantles. |
Always wall slam the Daora for free downs, this will also open up opportunities to hit the head resulting in more downs (which we invested more skills for that time window instead of a QOL skill that won't even be used half the fight).
Best Weapons
| Fire Elemental Weapon | Despite having 3 star weakness to both dragon and fire, Dragon actually doesn't work on unbroken parts. Make sure to bring fire weapons if you rely on elemental damage. |
|---|---|
| Weapons with Long Reach | Weapons like the Lance is great against AT Vaal Hazak. It allows you to snipe hard to target parts like the tail with ease. |
Sample Armor Loadout
| Weapon | Decorations | |
|---|---|---|
 Shattering Flames II
|
Sprinter/Expert Jewel 4
Tenderizer Jewel 2 Augment:Recovery |
|
| Armor | Decorations | |
| Head | Silver Solhelm Beta + |
Miasma Jewel+ 4
Shaver Jewel 3 |
| Armor | Silver Solmail Beta + | Sprinter/Expert Jewel 4 |
| Greaves | Silver Solbraces Alpha + |
Sprinter/Expert Jewel 4
Sharp Jewel 2 |
| Waist | Silver Solcoil Beta + |
Blaze Jewel+ 4
Miasma Jewel 1 |
| Legs | Garuga Greaves Beta + |
Expert Jewel+ 4
Tenderizer Jewel 2 x2 |
| Charm | Blaze Charm III | none |
Sample Build Skill List
| Skills | |
|---|---|
| Critical Eye 7 | Fire Attack 5 |
| Windproof 3 | Critical Boost 3 |
| Weakness Exploit 3 | Marathon Runner 3 |
| Slinger Capacity 3 | Effluvia Resistance 3 |
| Protective Polish | Clutch Claw Boost |
 |
This is a modified Critical Silversol Build. We added in some Effluvia Resist to mitigate the Vaal Hazak's Effluvia aura. This will prevent you from losing your HP. The Health Augment will also keep your HP up allowing you to keep the offensive. |
|---|
Best Mantles
| Temporal Mantle | Easy way to dodge its attacks and it also allows you to flinch shot Daora much easier. |
|---|---|
| Health Booster | The most annoying part about fighting Vaal Hazak is its Effluvia. Not only does it halve your HP, it also does a steady amount of DoT. The HP debuff can be countered by Effluvia Resistance but the only way to counter its DoT is to outsustain it. |
Best Items
| Max Potion | Instant full healing. |
|---|---|
| Ancient Potion | More instant full healing. |
| Nulberry | If for somereason, you don't want to run Effluvia Resistance, make sure to at least bring Nulberries with you. A single pop will allow your health to return to its normal state but the HP removed will still need to be recovered. |
Best Felyne and Palico Skills, Weapons, and Gadgets
| Vigorwasp Spray | More healing to counter Vaal Hazak's DoT. |
|---|---|
| Felyne Insurance/Safeguard | More Cart limit. |
| Felyne Moxie | Allows you to survive a single lethal hit. Just make sure that you're away from Velkhana when the attack hits or not in an area with Effluvia or the damage tick will kill you. Not as recommended as Safeguard. |
How to Beat Arch-Tempered Vaal Hazak
| Arch-Tempered Vaal Hazak Tips |
|---|
| ・Effluvia Resistance is essential ・Use the collapsable rocks in the first area ・Avoid using Rocksteady Mantle |
Building Effluvia Resistance
Since Arch-Tempered Vaal Hazak covers himself with effluvia it is highly recommended that you build up your Effluvia Resistance to avoid taking chip damage and reducing your maximum health in half.
However, if you do not have any gears that can build up your Effluvia Resistance, you can rely on using Nullberry to counter any negative effects from the effluvia.
Using the Collapsable Rocks
 |
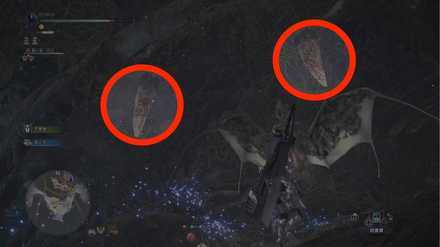 |
There are two collapsable rocks in area 14 that you can utilize to deal massive damage to Arch-Tempered Vaal Hazak. Using these rocks will not only take a huge chunk of Arch-Tempered Vaal Hazak's health but it can also stun him for a few seconds giving you an opportunity to attack.
Using Rocksteady Mantle
Many of Arch-Tempered Vaal Hazak's attacks can hit multiple times and it can instantly kill you if you are wearing a Rocksteady Mantle. Some of Arch-Tempered Vaal Hazak's attacks can hit you multiple times until you cart, it is best to avoid using Rocksteady Mantle since it will prevent you from being blown away after taking the initial hit.
Miasma Breath

Arch-Tempered Vaal Hazak's miasma breath attack can cover the area which can be deadly if you are not wearing any Effluvia Resistance. Be sure to move away from the cloud and only engage when you are sure that it is safe to attack.
Moving to the Sides
Miasma Breath covers a large cone-shaped area in front of Arch-Tempered Vaal Hazak, immediately move to Arch-Tempered Vaal Hazak's sides to keep on attacking and to remain aggressive while avoiding damage from the miasma.
Changing Targets
| ・Attack the Head and the Tail at the beginning of the quest ・You can reduce the amount of miasma around a body part after dealing a certain amount of damage ・Breaking a body part will significantly reduce the amount of miasma in that area ・Amount of miasma increases when Arch-Tempered Vaal Hazak roars or enrages |
Which Part to Focus
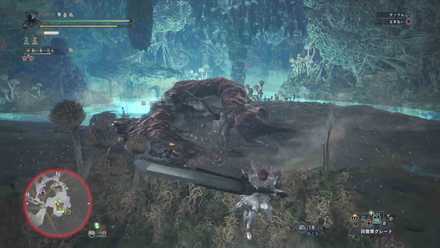
Once you start the hunt, Arch-Tempered Vaal Hazak will cover his whole body with miasma except for the head and the tail. Focus on attacking these parts and destroy them immediately to prevent Arch-Tempered Vaal Hazak from releasing miasma on these parts.
Reducing The Miasma
Dealing a certain amount of damage to a body part will greatly reduce the amount of miasma that Arch-Tempered Vaal Hazak can release. If Arch-Tempered Vaal Hazak manages to cover his head and tail with miasma, it is best that you focus on attacking the legs instead since they are the easiest part that you can reach with most of the melee weapons available.
Changing Patterns
| ・Arch-Tempered Vaal Hazak will only use the enhanced miasma breath when his body is covered with miasma. ・Arch-Tempered Vaal Hazak will move faster with less miasma around his body |
If the amount of miasma that covers Arch-Tempered Vaal Hazak decreases, there is a higher probability that he will perform a quick counter-attack.
Arch-Tempered Vaal Hazak Attack Patterns
| Attack | Attack Power | Guardable | Exhaustion |
|---|---|---|---|
| Forward Bite | 90 | ◯ | 80 |
| Lean Attack | 75 | ◯ | 50 |
| Bite Rush | 70 | ◯ | 80 |
| Headbutt | 60 | ◯ | 30 |
| Swivel Bite | 65 | ◯ | 30 |
| Scratch | 50 | ◯ | 30 |
| Scratch and Bite | 60 | ◯ | 30 |
| Tail Attack and Bite | 60 | ◯ | 30 |
| Rush | 80 | ◯ | 50 |
| Miasma | 0 | X | 0 |
| Miasma Breath | 60 | Guard Up | 30 |
| Enhanced Miasma Breath | 110 | Guard Up | 60 |
| Leaning Miasma Breath | 110 | Guard Up | 60 |
Arch-Tempered Vaal Hazak Carves and Rewards
Carvings and Hunt Rewards
| Obtain Rate (%) | |
|---|---|
| HR |
Vaal Hazak Tail
/ Body 8, Tail 75 Vaal Hazak Fang+ / Body 8 Deceased Scale / Body 32, Tail 22 Vaal Hazak Carapace / Body 24 Vaal Hazak Gem / Body 2, Tail 3 Vaal Hazak Talon / Body 15 Vaal Hazak Wing / Body 11 |
Rewards for Each Body Part
| Obtain Rate (%) | |
|---|---|
| HR |
Vaal Hazak Wing
/ Torso 70 Vaal Hazak Fang+ / Head 66 Vaal Hazak Membrane / Head 32, Torso 30 Vaal Hazak Gem / Head 2 Vaal Hazak Talon / Both Legs 80 Vaal Hazak Carapace / Both Legs 20 |
Shiny Drops
| Obtain Rate (%) | |
|---|---|
| HR Drops |
Vaal Hazak Membrane
/ 50 Deceased Scale / 28 Old Dragon Treasure / 22 |
Quest Clear & Investigation Rewards
| Obtain Rate (%) | |
|---|---|
| HR Quest |
Elder Dragon Bone
/ 8 Vaal Hazak Carapace / 24 Deceased Scale / 19 Vaal Hazak Wing / 14 Vaal Hazak Talon / 13 Elder Dragon Blood / 12 Vaal Hazak Membrane / 10 |
| HR Silver |
Vaal Hazak Gem
/ 6 Vaal Hazak Tail / 4 Vaal Hazak Wing / 17 Vaal Hazak Talon / 16 Vaal Hazak Fang+ / 15 Vaal Hazak Carapace / 12 Deceased Scale / 10 Vaal Hazak Membrane / 10 |
| HR Gold |
Deceased Scale
/ 8 Vaal Hazak Wing / 16 Vaal Hazak Talon / 15 Vaal Hazak Fang+ / 14 Vaal Hazak Tail / 14 Vaal Hazak Gem / 13 Vaal Hazak Carapace / 10 Vaal Hazak Membrane / 10 |
Plunderblade Rewards
Plunderblade
| Obtain Rate (%) | |
|---|---|
| HR |
Deceased Scale
/ 45 Vaal Hazak Carapace / 30 Vaal Hazak Talon / 24 Vaal Hazak Gem / 1 |
Quests Where Arch-Tempered Vaal Hazak Appears
| Type | Quest Name |
|---|---|
| Event | ★9 - The Deathly Quiet Curtain |
Related Links
All Monster Guides

List of All Base Game Monsters
MHW (Base Game) Monsters
Colored Variants
 Ancient Leshen Ancient Leshen
|
 Azure Rathalos Azure Rathalos
|
 Black Diablos Black Diablos
|
 Pink Rathian Pink Rathian
|
Arch-Tempered Elder Dragons
Monsters by Game
| All Monsters by Game | |
|---|---|
 Iceborne Iceborne |
 Monster Hunter World Monster Hunter World |
Comment
Author
Arch-Tempered Vaal Hazak Weakness and Strategy Guide
improvement survey
03/2026
improving Game8's site?

Your answers will help us to improve our website.
Note: Please be sure not to enter any kind of personal information into your response.

We hope you continue to make use of Game8.
Rankings
- We could not find the message board you were looking for.
Gaming News
Popular Games

Genshin Impact Walkthrough & Guides Wiki

Honkai: Star Rail Walkthrough & Guides Wiki

Umamusume: Pretty Derby Walkthrough & Guides Wiki

Pokemon Pokopia Walkthrough & Guides Wiki

Resident Evil Requiem (RE9) Walkthrough & Guides Wiki

Monster Hunter Wilds Walkthrough & Guides Wiki

Wuthering Waves Walkthrough & Guides Wiki

Arknights: Endfield Walkthrough & Guides Wiki

Pokemon FireRed and LeafGreen (FRLG) Walkthrough & Guides Wiki

Pokemon TCG Pocket (PTCGP) Strategies & Guides Wiki
Recommended Games

Diablo 4: Vessel of Hatred Walkthrough & Guides Wiki

Fire Emblem Heroes (FEH) Walkthrough & Guides Wiki

Yu-Gi-Oh! Master Duel Walkthrough & Guides Wiki

Super Smash Bros. Ultimate Walkthrough & Guides Wiki

Pokemon Brilliant Diamond and Shining Pearl (BDSP) Walkthrough & Guides Wiki

Elden Ring Shadow of the Erdtree Walkthrough & Guides Wiki

Monster Hunter World Walkthrough & Guides Wiki

The Legend of Zelda: Tears of the Kingdom Walkthrough & Guides Wiki

Persona 3 Reload Walkthrough & Guides Wiki

Cyberpunk 2077: Ultimate Edition Walkthrough & Guides Wiki
All rights reserved
©CAPCOM CO., LTD. 2018, 2019 ALL RIGHTS RESERVED.
The copyrights of videos of games used in our content and other intellectual property rights belong to the provider of the game.
The contents we provide on this site were created personally by members of the Game8 editorial department.
We refuse the right to reuse or repost content taken without our permission such as data or images to other sites.
 Anjanath
 Barroth
 Bazelgeuse
 Behemoth
 Deviljho
 Diablos
 Dodogama
 Great Girros
 Great Jagras
 Jyuratodus
 Kirin
Kirin Kulu-Ya-Ku
 Kulve Taroth
 Kushala Daora
 Lavasioth
 Legiana
 Leshen
 Lunastra
 Nergigante
 Odogaron
 Paolumu
 Pukei-Pukei
 Radobaan
 Rathalos
 Rathian
 Teostra
 Tobi-Kadachi
 Tzitzi-Ya-Ku
 Uragaan
 Vaal Hazak
 Xeno'jiiva
 Zorah Magdaros
 Arch-Tempered Great Jagras
 Arch-Tempered Kirin
 Arch-Tempered Kulve Taroth
 Arch-Tempered Kushala Daora
 Arch-Tempered Lunastra
 Arch-Tempered Nergigante
 Arch-Tempered Teostra
 Arch-Tempered Vaal Hazak
 Arch-Tempered Xeno'jiiva
 Arch-Tempered Zorah Magdaros


![Everwind Review [Early Access] | The Shaky First Step to A Very Long Journey](https://img.game8.co/4440226/ab079b1153298a042633dd1ef51e878e.png/thumb)

![Monster Hunter Stories 3 Review [First Impressions] | Simply Rejuvenating](https://img.game8.co/4438641/2a31b7702bd70e78ec8efd24661dacda.jpeg/thumb)


