Lunastra Weakness and Strategy Guide
★ 2025/2/28: Monster Hunter Wilds is now available!
Join the hunt at our Monster Hunter Wilds Wiki!
Learn how to beat Lunastra in the game Monster Hunter World (MHW)! This guide explains everything about Lunastra's weakness, carves, rewards, and a complete strategy guide for beating and capturing it. Find out what parts are breakable and severable, and what drops and Monster materials are available.
| All Lunastra Articles | ||
|---|---|---|
|
|
⍺ | β | ⍺+ | β+ |
|
List of Contents
Lunastra Weakness, Body Parts, and Resistances
Lunastra Characteristics
 |
|||||
| Roar | Wind | Tremor | Blight | Status | |
|---|---|---|---|---|---|
| Big | High | None | Fire | Blastblight | |
| Breakable Parts | |||||
| Head, Wings, Tail | |||||
Locations and Areas Visited
| Map | Starting Area | Visited Areas | Rest Spot |
|---|---|---|---|
 Wildspire Waste Wildspire Waste
|
8 | 13 | 14 |
 Elder's Recess Elder's Recess
|
11 | 8 / 9 / 12 | 13 |
*The starting location may change depending on the Quest.
Weakness, Body Parts, Extracts
Head
| Sever | Break | Bomb | Fire | Extract |
|---|---|---|---|---|
| 37 | 60 | 45 | 0 | Red |
| Water | Thunder | Ice | Dragon | |
| 7 | 7 | 30 | 25 |
Neck
| Sever | Break | Bomb | Fire | Extract |
|---|---|---|---|---|
| 33 | 37 | 33 | 0 | Red |
| Water | Thunder | Ice | Dragon | |
| 3 | 3 | 20 | 15 |
Stomach
| Sever | Break | Bomb | Fire | Extract |
|---|---|---|---|---|
| 17 | 17 | 20 | 0 | Orange |
| Water | Thunder | Ice | Dragon | |
| 0 | 0 | 15 | 10 |
Back
| Sever | Break | Bomb | Fire | Extract |
|---|---|---|---|---|
| 17 | 17 | 20 | 0 | Orange |
| Water | Thunder | Ice | Dragon | |
| 0 | 0 | 15 | 10 |
Hindlegs
| Sever | Break | Bomb | Fire | Extract |
|---|---|---|---|---|
| 25 | 30 | 20 | 0 | White |
| Water | Thunder | Ice | Dragon | |
| 3 | 3 | 15 | 10 |
Forelegs
| Sever | Break | Bomb | Fire | Extract |
|---|---|---|---|---|
| 30 | 25 | 20 | 0 | White |
| Water | Thunder | Ice | Dragon | |
| 3 | 3 | 15 | 10 |
Wings
| Sever | Break | Bomb | Fire | Extract |
|---|---|---|---|---|
| 55 | 35 | 40 | 0 | White |
| Water | Thunder | Ice | Dragon | |
| 7 | 7 | 25 | 20 |
Tail
| Sever | Break | Bomb | Fire | Extract |
|---|---|---|---|---|
| 45 | 37 | 50 | 0 | Orange |
| Water | Thunder | Ice | Dragon | |
| 3 | 3 | 20 | 15 |
Higher values indicate higher damage.
Vulnerability to Status Effects and Items
| Poison | ★★ | Flash | ★ |
|---|---|---|---|
| Paral | ★★ | Shock | ❌ |
| Sleep | ★★ | Pitfall | ❌ |
| Stun | ★★ | Ivy | ❌ |
| Blast | ❌ | Dung | ❌ |
| Exhaust | ❌ | Meat | ❌ |
| Mount | ★★ | Screamer | ❌ |
Countermeasures against Lunastra
Recommended Weapon Element and Armor Skills
| Recommended Weapon Element | |
|---|---|
| Ice Weapon | Lunastra is weakest against ice. |
| Water Weapon | Water weapons can also extinguish some of the pools of flame that Lunastra leaves around. Be wary as Lunastra only has a one-star weakness to water; this should only be used if your water weapon is much stronger than your ice weapon. |
| Recommended Armor Skills | |
| Fire Resistance | Like Teostra, Lunastra has a ton of fire attacks, so getting Fire Resistance will be useful. |
| Heat Guard | Heat Guard can help against the continuous damage you get from Teostra's fire armor, as well as the heat in the volcanic areas in Elder's Recess. |
| Windproof | Windproof at Lvl 5 or higher can negate the wind pressure from Lunastra, including Hellflare. |
| Nullify Wind Pressure | Alternatively, the Nullify Wind Pressure armor set bonus from having three pieces of Kushala Daora's armor set is going to be useful against of all of the wind pressure attacks, including Hellflare. |
| Earplugs | Lunastra has a big roar, so getting Earplugs Lvl 5 would be immensely helpful. |
How to Beat Lunastra
Things You Should Know in Advance
・Wind Resistance can be good against Hellflare
・Fire Resistance is strongly recommended
・Use a Cool Drink before initiating the fight
Max Health and Fire Resistance
Most of Lunastra's attacks can be pretty strong. It is recommended that you increase your max health and equip gears with high Fire Resistance to increase your chances of winning the fight.
If you are still having a hard time clearing the hunt, you can also add skills such as Stun Resistance or Evade Window to further increase your survivability.
Wind Pressure From Hellflare
Hellflare has an additional wind pressure effect that can stagger you making it harder for you to get away. You can negate this effect by simply wearing gears that can give you level 5 Windproof or get the armor set bonus Kushala Daora Flight from the Kushala set piece.
Cool Drink and Extreme Heat
You will constantly take damage from the environment due to the extreme heat. Prevent this by using a Cool Drink before entering areas with extreme heat.
Avoid Using Flash Pods
Using a Flash Pod will only anger Lunastra even more and has a chance to make Lunastra perform the Hellflare attack. This can be useful if you are playing solo. However, if you are playing in multiplayer, it might be better to not use Flash Pods at all since it can endanger other hunters in your party.
Use Elderseal Weapons
| Normal | Blue Flame |
|---|---|
 |
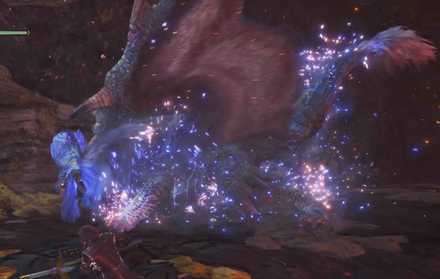 |
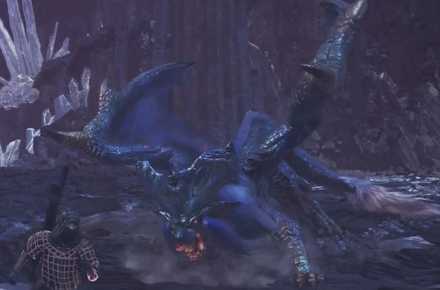
It is possible to suppress the fire and dust surrounding Lunastra when he is enraged by using a weapon with an Elderseal.
Hellflare

Hellflare is one of Lunastra's most powerful attack. This causes a big explosion setting a large area on fire with high wind pressure. The high wind pressure can disable your movement making it difficult for you to move away.
It is recommended that you equip gears with at least Windproof Lv 5 to completely negate all the effects of the wind pressure.
Gears and Strategies without Windproof
| Gear and Strategy | Description |
|---|---|
| Temporal Mantle | Helps you avoid taking damage from the Blue Flame |
| Fireproof Mantle | Increases your resistance against fire attacks |
| Farcaster | Instantly moves you back to camp |
| Continuous Rolls | Helps you move away from the Hellflare and Supernova |
Blue Flame
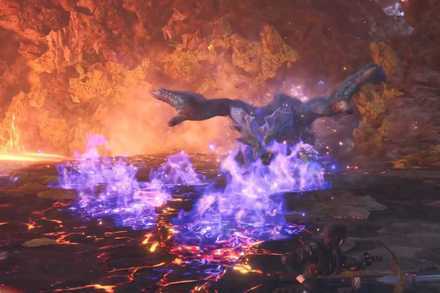
The blue flame that Lunastra scatters during the fight can be difficult to deal with if you do not have enough fire resistance. Try to stay away from it or try to lure Lunastra away from the blue flame to avoid taking more damage when you are running away from his attacks.
Using a Water Affinity weapon a Crystal Burst on the blue flame can instantly extinguish it. However, this is not recommended since it can deal damage if not approached carefully. Extinguishing the blue flame while fighting Lunastra can be difficult. Only use this trick if you have no other option.
Arrows and Bullets
Attacking Lunastra with blue flames using a ranged weapon will deal 0 damage. The blue flame can surrounding Lunastra repels any arrows or bullets fired at him.
Attacking the Rear

The safest place to attack is somewhere near the hind legs. If you manage to deal enough damage on this area, this can also down Lunastra for a few seconds. Also, staying near the hind legs will help you avoid most of the high damaging attacks like bite and flame breath.
Dealing with the Supernova

When Lunastra and Teostra are together, they can initiate their special move called the Supernova. This powerful move can instantly kill you if you are within its large area of effect.
It is best to try and kill one of them before they can group up. This will not only stop them from using the Supernova but it can also lessen the flames you have to deal with. If this is not possible, try to lure them away from each other. Keep in mind that Dung Pods do not work against them, you have to enrage one of them to lure them out of the area.
Lunastra Attack Patterns
| Attack | Description |
|---|---|
| Bite | A short range bite attack |
| Rush | A quick move forward that can deal damage if you are on the way |
| Scratch | A short attack infront of Lunastra |
| Pounce | A forward jump attack |
| Tail Attack | A fast moving tail attack |
| Tail Attack (x2) | A swift tail attack twice in a row |
| Front Flame Breath | A flame breath that goes on a straight line |
| Blue Flame Breath | Short distance attack that spreads blue flame on the ground |
| Blast Attack | Forward Blast attack that scatters blue flame |
| Air Attack | An Aerial attack that can be dodged by moving left or right |
| Aerial Flame Breath | A concentrated fire attack that can easily be avoided by moving away |
| Hellflare | A charged up blue flame explosion followed up by a strong wind pressure that can deal massive damage every second. |
Lunastra Carves and Rewards
Carvings and Hunt Rewards
| Obtain Rate (%) | |
|---|---|
| HR |
Lunastra Scale+
/ ★★★★★ Lunastra Carapace / ★★★★ Lunastra Mane / ★★★ Lunastra Tail / ★★★ Lunastra Wing / ★★ Lunastra Gem / ★ |
| MR |
Lunastra Lash
/ Tail 75 Lunastra Hardhorn / Body 8 Lunastra Gem / Body 5 Lunastra Shard / Body 30, Tail 22 Lunastra Cortex / Body 23 Large Elder Dragon Gem / Body 2, Tail 3 Lunastra Mane+ / Body 18 Lunastra Fellwing / Body 13 |
Rewards for Each Body Part
| Obtain Rate (%) | |
|---|---|
| HR |
Lunastra Wing
/ Wings Lunastra Tail / Tail Lunastra Gem / Head, Tail Lunastra Horn / Head |
| MR |
Lunastra Fellwing
/ Wings 70 Lunastra Cortex / Wings 30 Lunastra Hardhorn / Head 65 Lunastra Mane+ / Head 32 Large Elder Dragon Gem / Head 3 |
Breakable Body Parts
| Defense Value | How to Break | |
|---|---|---|
| Head | 200 | Set Durability to 0, 4 times. |
| Left Wing | 280 | Set Durability to 0, twice. |
| Right Wing | 280 | Set Durability to 0, twice. |
| Tail | 300 | Reduce durability by 500 using cut damage. |
Shiny Drops
| Obtain Rate (%) | |
|---|---|
| HR Drops |
Lunastra Gem
/ Lunastra Scale+ / |
| MR Drops |
Lunastra Mane+
/ 50 Lunastra Shard / 28 Old Dragon Treasure / 20 Large Elder Dragon Gem / 2 |
Quest Clear & Investigation Rewards
| Obtain Rate (%) | |
|---|---|
| HR Quest |
Lunastra Carapace
/ ★★★★ Elder Dragon Blood / ★★★ Lunastra Mane / ★★★ Lunastra Wing / ★★★ Lunastra Scale+ / ★★★ Lunastra Horn / ★★ Large Elder Dragon Bone / ★★ |
| MR Quest |
Large Elder Dragon Bone
/ 8 Lunastra Gem / 3 Lunastra Cortex / 22 Lunastra Shard / 18 Lunastra Mane+ / 15 Pure Dragon Blood / 12 Lunastra Fellwing / 12 Lunastra Lash / 10 |
| MR Silver |
Large Elder Dragon Gem
/ 8 Lunastra Fellwing / 18 Lunastra Shard / 16 Lunastra Hardhorn / 16 Lunastra Lash / 16 Lunastra Mane+ / 14 Lunastra Cortex / 12 Lunastra Shard / 16 |
| MR Gold |
Lunastra Mane+
/ 8 Lunastra Cortex / 8 Lunastra Hardhorn / 20 Lunastra Lash / 18 Large Elder Dragon Gem / 16 Lunastra Fellwing / 16 Lunastra Shard / 14 |
Plunderblade Rewards
Plunderblade
| Obtain Rate (%) | |
|---|---|
| MR |
Lunastra Shard
/ 45 Lunastra Cortex / 30 Lunastra Mane+ / 24 Large Elder Dragon Gem / 1 |
Palarang
| Obtain Rate (%) | |
|---|---|
| MR |
Lunastra Mane+
/ 50 Lunastra Shard / 28 Old Dragon Treasure / 22 |
Quests Where Lunastra Appears
| Type | Quest Name |
|---|---|
| Event | ★8 - SDF: Silent, Deadly, and Fierce |
| Special Assignment | ★8 - Pandora's Arena |
| Special Assignment | ★8 - No Remorse, No Surrender |
| Optional | ★8 - Infernal Monarchy |
| Optional | ★8 - Blue Prominence |
| Event | ★9 - The Thronetaker |
| Challenge | ★8 - The Hunter And The Blue Empress |
| Optional | M★6 - One Hot Night in the Spire |
| Optional | M★6 - Master Hunter of the New World |
| Event | M★6 - The Cold Never Bothered Me |
Related Links
All Monster Guides

List of All Base Game Monsters
MHW (Base Game) Monsters
Colored Variants
 Ancient Leshen Ancient Leshen
|
 Azure Rathalos Azure Rathalos
|
 Black Diablos Black Diablos
|
 Pink Rathian Pink Rathian
|
Arch-Tempered Elder Dragons
Monsters by Game
| All Monsters by Game | |
|---|---|
 Iceborne Iceborne |
 Monster Hunter World Monster Hunter World |
Comment
Author
Lunastra Weakness and Strategy Guide
improvement survey
03/2026
improving Game8's site?

Your answers will help us to improve our website.
Note: Please be sure not to enter any kind of personal information into your response.

We hope you continue to make use of Game8.
Rankings
- We could not find the message board you were looking for.
Gaming News
Popular Games

Genshin Impact Walkthrough & Guides Wiki

Honkai: Star Rail Walkthrough & Guides Wiki

Umamusume: Pretty Derby Walkthrough & Guides Wiki

Pokemon Pokopia Walkthrough & Guides Wiki

Resident Evil Requiem (RE9) Walkthrough & Guides Wiki

Monster Hunter Wilds Walkthrough & Guides Wiki

Wuthering Waves Walkthrough & Guides Wiki

Arknights: Endfield Walkthrough & Guides Wiki

Pokemon FireRed and LeafGreen (FRLG) Walkthrough & Guides Wiki

Pokemon TCG Pocket (PTCGP) Strategies & Guides Wiki
Recommended Games

Diablo 4: Vessel of Hatred Walkthrough & Guides Wiki

Fire Emblem Heroes (FEH) Walkthrough & Guides Wiki

Yu-Gi-Oh! Master Duel Walkthrough & Guides Wiki

Super Smash Bros. Ultimate Walkthrough & Guides Wiki

Pokemon Brilliant Diamond and Shining Pearl (BDSP) Walkthrough & Guides Wiki

Elden Ring Shadow of the Erdtree Walkthrough & Guides Wiki

Monster Hunter World Walkthrough & Guides Wiki

The Legend of Zelda: Tears of the Kingdom Walkthrough & Guides Wiki

Persona 3 Reload Walkthrough & Guides Wiki

Cyberpunk 2077: Ultimate Edition Walkthrough & Guides Wiki
All rights reserved
©CAPCOM CO., LTD. 2018, 2019 ALL RIGHTS RESERVED.
The copyrights of videos of games used in our content and other intellectual property rights belong to the provider of the game.
The contents we provide on this site were created personally by members of the Game8 editorial department.
We refuse the right to reuse or repost content taken without our permission such as data or images to other sites.
 Anjanath
 Barroth
 Bazelgeuse
 Behemoth
 Deviljho
 Diablos
 Dodogama
 Great Girros
 Great Jagras
 Jyuratodus
 Kirin
Kirin Kulu-Ya-Ku
 Kulve Taroth
 Kushala Daora
 Lavasioth
 Legiana
 Leshen
 Lunastra
 Nergigante
 Odogaron
 Paolumu
 Pukei-Pukei
 Radobaan
 Rathalos
 Rathian
 Teostra
 Tobi-Kadachi
 Tzitzi-Ya-Ku
 Uragaan
 Vaal Hazak
 Xeno'jiiva
 Zorah Magdaros
 Arch-Tempered Great Jagras
 Arch-Tempered Kirin
 Arch-Tempered Kulve Taroth
 Arch-Tempered Kushala Daora
 Arch-Tempered Lunastra
 Arch-Tempered Nergigante
 Arch-Tempered Teostra
 Arch-Tempered Vaal Hazak
 Arch-Tempered Xeno'jiiva
 Arch-Tempered Zorah Magdaros


![Everwind Review [Early Access] | The Shaky First Step to A Very Long Journey](https://img.game8.co/4440226/ab079b1153298a042633dd1ef51e878e.png/thumb)

![Monster Hunter Stories 3 Review [First Impressions] | Simply Rejuvenating](https://img.game8.co/4438641/2a31b7702bd70e78ec8efd24661dacda.jpeg/thumb)


