 Anjanath
 Barroth
 Bazelgeuse
 Behemoth
 Deviljho
 Diablos
 Dodogama
 Great Girros
 Great Jagras
 Jyuratodus
 Kirin
Kirin Kulu-Ya-Ku
 Kulve Taroth
 Kushala Daora
 Lavasioth
 Legiana
 Leshen
 Lunastra
 Nergigante
 Odogaron
 Paolumu
 Pukei-Pukei
 Radobaan
 Rathalos
 Rathian
 Teostra
 Tobi-Kadachi
 Tzitzi-Ya-Ku
 Uragaan
 Vaal Hazak
 Xeno'jiiva
 Zorah Magdaros
 Arch-Tempered Great Jagras
 Arch-Tempered Kirin
 Arch-Tempered Kulve Taroth
 Arch-Tempered Kushala Daora
 Arch-Tempered Lunastra
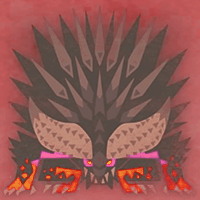 Arch-Tempered Nergigante
 Arch-Tempered Teostra
 Arch-Tempered Vaal Hazak
 Arch-Tempered Xeno'jiiva
 Arch-Tempered Zorah Magdaros
This survey will take about 1 minute.
Your answers will help us to improve our website.
Monster Hunter World (MHW)
Behemoth Weakness and Strategy Guide
★ 2025/2/28: Monster Hunter Wilds is now available!
Join the hunt at our Monster Hunter Wilds Wiki!
Learn how to beat Behemoth in the game Monster Hunter World (MHW)! This guide explains everything about Behemoth's weakness, carves, rewards, and a complete strategy guide for beating and capturing it. Find out what parts are breakable and severable, and what drops and Monster materials are available.
| All Behemoth Articles | ||
|---|---|---|
|
|
⍺ |
|
List of Contents
Behemoth Weakness, Body Parts, and Resistances
Behemoth Characteristics
 |
|||||
| Roar | Wind | Tremor | Blight | Status | |
|---|---|---|---|---|---|
| Big | High | Big | Thunder, Fire | Bleeding | |
| Breakable Parts | |||||
| Horn, Forearms, Tail | |||||
Locations and Areas Visited
| Map | Starting Area | Visited Areas | Rest Spot |
|---|---|---|---|
 Elder's Recess Elder's Recess
|
8 | 8 / 9 / 12 / 13 / 14 / 15 | TBD |
*The starting location may change depending on the Quest.
Weakness, Body Parts, Extracts
Horn
| Sever | Break | Bomb | Fire | Extract |
|---|---|---|---|---|
| △ | ◯ | △ | ◯ | Orange |
| Water | Thunder | Ice | Dragon | |
| ◎ | ◎ | ◎ | ◎ |
Head
| Sever | Break | Bomb | Fire | Extract |
|---|---|---|---|---|
| ◎ | ◎ | ◎ | × | Orange |
| Water | Thunder | Ice | Dragon | |
| ◎ | △ | △ | △ |
Hindlegs
| Sever | Break | Bomb | Fire | Extract |
|---|---|---|---|---|
| ◎ | ◎ | ◎ | △ | Red |
| Water | Thunder | Ice | Dragon | |
| △ | △ | △ | ◯ |
Torso
| Sever | Break | Bomb | Fire | Extract |
|---|---|---|---|---|
| △ | △ | △ | × | Green |
| Water | Thunder | Ice | Dragon | |
| △ | △ | △ | × |
Forelegs
| Sever | Break | Bomb | Fire | Extract |
|---|---|---|---|---|
| ◯ | ◎ | △ | × | White |
| Water | Thunder | Ice | Dragon | |
| △ | △ | ◎ | △ |
Tail
| Sever | Break | Bomb | Fire | Extract |
|---|---|---|---|---|
| ◎ | ◯ | △ | ◎ | Orange |
| Water | Thunder | Ice | Dragon | |
| △ | ◯ | △ | △ |
Higher values indicate higher damage.
Vulnerability to Status Effects and Items
| Poison | ★★ | Flash | ★ |
|---|---|---|---|
| Paral | ★★ | Shock | ❌ |
| Sleep | ★★ | Pitfall | ❌ |
| Stun | ★★ | Ivy | ❌ |
| Blast | ★★ | Dung | ❌ |
| Exhaust | ★★ | Meat | ❌ |
| Mount | ★★ | Screamer | ❌ |
Best Skills to Use By Role
With the Iceborne patch, we are no longer limited with using specific armor to combat the massive Behemoths. The Iceborne armor comes with several decoration slots and massive defense stats which makes assembling skills, the only issue when facing certain monsters. Below, we list all the recommended skills to have when facing the mighty behemoth. Before starting the fight, know your role and make sure to play according to it.
Tank Recommended Skills
As a tank, your role is to keep on drawing the aggro of the Giant Behemoth, while the Behemoth focuses you, turtle up, keey your HP up, and stay alive!
| Skills | |
|---|---|
| Recovery Up 3 | Recovery Speed 3 |
| Widerange | Blight Resist |
| Guard 5 | Health Boost 3 |
| Blight Resist | Guard Up |
| Flinch Free | Mind's Eye/Ballistics |
Attacker Recommended SKills
As the attacker, you must always be on the move. Keep the pressure up while the tank draws the monster's attention. Skills such as True Razor Sharp are recommended to reduce the time you'll be out of the fight sharpening your weapon / keep your damage up. While it is not completely necessary, attackers can also run wide range to save the tank/healer when they can but their main goal is to deal damage.
| Skills | |
|---|---|
| True Razor Sharp/Spare Shot (or Protective Polish) | Clutch Claw Boost (must have for light weapons |
| Weakness Exploit | Critical Boost |
| Agitator | Coalescence/Blight Resistance |
Healer Recommended SKills
As the healer, keeping the tank alive is your priority, yourself second, and the attackers third. Massive amount of items and supportive buffs are asked of the healer to make sure allies don't die to the Massive Behemoth.
| Skills | |
|---|---|
| Free Meal | Wide Range |
| Gobbler | Critical Boost |
| Evade Window/ Guard Up | Blight Resistance |
Best Mantles To Use
| Evasion Mantle | The Behemoth has some nasty attacks. Using a mantle that increases your survivability is always great. The Evasion Mantle is trickier to use for tank weapons so they're better off opting for the Health Booster. |
|---|---|
| Temporal Mantle | Free dodges increases survivability. Sadly, the Behemoth cannot be flinched so the Temporal Mantle is solely used for defensive purposes. |
| Health Booster | This can be used on your tank's position to keep his/her HP up. |
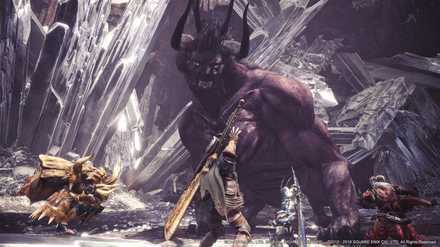
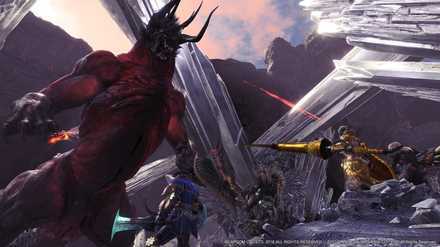
How to Beat Behemoth
Things to Know About Behemoth's Attacks
| Attack | Information |
|---|---|
| Enmity | ・A state where you are targeted by Behemoth wherever you go ・You can earn Enmity by continuously attacking Behemoth's head ・The hunter with a shielded weapon and the highest defense should be the one to get the Enmity for the party |
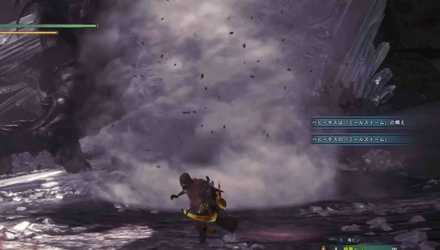
| Charybdis | ・A powerful tornado similar to Kushala Daora's attack ・Targeted hunters can guide them to the edge of the area ・Can be stopped using a Flash Pod |
| Comet | ・A large rock from the sky that will target your position before falling ・Use as a barrier against the Ecliptic Meteor ・Move it slightly away from Behemoth to prevent it from breaking |
| Ecliptic Meteor | ・A powerful attack that covers a wide area which instantly cart your party ・Items cannot be used during this attack ・Hide behind the Meteorite or avoid the attack using the FF14 Jump Gesture |
| Meteor | ・A large falling rock from the sky on a fixed point ・Has an additional fire attribute |
| Thunderbolt | ・A lightning attack that hits in three locations ・Has an additional lightning attribute ・Can inflict stun if it lands directly to a hunter |
Division of Roles
Dividing the roles is important in the Behemoth hunt. Your team should decide who will tank Behemoth and who will focus on healing the team before starting the hunt to avoid any confusion.
| Tank (Weapon with Shield) | ・Focus on attacking the head to gain Enmity ・Proper positioning so allies can hit Behemoth easily |
|---|---|
| Healer (Focus on Recovery) | ・Recover the health of your allies using Wide-Range ・Constantly check the tank if he needs more support |
| Attacker | ・Deal as much damage as you can while the tank has the Enmity |
Party and Solo Multiplier
Unlike other monsters, Behemoth will have the same HP for both the solo run and the party run. Also, since Behemoth can easily be controlled using his Enmity mechanic, it is highly recommended that you only fight him with a 4-man party.
The Ecliptic Meteor

Ecliptic Meteor is the most powerful technique that Behemoth can use and it can cart you regardless of your health and defense. You can only avoid dying from this attack by hiding behind the comet or by using the FF14 Jump Gesture at the perfect time.
Avoiding the Meteor
| How to Avoid | |
|---|---|
| Comet | Behemoth will usually summon a comet that will stay in its place unless it gets hit by any of Behemoth's attacks. You can hide behind these comets when Behemoth uses his Ecliptic Meteor to avoid carting from the attack. |
| FF14 Jump Gesture | The Ecliptic Meteor can also be avoided by using the gesture that you will get during the event. This gesture is the FF14 Jump, this will allow you to jump out of the screen and it can give you a few seconds of invincibility which is enough to completely avoid any damage from the Ecliptic Meteor. |
| Methods That Does Not Work | |
| Farcaster | When Behemoth enters the Ecliptic Meteor stance, all items can no longer be used |
| Temporal Mantle | The damage from the Ecliptic Meteor can penetrate the mantle |
| Area Movement | The range of the Ecliptic Meteor is big enough to hit all nearby areas |
| Skill Guts | Dying from the Ecliptic Meteor will not activate the Guts skill |
Behemoth's Enmity
You can get the Enmity from Behemoth if you deal enough damage to its head or by shooting a specific slinger ammo continuously. This will force Behemoth to focus on only attacking his target and ignore all other hunters that are attacking a different part of his body.
How to Get Enmity
| Method | Explanation |
|---|---|
| Attack the Head | You can gain Behemoth's Enmity by hitting his head with a certain number of times. The number of attacks required will vary depending on the weapon that you are using. (Example: Gunlance = 10 Times, Heavy Bowgun = 30 Times) |
| Using Dragon Pod | Hit Behemoth's head 5 times with the Dragon Pod |
Dealing with the Charybdis
Charybdis is an attack that creates a tornado at the hunter's position after a few seconds. These tornadoes that Behemoth summons will not disappear for a few minutes. It is recommended that you immediately move to the edge of the area so the tornadoes will not appear near the battle.
If it becomes too difficult to move around because of the tornadoes, you can use a Flash Pod to stop these tornadoes. However, Behemoth will eventually resist the Flash Pod if it is used frequently.
Increasing Your Survivability
The attacks of Behemoth are extremely powerful and it can instantly cart you if you do not have high enough maximum health or defense. Using gears that can push your Health Boots skill to level 3 and build up your Stun Resistance is highly recommended for this hunt.
Also, some of Behemoth's heavy attacks can cause major tremors which can be dangerous especially if you are using a melee weapon. It might be a good idea to consider wearing gears with Tremor Resistance.
Recovering Your Health
Having a healer with the skill Wide-Range at max level is a must in order for your tank to survive the attack. Since the tank will be getting the Enmity, most of the time he will have to raise his shield to lessen the damage from the attacks, this will prevent him from using any potions to recover his health.
It is highly recommended that your healer uses the Lunastra Beta set and utilize the bonus effect of the skill Wide-Range.
Releasing the Enmity
There are many ways to release the Enmity from Behemoth but if you accidentally take the Enmity away from the tank, the best thing that you can do is that you shoot a Flash Pod directly onto his face to release the Enmity.
Items That Can Release Enmity
| Smoke Bomb | Flash Pod |
| Farcaster | Ghillie Mantle |
Weakening Behemoth's Attacks
You can weaken his rotation attack by cutting off his tail. This will not only weaken the damage, but it will also shorten the range of his tail attacks making the hunt a lot easier. You should focus on attacking this part especially if the tank has Behemoth's Enmity.
Status Ailments
Paralyzing or putting Behemoth to sleep will also release the Enmity away from the tank. It is best that you avoid using any status effect weapons to avoid accidentally inflicting any ailment. Leave this task to your tank and get as much raw damage as you can from your weapon to maximize your damage output.
Environmental Hazards
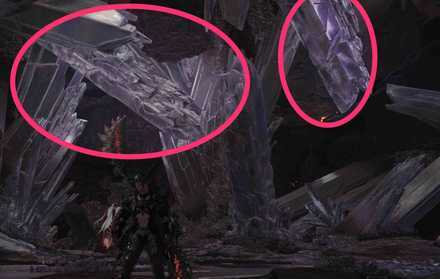
There are two collapsable crystals that you can use in area 8 that can deal massive damage to Behemoth. Try to lure Behemoth under these crystals and use your slinger ammo to drop it on top of Behemoth. This will take a huge chunk of his health and also stun him for a few seconds.
Bleeding Status
Behemoth can inflict a Bleeding status ailment with his pin attack which is only available during the third phase. This attack can stop you from moving around because of the Bleeding ailment, try to cure this immediately using an Astera Jerky to avoid taking any further damage.
Behemoth Carves and Rewards
Carvings and Hunt Rewards
| Obtain Rate (%) | |
|---|---|
| HR |
Behemoth Mane
/ ★★★★★ Behemoth Bone / ★★★★ Behemoth Tail / ★★★ Behemoth Shearclaw / ★★★ Behemoth Great Horn / ★★ |
Rewards for Each Body Part
| Obtain Rate (%) | |
|---|---|
| HR |
Behemoth Tail
/ Tail Behemoth Great Horn / Horn Behemoth Shearclaw / Hindlegs |
Shiny Drops
| Obtain Rate (%) | |
|---|---|
| HR Drops |
Behemoth Mane
/ |
Quest Clear & Investigation Rewards
| Obtain Rate (%) | |
|---|---|
| HR Quest |
Behemoth Bone
/ ★★★★★ Aetheryte Shard / ★★★★ Behemoth Mane / ★★★★ Behemoth Shearclaw / ★★★ Behemoth Tail / ★★ Behemoth Great Horn / ★ |
Quests Where Behemoth Appears
| Type | Quest Name |
|---|---|
| Event | ★9 - A Visitor from Eorzea (Extreme) |
| Special Assignment | ★9 - The Legendary Beast |
| Special Assignment | ★9 - He Taketh It With His Eyes |
| Optional | ★9 - A Visitor From Eorzea |
Related Links
All Monster Guides

List of All Base Game Monsters
MHW (Base Game) Monsters
Colored Variants
 Ancient Leshen Ancient Leshen
|
 Azure Rathalos Azure Rathalos
|
 Black Diablos Black Diablos
|
 Pink Rathian Pink Rathian
|
Arch-Tempered Elder Dragons
Monsters by Game
| All Monsters by Game | |
|---|---|
 Iceborne Iceborne |
 Monster Hunter World Monster Hunter World |
Comment
Author

Behemoth Weakness and Strategy Guide
Please participate in our site
improvement survey
03/2026
improvement survey
03/2026
Would you assist in
improving Game8's site?
improving Game8's site?

×
We are listening to our users' valuable opinions and discussing how to act on them.
The information collected through this survey will be used for the purpose of improving our services. In addition, the information will only be disclosed a part of a statistic in a format that will not allow identification of personal information.
Begin Survey
Not Now
×
Please rate each item regarding Game8.co's Advertisements.
Amount of Ads
Very Dissatisfied
Somewhat Dissatisfied
Fine
Somewhat Satisfied
Highly Satisfied
Placement of Ads
Timing of Ad Display
Ad Loading Speed
Safeness of Ads
Content of Ads
×
Please rate each item regarding Game8.co's Quality of Articles.
Amount of information
Very Dissatisfied
Somewhat Dissatisfied
Fine
Somewhat Satisfied
Highly Satisfied
Frequency of updates
Speed of new information
Accuracy of articles
Understandibility of articles
Readability of sentences
×
Please rate each item regarding Game8.co's Usability of the Site.
Ease of finding information
Very Dissatisfied
Somewhat Dissatisfied
Fine
Somewhat Satisfied
Highly Satisfied
Loading Speed
Use of Color
Font Size
Visibility of Images
Easy to Understand Layout
×
Please rate each item regarding Game8.co's Message Boards, Comments.
Ease of Writing
Very Dissatisfied
Somewhat Dissatisfied
Fine
Somewhat Satisfied
Highly Satisfied
Readability
Ease in Finding Information
Comment Quality
Comment Quantity
Admin Response
×
Please rate each item regarding Game8.co's Site's new design.
Please rate our site's new design
Very Dissatisfied
Somewhat Dissatisfied
Fine
Somewhat Satisfied
Highly Satisfied
Do you think that the website's design change makes the site easier to use?
Has the new design made it easier for you to find information on the site?
Has the new design improved the overall visual appeal of the site?
How would you rate your overall satisfaction with the new design of the site?
×
How likely are you to recommend Game8 to someone you know?
Very Unlikely
0
1
2
3
4
5
6
7
8
9
10
Very Likely
If you have other opinions regarding potential improvement to the website, please share them with us. We would appreciate your honest opinion.
Note: This is a free response section, so you can proceed without entering anything.
Note: Please be sure not to enter any kind of personal information into your response.
Note: Please be sure not to enter any kind of personal information into your response.
×
Thank You
×
Thank you for participating in our survey! Your answers will help us to improve the quality of our website and services.
We hope you continue to make use of Game8.
We hope you continue to make use of Game8.
Close
Rankings
- We could not find the message board you were looking for.
Gaming News


![Monster Hunter Stories 3 Review [First Impressions] | Simply Rejuvenating](https://img.game8.co/4438641/2a31b7702bd70e78ec8efd24661dacda.jpeg/thumb)
Popular Games

Genshin Impact Walkthrough & Guides Wiki
Honkai: Star Rail Walkthrough & Guides Wiki
Umamusume: Pretty Derby Walkthrough & Guides Wiki
Pokemon Pokopia Walkthrough & Guides Wiki
Resident Evil Requiem (RE9) Walkthrough & Guides Wiki
Monster Hunter Wilds Walkthrough & Guides Wiki
Wuthering Waves Walkthrough & Guides Wiki
Arknights: Endfield Walkthrough & Guides Wiki
Pokemon FireRed and LeafGreen (FRLG) Walkthrough & Guides Wiki
Pokemon TCG Pocket (PTCGP) Strategies & Guides Wiki


Recommended Games
Diablo 4: Vessel of Hatred Walkthrough & Guides Wiki
Cyberpunk 2077: Ultimate Edition Walkthrough & Guides Wiki
Fire Emblem Heroes (FEH) Walkthrough & Guides Wiki
Yu-Gi-Oh! Master Duel Walkthrough & Guides Wiki
Super Smash Bros. Ultimate Walkthrough & Guides Wiki
Pokemon Brilliant Diamond and Shining Pearl (BDSP) Walkthrough & Guides Wiki
Elden Ring Shadow of the Erdtree Walkthrough & Guides Wiki
Monster Hunter World Walkthrough & Guides Wiki
The Legend of Zelda: Tears of the Kingdom Walkthrough & Guides Wiki
Persona 3 Reload Walkthrough & Guides Wiki


All rights reserved
©CAPCOM CO., LTD. 2018, 2019 ALL RIGHTS RESERVED.
The copyrights of videos of games used in our content and other intellectual property rights belong to the provider of the game.
The contents we provide on this site were created personally by members of the Game8 editorial department.
We refuse the right to reuse or repost content taken without our permission such as data or images to other sites.