Paolumu Weakness and Strategy Guide
★ 2025/2/28: Monster Hunter Wilds is now available!
Join the hunt at our Monster Hunter Wilds Wiki!
Learn how to beat Paolumu in the game Monster Hunter World (MHW)! This guide explains everything about Paolumu's weakness, carves, rewards, and a complete strategy guide for beating and capturing it. Find out what parts are breakable and severable, and what drops and Monster materials are available.
| All Paolumu Articles | ||
|---|---|---|
|
|
1 | ⍺ | β | ⍺+ | β+ |
|
List of Contents
Paolumu Weakness, Body Parts, and Resistances
Paolumu Characteristics
 |
|||||
| Roar | Wind | Tremor | Blight | Status | |
|---|---|---|---|---|---|
| Small | High | None | None | None | |
| Breakable Parts | |||||
| Dewlap, Back, Left Wing, Right Wing, Tail | |||||
Locations and Areas Visited
| Map | Starting Area | Visited Areas | Rest Spot |
|---|---|---|---|
 Coral Highlands Coral Highlands
|
5 | 3 / 5 / 10 | 9 |
*The starting location may change depending on the Quest.
Weakness, Body Parts, Extracts
Head
| Sever | Break | Bomb | Fire | Extract |
|---|---|---|---|---|
| 55 | 55 | 45 | 25 | Red |
| Water | Thunder | Ice | Dragon | |
| 0 | 15 | 10 | 10 |
Neck
| Sever | Break | Bomb | Fire | Extract |
|---|---|---|---|---|
| 40 | 40 | 30 | 20 | Red |
| Water | Thunder | Ice | Dragon | |
| 0 | 15 | 10 | 10 |
Dewlap
| Sever | Break | Bomb | Fire | Extract |
|---|---|---|---|---|
| 65 | 65 | 52 | 25 | Red |
| Water | Thunder | Ice | Dragon | |
| 0 | 15 | 10 | 10 |
Torso
| Sever | Break | Bomb | Fire | Extract |
|---|---|---|---|---|
| 46 | 46 | 42 | 15 | Orange |
| Water | Thunder | Ice | Dragon | |
| 0 | 10 | 5 | 5 |
Legs
| Sever | Break | Bomb | Fire | Extract |
|---|---|---|---|---|
| 40 | 35 | 25 | 15 | White |
| Water | Thunder | Ice | Dragon | |
| 0 | 10 | 5 | 5 |
Wings
| Sever | Break | Bomb | Fire | Extract |
|---|---|---|---|---|
| 35 | 35 | 45 | 15 | White |
| Water | Thunder | Ice | Dragon | |
| 0 | 10 | 5 | 5 |
Tail
| Sever | Break | Bomb | Fire | Extract |
|---|---|---|---|---|
| 20 | 20 | 15 | 20 | Orange |
| Water | Thunder | Ice | Dragon | |
| 0 | 15 | 10 | 10 |
Higher values indicate higher damage.
Vulnerability to Status Effects and Items
| Poison | ★★ | Flash | ★★ |
|---|---|---|---|
| Paral | ★★ | Shock | ★★ |
| Sleep | ★★ | Pitfall | ★★ |
| Stun | ★★★ | Ivy | ❌ |
| Blast | ★★★ | Dung | ★★ |
| Exhaust | ★ | Meat | ❌ |
| Mount | ★★ | Screamer | ❌ |
Countermeasures against Paolumu
Recommended Weapon Element and Armor Skills
| Recommended Weapon Element | |
|---|---|
| Fire Weapon | Paolumu is weakest against fire. |
| Recommended Armor Skills | |
| Windproof | Having Windproof Lvl 5 against Paolumu is almost necessary since Paolumu's attacks will usually give you wind pressure and incapacitate you. |
| Fire Attack | Since you don't really need a lot of armor skills against Paolumu, you can level up your fire weapon's fire damage with Fire Attack. |
| Earplugs | Paolumu has a small roar, so Earplugs Lvl 3 should suffice. |
How to Beat Paolumu
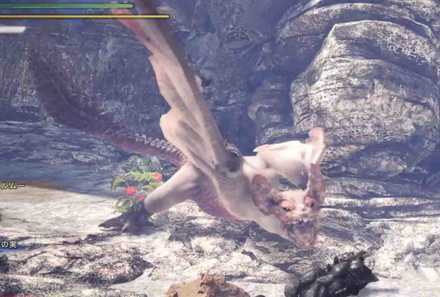
Inflated and Deflated Air Sack
| Normal | Inflated |
|---|---|
 |
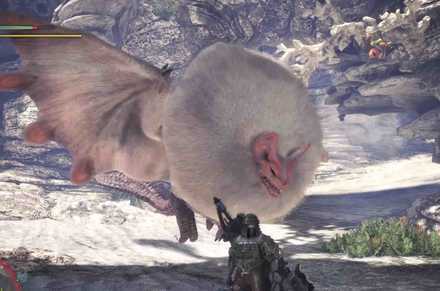 |
Paolumu is a fairly docile Monster that will not engage unless provoked by a hunter or another monster. When angered, Paolumu will inflate an air sac in its neck and float above the ground.
This will make Paolumu's attacks a lot stronger than usual and it becomes harder to predict. You can instantly shut this down by shooting a Flash Pod directly on to his head to release this state.
Also, when Paolumu is on the ground in his normal state, it is a good time for you to set up and use traps to give you and your team some space to attack with your best combos to deal massive damage.
Engaging Paolumu
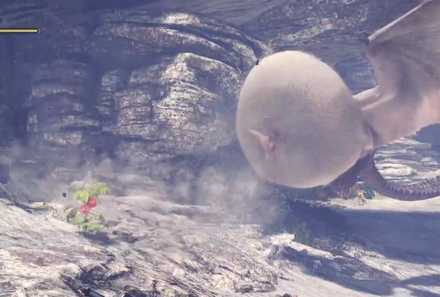
It is best to make sure that there are no other monsters in the area. If another monster enters battle while you are fighting Paolumu, they will most likely attack the hunters in proximity and will give you and your teammates a harder time.
Though they can assist you in battle by dealing great damage to Paolumu, it is still best if you only have to deal with one large monster during your hunt.
It is also highly recommended that you equip gears with at least level 5 Wind Resistance to negate any wind effects from Paolumu's attacks and pair it with the Rocksteady Mantle to make the hunt easier.
Paolumu Attack Patterns
| Attack | Attack Power | Guardable | Exhaustion |
|---|---|---|---|
| Bite | 25 | ◯ | 20 |
| Airborne Bite | 30 | ◯ | 35 |
| Rush | 35 | ◯ | 35 |
| Compressed Air | 40 | ◯ | 0 |
| Trample | 25 | ◯ | 20 |
| Leaning Attack | 90 | ◯ | 75 |
| Body Slam | 65 | ◯ | 60 |
| Tail Sweep | 30 | ◯ | 30 |
| Glide Attack | 45 | ◯ | 35 |
| Tail Rotation Attack | 30 | ◯ | 35 |
Paolumu Carves and Rewards
Carvings and Hunt Rewards
| Obtain Rate (%) | |
|---|---|
| LR |
Paolumu Scale
/ Body 36 Paolumu Pelt / Body 28 Paolumu Webbing / Body 21 Paolumu Shell / Body 15 |
| HR |
Paolumu Scale+
/ Body 34 Paolumu Pelt+ / Body 28 Paolumu Wing / Body 21 Wyvern Gem / Body 2 Paolumu Carapace+ / Body 15 |
| MR |
Wyvern Gem
/ 5 Paolumu Shard / 32 Paolumu Thickfur / 26 Paolumu Fellwing / 20 Large Wyvern Gem / 2 Paolumu Cortex / 15 |
Rewards for Each Body Part
| Obtain Rate (%) | |
|---|---|
| LR |
Paolumu Shell
/ Tail 100 Paolumu Pelt / Dewlap 100, Back 100 Paolumu Webbing / Both Wings 100 |
| HR |
Paolumu Carapace+
/ Tail 100 Paolumu Pelt+ / Head 100, Back 100 Paolumu Wing / Both Wings 100 |
| MR |
Paolumu Fellwing
/ Wings 100 Paolumu Cortex / Tail 100 Paolumu Thickfur / Cheek Pouch 100, Torso 100 |
Shiny Drops
| Obtain Rate (%) | |
|---|---|
| LR Drops |
Paolumu Scale
/ 50 Paolumu Shell / 28 Wyvern Tear / 22 |
| HR Drops |
Paolumu Scale+
/ 50 Paolumu Carapace+ / 28 Wyvern Tear / 22 |
| MR Drops |
Paolumu Shard
/ 50 Paolumu Cortex / 28 Large Wyvern Tear / 22 |
How to Get Drops
| How to Get | # Times |
|---|---|
| ・At the time of turf war ・When an inflated part is attacked ・When attacked while eating ・When frightened by the attack of another monster |
3 |
Quest Clear & Investigation Rewards
| Obtain Rate (%) | |
|---|---|
| LR Quest |
Paolumu Webbing
/ 9 Paolumu Pelt / 27 Paolumu Scale / 21 Monster Bone L / 16 Paolumu Shell / 15 Nourishing Extract / 12 |
| LR Silver |
Paolumu Shell
/ 32 Paolumu Webbing / 25 Paolumu Pelt / 18 Nourishing Extract / 14 Paolumu Scale / 11 |
| LR Gold |
Paolumu Scale
/ 8 Paolumu Shell / 36 Paolumu Webbing / 30 Paolumu Pelt / 14 True Armor Sphere / 12 |
| HR Quest |
Paolumu Wing
/ 9 Paolumu Pelt+ / 26 Paolumu Scale+ / 20 Monster Keenbone / 16 Paolumu Carapace+ / 14 True Armor Sphere / 14 Wyvern Gem / 1 |
| HR Silver |
Wyvern Gem
/ 8 Paolumu Carapace+ / 32 Paolumu Wing / 23 Paolumu Pelt+ / 14 Nourishing Extract / 12 Paolumu Scale+ / 11 |
| HR Gold |
Paolumu Scale+
/ 8 Paolumu Carapace+ / 30 Paolumu Wing / 24 Wyvern Gem / 16 Paolumu Pelt+ / 12 Nourishing Extract / 10 |
| MR Quest |
Paolumu Thickfur
/ 32 Paolumu Shard / 21 Large Wyvern Gem / 2 Nourishing Extract / 18 Paolumu Cortex / 16 Paolumu Fellwing / 11 |
Plunderblade Rewards
Plunderblade
| Obtain Rate (%) | |
|---|---|
| LR |
Paolumu Scale
/ 43 Paolumu Pelt / 35 Paolumu Shell / 22 |
| HR |
Paolumu Pelt+
/ 43 Paolumu Scale+ / 35 Paolumu Carapace+ / 20 Wyvern Gem / 2 |
| MR |
Paolumu Thickfur
/ 43 Paolumu Shard / 35 Paolumu Cortex / 20 Large Wyvern Gem / 2 |
Palarang
| Obtain Rate (%) | |
|---|---|
| MR |
Paolumu Shard
/ 50 Paolumu Cortex / 28 Large Wyvern Tear / 22 |
Quests Where Paolumu Appears
| Type | Quest Name |
|---|---|
| Assigned | ★4 - Ballooning Problems |
| Assigned | ★5 - The Embodiment of Legiana |
| Optional | ★4 - A Tzitzi For Science |
| Optional | ★4 - Sorry You're Not Invited |
| Optional | ★4 - White Monster For A White Coat |
| Optional | ★4 - Special Arena: Paolumu |
| Optional | ★5 - A Humid Headache |
| Optional | ★6 - Say Cheese! |
| Optional | ★6 - Loop the Paolumu |
| Optional | ★6 - Special Arena: HR Paolumu |
| Event | ★7 - Coral Waltz |
| Event | ★4 - Greeting the Gluttons |
| Event | ★5 - Every Hunter's Dream |
| Challenge | ★4 - Challenge Quest 2: Beginner |
| Assigned | M★2 - Play Both Ends |
| Optional | M★1 - All the Wrong Signals |
| Optional | M★2 - The Plight of Paolumu |
| Optional | M★2 - Pink Power Grab |
| Optional | M★2 - Protip: Stay Hydrated |
| Optional | M★2 - Special Arena: MR Paolumu |
| Optional | M★3 - A Nasty Flesh Wound |
| Event | M★2 - Balloon Fight |
| Event | M★6 - Symphony of the Coral |
Related Links
All Monster Guides

List of All Base Game Monsters
MHW (Base Game) Monsters
Colored Variants
 Ancient Leshen Ancient Leshen
|
 Azure Rathalos Azure Rathalos
|
 Black Diablos Black Diablos
|
 Pink Rathian Pink Rathian
|
Arch-Tempered Elder Dragons
Monsters by Game
| All Monsters by Game | |
|---|---|
 Iceborne Iceborne |
 Monster Hunter World Monster Hunter World |
Comment
Author
Paolumu Weakness and Strategy Guide
improvement survey
03/2026
improving Game8's site?

Your answers will help us to improve our website.
Note: Please be sure not to enter any kind of personal information into your response.

We hope you continue to make use of Game8.
Rankings
- We could not find the message board you were looking for.
Gaming News
Popular Games

Genshin Impact Walkthrough & Guides Wiki

Honkai: Star Rail Walkthrough & Guides Wiki

Umamusume: Pretty Derby Walkthrough & Guides Wiki

Pokemon Pokopia Walkthrough & Guides Wiki

Resident Evil Requiem (RE9) Walkthrough & Guides Wiki

Monster Hunter Wilds Walkthrough & Guides Wiki

Wuthering Waves Walkthrough & Guides Wiki

Arknights: Endfield Walkthrough & Guides Wiki

Pokemon FireRed and LeafGreen (FRLG) Walkthrough & Guides Wiki

Pokemon TCG Pocket (PTCGP) Strategies & Guides Wiki
Recommended Games

Diablo 4: Vessel of Hatred Walkthrough & Guides Wiki

Fire Emblem Heroes (FEH) Walkthrough & Guides Wiki

Yu-Gi-Oh! Master Duel Walkthrough & Guides Wiki

Super Smash Bros. Ultimate Walkthrough & Guides Wiki

Pokemon Brilliant Diamond and Shining Pearl (BDSP) Walkthrough & Guides Wiki

Elden Ring Shadow of the Erdtree Walkthrough & Guides Wiki

Monster Hunter World Walkthrough & Guides Wiki

The Legend of Zelda: Tears of the Kingdom Walkthrough & Guides Wiki

Persona 3 Reload Walkthrough & Guides Wiki

Cyberpunk 2077: Ultimate Edition Walkthrough & Guides Wiki
All rights reserved
©CAPCOM CO., LTD. 2018, 2019 ALL RIGHTS RESERVED.
The copyrights of videos of games used in our content and other intellectual property rights belong to the provider of the game.
The contents we provide on this site were created personally by members of the Game8 editorial department.
We refuse the right to reuse or repost content taken without our permission such as data or images to other sites.
 Anjanath
 Barroth
 Bazelgeuse
 Behemoth
 Deviljho
 Diablos
 Dodogama
 Great Girros
 Great Jagras
 Jyuratodus
 Kirin
Kirin Kulu-Ya-Ku
 Kulve Taroth
 Kushala Daora
 Lavasioth
 Legiana
 Leshen
 Lunastra
 Nergigante
 Odogaron
 Paolumu
 Pukei-Pukei
 Radobaan
 Rathalos
 Rathian
 Teostra
 Tobi-Kadachi
 Tzitzi-Ya-Ku
 Uragaan
 Vaal Hazak
 Xeno'jiiva
 Zorah Magdaros
 Arch-Tempered Great Jagras
 Arch-Tempered Kirin
 Arch-Tempered Kulve Taroth
 Arch-Tempered Kushala Daora
 Arch-Tempered Lunastra
 Arch-Tempered Nergigante
 Arch-Tempered Teostra
 Arch-Tempered Vaal Hazak
 Arch-Tempered Xeno'jiiva
 Arch-Tempered Zorah Magdaros


![Everwind Review [Early Access] | The Shaky First Step to A Very Long Journey](https://img.game8.co/4440226/ab079b1153298a042633dd1ef51e878e.png/thumb)

![Monster Hunter Stories 3 Review [First Impressions] | Simply Rejuvenating](https://img.game8.co/4438641/2a31b7702bd70e78ec8efd24661dacda.jpeg/thumb)


