Lynari Desert Map and Dungeon Walkthrough | Desert Puzzle Solution
This is a guide to the dungeon Lynari Desert in Final Fantasy: Crystal Chronicles Remastered Edition (FFCC). Read on to see our map and guide to Lynari Desert, learn how to solve the desert puzzle, and a list of all obtainable items, artifacts, scrolls, and monsters you can encounter in this dungeon on each cycle.
| Normal | Hard |
|---|---|
| Lynari Desert | Moonlit Desert |
List of Contents
Lynari Desert Map
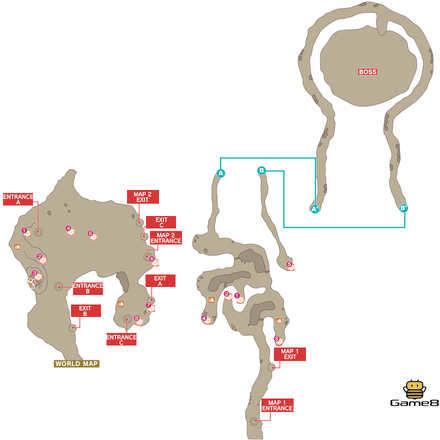 Enlarge
On the far left side of the Desert you can find a small cave with the Moogle House hidden behind the treasure chest.
Item List
Area 1
Coming soon!
Area 2
Coming soon!
Area 1
Coming soon!
Area 2
Coming soon!
Area 1
Coming soon!
Area 2
Coming soon!
Lynari Desert Walkthrough
Recommended Starting Stats
| HP | Strength | Defense | Magic |
|---|---|---|---|
| 7 | 45 | 40 | 40 |
Gather All 4 Magic Types
In order to get the Unknown Element Chalice you will need a Fire, Blizzard, Thunder, and Raise magicite. Including Cure, all can be found from monsters near the entrance. Be sure to grab these before heading off.
List of Magicite and its Effects
How to Get the Unknown Element Chalice
Your main goal in Lynari Desert is to obtain the Unknown Element for your Crystal Chalice. Without this, you will be unable to enter Mount Vellenge, the final dungeon.
Gurdy drops hints on how to accomplish this throughout the various caravan events in the game, revealing what objects you need to cast magic on, shown in the table below.
| ▼How to Get the Unknown Element |
|---|
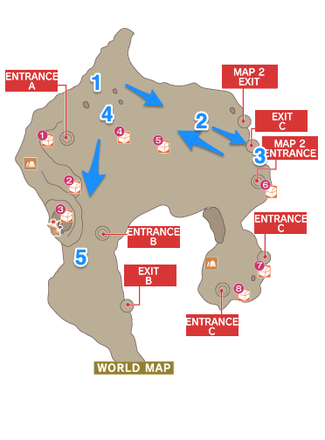 Enlarge Enlarge |
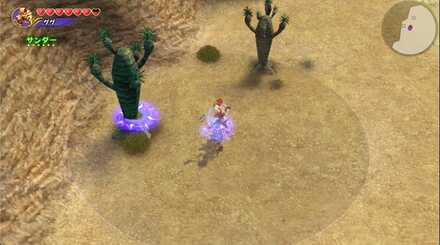 Enlarge Enlarge |
| Use Thunder on the cactus |
 Enlarge Enlarge |
| Use Gravity on the destroyed tent |
 Enlarge Enlarge |
| Use Fire on the mushroom on the cliff |
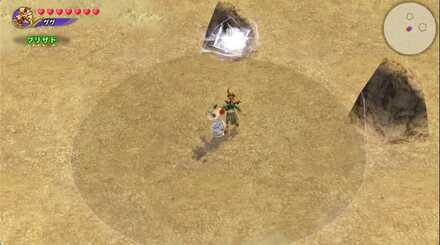 Enlarge Enlarge |
| Use Blizzard on the 3 rocks, starting with the smallest |
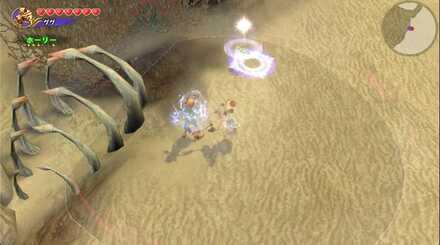 Enlarge Enlarge |
| Use Holy on the white flower |
The Unknown Element Chalice will protect you from any element of miasma, giving you little reason to change its element again, so watch out for other hotspots.
Head Into the Ant's Lair
Once you've obtained the Unknown Element Chalice, make your way to the right side of the map and fall down the sandpit to reach the next area. If you continue along this straight path you'll eventually make it to the boss room.
If you didn't intend to move on to the second area just yet you can always leave.
Cactus Flower
On your way to treasure chest 2 in the second area you can come across a cactus that when struck can drop a Cactus Flower that can be given to the ferryman. It doesn't always drop, however, so you may need to try multiple times.
Lynari Desert Boss Guide
Antlion

Lynari Desert Monsters
| Monster |
Cactaur
Cycle: All |
Chimera
Cycle: All |
|---|---|
|
Electric Scorpion
Cycle: Cycle 2 & 3 |
Lamia
Cycle: All |
|
Rock Scorpion
Cycle: Cycle 2 & 3 |
Sand Sahagin
Cycle: All |
|
Scorpion
Cycle: All |
Skeleton Mage
Cycle: Cycle 2 & 3 |
|
Zu
Cycle: All |
|
Lynari Desert Obtainables
The alphabets and numbers refers to the items/monsters where those items can be obtained respectively.
Scrolls List
| Scroll |
New Clockwork
(All) |
Lightning Craft
(All) |
Gold Craft
(All) |
|---|---|---|
|
Goggle Techniques
(All) |
Frost Craft
(All) |
Flame Craft
(All) |
|
Designer Goggles
(Cycle 3) |
Designer Glasses
(Cycle 3) |
Clockwork
(All) |
|
Radiant Armor
(Cycle 3) |
Pure Armor
(Cycle 2 & 3) |
Mythril Armor
(Cycle 1 & 2) |
|
Gold Armor
(Cycle 2 & 3) |
Eternal Armor
(Cycle 1 & 2) |
Diamond Armor
(Cycle 3 & Boss) |
|
Victorious Weapon
(All) |
Valiant Weapon
(All) |
Mighty Weapon
(All) |
|
Master's Weapon
(Cycle 1 & 2) |
Legendary Weapon
(Cycle 3) |
Hero's Weapon
(Boss) |
Materials
| Materials |
Alloy
(All) |
Chimera's Horn
(All) |
Needle
(All) |
|---|---|---|
|
Zu's Beak
(All) |
Desert Fang
(Boss) |
Thunderball
(Cycle 2 & 3) |
|
Diamond Ore
(Cycle 3) |
Orichalcum
(Cycle 3 & Boss) |
|
Artifacts
| Artifacts |
Gobbie Pocket
(All & Boss) |
Star Pendant
(All & Boss) |
Main Gauche
(Boss) |
|---|---|---|
|
Sage's Staff
(Boss) |
Black Hood
(Boss) |
Flametongue
(Boss) |
|
Noah's Lute
(Boss) |
Chicken Knife
(Boss) |
Heavy Armband
(Boss) |
|
Rune Bell
(Boss) |
Elven Mantle
(Boss) |
Engetsurin
(Boss) |
|
Red Slippers
(Boss) |
Sun Pendant
(Boss) |
Twisted Headband
(Boss) |
|
Ashura
(Cycle 1) |
Book of Light
(Cycle 1) |
Dragon's Whisker
(Cycle 1) |
|
Drill
(Cycle 1) |
Fang Charm
(Cycle 1) |
Double Axe
(Cycle 1 & 2) |
|
Silver Bracer
(Cycle 1 & 2) |
Helm of Arai
(Cycle 1 & 2 & Boss) |
Loaded Dice
(Cycle 1 & 2 & Boss) |
|
Wonder Wand
(Cycle 1 & 2 & Boss) |
Mage's Staff
(Cycle 2 & 3) |
Teddy Bear
(Cycle 2 & 3) |
|
Dark Matter
(Cycle 2 & 3 & Boss) |
Ice Brand
(Cycle 2 & 3 & Boss) |
Ogrekiller
(Cycle 2 & 3 & Boss) |
|
Giant's Glove
(Cycle 3) |
Gold Hairpin
(Cycle 3) |
Masquerade
(Cycle 3 & Boss) |
|
Ultima Tome
(Cycle 3 & Boss) |
Wonder Bangle
(Cycle 3 & Boss) |
|
Crystal Chronicles Related Guides

Story Walkthrough Guides
| All Story Guides | |
|---|---|
| Story Walkthrough | Post-Game Dungeons |
All Dungeon and Town Guides
| Tipa Peninsula | |
|---|---|
| Tipa | Port Tipa |
| River Belle Path | Goblin Wall |
| Iron Mine Downs | |
| Marr's Pass | Jegon River (East) |
| The Mushroom Forest | The Mine of Cathuriges |
| Vale of Alfitaria | |
| Alfitaria | Tida |
| Moschet Manor | - |
| Veo Lu | |
| Shella | Veo Lu Sluice |
| Plains of Fum | |
| The Fields of Fum | Jegon River (West) |
| Daemon's Court | Selepation Cave |
| Kilanda Islands | |
| Kilanda | - |
| Rebena Plains | |
| Conall Curach | Rebena Te Ra |
| Lynari Isle | |
| Leuda | Lynari Desert |
| The Abyss | |
| Mag Mell | Mount Vellenge |
| The Nest of Memories | - |
Comment
It's a bit counterintuitive because that chest is typically for defense artifacts. Probably why so many people have a hard time finding this one. There is a separate chest dedicated to armor in the first section, but Square Enix had to make it difficult I guess. Crystal Mail is nothing fancy either, +24 def with +1 miasma resistance. How important is fighting off miasma when you already have a crystal chalice? I don't know, that's up to you to decide.
Author
Lynari Desert Map and Dungeon Walkthrough | Desert Puzzle Solution
Rankings
- We could not find the message board you were looking for.
Gaming News
Popular Games

Genshin Impact Walkthrough & Guides Wiki

Honkai: Star Rail Walkthrough & Guides Wiki

Arknights: Endfield Walkthrough & Guides Wiki

Umamusume: Pretty Derby Walkthrough & Guides Wiki

Wuthering Waves Walkthrough & Guides Wiki

Pokemon TCG Pocket (PTCGP) Strategies & Guides Wiki

Abyss Walkthrough & Guides Wiki

Zenless Zone Zero Walkthrough & Guides Wiki

Digimon Story: Time Stranger Walkthrough & Guides Wiki

Clair Obscur: Expedition 33 Walkthrough & Guides Wiki
Recommended Games

Fire Emblem Heroes (FEH) Walkthrough & Guides Wiki

Pokemon Brilliant Diamond and Shining Pearl (BDSP) Walkthrough & Guides Wiki

Diablo 4: Vessel of Hatred Walkthrough & Guides Wiki

Super Smash Bros. Ultimate Walkthrough & Guides Wiki

Yu-Gi-Oh! Master Duel Walkthrough & Guides Wiki

Elden Ring Shadow of the Erdtree Walkthrough & Guides Wiki

Monster Hunter World Walkthrough & Guides Wiki

The Legend of Zelda: Tears of the Kingdom Walkthrough & Guides Wiki

Persona 3 Reload Walkthrough & Guides Wiki

Cyberpunk 2077: Ultimate Edition Walkthrough & Guides Wiki
All rights reserved
© 2003, 2020 SQUARE ENIX CO., LTD. All Rights Reserved.
The copyrights of videos of games used in our content and other intellectual property rights belong to the provider of the game.
The contents we provide on this site were created personally by members of the Game8 editorial department.
We refuse the right to reuse or repost content taken without our permission such as data or images to other sites.


![Animal Crossing: New Horizons Review [Switch 2] | Needlessly Crossing Over to a New Generation](https://img.game8.co/4391759/47d0408b0b8a892e453a0b90f54beb8a.png/show)


If I remember correct, it's actually Resist Miasma +15. It makes it so it takes longer before you take Miasma damage by 0.5s per tick. It's decent in multiplayer if you like to fight outside of the chalice range, but definitely very niche.