Daemon's Court Dungeon Walkthrough
This is a guide to the dungeon Daemon's Court in Final Fantasy: Crystal Chronicles Remastered Edition (FFCC). Read on to see our guide about Daemon's Court and a list of all obtainable items, artifacts, scrolls, and monsters you can encounter in this dungeon on each cycle.
| Normal | Hard |
|---|---|
| Daemon's Court | Afternoon Fort |
List of Contents
Daemon's Court Map
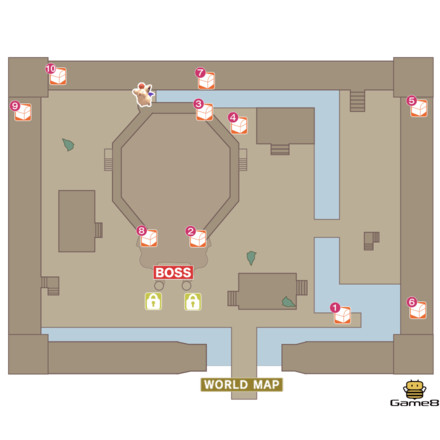 Enlarge
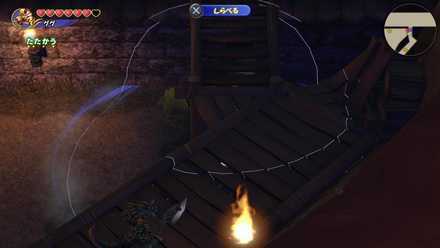
Along the back wall of the fortress is a hole where you can find a Moogle House.
Item List
| Contents | |
|---|---|
| 1 | Fire/Thunder/Blizzard/Cure |
| 2 | Raise |
| 3 | Phoenix Down |
| 4 | Eyewear Techniques |
| 5 | Main Gauche |
| 6 | Book of Light/Cat's Bell/Faerie Ring/Rune Staff |
| 7 | Engetsurin/Fang Charm/Power Wristband/Twisted Headband |
| 8 | Cure |
| 9 | Chocobo Pocket/Moon Pendant |
| 10 | Master's Weapon/Warrior's Weapon |
| Contents | |
|---|---|
| 1 | Fire/Thunder/Blizzard/Cure |
| 2 | Raise |
| 3 | Phoenix Down |
| 4 | Eyewear Techniques |
| 5 | Main Gauche/Rat's Tail |
| 6 | Cat's Bell/Faerie Ring/Gold Hairpin/Mage's Staff |
| 7 | Engetsurin/Heavy Armband/Masquerade/Twisted Headband |
| 8 | Cure |
| 9 | Chocobo Pocket/Moon Pendant |
| 10 | Master's Weapon/Victorious Weapon |
| Contents | |
|---|---|
| 1 | Fire/Thunder/Blizzard/Cure |
| 2 | Raise |
| 3 | Phoenix Down |
| 4 | Designer Glasses |
| 5 | Chicken Knife/Rat's Tail |
| 6 | Book of Light/Gold Hairpin/Mage's Staff/Noah's Lute/Tome of Ultima |
| 7 | Giant's Glove/Heavy Armband/Masquerade/Onion Sword |
| 8 | Cure |
| 9 | Chocobo Pocket/Moon Pendant |
| 10 | Master's Weapon/Mighty Weapon/Valiant Weapon/Victorious Weapon |
Daemon's Court Walkthrough
Recommended Starting Stats
| HP | Strength | Defense | Magic |
|---|---|---|---|
| 5 | 35 | 25 | 25 |
In Daemon's Court the enemies are strong and plenty making it easy to get overwhelmed. This dungeon serves as one of the hurdles to the mid-game so if you're feeling underpowered, you should take the time to gather up some new equipment and artifacts.
Cure Magicite in Treasure Chest 1 or 8
Going to your left upon entering the dungeon will lead you to treasure chest 1 that contains a Cure magicite, but the chance of it spawning is at a low 25%. If it pops on your first try, you can go ahead and continue on with the dungeon, but if not head back towards the entrance to treasure chest 8 that has a 100% chance of containing one instead.
Treasure chest 8 is in an area with not as much breathing room and populated with Lizard enemies so be careful.
List of Magicite and its Effects
Make Use of Catapults
Some areas in the dungeon have catapults that can deal massive damage to enemies. Lure one over and launch a large boulder at it with the attack command.
The Golden Lizards Drop the Keys
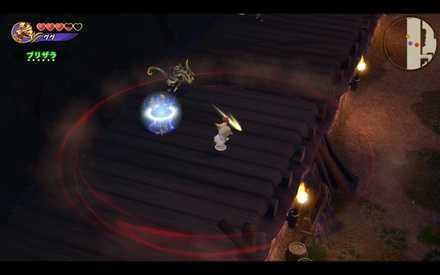
You will need 2 keys in order to unlock the boss room. Each key can be obtained by defeating a golden Lizard Skirmisher, but their locations are entirely random. If you're unlucky you may have to make a few laps around the dungeon putting yourself in danger of getting smacked around by other enemies.
Lizard Skirmisher (Gold) Weaknesses and Locations
Life in Treasure Chest 4
Make sure to get Raise Magicite from Treasure Chest 4, which you can use to make Holy, which you'll need to attack Wraiths.
Surprise Attack from a Distance
Stand below the wooden platforms, where enemies can't hit you, and where you'll be able to take your time casting magic to defeat them.
Use Gravity and Holy
Before uselessly attacking them, weaken Flying enemies with Gravity and reveal Undead enemies with Holy.
Prioritize the Spear Throwing Lizards
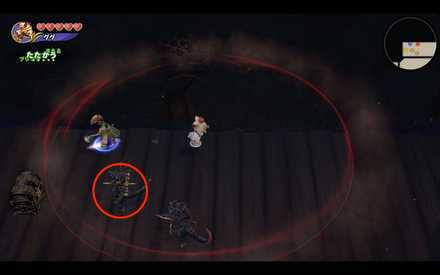
As stated above, there are a lot of enemies in Daemon's Court and it's easy to get surrounded with no time to get a Cure off. Your priority should be going after the long range spear hurling Lizards first so you can focus on the close range enemies with less annoyances.
If you're not sure you can handle the horde of enemies, book it out of there and freshen up.
Blow Up the Bomb on the Bridge!
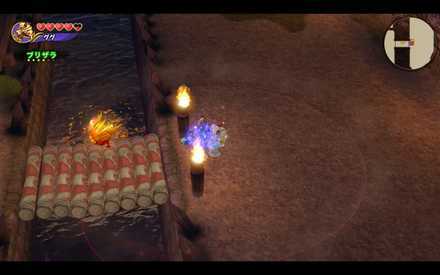
On the right side of the dungeon is a river with a bridge and a Bomb. After you've cleaned up the surrounding enemies use magic to defeat the Bomb. Once you've defeated the boss go back to the bridge and take the bomb out a second time before heading out.
While this does nothing in Daemon's Court, it actually unlocks an area in Conall Curach with a hidden treasure so go ahead and do this.
Conall Curach Map and Dungeon Walkthrough
Hit Lizards With Ice
As there are so many Lizards in this dungeon, having the ability to cast Blizzara or Blizzaga on them is incredibly useful. Not only are they vulnerable to ice, this will also freeze them making it harder for them to overwhelm you.
Daemon's Court Boss Guide
Lizardman King

Daemon's Court Monsters
| Monster |
Bomb
Cycle: All |
Coeurl
Cycle: All |
|---|---|
|
Killer Bee
Cycle: All |
Lizard Skirmisher
Cycle: All |
|
Lizard Skirmisher (Gold)
Cycle: All |
Lizard Soldier
Cycle: All |
|
Lizard Warrior
Cycle: All |
Lizard Wizard
Cycle: All |
|
Wraith
Cycle: All |
|
Daemon's Court Obtainables
The alphabets and numbers refers to the items/monsters where those items can be obtained respectively.
Scrolls List
| Scroll |
Eyewear Techniques
(Cycle 1 & 2) |
Designer Glasses
(Cycle 3) |
Diamond Gloves
(Boss) |
|---|---|---|
|
Diamond Shield
(Boss) |
Warrior's Weapon
(Cycle 1) |
Victorious Weapon
(Cycle 2 & 3) |
|
Valiant Weapon
(Cycle 3) |
Mighty Weapon
(Cycle 3) |
Master's Weapon
(All) |
Materials
| Materials |
Coeurl's Whisker
(All) |
Heavenly Dust
(All) |
Holy Water
(All) |
|---|---|---|
|
Mythril
(All) |
Orichalcum
(Boss) |
King's Scale
(Boss) |
|
Iron
(Cycle 1) |
Alloy
(Cycle 3) |
|
Artifacts
| Artifacts |
Winged Cap
(Boss) |
Chocobo Pocket
(All & Boss) |
Moon Pendant
(All & Boss) |
|---|---|---|
|
Silver Spectacles
(Boss) |
Maneater
(Boss) |
Candy's Ring
(Boss) |
|
Double Axe
(Boss) |
Dragon's Whisker
(Boss) |
Sparkling Bracer
(Boss) |
|
Rune Bell
(Boss) |
Wonder Bangle
(Boss) |
Ogrekiller
(Boss) |
|
Dark Matter
(Boss) |
Flametongue
(Boss) |
Kris
(Boss) |
|
Ice Brand
(Boss) |
Red Slippers
(Boss) |
Aegis
(Boss) |
|
Loaded Dice
(Boss) |
Winged Cap
(Boss) |
Buckler
(Boss) |
|
Shuriken
(Boss) |
Wonder Wand
(Boss) |
Drill
(Cycle 1) |
|
Fang Charm
(Cycle 1) |
Power Wristband
(Cycle 1) |
Rune Staff
(Cycle 1) |
|
Cat's Bell
(Cycle 1 & 2) |
Engetsurin
(Cycle 1 & 2) |
Faerie Ring
(Cycle 1 & 2) |
|
Main Gauche
(Cycle 1 & 2) |
Twisted Headband
(Cycle 1 & 2) |
Book of Light
(Cycle 1 & 3) |
|
Gold Hairpin
(Cycle 2 & 3) |
Heavy Armband
(Cycle 2 & 3) |
Mage's Staff
(Cycle 2 & 3) |
|
Masquerade
(Cycle 2 & 3) |
Rat's Tail
(Cycle 2 & 3 & Boss) |
Chicken Knife
(Cycle 3) |
|
Onion Sword
(Cycle 3) |
Noah's Lute
(Cycle 3) |
Ultima Tome
(Cycle 3) |
|
Giant's Glove
(Cycle 3 & Boss) |
||
Crystal Chronicles Related Guides

Story Walkthrough Guides
| All Story Guides | |
|---|---|
| Story Walkthrough | Post-Game Dungeons |
All Dungeon and Town Guides
| Tipa Peninsula | |
|---|---|
| Tipa | Port Tipa |
| River Belle Path | Goblin Wall |
| Iron Mine Downs | |
| Marr's Pass | Jegon River (East) |
| The Mushroom Forest | The Mine of Cathuriges |
| Vale of Alfitaria | |
| Alfitaria | Tida |
| Moschet Manor | - |
| Veo Lu | |
| Shella | Veo Lu Sluice |
| Plains of Fum | |
| The Fields of Fum | Jegon River (West) |
| Daemon's Court | Selepation Cave |
| Kilanda Islands | |
| Kilanda | - |
| Rebena Plains | |
| Conall Curach | Rebena Te Ra |
| Lynari Isle | |
| Leuda | Lynari Desert |
| The Abyss | |
| Mag Mell | Mount Vellenge |
| The Nest of Memories | - |
Author
Daemon's Court Dungeon Walkthrough
improvement survey
03/2026
improving Game8's site?

Your answers will help us to improve our website.
Note: Please be sure not to enter any kind of personal information into your response.

We hope you continue to make use of Game8.
Rankings
- We could not find the message board you were looking for.
Gaming News
Popular Games

Genshin Impact Walkthrough & Guides Wiki

Honkai: Star Rail Walkthrough & Guides Wiki

Umamusume: Pretty Derby Walkthrough & Guides Wiki

Pokemon Pokopia Walkthrough & Guides Wiki

Resident Evil Requiem (RE9) Walkthrough & Guides Wiki

Monster Hunter Wilds Walkthrough & Guides Wiki

Wuthering Waves Walkthrough & Guides Wiki

Arknights: Endfield Walkthrough & Guides Wiki

Pokemon FireRed and LeafGreen (FRLG) Walkthrough & Guides Wiki

Pokemon TCG Pocket (PTCGP) Strategies & Guides Wiki
Recommended Games

Diablo 4: Vessel of Hatred Walkthrough & Guides Wiki

Fire Emblem Heroes (FEH) Walkthrough & Guides Wiki

Yu-Gi-Oh! Master Duel Walkthrough & Guides Wiki

Super Smash Bros. Ultimate Walkthrough & Guides Wiki

Pokemon Brilliant Diamond and Shining Pearl (BDSP) Walkthrough & Guides Wiki

Elden Ring Shadow of the Erdtree Walkthrough & Guides Wiki

Monster Hunter World Walkthrough & Guides Wiki

The Legend of Zelda: Tears of the Kingdom Walkthrough & Guides Wiki

Persona 3 Reload Walkthrough & Guides Wiki

Cyberpunk 2077: Ultimate Edition Walkthrough & Guides Wiki
All rights reserved
© 2003, 2020 SQUARE ENIX CO., LTD. All Rights Reserved.
The copyrights of videos of games used in our content and other intellectual property rights belong to the provider of the game.
The contents we provide on this site were created personally by members of the Game8 editorial department.
We refuse the right to reuse or repost content taken without our permission such as data or images to other sites.




![Everwind Review [Early Access] | The Shaky First Step to A Very Long Journey](https://img.game8.co/4440226/ab079b1153298a042633dd1ef51e878e.png/thumb)

![Monster Hunter Stories 3 Review [First Impressions] | Simply Rejuvenating](https://img.game8.co/4438641/2a31b7702bd70e78ec8efd24661dacda.jpeg/thumb)


